1. 概述
基于可扩展云网格的自动化视觉回归测试,为保障Web应用在不同浏览器、设备和屏幕分辨率下的视觉一致性和完整性提供了强大解决方案。通过利用云基础设施能力,团队能高效并行执行视觉回归测试,实现全面覆盖和更快的反馈周期。
这种方法不仅能提高视觉差异检测的准确性,还能通过消除人工干预简化自动化测试流程。最终,组织可以在优化资源、加速上市时间的同时,对发布版本建立更强的信心。
本文将介绍如何使用LambdaTest等可扩展云网格实现视觉回归测试的自动化。
2. 什么是视觉回归测试?
回归测试是一种确保最新代码变更不会破坏现有功能的测试类型。
视觉回归测试则专注于检查应用用户界面是否符合整体预期,监控布局和视觉元素。其主要目标是通过预防视觉和可用性问题,确保用户体验(UX)的卓越性。
视觉回归测试执行的典型验证包括:
- Web元素位置
- 亮度
- 对比度
- 按钮颜色
- 菜单选项
- 组件
- 文本及其对齐方式
视觉回归测试的重要性体现在:
- 帮助软件团队和利益相关者理解用户界面的工作方式,提升最终用户体验
- 维持直观的UI能更好地引导最终用户
2.1. 视觉缺陷示例
为展示视觉回归测试的重要性,假设我们在LambdaTest电子商务演示网站发现一个缺陷:
- 按钮标题错位并显示在右侧
- 按钮字体大小不符合标准,字体过小且不易察觉

这些缺陷与系统功能无关,但用户可能因视觉问题难以将商品加入购物车。糟糕的界面体验可能导致用户流失。
修复代码后重新截图:
可见按钮文字恢复正常,可用性问题得到解决。
3. 视觉回归测试的实现方法
视觉回归测试本质是比较同一应用的两张截图:第一张来自代码变更前的稳定版本,第二张来自新发布版本。
测试人员通过手动或自动化方式检查截图差异。
主要有以下几种测试技术:
3.1. 手动视觉测试
完全依赖人工完成,无需工具。设计师、开发者和测试人员通过目视比较代码变更后的应用界面与设计稿或旧版本。
✅ 优势:无需购买/构建自动化测试软件的前期成本,适合开发初期和探索性UI测试
❌ 劣势:需在多设备/分辨率下重复测试,耗时且易出错,项目复杂度增长时工作量指数级上升
通常使用电子表格等简单脚本跟踪测试场景和结果。对于追求快速上市的业务,建议采用其他方法。
3.2. 逐像素比较
使用自动化图像比较工具/框架分析两张应用截图:基准图像(参考图)与新版本图像。通过逐像素比较突出UI差异和整体美学(字体样式、设计、背景色等)。
✅ 优势:适合大型快速迭代项目
❌ 劣势:需承担工具/框架的资本、计算资源、维护和扩展成本
工具通过阈值百分比过滤结果,控制图像相似度的可接受范围。但需注意:视觉测试本身无法保证应用的可用性。
3.3. 基于视觉AI的比较
利用AI和ML技术识别UI缺陷,基于计算机视觉"观察"网站/移动应用的视觉元素并与基准版本对比。训练良好的AI能节省测试时间,仅突出相关变更。
✅ 优势:支持动态内容测试,仅标记非预期变更区域
⚠️ 注意:依赖AI模型训练质量
3.4. 基于DOM的测试
通过文档对象模型(DOM)快照识别UI问题。比较基准DOM与新版本DOM,仅验证样式是否正确应用。
❌ 缺点:
- 非真正视觉比较
- 动态内容添加等场景会产生大量误报/漏报
- 相同DOM可能渲染不同,不同DOM可能渲染相似
- 测试结果不稳定,需人工审查视觉缺陷
4. 视觉回归测试工具
4.1. LambdaTest的SmartUI
支持Web和移动应用的视觉回归测试,提供逐像素比较功能,支持多浏览器、屏幕尺寸和分辨率下的视觉元素对比。
可通过Webhook配置集成到自动化测试中,支持项目协作(最多添加5个审批人/标签)。集成Slack等通信平台可实时获取测试状态通知,加速视觉缺陷修复。
4.2. WebdriverIO图像比较服务
wdio-image-comparison-service轻量级服务,支持跨屏幕尺寸、浏览器和元素的图像比较。框架无关,兼容Mocha、Jasmine等WebdriverIO支持的框架。
⚠️ 限制:仅支持同平台截图比较(如Windows截图仅能与Windows截图比较,不能与Mac/Linux比较)。
4.3. Appium移动自动化框架
支持移动应用的视觉回归测试,使用OpenCV跨平台库进行逐像素截图比较。OpenCV是图像处理工具集合,可直接使用无需深入理解实现细节。
5. 如何在云端实现自动化视觉回归测试?
以LambdaTest的SmartUI为例(AI驱动的测试编排执行平台,支持3000+浏览器/版本/OS组合),演示使用Selenium进行视觉回归测试。
测试场景1:
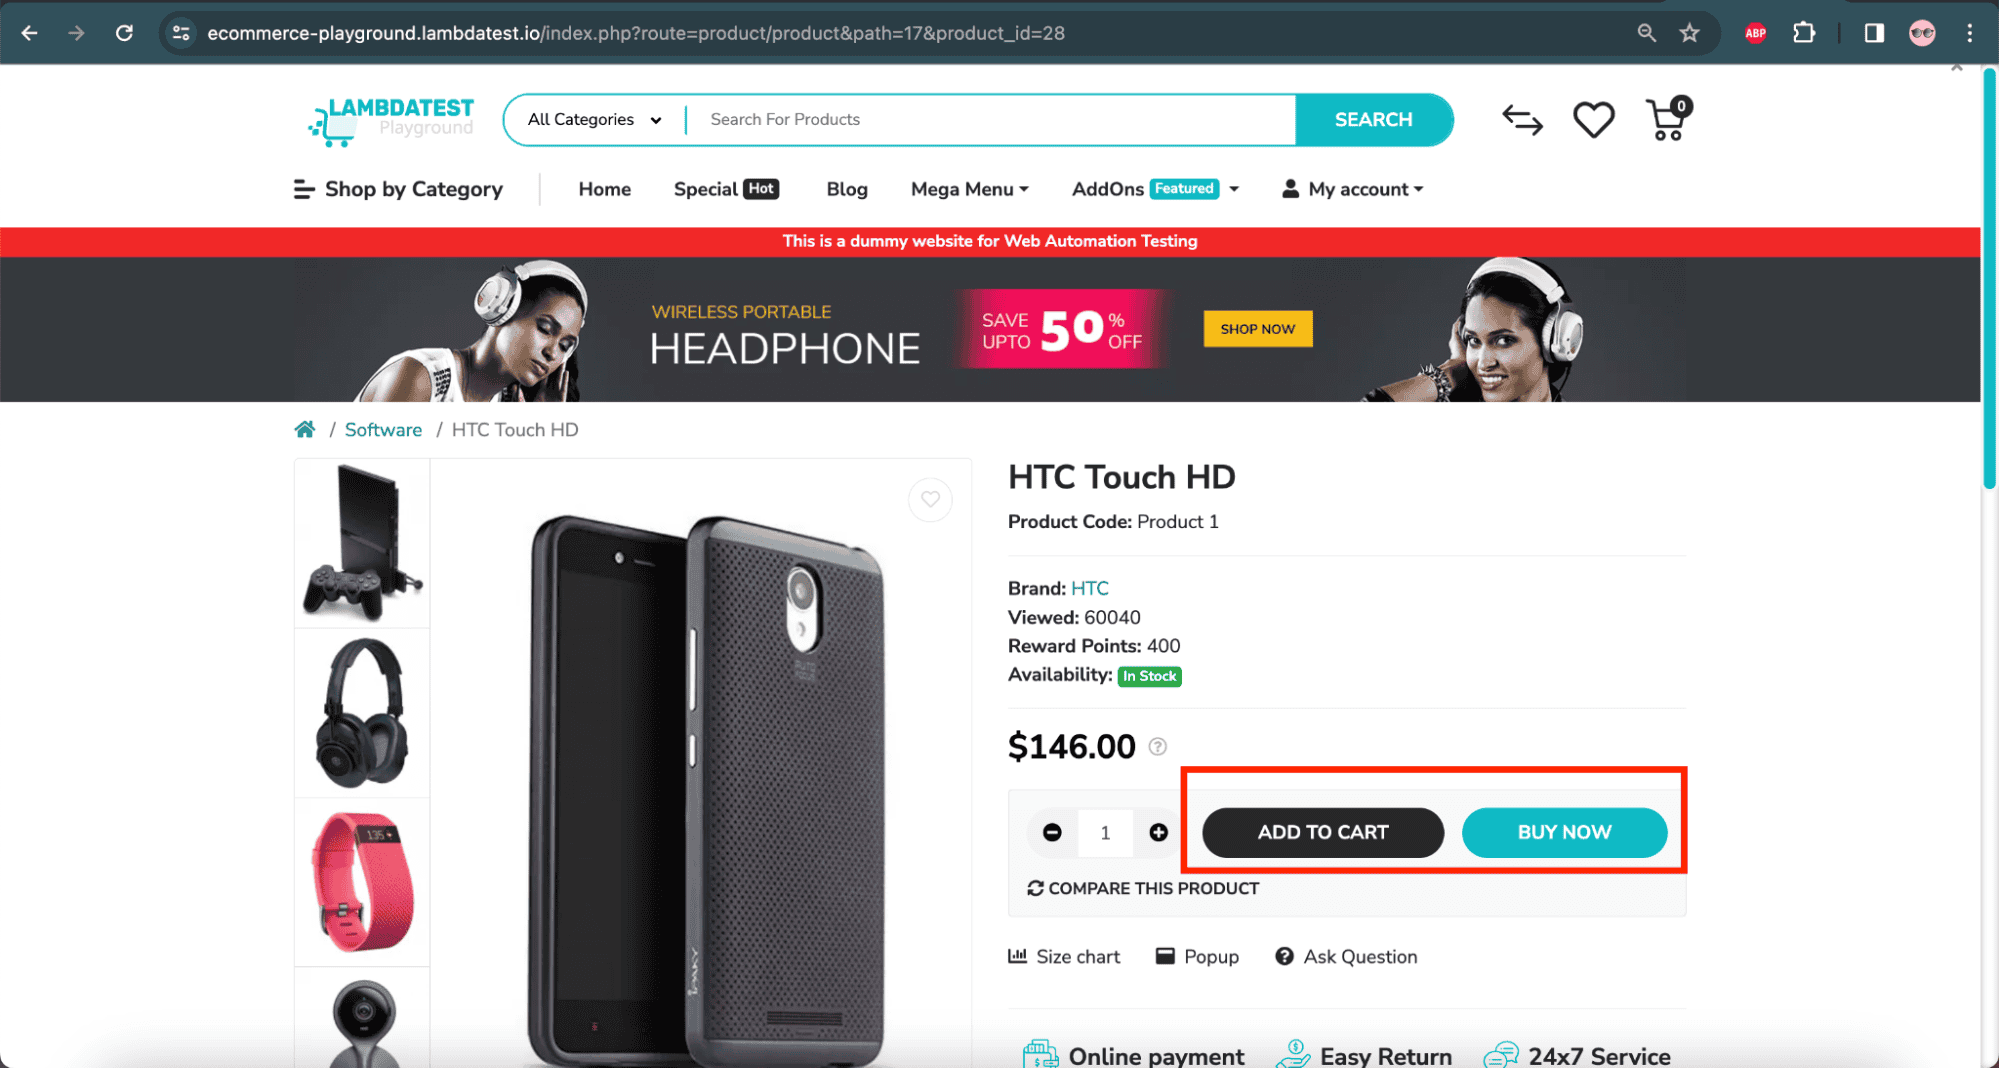
- 访问LambdaTest电子商务演示网站的相机产品页
- 通过自动化代码设置相机产品页为基准图像
- 访问打印机产品页
- 使用SmartUI比较相机页与打印机页
- 在SmartUI中检查差异

相机产品页 – LambdaTest电子商务网站
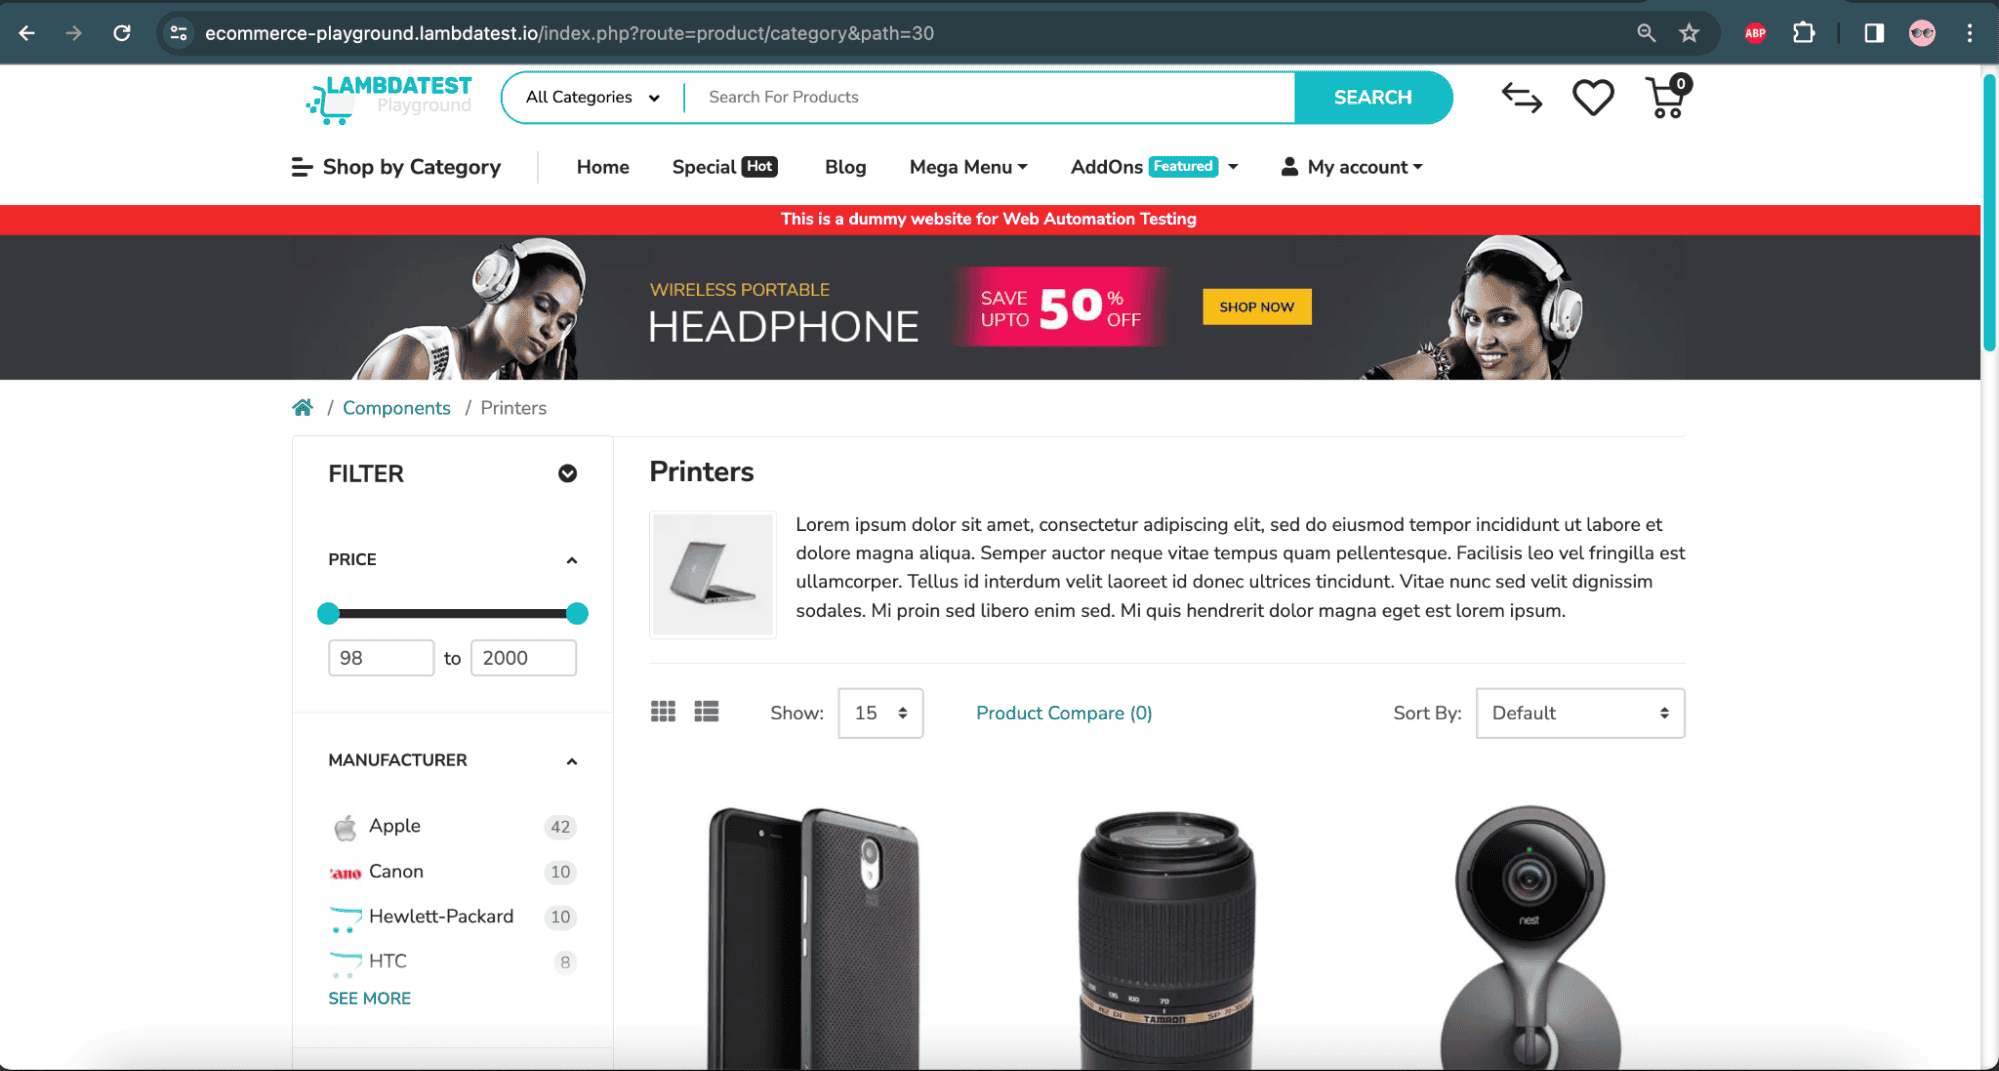
打印机产品页 – LambdaTest电子商务网站
测试场景2:
- 访问相机产品页
- 设置为基准图像
- 再次访问相机产品页
- 与基准图像比较
- 应无差异显示
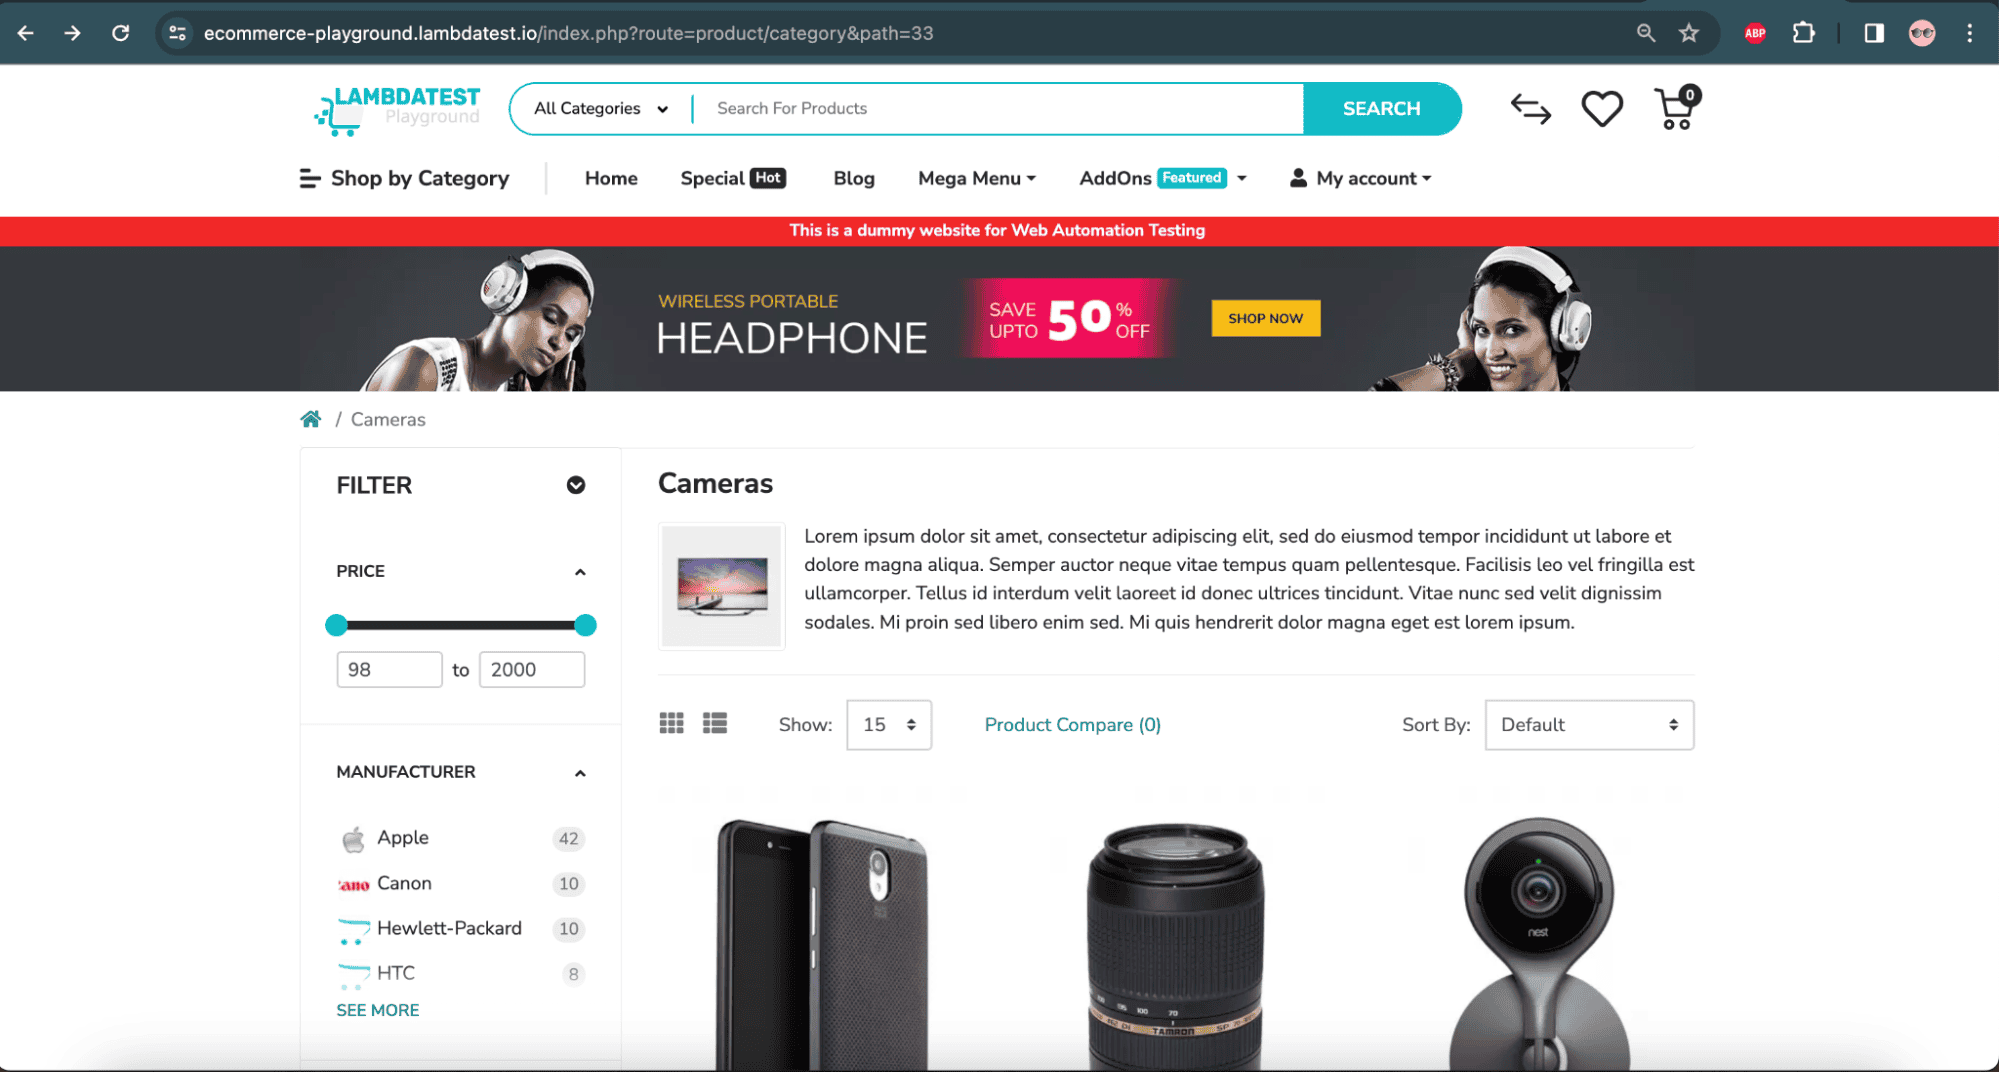
相机产品页 – LambdaTest电子商务网站
5.1. LambdaTest SmartUI入门
注册后按以下步骤操作:
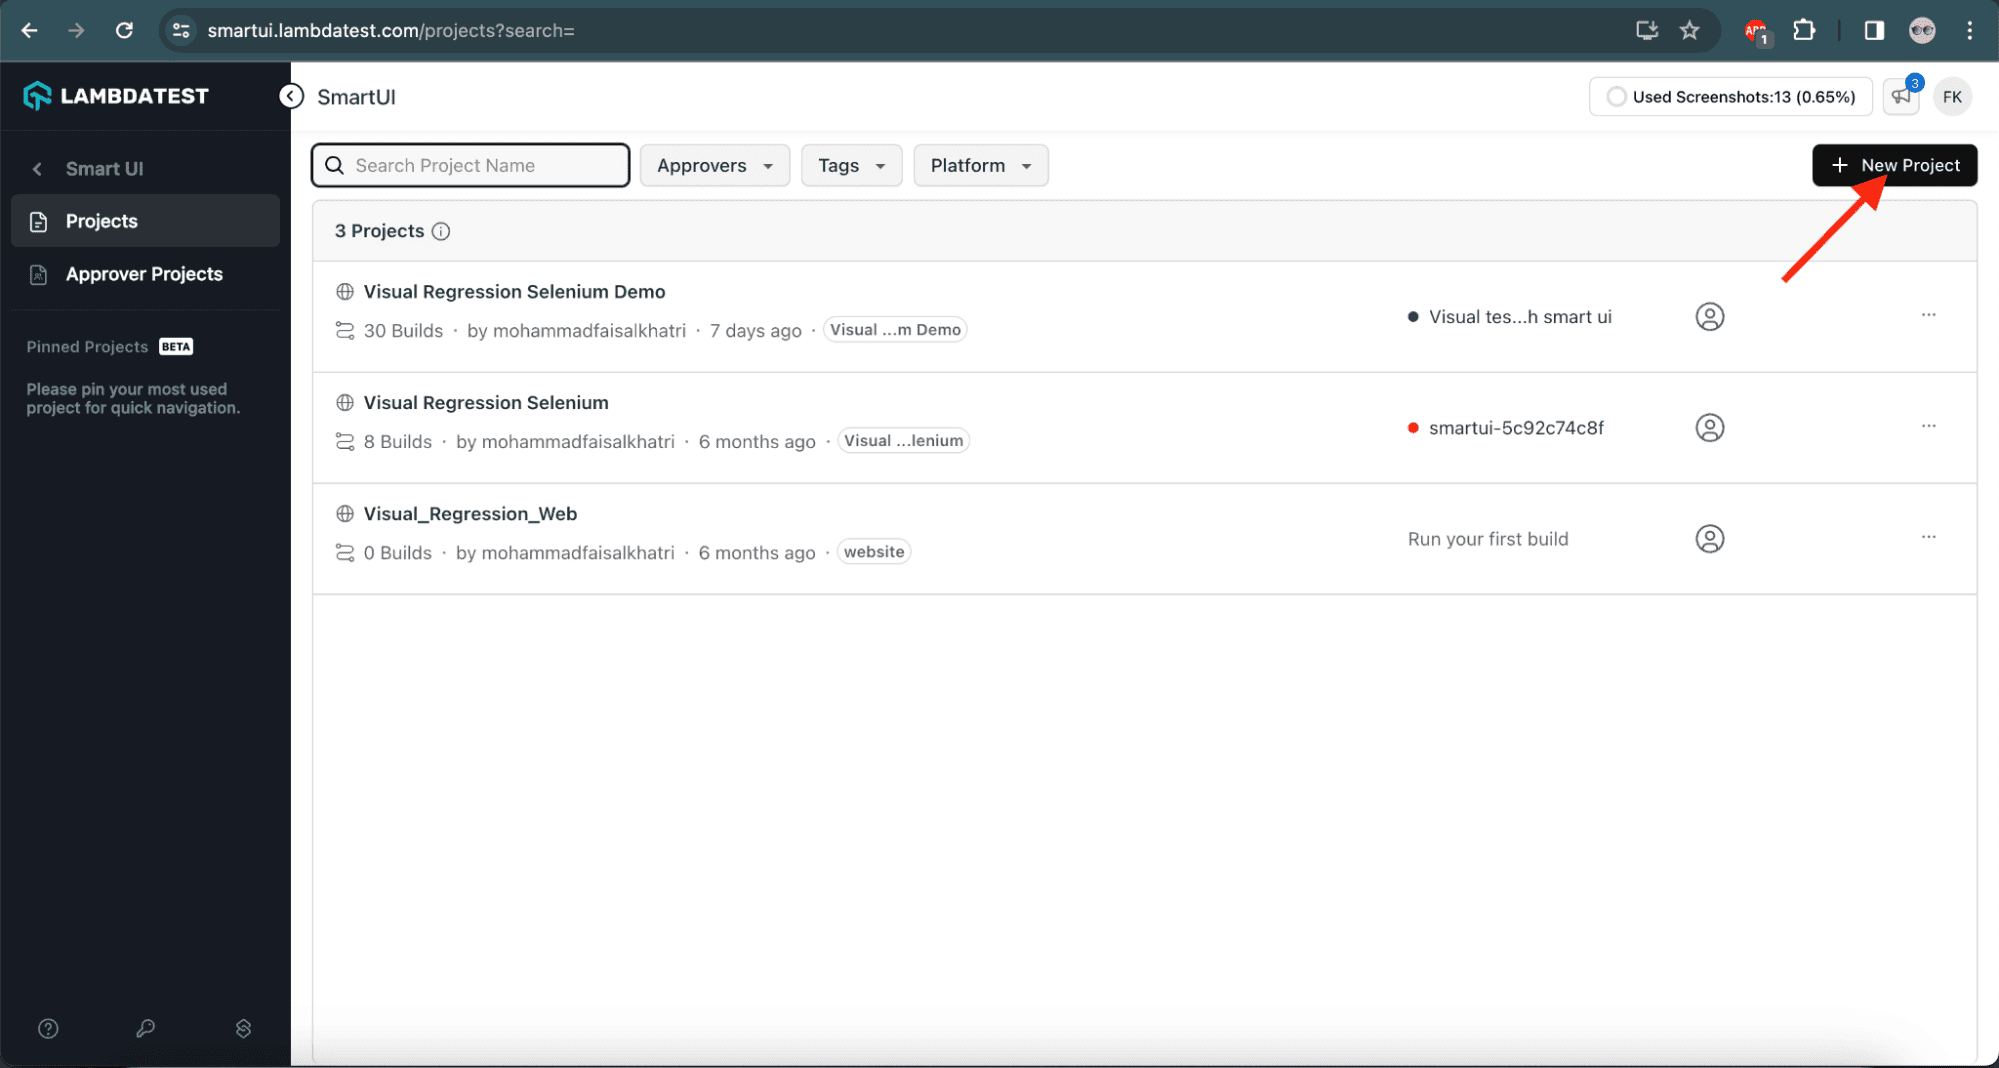
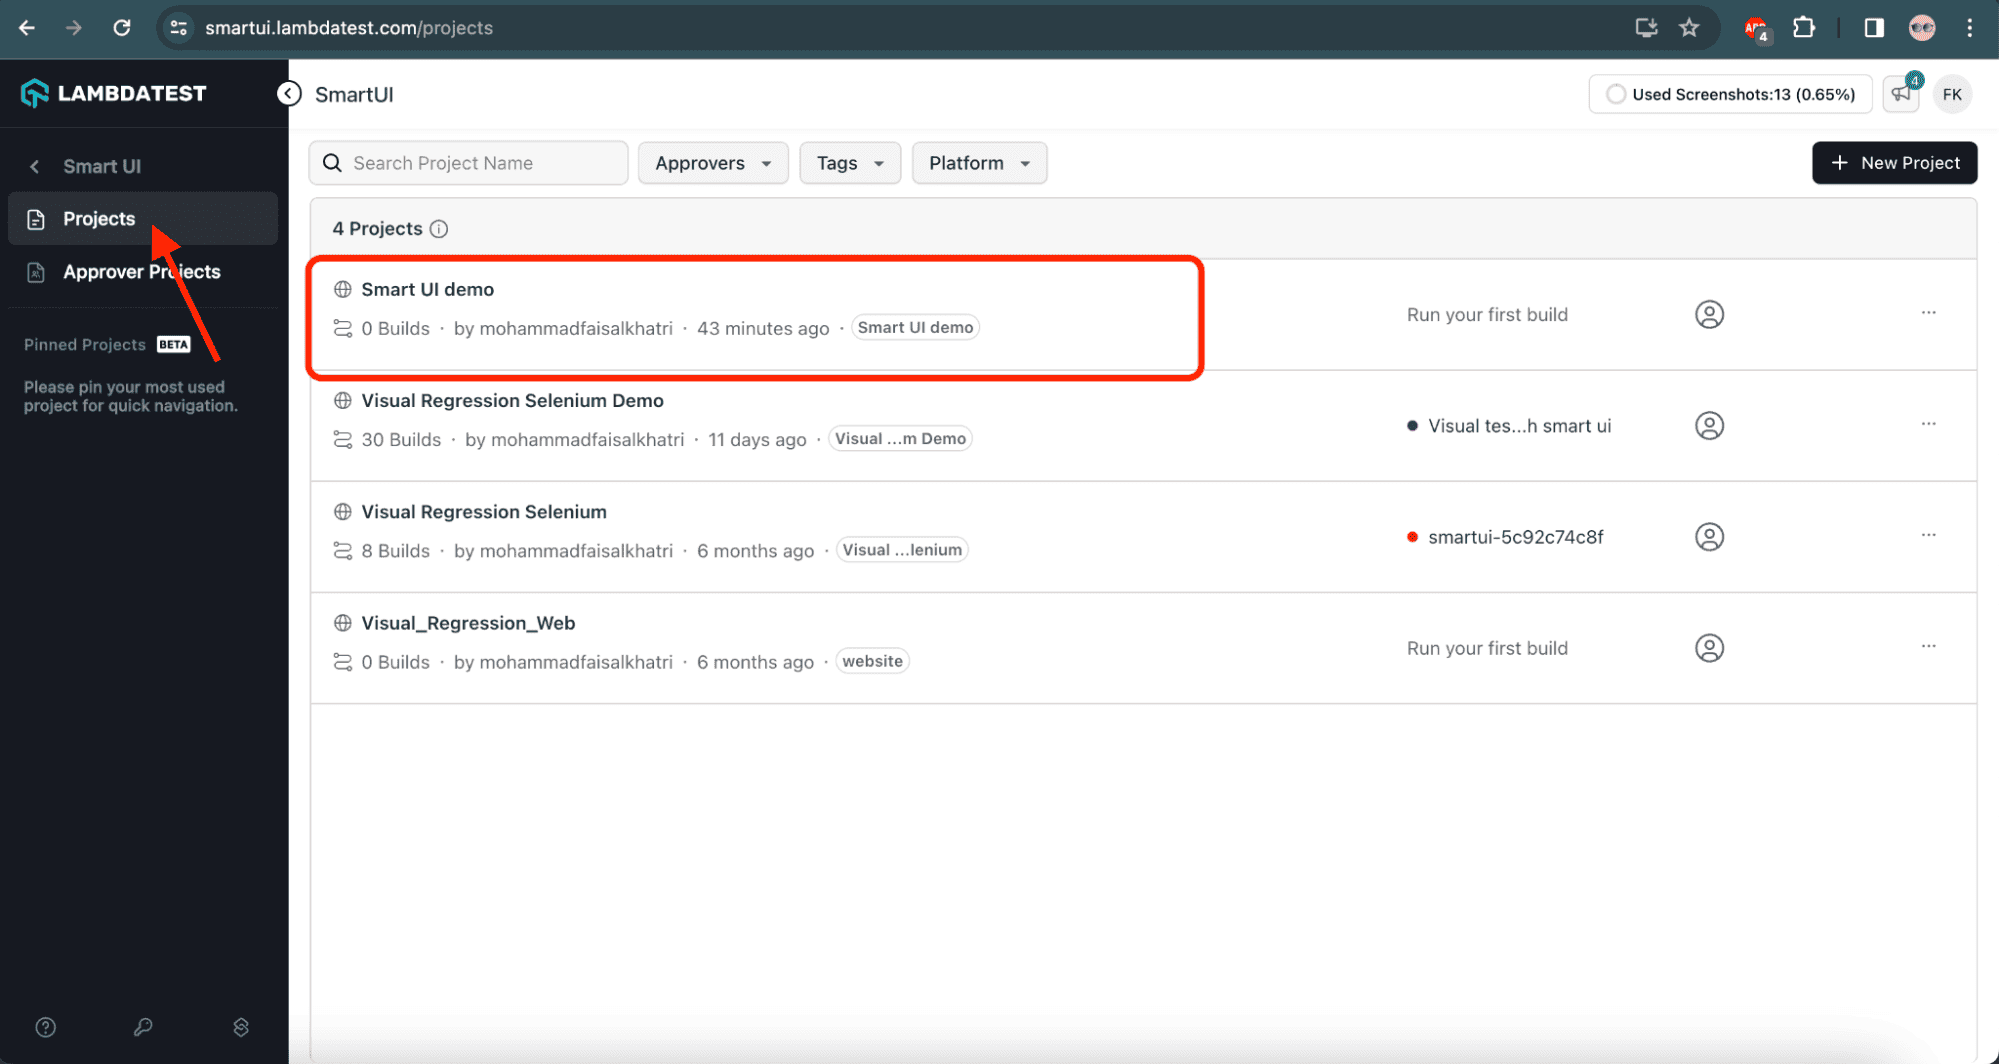
左侧菜单选择SmartUI
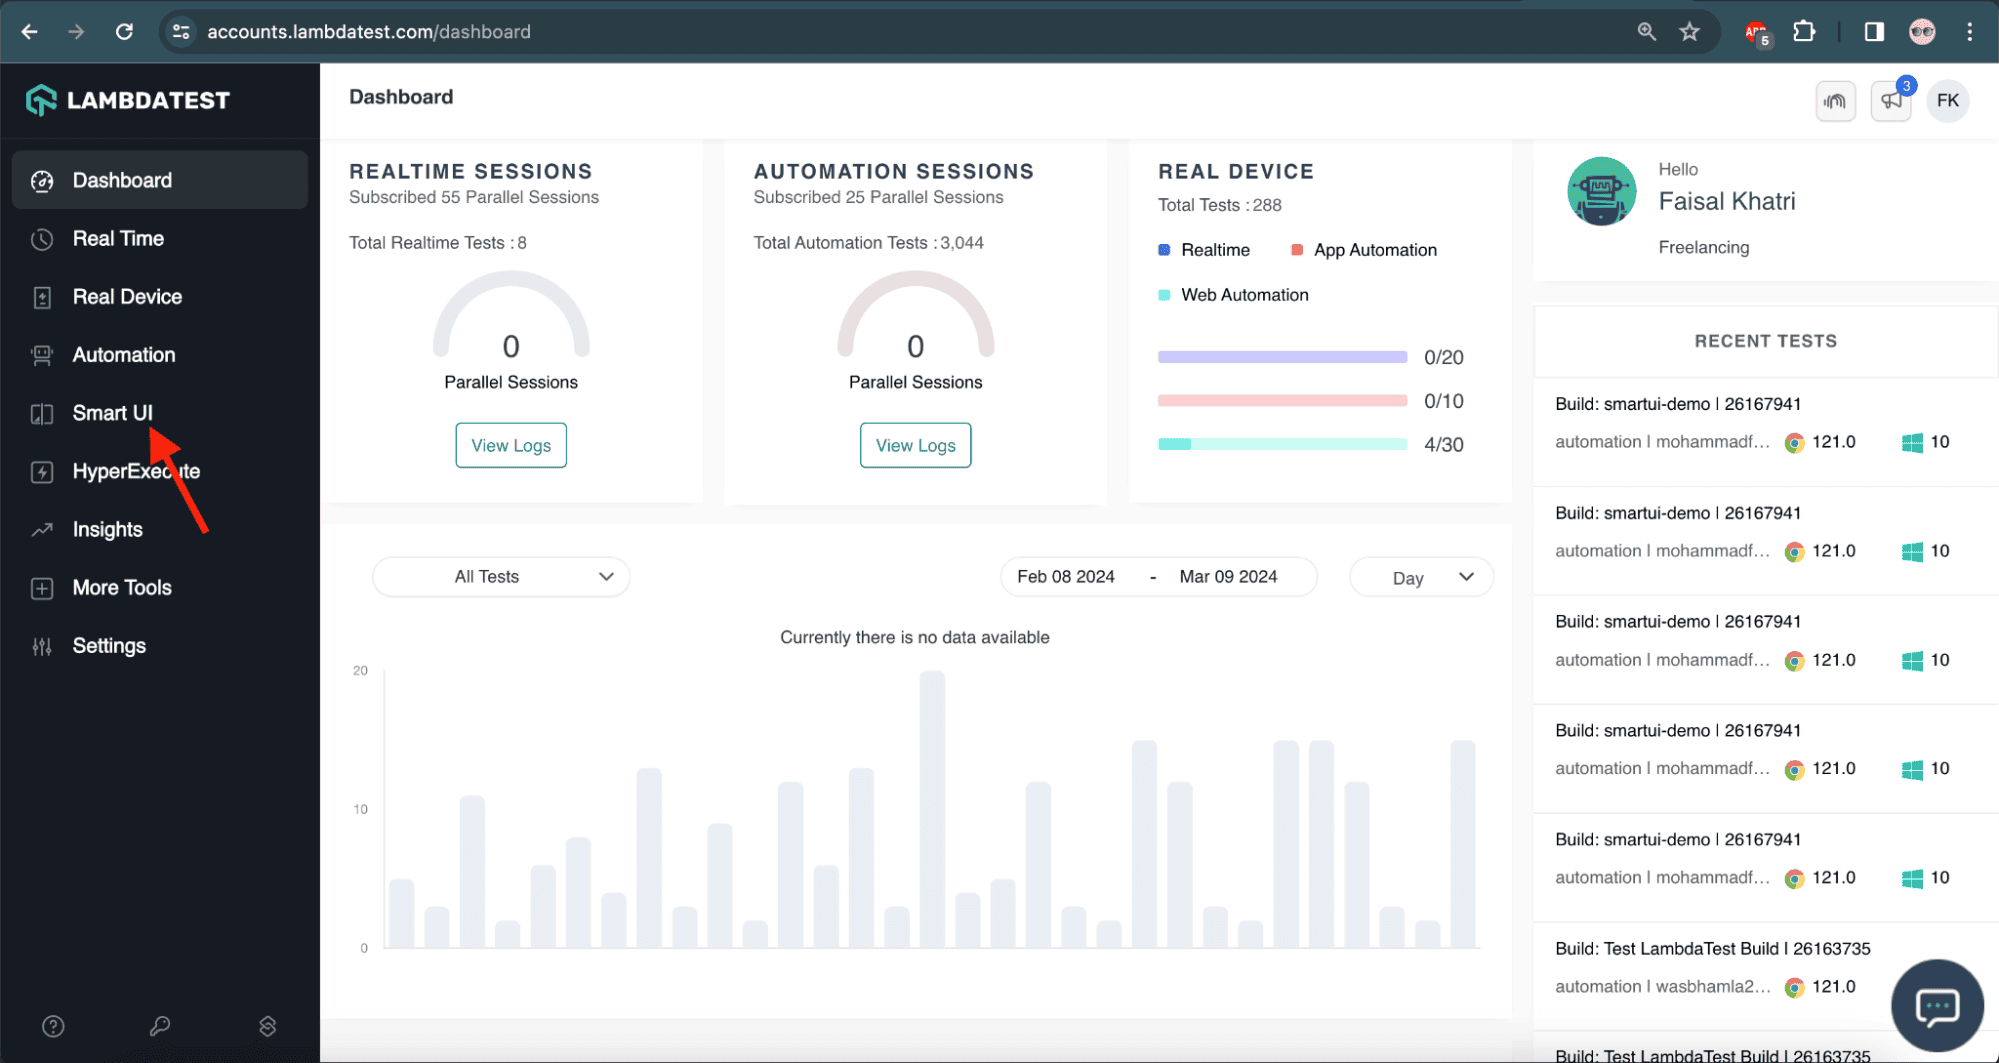
点击"New Project"
填写基本信息(平台、项目名、审批人、标签)。选择平台为"Web"
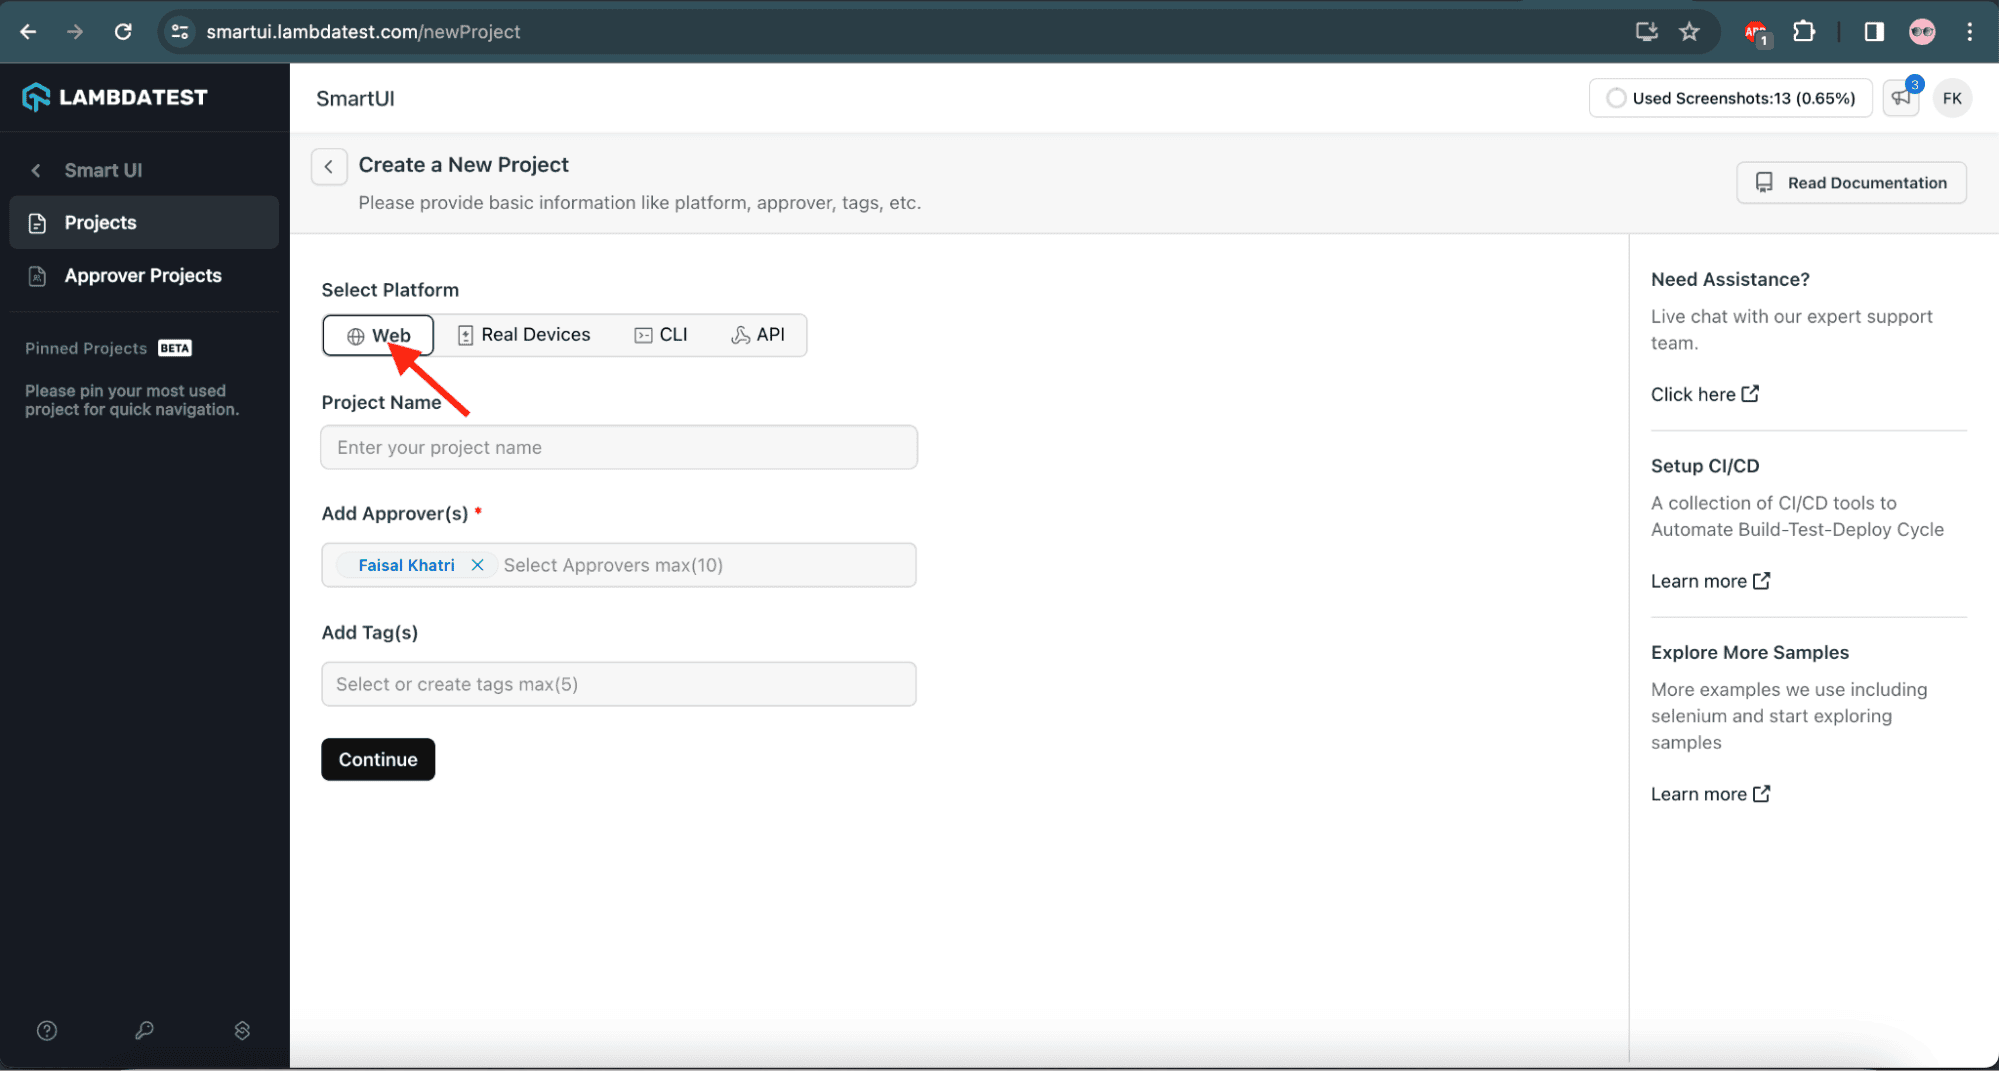
输入项目名和审批人(审批人负责决定构建是否通过)
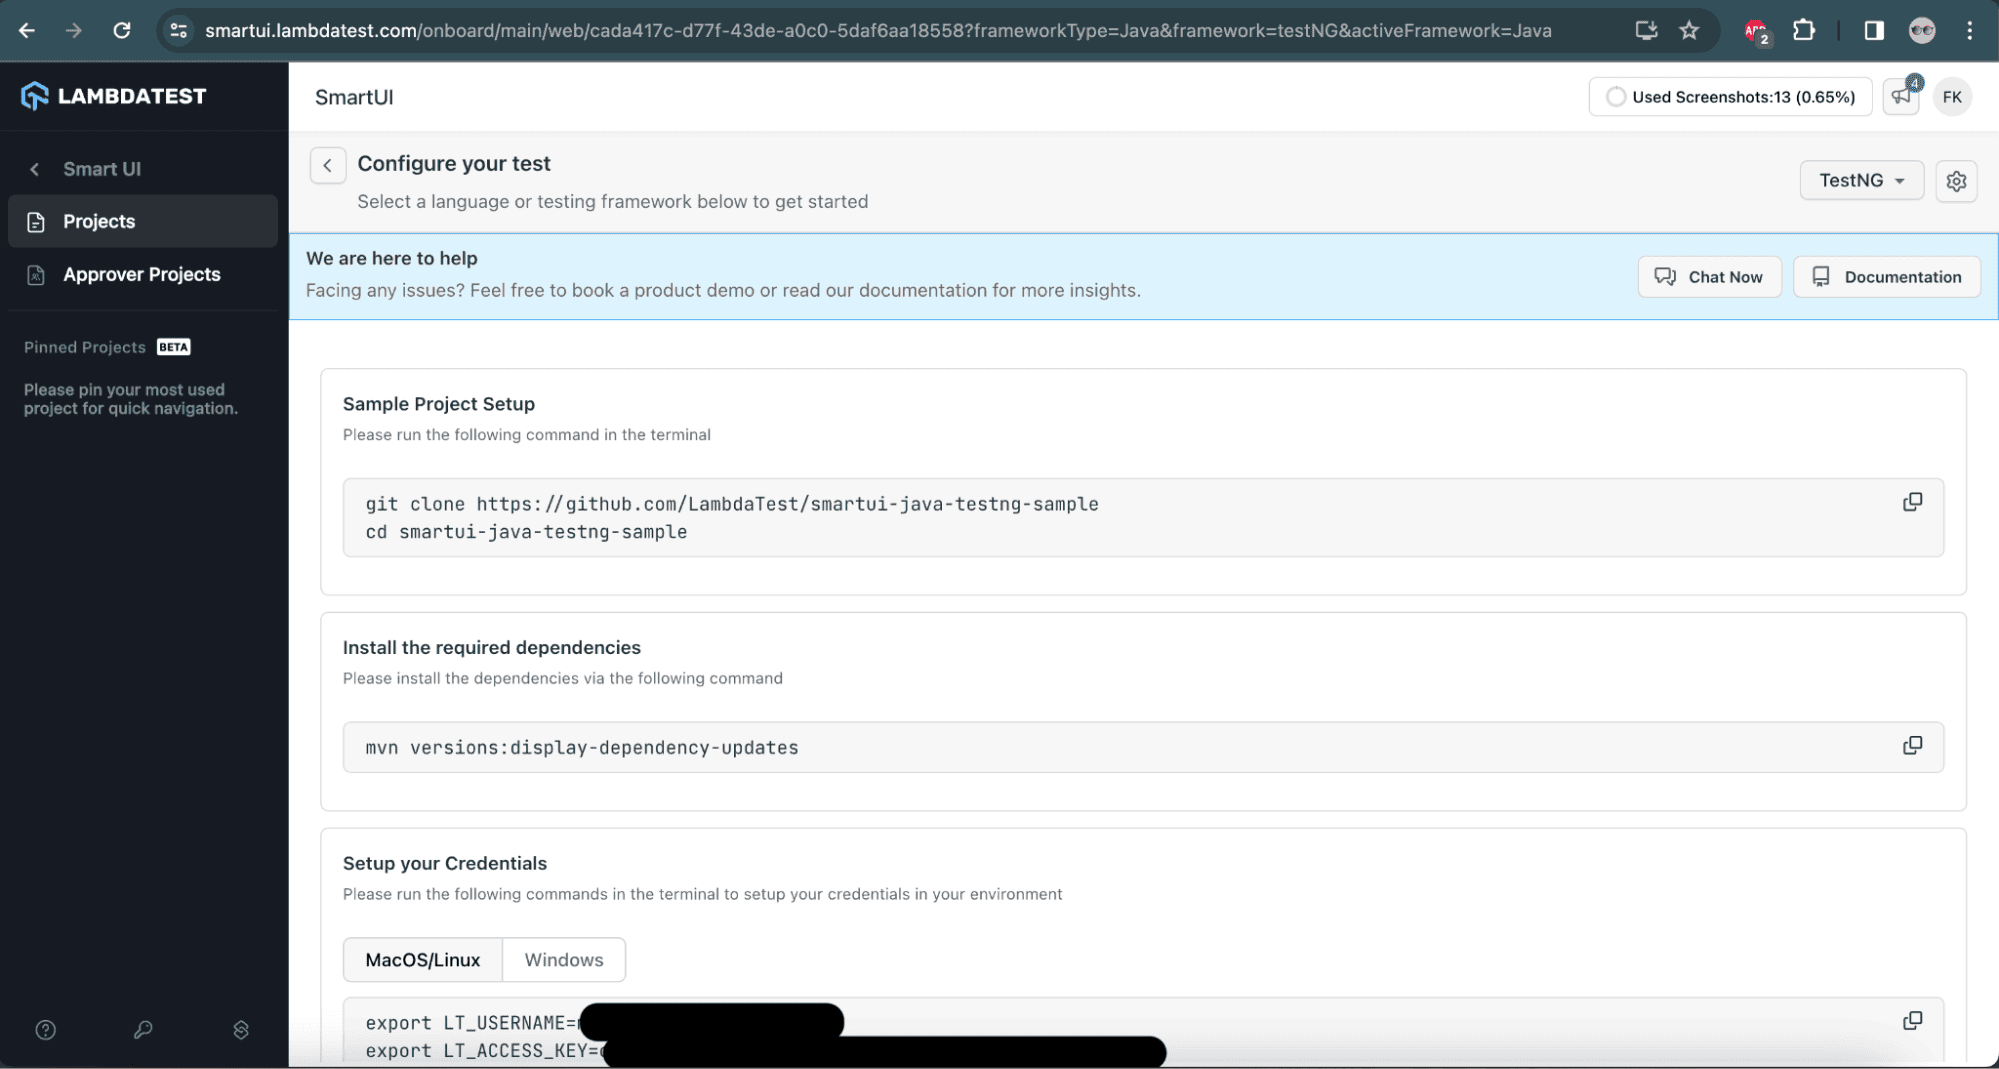
选择测试框架(示例选择Java+TestNG)
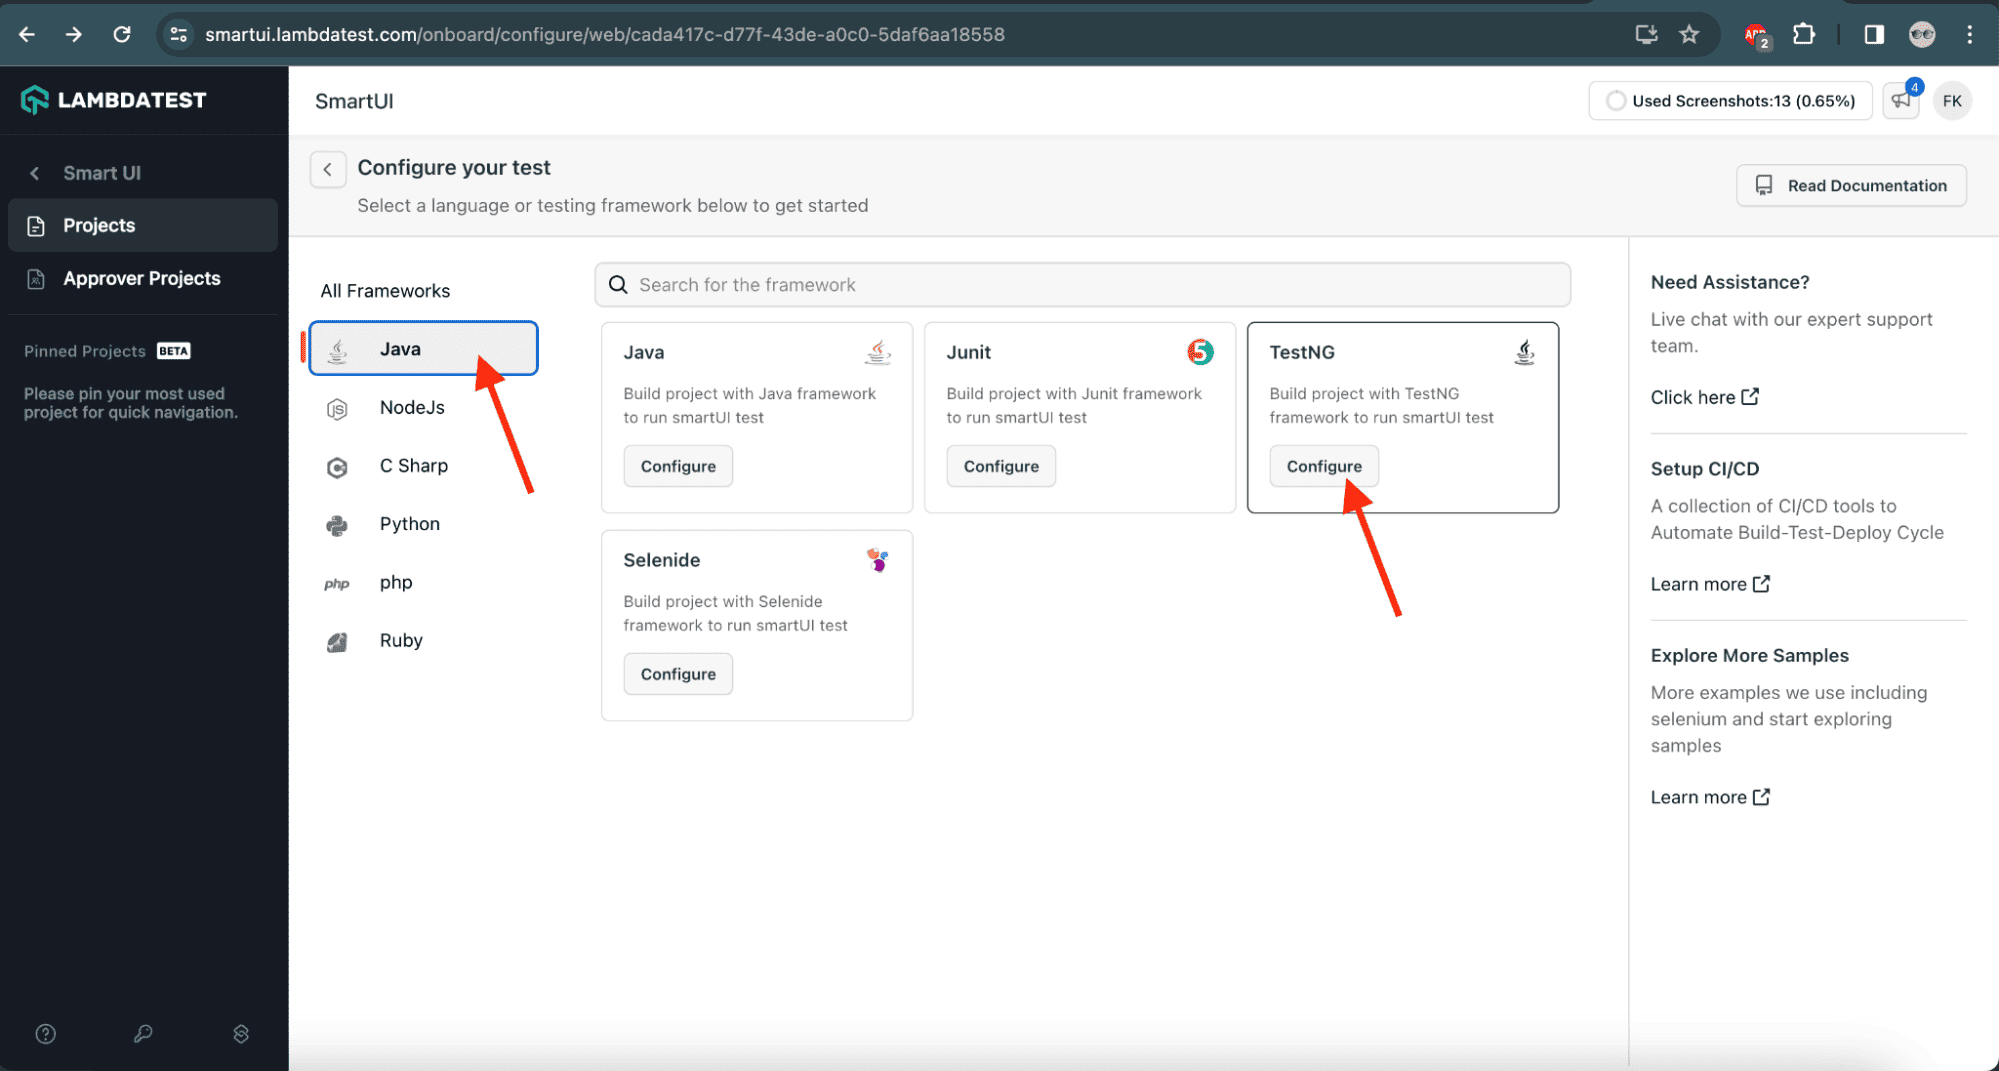
复制配置到测试项目
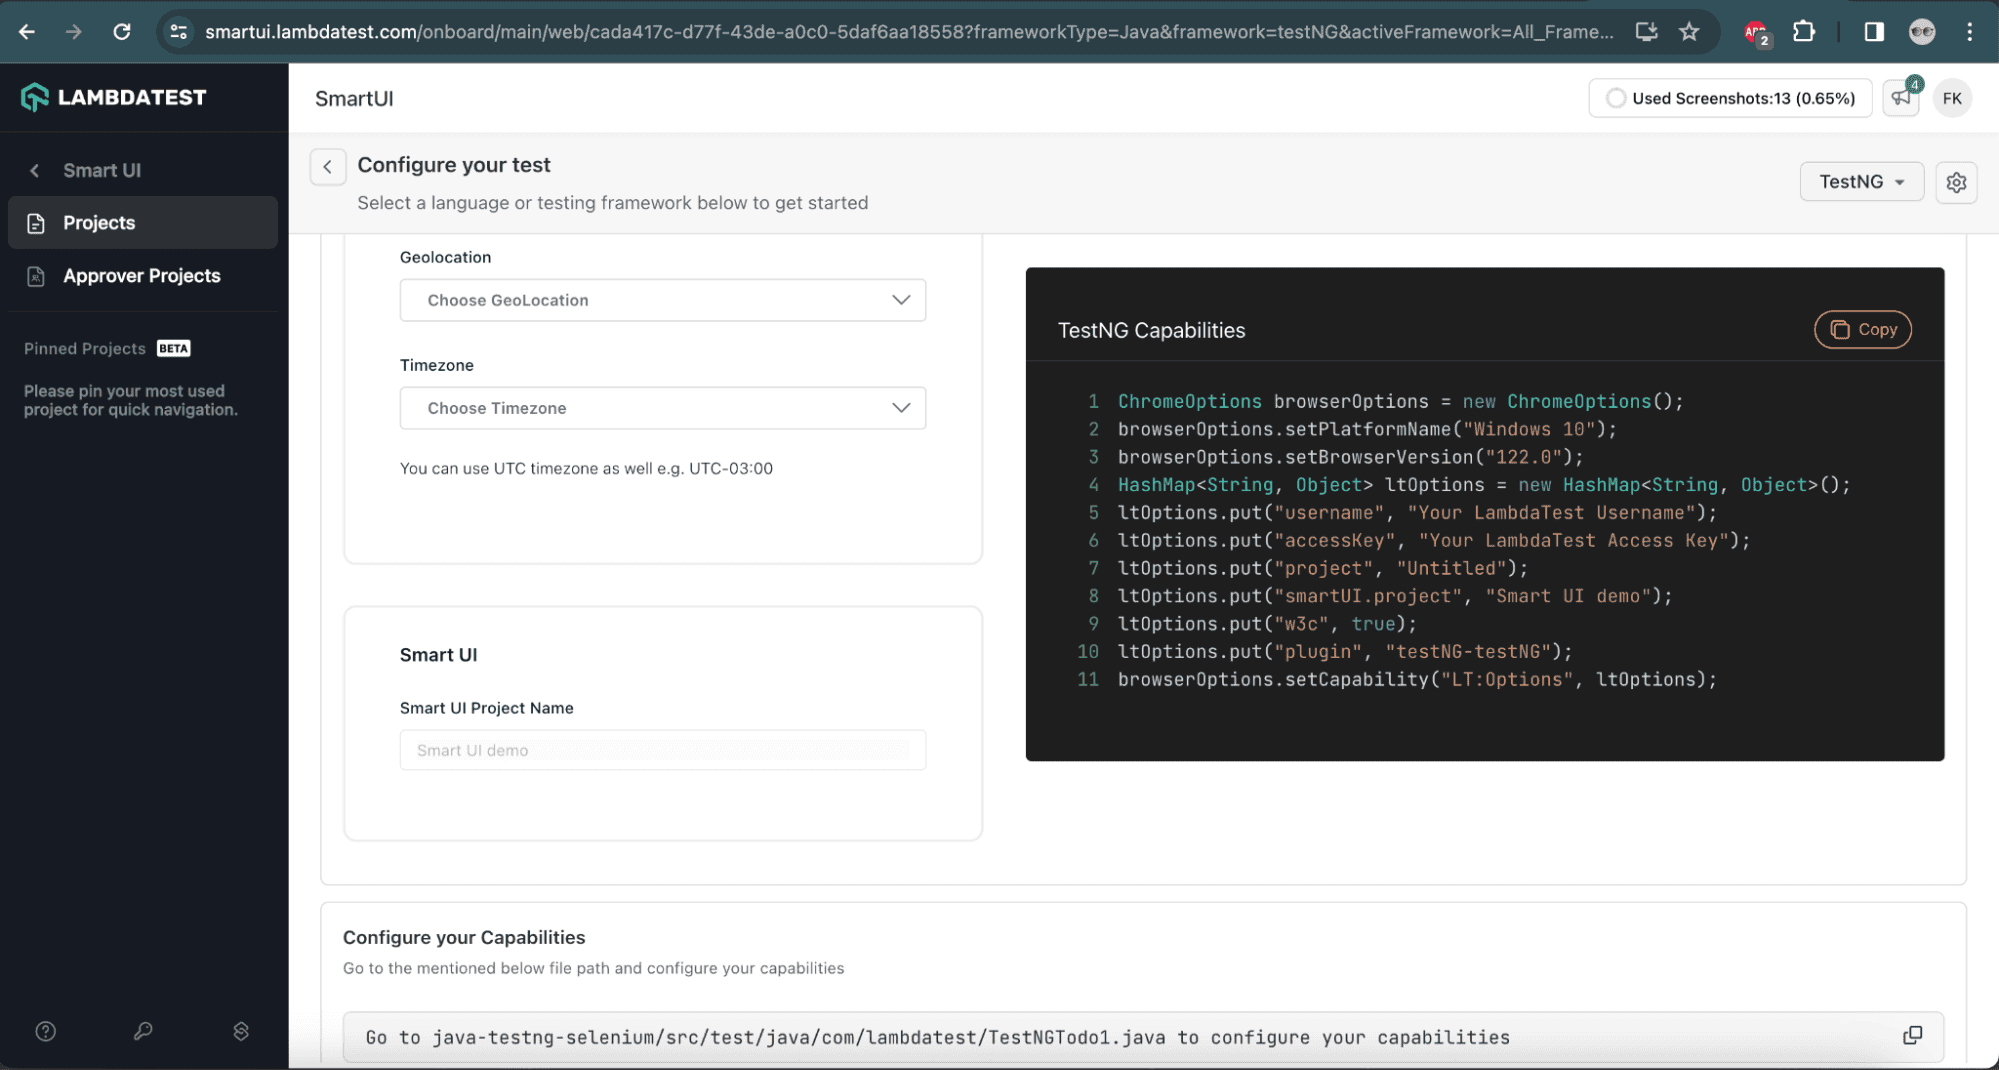
确认项目创建成功
5.2. 设置基准图像
使用Selenium WebDriver设置后,基准图像可上传到SmartUI项目。
5.3. Maven依赖
在pom.xml添加:
<dependency>
    <groupId>org.seleniumhq.selenium</groupId>
    <artifactId>selenium-java</artifactId>
    <version>4.21.0</version>
</dependency>
5.4. Selenium与SmartUI配置
创建DriverManager.java类配置云端WebDriver:
public class DriverManager {

    private WebDriver driver;
    //...
}
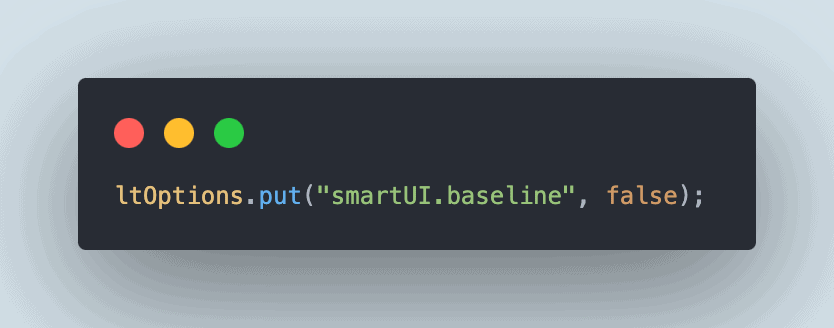
getLambdaTestOptions()方法包含所有必需配置:
private static HashMap<String, Object> getLambdaTestOptions() {
HashMap<String, Object> ltOptions = new HashMap<>();
ltOptions.put("resolution", "2560x1440");
ltOptions.put("video", true);
ltOptions.put("build", "smartui-demo");
ltOptions.put("name", "visual regression with smartui");
ltOptions.put("smartUI.project", "Visual Regression Selenium Demo");
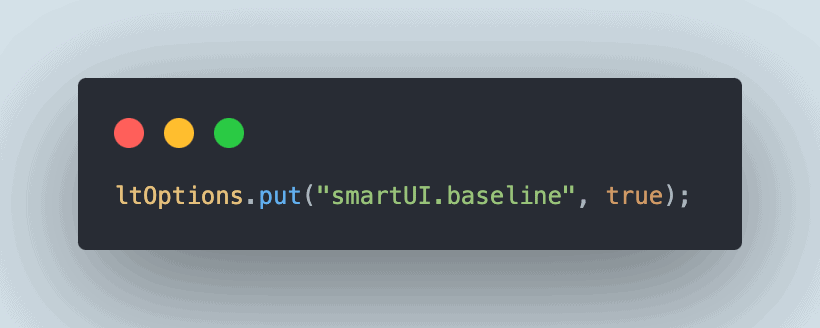
ltOptions.put("smartUI.baseline", true);
ltOptions.put("w3c", true);
ltOptions.put("plugin", "java-testNG");
var smartOptions = new HashMap<String, Object>();
smartOptions.put("largeImageThreshold", 1200);
smartOptions.put("transparency", 0.3);
smartOptions.put("errorType", "movement");
ltOptions.put("smartUI.options", smartOptions);
return ltOptions;
}
5.5. SmartUI关键配置
| 配置项 | 说明 |
|---|---|
smartUI.project |
必需,指定项目名 |
largeImageThreshold |
像素粒度设置(100-1200) |
errorType |
差异显示方式("movement"/"flat") |
ignore |
忽略像素差异("antiliasing"/"alpha"/"colors"/"nothing") |
transparency |
透明度设置(0-1,支持0.1-0.9) |
boundingBoxes |
限定比较区域(像素坐标) |
ignoredBoxes |
排除比较区域(像素坐标) |
ignoreAreasColoredWith |
忽略指定颜色区域(RGBA值) |
5.6. 添加基准图像
通过代码设置基准图像(需smartUI.baseline: true):
初始化云端WebDriver:
public void startChromeInCloud() {
    String ltUserName = System.getenv("LT_USERNAME");
    String ltAccessKey = System.getenv("LT_ACCESS_KEY");
    String gridUrl = "@hub.lambdatest.com/wd/hub";
    ChromeOptions browserOptions = new ChromeOptions();
    browserOptions.setPlatformName("Windows 10");
    browserOptions.setBrowserVersion("latest");
    browserOptions.setPageLoadStrategy(PageLoadStrategy.NORMAL);
    HashMap<String, Object> ltOptions = getLambdaTestOptions();
    browserOptions.setCapability("LT:Options", ltOptions);
    try {
      this.driver = new RemoteWebDriver(
        new URL(format("https://{0}:{1}{2}", ltUserName, ltAccessKey, gridUrl)),browserOptions);
    } catch (MalformedURLException e) {
      throw new Error("Error in setting RemoteDriver's URL!");
    }
    this.driver.manage().timeouts().implicitlyWait(Duration.ofSeconds(20));
}
需要LambdaTest用户名和访问密钥,建议通过环境变量设置(避免硬编码)。配置Chrome在Windows 10上运行最新版本,使用RemoteWebDriver连接云端。设置20秒隐式等待。
6. 编写测试
创建SeleniumVisualRegressionLiveTest测试类:
public class SeleniumVisualRegressionLiveTest {

    private DriverManager driverManager;
    private CameraProductPage cameraProductPage;
    //...
}
使用Page Object模式(提升可维护性),创建CameraProductPage类:
public class CameraProductPage {
    private static String SCREEN_NAME = "Camera-Product-Page";
    private WebDriver driver;
    public CameraProductPage(WebDriver driver) {
    this.driver = driver;
}
public void checkVisual() {
    ((JavascriptExecutor) this.driver)
      .executeScript(MessageFormat.format("smartui.takeScreenshot={0}", SCREEN_NAME));
    }
}
在测试类中初始化:
@BeforeClass(alwaysRun = true)
public void testSetup() {
    this.driverManager = new DriverManager();
    this.driverManager.startChromeInCloud();
    this.cameraProductPage =
    new CameraProductPage(this.driverManager.getDriver());
}

@AfterClass(alwaysRun = true)
public void tearDown() {
    this.driverManager.quitDriver();
}
6.1. 测试实现1
比较不同页面(相机页vs打印机页):
@Test
public void whenActualImageIsDifferentFromBaseline_thenItShouldShowDifference() {
    this.driverManager.getDriver().get(
      "https://ecommerce-playground.lambdatest.io/index.php?route=product/category&path=30");

    this.cameraProductPage.checkVisual();
}
6.2. 测试实现2
比较相同页面(相机页自身):
@Test
public void whenActualImageIsSameAsBaseline_thenItShouldNotShowAnyDifference() {
    this.driverManager.getDriver().get(
      "https://ecommerce-playground.lambdatest.io/index.php?route=product/category&path=33");
    this.cameraProductPage.checkVisual();
}
7. 执行测试
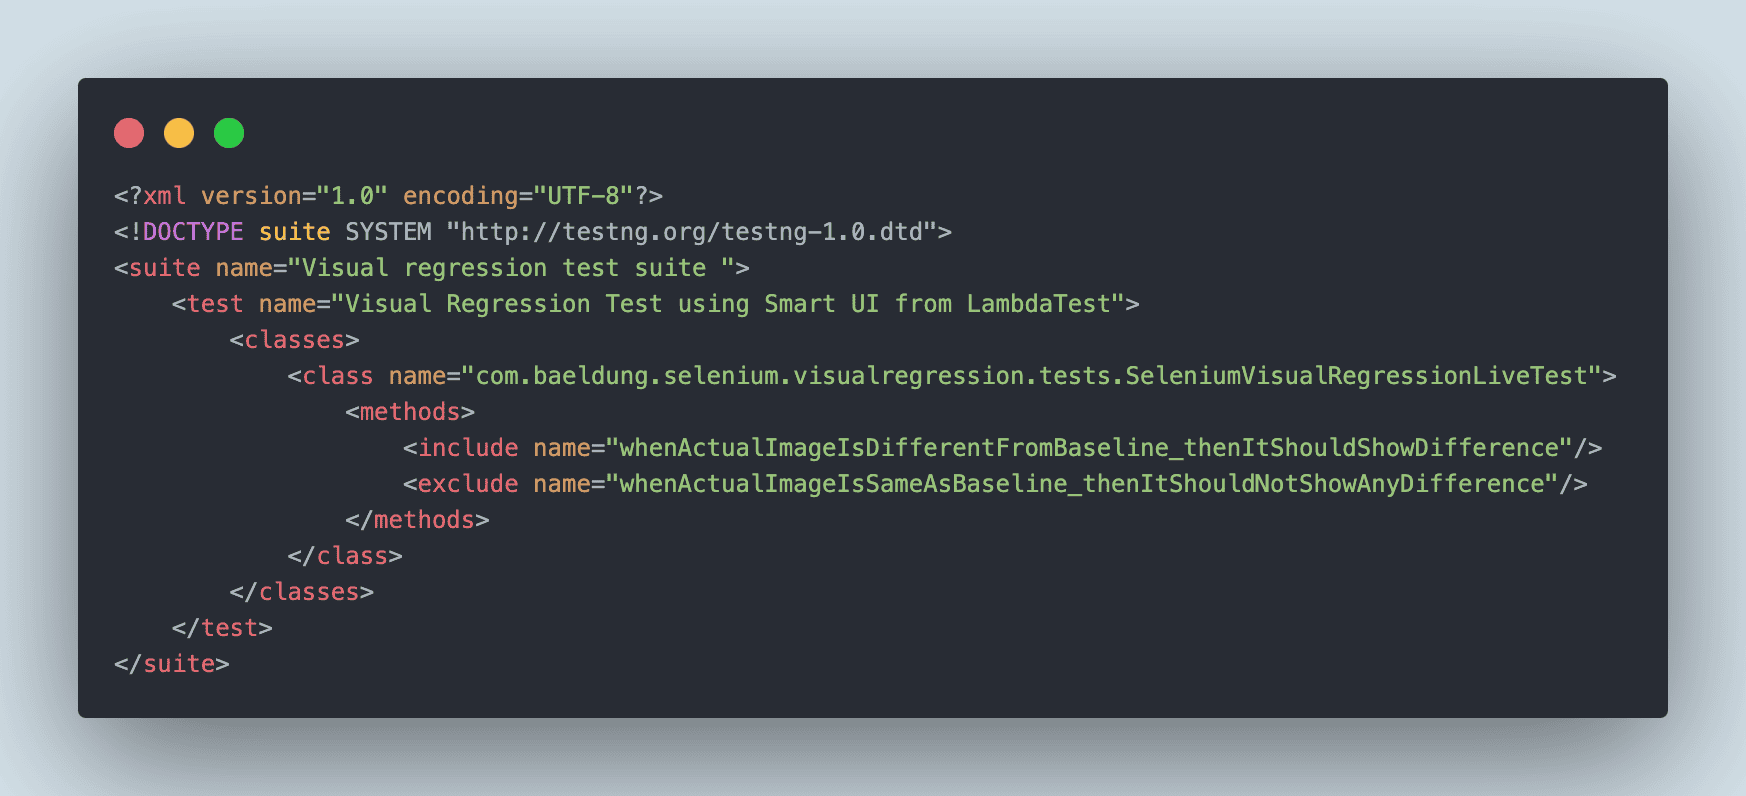
使用testng.xml配置执行顺序:
<?xml version="1.0" encoding="UTF-8"?>
<!DOCTYPE suite SYSTEM "http://testng.org/testng-1.0.dtd">
<suite name="Visual regression test suite ">
    <test name="Visual Regression Test using Smart UI from LambdaTest">
    <classes>
    <class name="com.baeldung.selenium.visualregression.tests.SeleniumVisualRegressionLiveTest">
    <methods>
    <include name="whenActualImageIsDifferentFromBaseline_thenItShouldShowDifference"/>
    <exclude name="whenActualImageIsSameAsBaseline_thenItShouldNotShowAnyDifference"/>
    </methods>
    </class>
    </classes>
    </test>
</suite>
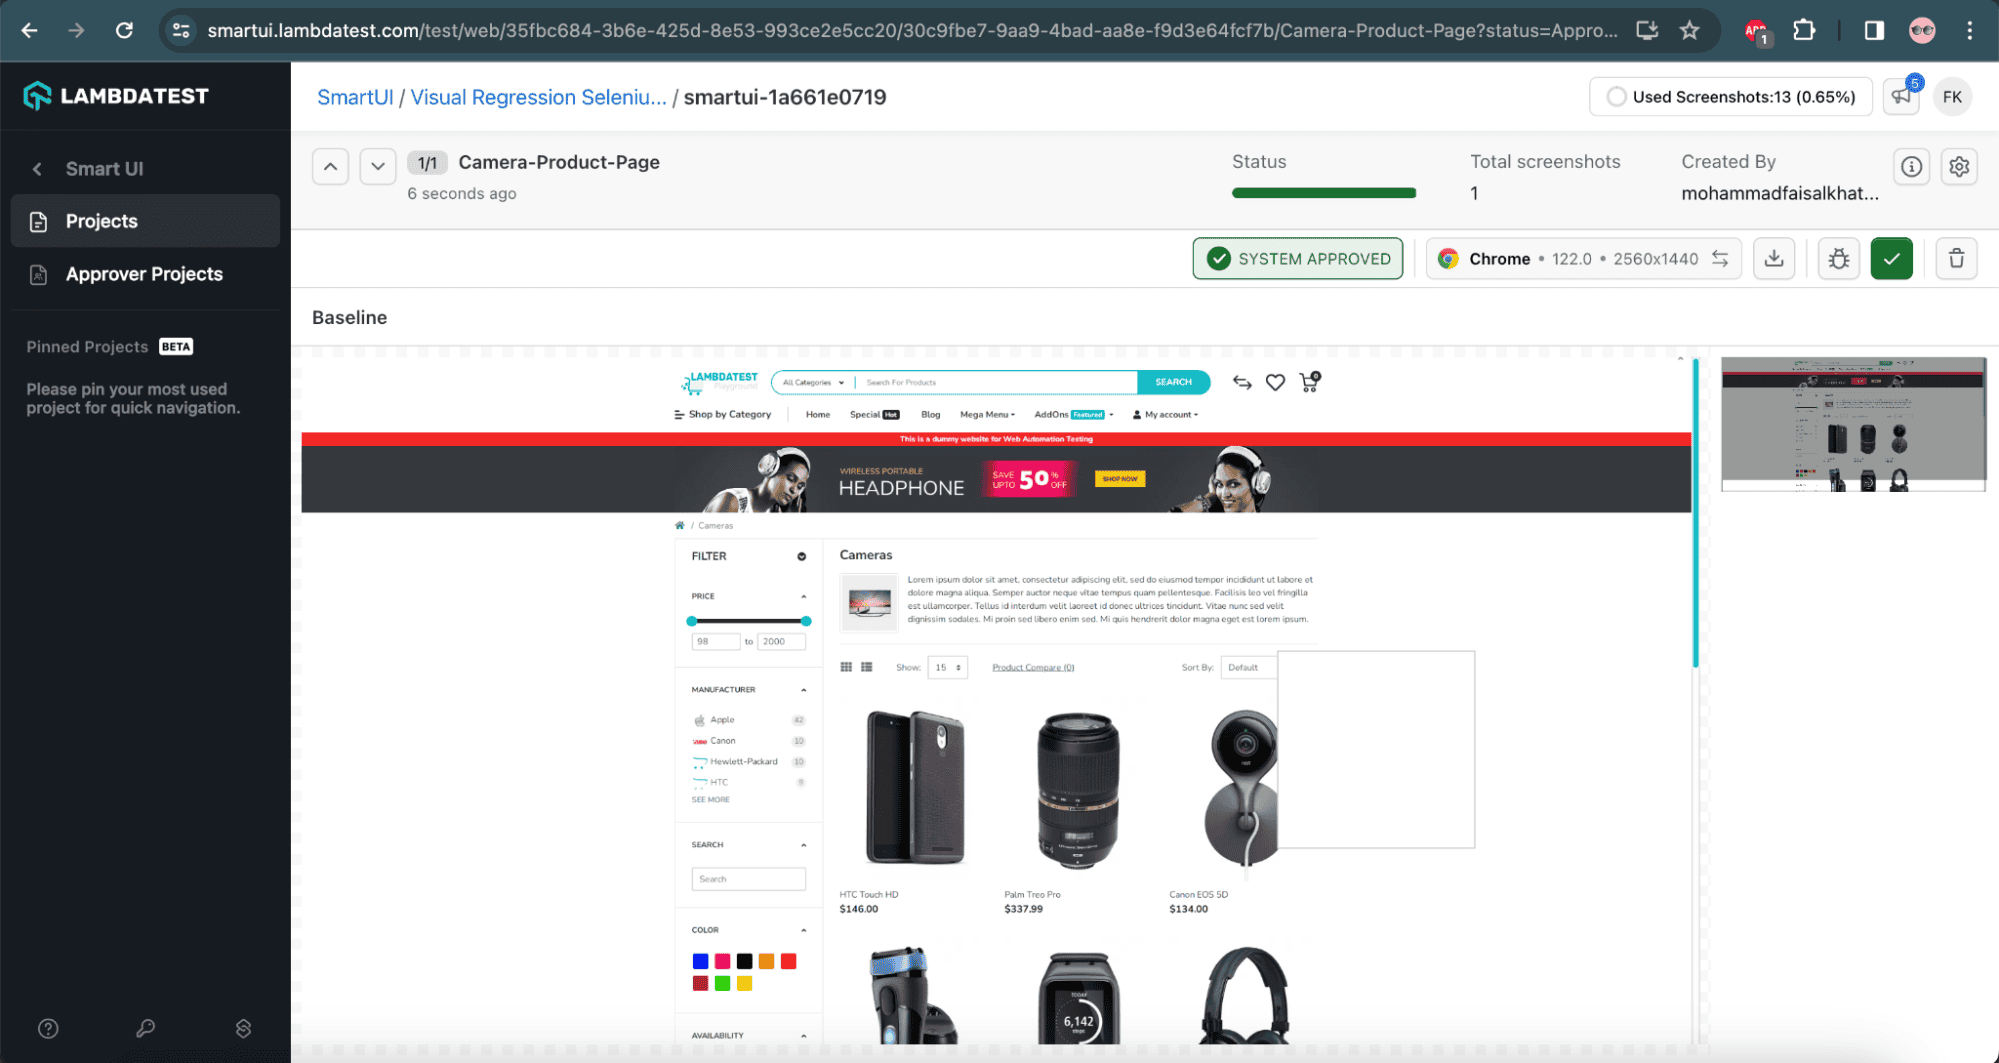
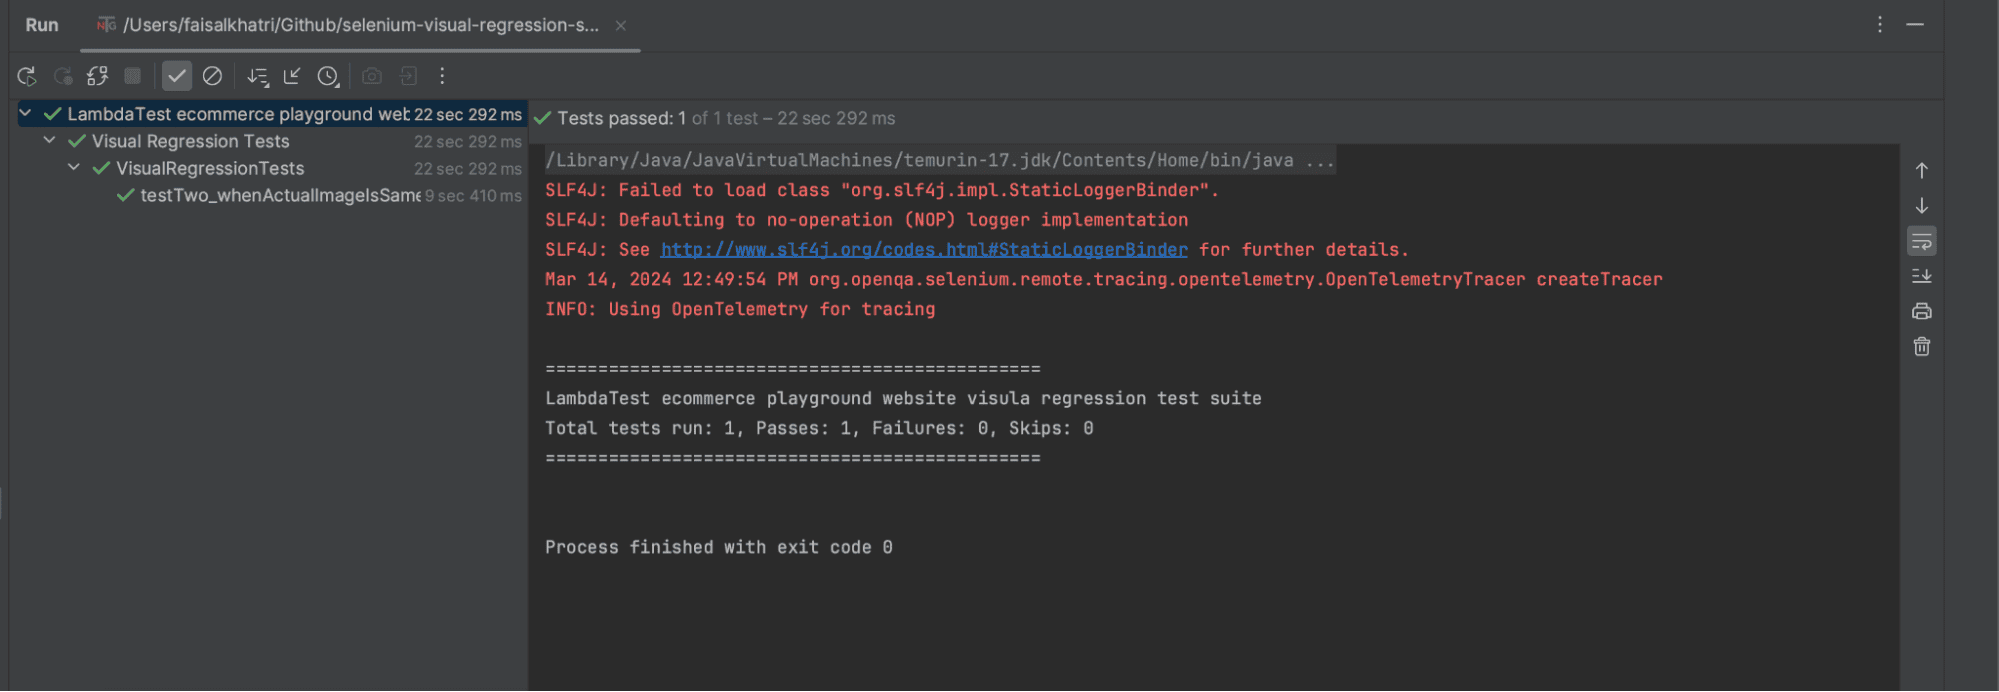
先执行相同页面测试设置基准图像,IntelliJ执行效果:
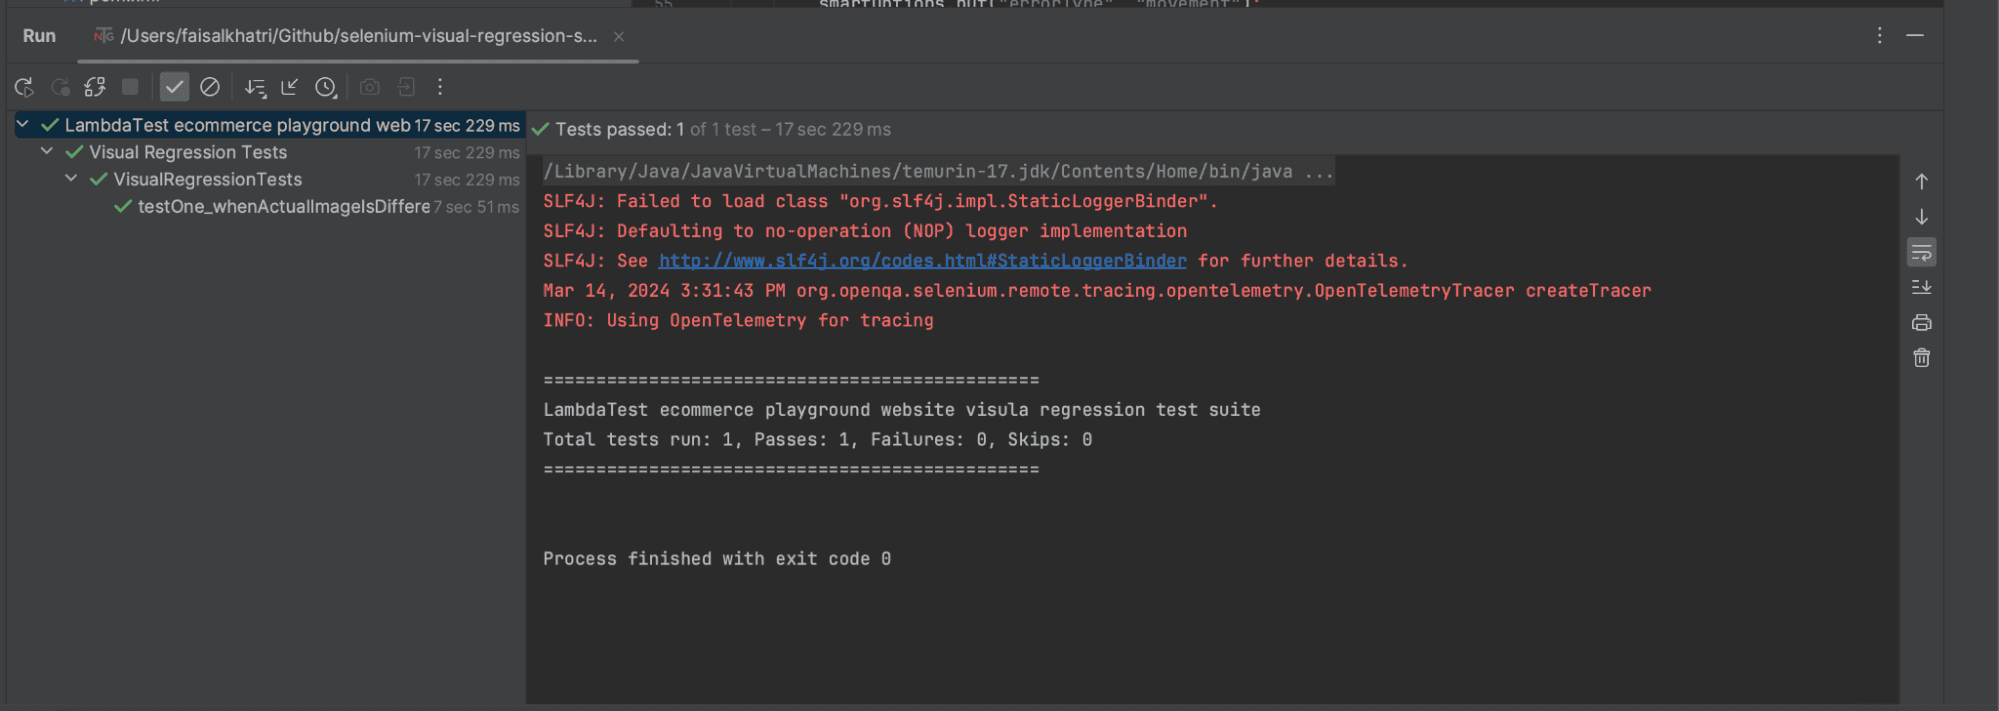
基准图像设置成功:

7.1. 执行视觉回归测试
更新DriverManager将smartUI.baseline设为false:
修改testng.xml执行差异测试:
IntelliJ执行效果:
SmartUI显示视觉差异:

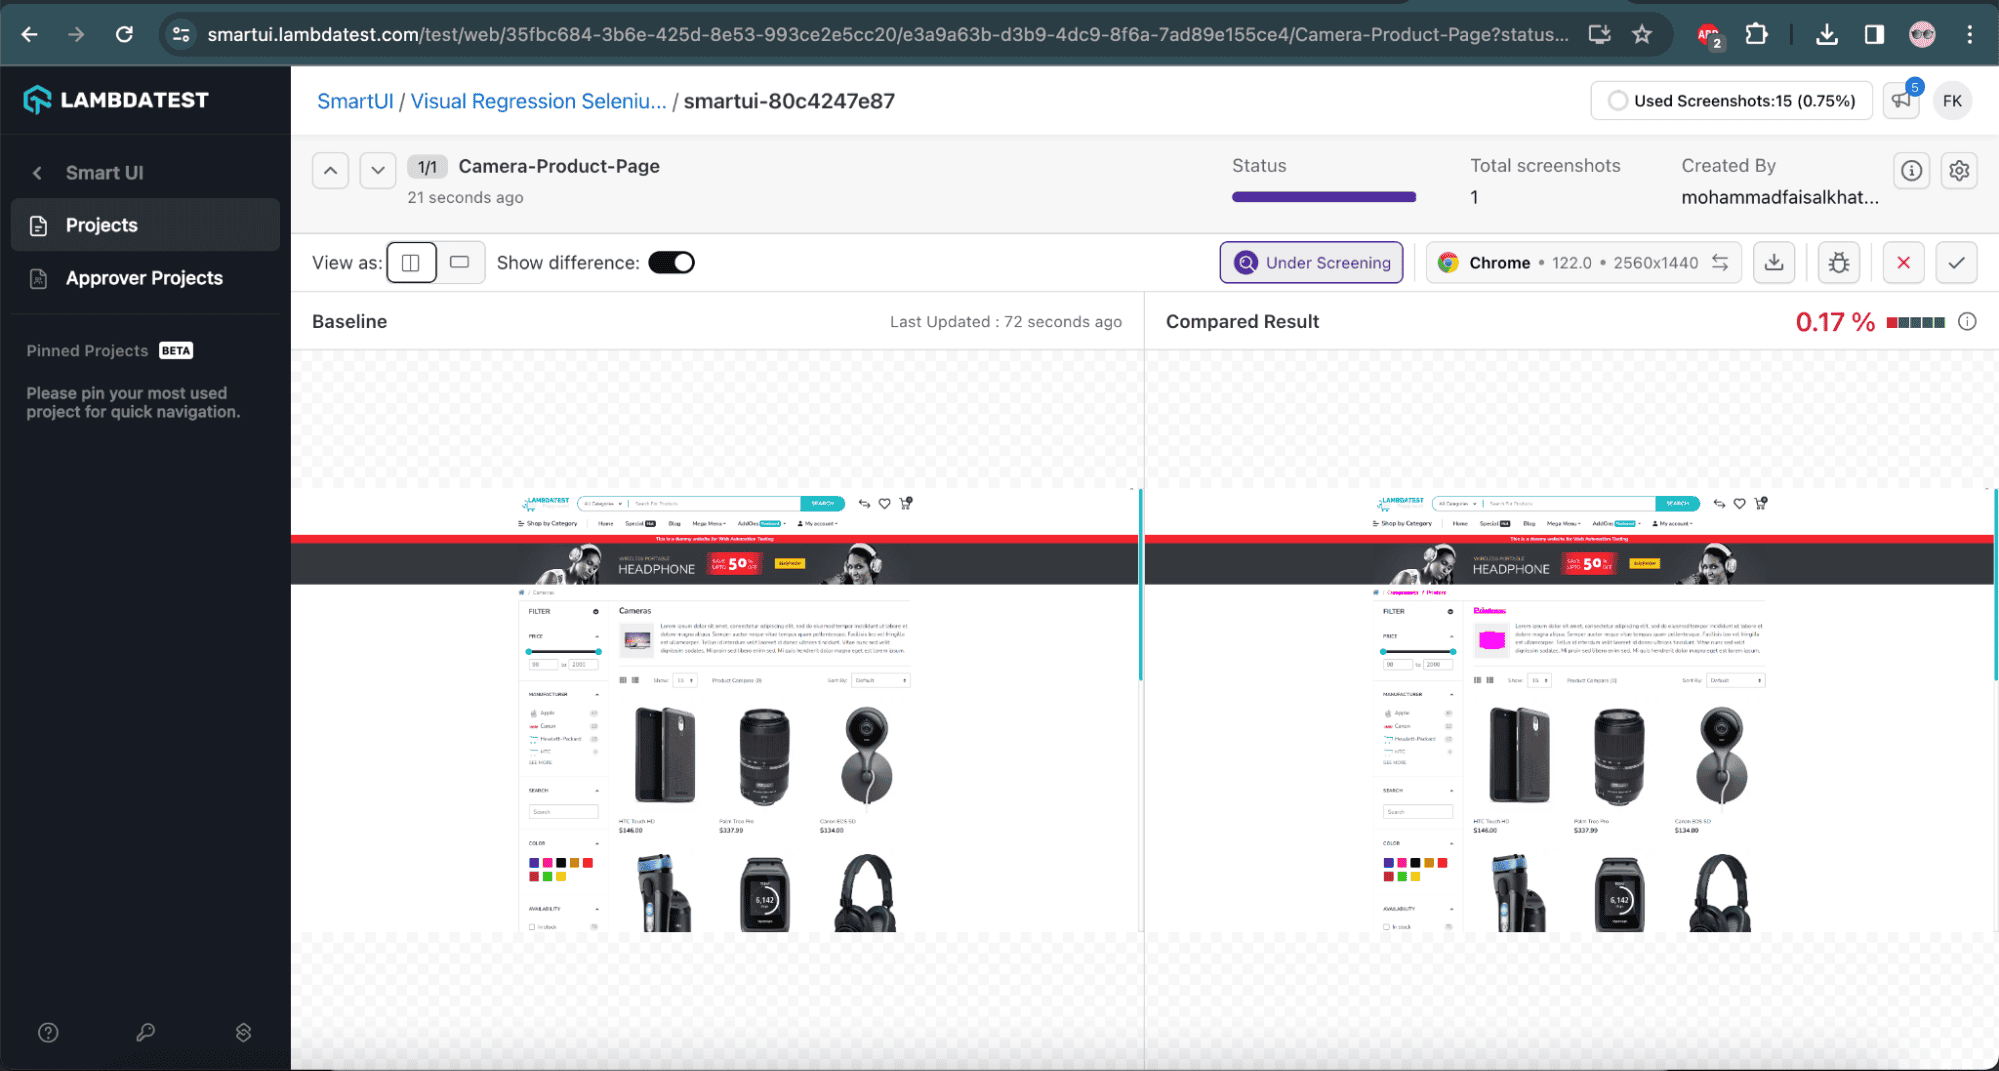
上方截图展示详细测试结果:基准图像、当前图像及其差异。LambdaTest SmartUI通过逐像素比较得出0.17%的失配率,并在当前图像中高亮差异区域。可通过上方按钮批准或拒绝结果。
使用的SmartUI配置:
| 配置项 | 值 |
|---|---|
largeImageThreshold |
1200 |
transparency |
0.3 |
errorType |
movement |
最大阈值确保精确逐像素比较,"movement"模式突出像素分布变化,0.3透明度便于审批者识别差异。
8. 结论
本文使用LambdaTest SmartUI和Selenium WebDriver实现了视觉回归测试。视觉回归测试是保障Web应用视觉一致性和用户体验的关键手段。通过创新工具和方法,团队能主动识别和缓解视觉缺陷,提升产品质量,降低回归风险,为最终用户交付卓越的数字体验。
本文源代码可在GitHub获取。