1. Introduction

This tutorial is an introductory guide to using CockroachDB with Java.

We’ll explain the key features, how to configure a local cluster and how to monitor it, along with a practical guide on how we can use Java to connect and interact with the server.

Let’s start by first defining what it is.

2. CockroachDB

CockroachDB is a distributed SQL database built on top of a transactional and consistent key-value store.

Written in Go and completely open source, its primary design goals are the support for ACID transactions, horizontal scalability, and survivability. With these design goals, it aims to tolerate everything from a single disk failure to an entire datacenter crash with minimal latency disruption and without manual intervention.

As result, CockroachDB can be considered a well-suited solution for applications that require reliable, available, and correct data regardless of scale. However, it’s not the first choice when very low latency reads and writes are critical.

2.1. Key Features

Let’s continue exploring some of the key aspects of CockroachDB:

  • SQL API and PostgreSQL compatibility – for structuring, manipulating and querying data
  • ACID transactions – supporting distributed transactions and provides strong consistency
  • Cloud-ready – designed to run in the cloud or on an on-premises solution providing easy migration between different cloud providers without any service interruption
  • Scales horizontally – adding capacity is as easy as pointing a new node at the running cluster with minimal operator overhead
  • Replication – replicates data for availability and guarantees consistency between replicas
  • Automated repair – continue seamlessly as long as a majority of replicas remain available for short-term failures while, for longer-term failures, automatically rebalances replicas from the missing nodes, using the unaffected replicas as sources

3. Configuring CockroachDB

After we’ve installed CockroachDB, we can start the first node of our local cluster:

cockroach start --insecure --host=localhost;

For demo purposes, we’re using the insecure attribute, making the communication unencrypted, without the need to specify the certificates location.

At this point, our local cluster is up and running. With only one single node, we can already connect to it and operate but to better take advantages of CockroachDB’s automatic replication, rebalancing, and fault tolerance, we’ll add two more nodes:

cockroach start --insecure --store=node2 \
  --host=localhost --port=26258 --http-port=8081 \
  --join=localhost:26257;

cockroach start --insecure --store=node3 \
  --host=localhost --port=26259 --http-port=8082 \
  --join=localhost:26257;

For the two additional nodes, we used the join flag to connect the new nodes to the cluster, specifying the address and port of the first node, in our case localhost:26257. Each node on the local cluster requires unique store, port, and http-port values.

When configuring a distributed cluster of CockroachDB, each node will be on a different machine, and so specifying the port, store and the http-port can be avoided since the defaults values suffice. In addition, the actual IP of the first node should be used when joining the additional nodes to the cluster.

3.1. Configuring Database and User

Once we have our cluster up and running, via the SQL console provided with CockroachDB, we need to create our database and a user.

First of all, let’s start the SQL console:

cockroach sql --insecure;

Now, let’s create our testdb database, create a user and add grants to the user in order to be able to perform CRUD operations:

CREATE DATABASE testdb;
CREATE USER user17 with password 'qwerty';
GRANT ALL ON DATABASE testdb TO user17;

If we want to verify that the database was created correctly, we can list all the databases created in the current node:

SHOW DATABASES;

Finally, if we want to verify the automatic replication feature of CockroachDB, we can check on one of the two others nodes if the database was created correctly. To do so, we have to express the port flag when we are using the SQL console:

cockroach sql --insecure --port=26258;

4. Monitoring CockroachDB

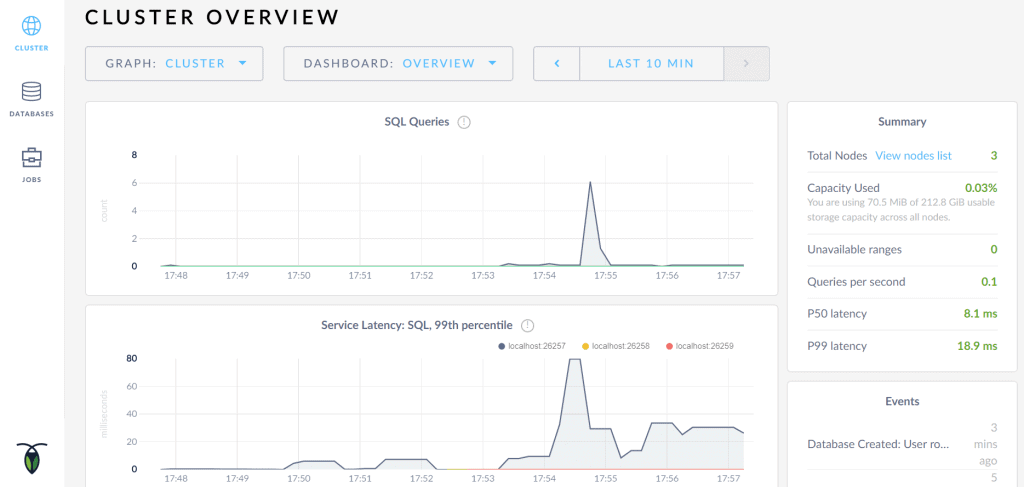
Now that we have started our local cluster and created the database, we can monitor them using the CockroachDB Admin UI:

CockroachDB Monitoring

This Admin UI, that comes in a bundle with CockroachDB, can be accessed at http://localhost:8080 as soon as the cluster is up and running. In particular, it provides details about cluster and database configuration, and helps us optimize cluster performance by monitoring metrics like:

  • Cluster Health – essential metrics about the cluster’s health
  • Runtime Metrics – metrics about node count, CPU time, and memory usage
  • SQL Performance – metrics about SQL connections, queries and transactions
  • Replication Details – metrics about how data is replicated across the cluster
  • Node Details – details of live, dead, and decommissioned nodes
  • Database Details – details about the system and user databases in the cluster

5. Project Setup

Given our running local cluster of CockroachDB, in order to be able to connect to it, we have to add an additional dependency to our pom.xml:

<dependency>
    <groupId>org.postgresql</groupId>
    <artifactId>postgresql</artifactId>
    <version>42.1.4</version>
</dependency>

Or, for a Gradle project:

compile 'org.postgresql:postgresql:42.1.4'

6. Using CockroachDB

Now that it’s clear what we’re working with and that everything is set up properly, let’s start using it.

Thanks to the PostgreSQL compatibility, it’s either possible to connect directly with JDBC or using an ORM, such as Hibernate (At the time of writing (Jan 2018) both drivers have been tested enough to claim the beta-level support according to the developers). In our case, we’ll use JDBC to interact with the database.

For simplicity, we’ll follow with the basic CRUD operations as they are the best to start with.

Let’s start by connecting to the database.

6.1. Connecting to CockroachDB

To open a connection with the database, we can use the getConnection() method of DriverManager class. This method requires a connection URL String parameter, a username, and a password:

Connection con = DriverManager.getConnection(
  "jdbc:postgresql://localhost:26257/testdb", "user17", "qwerty"
);

6.2. Creating a Table

With a working connection, we can start creating the articles table that we are going to use for all the CRUD operations:

String TABLE_NAME = "articles";
StringBuilder sb = new StringBuilder("CREATE TABLE IF NOT EXISTS ")
  .append(TABLE_NAME)
  .append("(id uuid PRIMARY KEY, ")
  .append("title string,")
  .append("author string)");

String query = sb.toString();
Statement stmt = connection.createStatement();
stmt.execute(query);

If we want to verify that the table was properly created, we can use the SHOW TABLES command:

PreparedStatement preparedStatement = con.prepareStatement("SHOW TABLES");
ResultSet resultSet = preparedStatement.executeQuery();
List tables = new ArrayList<>();
while (resultSet.next()) {
    tables.add(resultSet.getString("Table"));
}

assertTrue(tables.stream().anyMatch(t -> t.equals(TABLE_NAME)));

Let’s see how it’s possible to modify the just created table.

6.3. Altering a Table

If we missed some columns during the table creation or because we needed them later on, we can easily add them:

StringBuilder sb = new StringBuilder("ALTER TABLE ").append(TABLE_NAME)
  .append(" ADD ")
  .append(columnName)
  .append(" ")
  .append(columnType);

String query = sb.toString();
Statement stmt = connection.createStatement();
stmt.execute(query);

Once we altered the table, we can verify if the new column was added using the SHOW COLUMNS FROM command:

String query = "SHOW COLUMNS FROM " + TABLE_NAME;
PreparedStatement preparedStatement = con.prepareStatement(query);
ResultSet resultSet = preparedStatement.executeQuery();
List<String> columns = new ArrayList<>();
while (resultSet.next()) {
    columns.add(resultSet.getString("Field"));
}

assertTrue(columns.stream().anyMatch(c -> c.equals(columnName)));

6.4. Deleting a Table

When working with tables, sometimes we need to delete them and this can be easily achieved with few lines of code:

StringBuilder sb = new StringBuilder("DROP TABLE IF EXISTS ")
  .append(TABLE_NAME);

String query = sb.toString();
Statement stmt = connection.createStatement();
stmt.execute(query);

6.5. Inserting Data

Once we have clear the operations that can be performed on a table, we can now start working with data. We can start defining the Article class:

public class Article {

    private UUID id;
    private String title;
    private String author;

    // standard constructor/getters/setters
}

Now we can see how to add an Article to our articles table:

StringBuilder sb = new StringBuilder("INSERT INTO ").append(TABLE_NAME)
  .append("(id, title, author) ")
  .append("VALUES (?,?,?)");

String query = sb.toString();
PreparedStatement preparedStatement = connection.prepareStatement(query);
preparedStatement.setString(1, article.getId().toString());
preparedStatement.setString(2, article.getTitle());
preparedStatement.setString(3, article.getAuthor());
preparedStatement.execute();

6.6. Reading Data

Once the data are stored in a table, we want to read those data and this can be easily achieved:

StringBuilder sb = new StringBuilder("SELECT * FROM ")
  .append(TABLE_NAME);

String query = sb.toString();
PreparedStatement preparedStatement = connection.prepareStatement(query);
ResultSet rs = preparedStatement.executeQuery();

However, if we don’t want to read all the data inside the articles table but just one Article, we can simply change how we build our PreparedStatement:

StringBuilder sb = new StringBuilder("SELECT * FROM ").append(TABLE_NAME)
  .append(" WHERE title = ?");

String query = sb.toString();
PreparedStatement preparedStatement = connection.prepareStatement(query);
preparedStatement.setString(1, title);
ResultSet rs = preparedStatement.executeQuery();

6.7. Deleting Data

Last but not least, if we want to remove data from our table, we can delete a limited set of records using the standard DELETE FROM command:

StringBuilder sb = new StringBuilder("DELETE FROM ").append(TABLE_NAME)
  .append(" WHERE title = ?");

String query = sb.toString();
PreparedStatement preparedStatement = connection.prepareStatement(query);
preparedStatement.setString(1, title);
preparedStatement.execute();

Or we can delete all the record, within the table, with the TRUNCATE function:

StringBuilder sb = new StringBuilder("TRUNCATE TABLE ")
  .append(TABLE_NAME);

String query = sb.toString();
Statement stmt = connection.createStatement();
stmt.execute(query);

6.8. Handling Transactions

Once connected to the database, by default, each individual SQL statement is treated as a transaction and is automatically committed right after its execution is completed.

However, if we want to allow two or more SQL statements to be grouped into a single transaction, we have to control the transaction programmatically.

First, we need to disable the auto-commit mode by setting the autoCommit property of Connection to false, then use the commit() and rollback() methods to control the transaction.

Let’s see how we can achieve data consistency when doing multiple inserts:

try {
    con.setAutoCommit(false);

    UUID articleId = UUID.randomUUID();

    Article article = new Article(
      articleId, "Guide to CockroachDB in Java", "baeldung"
    );
    articleRepository.insertArticle(article);

    article = new Article(
      articleId, "A Guide to MongoDB with Java", "baeldung"
    );
    articleRepository.insertArticle(article); // Exception

    con.commit();
} catch (Exception e) {
    con.rollback();
} finally {
    con.setAutoCommit(true);
}

In this case, an exception was thrown, on the second insert, for the violation of the primary key constraint and therefore no articles were inserted in the articles table.

7. Conclusion

In this article, we explained what CockroachDB is, how to set up a simple local cluster, and how we can interact with it from Java.

The complete source code for this article can be found, as always, over on Github.


« 上一篇: Jenkins教程
» 下一篇: Java每周,问题211