1. 简介
Graylog 是一个强大的日志聚合服务,能够从多个来源收集海量的日志信息,并通过统一的界面进行展示。
它还支持实时告警、图表展示、仪表盘等高级功能。
本文将带你快速搭建 Graylog 服务,并配置 Spring Boot 应用将日志发送到 Graylog 中。
2. 搭建 Graylog 环境
安装 Graylog 有多种方式,我们这里介绍两种最便捷的方式:Docker 和 Amazon Web Services(AWS)。
2.1. 使用 Docker 快速启动
以下命令会下载所有必要的 Docker 镜像并启动相关服务容器:
$ docker run --name mongo -d mongo:3
$ docker run --name elasticsearch -p 9200:9200 -p 9300:9300 \
    -e ES_JAVA_OPTS="-Xms2g -Xmx4g" \
    -e "discovery.type=single-node" -e "xpack.security.enabled=false" \
    -e "bootstrap.memory_lock=true" --ulimit memlock=-1:-1 \
    -d docker.elastic.co/elasticsearch/elasticsearch:5.6.11
$ docker run --name graylog --link mongo --link elasticsearch \
    -p 9000:9000 -p 12201:12201 -p 514:514 -p 5555:5555 \
    -e GRAYLOG_WEB_ENDPOINT_URI="http://127.0.0.1:9000/api" \
    -d graylog/graylog:2.4.6-1
启动后,访问 http://localhost:9000/ 即可进入 Graylog 的 Web 界面,默认账号密码均为 admin。
⚠️ 注意:Docker 启动虽然简单,但对内存要求较高。在 macOS 上的 Docker 可能无法正常运行,请酌情选择。
2.2. 使用 AWS 快速部署
如果你希望快速测试 Graylog,也可以使用 AWS 提供的官方 AMI(Amazon Machine Image)来部署。
✅ Graylog 提供了内置所有依赖项的 AMI,部署后只需少量配置即可使用。
建议使用至少 4GB 内存的 EC2 实例。
部署完成后,需要通过 SSH 登录主机执行如下命令:
$ sudo graylog-ctl enforce-ssl
$ sudo graylog-ctl set-external-ip https://<EC2 PUBLIC IP>:443/api/
$ sudo graylog-ctl reconfigure
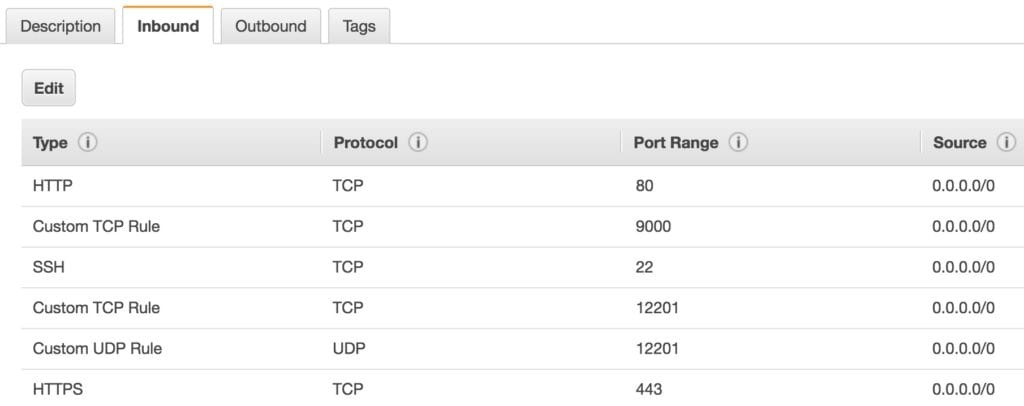
还需要更新安全组,开放如下端口:
配置完成后,访问 https://<EC2 PUBLIC IP>/ 即可进入 Graylog 界面,默认账号密码均为 admin。
2.3. 其他安装方式
除了 Docker 和 AWS,Graylog 还提供了多种操作系统的安装包。但这种方式需要手动安装 Elasticsearch 和 MongoDB。
❌ 不推荐新手使用这种方式,除非你对系统部署非常熟悉。
3. 发送日志到 Graylog
Graylog 启动后,我们就可以配置 Spring Boot 应用将日志发送到 Graylog 服务器了。
Graylog 支持通过 GELF 协议接收日志,Java 中任意日志框架都可以支持。
3.1. 使用 Log4J 接入
✅ 目前 Graylog 官方唯一支持的日志框架是 Log4J。
首先添加 GELF Appender 依赖:
<dependency>
    <groupId>org.graylog2</groupId>
    <artifactId>gelfj</artifactId>
    <version>1.1.16</version>
</dependency>
然后排除 Spring Boot 默认的日志依赖:
<dependency>
    <groupId>org.springframework.boot</groupId>
    <artifactId>spring-boot-starter-web</artifactId>
    <exclusions>
        <exclusion>
            <groupId>org.springframework.boot</groupId>
            <artifactId>spring-boot-starter-logging</artifactId>
        </exclusion>
    </exclusions>
</dependency>
最后在 log4j.xml 中配置 GELF Appender:
<appender name="graylog" class="org.graylog2.log.GelfAppender">
    <param name="graylogHost" value="<GRAYLOG IP>"/>
    <param name="originHost" value="localhost"/>
    <param name="graylogPort" value="12201"/>
    <param name="extractStacktrace" value="true"/>
    <param name="addExtendedInformation" value="true"/>
    <param name="facility" value="log4j"/>
    <param name="Threshold" value="INFO"/>
    <param name="additionalFields" value="{'environment': 'DEV', 'application': 'GraylogDemoApplication'}"/>
</appender>
✅ 上述配置会将所有 INFO 级别及以上的日志发送到 Graylog。
3.2. 其他日志框架支持
除了 Log4J,Graylog 的 插件市场 中也提供了一些第三方库,支持 Logback、Log4J2 等框架。
⚠️ 但请注意,这些库并非官方维护,部分项目可能已经停止更新或缺乏文档,使用时需谨慎。
3.3. 使用 Graylog Collector Sidecar
Graylog 还提供了 Collector Sidecar 机制,这是一种独立运行的进程,可以从日志文件中读取内容并发送到 Graylog。
✅ 适用于无法修改日志配置文件的场景,也可用于集成其他语言和平台的日志。
4. 在 Graylog 中查看日志
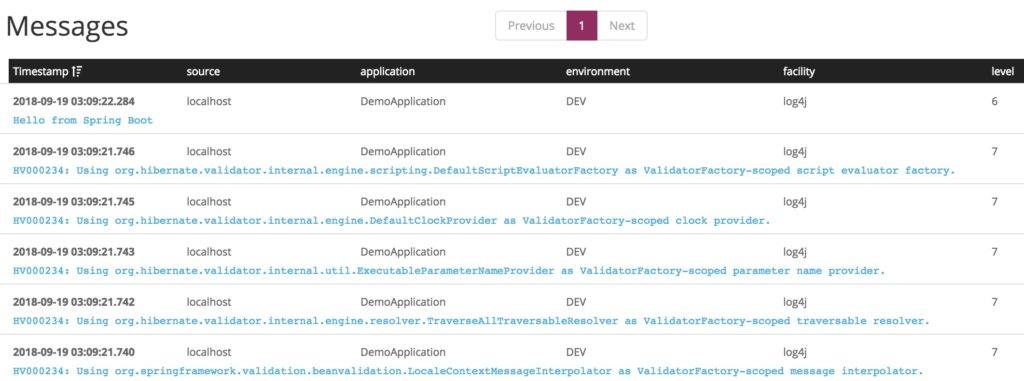
登录 Graylog 界面后,可以通过 source:localhost 过滤器查看我们发送的日志:
✅ 如果能看到日志内容,说明接入成功。
5. 总结
Graylog 是一个功能强大的日志聚合平台,支持海量日志实时搜索、可视化展示和告警机制。
在 Spring Boot 应用中接入 Graylog 非常简单,只需少量配置即可实现,无需编写额外代码。
📌 示例代码可以在 GitHub 获取。

