1. 概述
FindBugs 是一款用于对 Java 代码进行静态分析的开源工具。它能帮助开发者在编码阶段发现潜在缺陷,避免将问题带入生产环境。
⚠️ 重要提示:FindBugs 项目已停止维护,其继任者 SpotBugs 目前持续更新,支持最新 Java 版本。建议新项目优先考虑 SpotBugs。
本文将演示如何在 Java 项目中配置 FindBugs,并集成到 IDE 和 Maven 构建流程中。
2. FindBugs Maven 插件
2.1 Maven 配置
要生成静态分析报告,首先在 pom.xml 中添加 FindBugs 插件:
<reporting>
    <plugins>
        <plugin>
            <groupId>org.codehaus.mojo</groupId>
            <artifactId>findbugs-maven-plugin</artifactId>
            <version>3.0.4</version>
        </plugin>
    </plugins>
</reporting>
最新插件版本可在 Maven Central 查询。
2.2 报告生成
配置完成后,执行 mvn site 命令生成报告。报告文件将保存在项目目录的 target/site 下,文件名为 findbugsXml.xml。
✅ 快速查看报告:运行 mvn findbugs:gui 启动图形界面浏览分析结果。
构建失败配置
通过添加 check 执行目标,可使构建在检测到缺陷时失败:
<plugin>
    <groupId>org.codehaus.mojo</groupId>
    <artifactId>findbugs-maven-plugin</artifactId>
    <version>3.0.4</version>
    <configuration>
        <effort>Max</effort>
    </configuration>
    <executions>
        <execution>
            <goals>
                <goal>check</goal>
            </goals>
        </execution>
    </executions>
</plugin>
effort设为Max时分析更彻底,但消耗更多资源- 执行
mvn verify检查构建是否通过
高级配置
通过以下参数增强分析控制:
<configuration>
    <onlyAnalyze>org.baeldung.web.controller.*</onlyAnalyze>
    <omitVisitors>FindNullDeref</omitVisitors>
    <visitors>FindReturnRef</visitors>
</configuration>
onlyAnalyze:指定待分析的包/类(逗号分隔)visitors/omitVisitors:启用/禁用特定检测器(注意:二者不能同时使用)- 检测器名称参考 官方文档
3. FindBugs Eclipse 插件
3.1 安装
通过 Eclipse 的软件更新功能安装插件。安装后验证路径:Window -> Preferences -> Java,确认存在 FindBugs 选项。
3.2 报告浏览
右键项目 -> Find Bugs 启动分析。结果在 Bug Explorer 窗口展示:

缺陷分级(v2+)
FindBugs 使用 1-20 分级评估缺陷严重性:
| 等级 | 分数范围 | 说明 |
|---|---|---|
| Scariest | 1-4 | 最严重缺陷 |
| Scary | 5-9 | 严重缺陷 |
| Troubling | 10-14 | 需关注缺陷 |
| Of concern | 15-20 | 次要缺陷 |
置信度(Confidence):原称优先级(Priority),反映缺陷被误判的可能性。实际项目中需根据需求调整分析规则。
3.3 Eclipse 配置
通过 Window -> Preferences -> Java -> FindBugs 自定义分析策略:

核心配置项
- 缺陷类别过滤:可禁用不关注的类别
- 最小报告等级:设置缺陷分数阈值
- 最小置信度:控制误报率
- 标记类型:定义缺陷显示方式(Warning/Info/Error)
缺陷分类
| 类别 | 典型场景 |
|---|---|
| Correctness | 无限循环、equals() 误用等 |
| Bad practice | 异常处理、流未关闭、字符串比较等 |
| Performance | 空闲对象 |
| Multithreaded correctness | 同步问题、多线程竞态条件 |
| Internationalization | 编码国际化问题 |
| Malicious code vulnerability | 可被攻击者利用的代码片段 |
| Security | 协议漏洞、SQL 注入等 |
| Dodgy | 代码异味(如无用比较、未使用变量) |
检测器配置
在 Detector configuration 选项卡管理检测规则:

- Speed 属性:反映检测器资源消耗(速度越快消耗越少)
- 完整缺陷列表见 官方文档
过滤器配置
通过 Filter files 创建自定义规则,排除特定代码(如测试类或遗留代码)。
4. FindBugs IntelliJ IDEA 插件
4.1 安装
两种安装方式:
- 从 JetBrains 官网 下载插件包,解压到
%INSTALLATION_DIRECTORY%/plugins - 通过
Settings -> Plugins搜索安装
验证安装:检查 Analyze -> FindBugs 菜单是否存在 Analyze project code 选项。
4.2 报告浏览
点击 Analyze project code 启动分析,结果在 FindBugs-IDEA 面板展示:

分组操作
左侧工具栏提供四种分组方式:
- 按缺陷类别
- 按类
- 按包
- 按缺陷等级
✅ 导出报告:点击第四列的 export 按钮生成 XML/HTML 格式报告。
4.3 配置
通过 FindBugs-IDEA 面板的 Plugin preferences 图标打开设置:

配置项与 Eclipse 版本基本一致,包括:
- 分析强度(Effort)
- 缺陷等级阈值
- 置信度设置
- 类过滤规则
5. Spring-Rest 项目分析实战
以 GitHub 上的 spring-rest 项目 为例,分析典型缺陷:
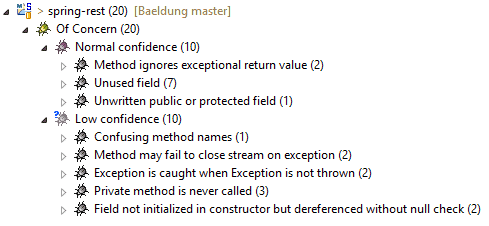
常见缺陷及修复方案
1. 忽略方法返回值
File fileServer = new File(fileName);
fileServer.createNewFile(); // ❌ 未使用返回值
问题:createNewFile() 返回布尔值指示文件是否创建成功,直接丢弃可能导致逻辑错误。
修复:
boolean created = fileServer.createNewFile();
if (created) {
    logger.debug("文件创建成功: {}", fileName);
}
2. 异常时流未关闭
try {
    // ... 流操作代码
    BufferedOutputStream stream = new BufferedOutputStream(new FileOutputStream(fileServer));
    stream.write(bytes);
    stream.close(); // ❌ 异常时可能不执行
} catch (Exception e) {
    return "上传失败: " + e.getMessage();
}
问题:异常发生时流未关闭,可能导致资源泄漏。
修复(使用 finally 块):
BufferedOutputStream stream = null;
try {
    stream = new BufferedOutputStream(new FileOutputStream(fileServer));
    stream.write(bytes);
} catch (Exception e) {
    return "上传失败: " + e.getMessage();
} finally {
    if (stream != null) {
        try {
            stream.close(); // ✅ 确保关闭
        } catch (IOException e) {
            logger.error("关闭流失败", e);
        }
    }
}
3. 过度捕获异常
catch (Exception e) { // ❌ 捕获范围过宽
    return "上传失败: " + e.getMessage();
}
问题:捕获 Exception 掩盖了具体异常类型,不利于问题定位。
修复:
catch (IOException e) { // ✅ 捕获具体异常
    return "IO异常: " + e.getMessage();
}
4. 字段未初始化
public class Example {
    private String config; // ❌ 未初始化

    public void process() {
        if (config.equals("default")) { // 潜在 NPE
            // ...
        }
    }
}
问题:字段未在构造器初始化,使用时可能触发 NullPointerException。
修复:
public Example() {
    this.config = "default"; // ✅ 初始化默认值
}
6. 总结
FindBugs 是一款简单而强大的静态分析工具,合理配置能有效提升代码质量。关键要点:
✅ 核心优势:
- 早期发现潜在缺陷
- 集成构建流程(Maven/Gradle)
- IDE 插件提供实时反馈
❌ 使用注意:
- 项目已废弃,建议迁移到 SpotBugs
- 需根据项目特点调整分析规则
- 避免过度依赖自动化分析
进阶建议:将 FindBugs 集成到持续集成系统(如 Sputnik),实现自动化代码质量监控。
本文示例代码可在 GitHub 获取。