1. 引言
在Java开发中,我们通常可以直接用JDK编译运行单个Java类。但一旦涉及第三方依赖,就不得不引入Maven或Gradle这类构建工具——对于小型项目来说,这显然有点杀鸡用牛刀。更别提打包可执行文件时,还得额外配置插件或使用其他工具。
好在有个叫Scala-CLI的实用工具能简化这个过程。虽然它主要为Scala设计,但处理Java项目也相当顺手。本文将带大家探索如何用它来编译、构建、打包Java应用,以及管理JDK版本。
2. Scala-CLI是什么?
Scala-CLI是个命令行工具,核心功能是简化Scala应用的编译、运行和打包。有趣的是,它对纯Java项目也提供了完整支持,能帮我们摆脱传统构建工具的繁琐配置。
3. 环境准备
安装Scala-CLI最简单的方式是参考官方文档。安装后验证命令:
scala-cli --version
成功时会显示版本号。建议在VS Code中安装Metals扩展获得IDE支持。Scala-CLI自带JDK管理能力,无需预装JDK。
⚠️ 注意:VS Code中可能与其他Java插件冲突,如果遇到报错可暂时禁用其他Java扩展。
本文所有示例将存放在scala-cli目录下。
4. Hello World程序
先从经典的Hello World开始。在scala-cli下创建hello-world目录,新建HelloWorld.java:
package com.baeldung;
public class HelloWorld {
    public static void main(String args[]) {
        System.out.println("Hello, World!");
    }
}
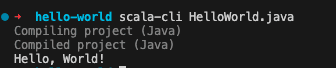
执行命令:
scala-cli HelloWorld.java
首次运行会自动下载依赖库。关键点:如果系统没装JDK,Scala-CLI会自动下载OpenJDK(默认JDK 17)。运行效果:
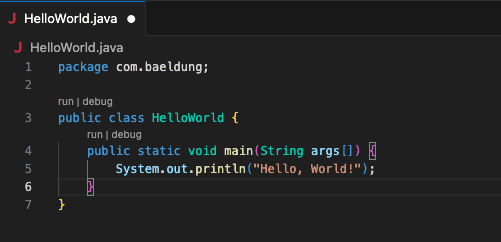
在VS Code中打开项目时,若遇到导航问题,在项目目录执行:
scala-cli setup-ide .
这会生成Metals插件所需的元数据。之后就能直接在IDE中运行:
5. 指令系统
Scala-CLI的指令(Directives)是特殊元数据配置,以//>开头。必须放在所有代码之前(包括package语句)。下面看几个实用指令:
5.1 指定Java版本
默认使用系统JDK或JDK 17,但我们可以通过jvm指令指定版本。创建Directives.java:
//> using jvm 21
package com.baeldung;
record Greet(String name){};
public class Jdk21Sample {
    public static void main(String args[]) {
        var greet = new Greet("Baeldung");
        var greeting = "Hello, " + greet.name();
        System.out.println(greeting);
    }
}
这里强制使用JDK 21。还能指定JDK发行版,比如用Zulu JDK:
//> using jvm zulu:21
无需手动配置就能切换JDK版本,底层通过Coursier管理依赖和JDK。
5.2 传递编译参数和系统属性
通过指令传递JVM参数和编译选项:
//> using jvm 21
//> using javaOpt -Xmx2g, -DappName=baeldungApp, --enable-preview
//> using javaProp language=english, country=usa
//> using javacOpt --release 21 --enable-preview
public class JavaArgs {
    public static void main(String[] args) {
        String appName = System.getProperty("appName");
        String language = System.getProperty("language");
        String country = System.getProperty("country");
        String combinedStr = STR."appName = \{ appName } , language = \{ language } and country = \{ country }";
        System.out.println(combinedStr);
    }
}
三种指令作用:
javaOpt:JVM参数(如-Xmx)和系统属性javacOpt:传递给javac编译器的选项javaProp:应用系统属性
5.3 管理外部依赖
用dep指令添加依赖,创建DependencyApp.java:
//> using dep com.google.code.gson:gson:2.8.9
import com.google.gson.JsonParser;
import com.google.gson.JsonElement;
public class DependencyApp {
    public static void main(String args[]) {
        String jsonString = "{\"country\": \"Germany\", \"language\": \"German\", \"currency\": \"Euro\"}";
        var countryJson = JsonParser.parseString(jsonString);
        var country = countryJson.getAsJsonObject().get("country").getAsString();
        System.out.println("Selected country: " + country);
    }
}
使用Gradle风格语法声明依赖。运行时会提示版本更新:
Compiled project (Java)
[hint] ./DependencyApp.java:1:15
[hint] "gson is outdated, update to 2.11.0"
[hint]      gson 2.8.9 -> com.google.code.gson:gson:2.11.0
[hint] //> using dep com.google.code.gson:gson:2.8.9
[hint]               ^^^^^^^^^^^^^^^^^^^^^^^^^^^^^^^
Selected country: Germany
Scala-CLI能自动检测依赖版本并提示更新,省去手动查Maven Central的麻烦。
6. 打包可执行程序
Scala-CLI最实用的功能之一:直接生成可执行文件,无需额外插件。用之前的DependencyApp.java演示:
scala-cli --power package DependencyApp.java -o myApp --assembly
参数说明:
--power:启用高级功能-o:指定输出文件名--assembly:生成可执行JAR(默认会包装成独立脚本)
运行生成的文件:
./myApp
如需纯JAR格式:
scala-cli --power package DependencyApp.java -o myApp.jar --assembly --preamble=false
执行方式:
java -jar myApp.jar
此外还支持:
7. 总结
Scala-CLI虽然主打Scala,但对Java项目的支持也相当完善。它通过以下方式简化开发:
✅ 无需构建工具即可管理依赖
✅ 灵活的JDK版本切换
✅ 内置打包能力(可执行文件/Docker/原生镜像)
✅ IDE友好(VS Code + Metals)
对于小型Java项目或快速原型开发,这比传统构建工具更轻量高效。完整示例代码可在GitHub获取。