1. 简介
Atomikos 是一个专为 Java 应用设计的分布式事务管理库。本文将带你深入理解为何以及如何使用 Atomikos,掌握其核心能力。
在过程中,我们会回顾事务的基础概念,并通过实际代码演示如何集成 Atomikos 实现跨数据库的分布式事务。目标是让你在微服务或复杂系统中,也能轻松驾驭数据一致性问题。
2. 事务基础概念
在深入 Atomikos 之前,先巩固一下事务的核心思想。简单来说,事务是一个逻辑上的工作单元,它的执行结果对外部要么全部生效,要么完全不生效(All-or-Nothing)。
举个例子:一个典型的零售系统在下单时,需要先扣减库存,再创建订单。这两个操作必须“同生共死”——不能出现库存扣了但订单没建,或者订单建了但库存没扣的情况。

解决这类问题的标准做法,就是把这两个操作包裹在一个事务中。
2.1 本地事务 vs 分布式事务
事务可能涉及多个独立操作,这些操作可以作用于同一个资源,也可以作用于不同资源。这里的“资源”通常指数据库、消息队列等。
- ✅ 本地事务(Local Transaction):所有操作都在同一个资源(如单个数据库)内完成。
- ✅ 分布式事务(Distributed Transaction):操作跨越多个资源,比如两个不同的数据库,甚至跨机器部署。

在我们的例子中,库存和订单表可能在同一数据库,也可能分属两个独立数据库。一旦跨库,就必须用分布式事务来保证一致性。
2.2 XA 规范与 JTA
- ✅ XA 规范:由 Open Group 提出的分布式事务处理标准,全称 eXtended Architecture。它的核心目标是保证跨异构系统的全局事务原子性。
- ✅ 两阶段提交(2PC):XA 的核心协议,通过“准备”和“提交”两个阶段协调所有参与者,确保事务最终一致性。
- ✅ Java 事务 API(JTA):Java EE 提供的标准接口,让 Java 应用能与 XA 兼容的资源(如数据库、消息队列)进行分布式事务交互。JTA 本身是接口规范,需要具体的事务管理器实现。
3. Atomikos 概述
3.1 什么是 Atomikos
JTA 只是接口,要真正运行还需要实现。传统上,应用服务器(如 WebLogic、WildFly)会内置事务管理器。但在 Spring Boot 等轻量级架构中,我们更希望应用自包含,不依赖重型中间件。
✅ Atomikos 就是一个轻量级、可嵌入的 JTA 事务管理器。它让 Java 应用无需依赖应用服务器,也能实现分布式事务,非常适合云原生和微服务场景。
3.2 Atomikos 架构
Atomikos 基于 XA 架构实现,核心是两阶段提交协议。它作为事务协调者(Transaction Manager),管理多个资源(如数据库、消息队列)的事务生命周期。
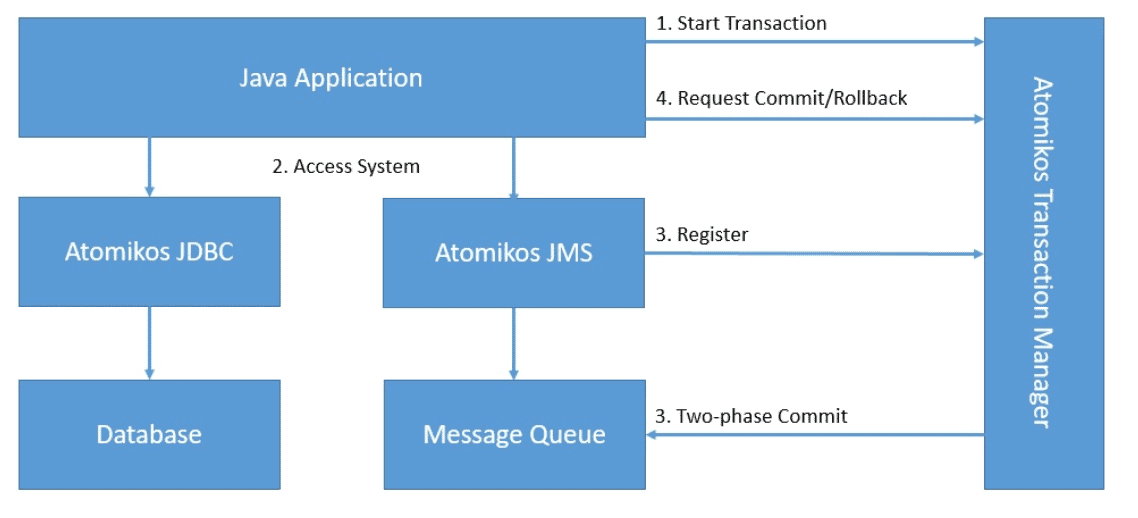
如上图所示,Atomikos 协调了数据库和消息队列之间的分布式事务。
3.3 产品版本
Atomikos 提供两个版本:
- ✅ TransactionsEssentials:开源版,支持数据库和消息队列的 JTA/XA 事务。适合测试和评估。
- ✅ ExtremeTransactions:商业版,功能更强大,支持 REST 服务等非传统资源,适用于极端事务处理(XTP)场景。
本文将以 TransactionsEssentials 为例进行演示。
4. 环境搭建
Atomikos 的最大优势之一是可嵌入,直接运行在应用的 JVM 中,无需独立部署。
4.1 依赖配置
在 pom.xml 中引入核心依赖:
<dependency>
    <groupId>com.atomikos</groupId>
    <artifactId>transactions-jdbc</artifactId>
    <version>6.0.0</version>
</dependency>
<dependency>
    <groupId>com.atomikos</groupId>
    <artifactId>transactions-jms</artifactId>
    <version>6.0.0</version>
</dependency>
💡 提示:Atomikos 还支持其他 XA 资源,均可在 Maven Central 找到对应依赖。
4.2 基本配置
Atomikos 支持通过 transactions.properties 文件进行配置(放在 classpath 下):
# 自定义事务日志路径
com.atomikos.icatch.file=/var/log/atomikos/transactions.log
# 事务超时时间(秒)
com.atomikos.icatch.default_jta_timeout=300
# 应用唯一标识
com.atomikos.icatch.tm_unique_name=myAppTM
其他可配置项包括:事务超时、TM 唯一名称、关闭行为等。
4.3 数据库准备
我们构建一个简单的零售系统,包含两个数据库:
库存库(inventory_db):
CREATE TABLE INVENTORY ( productId VARCHAR PRIMARY KEY, balance INT );订单库(order_db):
CREATE TABLE ORDERS (
    orderId VARCHAR PRIMARY KEY,
    productId VARCHAR,
    amount INT NOT NULL CHECK (amount <= 5)
);
⚠️ 注意:订单表的
CHECK (amount <= 5)约束将用于后续测试事务回滚。
5. 核心使用
5.1 初始化 UserTransaction
使用 JTA 的 UserTransaction 来控制事务边界:
UserTransactionImp utx = new UserTransactionImp();
5.2 配置数据源(DataSource)
Atomikos 提供两种数据源:
- ✅
AtomikosDataSourceBean:支持 XA 的数据源,适用于支持 XA 的数据库(如 MySQL、PostgreSQL)。 - ✅
AtomikosNonXADataSourceBean:非 XA 数据源,用于不支持 XA 的数据库。Atomikos 会尝试通过“最后资源提交”(Last Resource Commit)策略保证一致性。
// XA 数据源示例
AtomikosDataSourceBean inventoryDataSource = new AtomikosDataSourceBean();
inventoryDataSource.setXaDataSourceClassName("com.mysql.cj.jdbc.MysqlXADataSource");
inventoryDataSource.setUniqueResourceName("inventoryDB");
inventoryDataSource.setXaProperties(connectionProps); // 设置数据库连接参数
5.3 执行分布式操作
在事务中同时操作两个数据库:
public void placeOrder(String productId, int amount) throws Exception {
    String orderId = UUID.randomUUID().toString();
    boolean rollback = false;
    try {
        utx.begin();

        Connection invConn = inventoryDataSource.getConnection();
        Connection ordConn = orderDataSource.getConnection();

        Statement s1 = invConn.createStatement();
        String q1 = "UPDATE INVENTORY SET balance = balance - " + amount +
                   " WHERE productId = '" + productId + "'";
        s1.executeUpdate(q1);
        s1.close();

        Statement s2 = ordConn.createStatement();
        String q2 = "INSERT INTO ORDERS VALUES ('" + orderId + "', '" +
                   productId + "', " + amount + ")";
        s2.executeUpdate(q2); // 若 amount > 5,此处会因 CHECK 约束失败
        s2.close();

        invConn.close();
        ordConn.close();
    } catch (Exception e) {
        rollback = true;
        throw e;
    } finally {
        if (!rollback) {
            utx.commit();
        } else {
            utx.rollback();
        }
    }
}
✅ 关键点:两个
Connection都在同一个utx事务中,任何一步失败都会触发全局回滚。
5.4 验证事务行为
通过单元测试验证:
@Test
public void testPlaceOrderSuccess() throws Exception {
    int amount = 1;
    long initialBalance = getBalance(inventoryDataSource, productId);

    application.placeOrder(productId, amount);

    long finalBalance = getBalance(inventoryDataSource, productId);
    assertEquals(initialBalance - amount, finalBalance); // 库存应减少
}

@Test(expected = SQLException.class)
public void testPlaceOrderFailure() throws Exception {
    int amount = 10; // 超过约束
    long initialBalance = getBalance(inventoryDataSource, productId);

    application.placeOrder(productId, amount); // 应抛出异常

    long finalBalance = getBalance(inventoryDataSource, productId);
    assertEquals(initialBalance, finalBalance); // 库存应不变
}
5.5 高级用法
- ✅ 可直接操作
XAResource,手动注册资源到事务管理器(灵活性更高,但代码更复杂)。 - ✅ 使用
UserTransactionService接口进行资源恢复控制,适用于需要精细控制的场景。
6. 与主流框架集成
6.1 集成 Spring + DataSource
Spring 的声明式事务能极大简化代码。只需添加 @Transactional 注解:
@Service
public class OrderService {

    @Autowired
    private DataSource inventoryDataSource;

    @Autowired
    private DataSource orderDataSource;

    @Transactional(rollbackFor = Exception.class)
    public void placeOrder(String productId, int amount) throws SQLException {
        // 无需手动管理事务边界
        try (Connection invConn = inventoryDataSource.getConnection();
             Connection ordConn = orderDataSource.getConnection()) {

            // 执行 SQL 操作...
        }
    }
}
Spring 配置:
@Configuration
@EnableTransactionManagement
public class AtomikosConfig {

    @Bean(initMethod = "init", destroyMethod = "close")
    public AtomikosDataSourceBean inventoryDataSource() {
        AtomikosDataSourceBean ds = new AtomikosDataSourceBean();
        ds.setUniqueResourceName("inventoryDB");
        ds.setXaDataSourceClassName("com.mysql.cj.jdbc.MysqlXADataSource");
        // ... 其他配置
        return ds;
    }

    @Bean
    public JtaTransactionManager transactionManager() throws SystemException {
        UserTransactionManager utm = new UserTransactionManager();
        utm.setForceShutdown(true);
        return new JtaTransactionManager(utm, new UserTransactionImp());
    }
}
6.2 集成 Spring + JPA + Hibernate
进一步使用 JPA/Hibernate,代码更简洁:
@Service
@Transactional(rollbackFor = Exception.class)
public class OrderService {

    @Autowired
    private InventoryRepository inventoryRepo;

    @Autowired
    private OrderRepository orderRepo;

    public void placeOrder(String productId, int amount) {
        Inventory inv = inventoryRepo.findById(productId).orElseThrow();
        inv.setBalance(inv.getBalance() - amount);
        inventoryRepo.save(inv);

        Order order = new Order();
        order.setOrderId(UUID.randomUUID().toString());
        order.setProductId(productId);
        order.setAmount((long) amount);
        orderRepo.save(order); // amount > 5 时会因 @Max(5) 失败
    }
}
✅ 踩坑提醒:多数据源配置较繁琐,建议结合 Spring Boot 自动配置简化。
7. 超越 JTA:TCC 模式
JTA/XA 要求资源支持两阶段提交,但在微服务中,很多服务(如 HTTP 接口)并不支持 XA。
Atomikos 商业版提供 Try-Confirm/Cancel (TCC) 模式,一种基于补偿的分布式事务方案:
- ✅ Try:预留资源(如冻结库存)
- ✅ Confirm:确认执行(如扣除冻结库存)
- ✅ Cancel:取消操作(如释放冻结库存)
TCC 更适合业务场景,但需要服务提供方支持 TCC 接口,且仅限商业版使用。
8. 替代方案对比
8.1 Narayana
- ✅ 优点:历史悠久,Red Hat 支持,功能全面,支持 C/C++ 绑定。
- ❌ 缺点:配置复杂,学习曲线陡峭。
- 🔄 对比:功能比 Atomikos 更强大,但 Atomikos 更轻量、易上手。
8.2 Bitronix
- ✅ 优点:纯开源,嵌入式,日志和错误报告优秀,与 Spring 集成好。
- ❌ 缺点:无商业支持,不支持微服务级弹性伸缩。
- 🔄 对比:适合开源项目,但 Atomikos 商业版在企业级功能上更胜一筹。
9. 总结
Atomikos 是一个轻量、嵌入式的 JTA 事务管理器,非常适合 Spring Boot 等现代 Java 应用。它能让你在不依赖应用服务器的情况下,轻松实现跨数据库的分布式事务。
- ✅ 核心优势:简单易用、可嵌入、与 Spring 生态无缝集成。
- ✅ 适用场景:多数据源事务、消息队列事务、云原生应用。
- ✅ 进阶选择:商业版支持 TCC,适用于复杂微服务架构。