1. Overview

In this article, we’ll talk about a core feature of the Java language – the default annotations available in the JDK.

2. What an Annotation Is

Simply put, annotations are Java types that are preceded by an “@” symbol.

Java has had annotations ever since the 1.5 release. Since then, they’ve shaped the way we’ve designed our applications.

Spring and Hibernate are great examples of frameworks that rely heavily on annotations to enable various design techniques.

Basically, an annotation assigns extra metadata to the source code it’s bound to. By adding an annotation to a method, interface, class, or field, we can:

  1. Inform the compiler about warnings and errors
  2. Manipulate source code at compilation time
  3. Modify or examine behavior at runtime

3. Java Built-in Annotations

Now that we’ve reviewed the basics, let’s take a look at some annotations that ship with core Java. First, there are several that inform compilation:

  1. @Override
  2. @SuppressWarnings
  3. @Deprecated
  4. @SafeVarargs
  5. @FunctionalInterface
  6. @Native

These annotations generate or suppress compiler warnings and errors. Applying them consistently is often a good practice since adding them can prevent future programmer error.

The @Override annotation is used to indicate that a method overrides or replaces the behavior of an inherited method.

@SuppressWarnings indicates we want to ignore certain warnings from a part of the code. The @SafeVarargs annotation also acts on a type of warning related to using varargs.

The @Deprecated annotation can be used to mark an API as not intended for use anymore. Moreover, this annotation has been retrofitted in Java 9 to represent more information about the deprecation.

For all these, you can find more detailed information in the articles linked.

3.1. @FunctionalInterface

Java 8 allows us to write code in a more functional way.

Single Abstract Method interfaces are a big part of this. If we intend a SAM interface to be used by lambdas, we can optionally mark it as such with @FunctionalInterface:

@FunctionalInterface
public interface Adder {
    int add(int a, int b);
}

Like @Override with methods, @FunctionalInterface declares our intentions with Adder.

Now, whether we use @FunctionalInterface or not, we can still use Adder in the same way:

Adder adder = (a,b) -> a + b;
int result = adder.add(4,5);

But, if we add a second method to Adder, then the compiler will complain:

@FunctionalInterface
public interface Adder { 
    // compiler complains that the interface is not a SAM
    
    int add(int a, int b);
    int div(int a, int b);
}

Now, this would’ve compiled without the @FunctionalInterface annotation. So, what does it give us?

Like @Override, this annotation protects us against future programmer error. Even though it’s legal to have more than one method on an interface, it isn’t when that interface is being used as a lambda target. Without this annotation, the compiler would break in the dozens of places where Adder was used as a lambda. Now, it just breaks in Adder itself.

3.2. @Native

As of Java 8, there is a new annotation in the java.lang.annotation package called Native. The @Native annotation is only applicable to fields. It indicates the annotated field is a constant that may be referenced from the native code. For instance, here’s how it’s used in the Integer class:

public final class Integer {
    @Native public static final int MIN_VALUE = 0x80000000;
    // omitted
}

This annotation can also serve as a hint for the tools to generate some auxiliary header files.

4. Meta-Annotations

Next, meta-annotations are annotations that can be applied to other annotations.

For example, these meta-annotations are used for annotation configuration:

  1. @Target
  2. @Retention
  3. @Inherited
  4. @Documented
  5. @Repeatable

4.1. @Target

The scope of annotations can vary based on the requirements. While one annotation is only used with methods, another annotation can be consumed with constructor and field declarations.

To determine the target elements of a custom annotation, we need to label it with a @Target annotation.

@Target can work with 12 different element types. If we look at the source code of @SafeVarargs, then we can see that it must be only attached to constructors or methods:

@Documented
@Retention(RetentionPolicy.RUNTIME)
@Target({ElementType.CONSTRUCTOR, ElementType.METHOD})
public @interface SafeVarargs {
}

4.2. @Retention

Some annotations are meant to be used as hints for the compiler, while others are used at runtime.

We use the @Retention annotation to say where in our program’s lifecycle our annotation applies.

To do this, we need to configure @Retention with one of three retention policies:

  1. RetentionPolicy.SOURCE – visible by neither the compiler nor the runtime
  2. RetentionPolicy.CLASS – visible by the compiler
  3. RetentionPolicy.RUNTIME – visible by the compiler and the runtime

If no @Retention annotation is present on the annotation declaration, then the retention policy defaults to RetentionPolicy.CLASS.

If we have an annotation that should be accessible at runtime:

@Retention(RetentionPolicy.RUNTIME)
@Target(TYPE)
public @interface RetentionAnnotation {
}

Then, if we add some annotations to a class:

@RetentionAnnotation
@Generated("Available only on source code")
public class AnnotatedClass {
}

Now we can reflect on AnnotatedClass to see how many annotations are retained:

@Test
public void whenAnnotationRetentionPolicyRuntime_shouldAccess() {
    AnnotatedClass anAnnotatedClass = new AnnotatedClass();
    Annotation[] annotations = anAnnotatedClass.getClass().getAnnotations();
    assertThat(annotations.length, is(1));
}

The value is 1 because @RetentionAnnotation has a retention policy of RUNTIME while @Generated doesn’t.

4.3. @Inherited

In some situations, we may need a subclass to have the annotations bound to a parent class.

We can use the @Inherited annotation to make our annotation propagate from an annotated class to its subclasses.

If we apply @Inherited to our custom annotation and then apply it to BaseClass:

@Inherited
@Target(ElementType.TYPE)
@Retention(RetentionPolicy.RUNTIME)
public @interface InheritedAnnotation {
}

@InheritedAnnotation
public class BaseClass {
}

public class DerivedClass extends BaseClass {
}

Then, after extending the BaseClass, we should see that DerivedClass appears to have the same annotation at runtime:

@Test
public void whenAnnotationInherited_thenShouldExist() {
    DerivedClass derivedClass = new DerivedClass();
    InheritedAnnotation annotation = derivedClass.getClass()
      .getAnnotation(InheritedAnnotation.class);
 
    assertThat(annotation, instanceOf(InheritedAnnotation.class));
}

Without the @Inherited annotation, the above test would fail.

4.4. @Documented

By default, Java doesn’t document the usage of annotations in Javadocs.

But, we can use the @Documented annotation to change Java’s default behavior.

If we create a custom annotation that uses @Documented:

@Documented
@Target(ElementType.FIELD)
@Retention(RetentionPolicy.RUNTIME)
public @interface ExcelCell {
    int value();
}

And, apply it to the appropriate Java element:

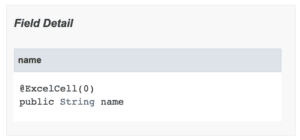
public class Employee {
    @ExcelCell(0)
    public String name;
}

Then, the Employee Javadoc will reveal the annotation usage:

Field Detail

4.5. @Repeatable

Sometimes it can be useful to specify the same annotation more than once on a given Java element.

Before Java 7, we had to group annotations together into a single container annotation:

@Schedules({
    @Schedule(time = "15:05"),
    @Schedule(time = "23:00")
})
void scheduledAlarm() {
}

However, Java 7 brought a cleaner approach. With the @Repeatable annotation, we can make an annotation repeatable:

@Repeatable(Schedules.class)
public @interface Schedule {
    String time() default "09:00";
}

To use @Repeatable, we need to have a container annotation, too*.* In this case, we’ll reuse @Schedules:

public @interface Schedules {
    Schedule[] value();
}

Of course, this looks a lot like what we had before Java 7. But, the value now is that the wrapper @Schedules isn’t specified anymore when we need to repeat @Schedule:

@Schedule
@Schedule(time = "15:05")
@Schedule(time = "23:00")
void scheduledAlarm() {
}

Because Java requires the wrapper annotation, it was easy for us to migrate from pre-Java 7 annotation lists to repeatable annotations.

5. Conclusion

In this article, we’ve talked about Java built-in annotations that every Java developer should be familiar with.

As always, all the examples of the article can be found over on GitHub.