1. 引言
试想一下,如果我们要手动完成工资单处理、利息计算、账单生成等任务,那将是一件非常枯燥、容易出错且永无止境的事情!
在本教程中,我们将介绍 **Java 批处理规范(JSR 352)**,这是 Jakarta EE 平台的一部分,用于自动化这些重复性任务。它为开发者提供了一套健壮的批处理模型,使我们可以专注于业务逻辑的实现。
2. Maven 依赖配置
由于 JSR 352 只是一个规范,我们需要引入其 API 和 实现库,比如 *jberet*:
<dependency>
    <groupId>javax.batch</groupId>
    <artifactId>javax.batch-api</artifactId>
    <version>1.0.1</version>
</dependency>
<dependency>
    <groupId>org.jberet</groupId>
    <artifactId>jberet-core</artifactId>
    <version>1.0.2.Final</version>
</dependency>
<dependency>
    <groupId>org.jberet</groupId>
    <artifactId>jberet-support</artifactId>
    <version>1.0.2.Final</version>
</dependency>
<dependency>
    <groupId>org.jberet</groupId>
    <artifactId>jberet-se</artifactId>
    <version>1.0.2.Final</version>
</dependency>
我们还会添加一个内存数据库,用于演示一些更真实的场景。
3. 核心概念
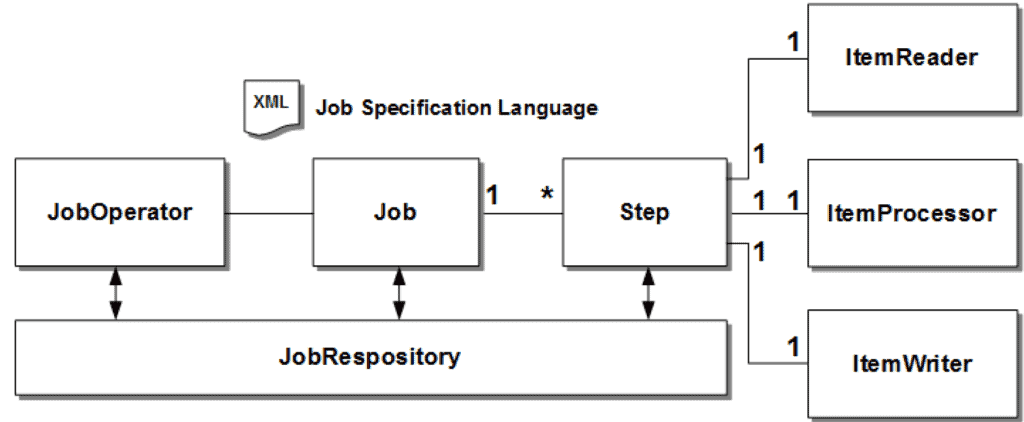
JSR 352 引入了几个核心组件,如下图所示:
我们来逐个定义这些组件:
- JobOperator:负责管理作业的生命周期,如启动、停止、重启等。
- Job:一个逻辑上的批处理任务,包含多个步骤(Step)。
- Step:作业中的最小执行单元,每个 Step 是独立且顺序执行的,通常由读取、处理和写入三部分组成。
- JobRepository:存储作业运行时的信息,用于跟踪作业状态和结果。
接下来我们将深入探讨 Step 的两种形式:Chunk 和 Batchlet。
4. 创建 Chunk 步骤
Chunk 是一种常见的 Step 类型,适用于对一组数据进行迭代处理,类似于 Java Stream 的中间操作。
Chunk 的核心是定义如何读取数据、如何处理数据、以及如何输出结果。
4.1. 数据读取(ItemReader)
要实现一个数据读取器,需要继承 AbstractItemReader 并实现 readItem() 方法。
以下是一个简单的例子,读取从 1 到 10 的整数:
@Named
public class SimpleChunkItemReader extends AbstractItemReader {
    private Integer[] tokens;
    private Integer count;

    @Inject
    JobContext jobContext;

    @Override
    public Integer readItem() throws Exception {
        if (count >= tokens.length) {
            return null;
        }

        jobContext.setTransientUserData(count);
        return tokens[count++];
    }

    @Override
    public void open(Serializable checkpoint) throws Exception {
        tokens = new Integer[] { 1,2,3,4,5,6,7,8,9,10 };
        count = 0;
    }
}
✅ 注意:readItem() 可以从数据库、文件系统等外部资源读取数据。
⚠️ 同时,我们使用 JobContext#setTransientUserData() 保存了一些临时状态,后面会用到。
4.2. 数据处理(ItemProcessor)
处理阶段的作用是对读取到的数据进行加工。如果返回 null,则该条数据将被丢弃。
比如我们只想保留偶数:
@Named
public class SimpleChunkItemProcessor implements ItemProcessor {
    @Override
    public Integer processItem(Object t) {
        Integer item = (Integer) t;
        return item % 2 == 0 ? item : null;
    }
}
✅ processItem() 方法会被调用多次,每次处理一个从 ItemReader 读取的数据项。
4.3. 数据写入(ItemWriter)
最后,处理后的数据会交给 ItemWriter 进行写入:
@Named
public class SimpleChunkWriter extends AbstractItemWriter {
    List<Integer> processed = new ArrayList<>();
    @Override
    public void writeItems(List<Object> items) throws Exception {
        items.stream().map(Integer.class::cast).forEach(processed::add);
    }
}
✅ writeItems() 中的 items 列表大小由 chunk size 决定。
4.4. 定义 Chunk 步骤
我们将这些组件整合到 XML 配置文件中(JSL - Job Specification Language):
<job id="simpleChunk">
    <step id="firstChunkStep" >
        <chunk item-count="3">
            <reader ref="simpleChunkItemReader"/>
            <processor ref="simpleChunkItemProcessor"/>
            <writer ref="simpleChunkWriter"/>
        </chunk>
    </step>
</job>
✅ chunk size 决定了每次提交到 JobRepository 的频率,有助于在失败时恢复。
⚠️ 配置文件需放在 META-INF/batch-jobs 目录下。
单元测试示例:
@Test
public void givenChunk_thenBatch_completesWithSuccess() throws Exception {
    JobOperator jobOperator = BatchRuntime.getJobOperator();
    Long executionId = jobOperator.start("simpleChunk", new Properties());
    JobExecution jobExecution = jobOperator.getJobExecution(executionId);
    jobExecution = BatchTestHelper.keepTestAlive(jobExecution);
    assertEquals(jobExecution.getBatchStatus(), BatchStatus.COMPLETED);
}
5. 创建 Batchlet 步骤
有些任务不适合使用 Chunk 模式,而是需要一次性执行完成,比如初始化操作或清理任务。这时可以使用 Batchlet。
Batchlet 的实现非常简单:
@Named
public class SimpleBatchLet extends AbstractBatchlet {

    @Override
    public String process() throws Exception {
        return BatchStatus.COMPLETED.toString();
    }
}
对应的 JSL 配置:
<job id="simpleBatchLet">
    <step id="firstStep" >
        <batchlet ref="simpleBatchLet"/>
    </step>
</job>
测试代码与 Chunk 类似:
@Test
public void givenBatchlet_thenBatch_completeWithSuccess() throws Exception {
    JobOperator jobOperator = BatchRuntime.getJobOperator();
    Long executionId = jobOperator.start("simpleBatchLet", new Properties());
    JobExecution jobExecution = jobOperator.getJobExecution(executionId);
    jobExecution = BatchTestHelper.keepTestAlive(jobExecution);
    assertEquals(jobExecution.getBatchStatus(), BatchStatus.COMPLETED);
}
6. 自定义 Checkpoint
系统在执行批处理时可能会发生故障,Checkpoint 机制可以帮助我们从失败点恢复。
默认情况下,每个 chunk 结束就是一个 checkpoint。
我们也可以自定义 Checkpoint 策略:
@Named
public class CustomCheckPoint extends AbstractCheckpointAlgorithm {

    @Inject
    JobContext jobContext;

    @Override
    public boolean isReadyToCheckpoint() throws Exception {
        int counterRead = (Integer) jobContext.getTransientUserData();
        return counterRead % 5 == 0;
    }
}
然后在 JSL 中引用:
<job id="customCheckPoint">
    <step id="firstChunkStep" >
        <chunk item-count="3" checkpoint-policy="custom">
            <reader ref="simpleChunkItemReader"/>
            <processor ref="simpleChunkItemProcessor"/>
            <writer ref="simpleChunkWriter"/>
            <checkpoint-algorithm ref="customCheckPoint"/>
        </chunk>
    </step>
</job>
测试验证:
@Test
public void givenChunk_whenCustomCheckPoint_thenCommitCountIsThree() throws Exception {
    // ... start job and wait for completion

    jobOperator.getStepExecutions(executionId)
      .stream()
      .map(BatchTestHelper::getCommitCount)
      .forEach(count -> assertEquals(3L, count.longValue()));
    assertEquals(jobExecution.getBatchStatus(), BatchStatus.COMPLETED);
}
✅ 最终会多一次 commit,确保所有数据都被处理。
7. 异常处理
默认情况下,如果发生异常,整个作业会被标记为 FAILED。
我们可以通过配置跳过或重试机制来增强容错能力:
<job id="simpleErrorSkipChunk" >
    <step id="errorStep" >
        <chunk checkpoint-policy="item" item-count="3" skip-limit="3" retry-limit="3">
            <reader ref="myItemReader"/>
            <processor ref="myItemProcessor"/>
            <writer ref="myItemWriter"/>
            <skippable-exception-classes>
                <include class="java.lang.RuntimeException"/>
                <include class="java.lang.UnsupportedOperationException"/>
            </skippable-exception-classes>
            <retryable-exception-classes>
                <include class="java.lang.IllegalArgumentException"/>
                <include class="java.lang.UnsupportedOperationException"/>
            </retryable-exception-classes>
        </chunk>
    </step>
</job>
测试代码:
@Test
public void givenChunkError_thenErrorSkipped_CompletesWithSuccess() throws Exception {
   // ... start job and wait for completion
   jobOperator.getStepExecutions(executionId).stream()
     .map(BatchTestHelper::getProcessSkipCount)
     .forEach(skipCount -> assertEquals(1L, skipCount.longValue()));
   assertEquals(jobExecution.getBatchStatus(), BatchStatus.COMPLETED);
}
✅ 异常处理机制可以显著提升批处理的健壮性。
8. 多步骤执行
一个 Job 可以包含多个 Step,我们来看几种常见方式。
8.1. 顺序执行多个 Step
通过 next 属性指定下一个 Step:
<job id="simpleJobSequence">
    <step id="firstChunkStepStep1" next="firstBatchStepStep2">
        <chunk item-count="3">
            <reader ref="simpleChunkItemReader"/>
            <processor ref="simpleChunkItemProcessor"/>
            <writer ref="simpleChunkWriter"/>
        </chunk>
    </step>
    <step id="firstBatchStepStep2" >
        <batchlet ref="simpleBatchLet"/>
    </step>
</job>
✅ 如果不指定 next,后续 Step 将不会执行。
8.2. Flow(流程)
Flow 是一组 Step 的封装,可以作为整体进行跳转:
<job id="flowJobSequence">
    <flow id="flow1" next="firstBatchStepStep3">
        <step id="firstChunkStepStep1" next="firstBatchStepStep2">
            <chunk item-count="3">
            <reader ref="simpleChunkItemReader" />
        <processor ref="simpleChunkItemProcessor" />
        <writer ref="simpleChunkWriter" />
        </chunk>
    </step>
    <step id="firstBatchStepStep2">
        <batchlet ref="simpleBatchLet" />
    </step>
    </flow>
    <step id="firstBatchStepStep3">
     <batchlet ref="simpleBatchLet" />
    </step>
</job>
8.3. Decision(决策)
Decision 提供了类似 if/else 的跳转逻辑:
<job id="decideJobSequence">
     <step id="firstBatchStepStep1" next="firstDecider">
     <batchlet ref="simpleBatchLet" />
     </step>
     <decision id="firstDecider" ref="deciderJobSequence">
        <next on="two" to="firstBatchStepStep2"/>
        <next on="three" to="firstBatchStepStep3"/>
     </decision>
     <step id="firstBatchStepStep2">
    <batchlet ref="simpleBatchLet" />
     </step>
     <step id="firstBatchStepStep3">
    <batchlet ref="simpleBatchLet" />
     </step>
</job>
✅ 每个 Decision 需要一个实现 Decider 接口的类。
8.4. Split(并行)
Split 允许多个 Flow 并发执行:
<job id="splitJobSequence">
   <split id="split1" next="splitJobSequenceStep3">
      <flow id="flow1">
      <step id="splitJobSequenceStep1">
              <batchlet ref="simpleBatchLet" />
           </step>
      </flow>
      <flow id="flow2">
          <step id="splitJobSequenceStep2">
              <batchlet ref="simpleBatchLet" />
      </step>
      </flow>
   </split>
   <step id="splitJobSequenceStep3">
      <batchlet ref="simpleBatchLet" />
   </step>
</job>
⚠️ Split 中的 Flow 是并发执行的,顺序无法保证。
测试代码:
@Test
public void givenSplit_thenBatch_CompletesWithSuccess() throws Exception {
    // ... start job and wait for completion
    List<StepExecution> stepExecutions = jobOperator.getStepExecutions(executionId);

    assertEquals(3, stepExecutions.size());
    assertEquals("splitJobSequenceStep3", stepExecutions.get(2).getStepName());
    assertEquals(jobExecution.getBatchStatus(), BatchStatus.COMPLETED);
}
9. 作业分区(Partitioning)
我们可以在 Java 代码中注入批处理属性,支持 job、step 和 batch-artifact 三个级别:
Job 级别注入:
@Inject
JobContext jobContext;
...
jobProperties = jobContext.getProperties();
Step 级别注入:
@Inject
StepContext stepContext;
...
stepProperties = stepContext.getProperties();
Batch-artifact 级别注入:
@Inject
@BatchProperty(name = "name")
private String nameString;
分区配置示例:
<job id="injectSimpleBatchLet">
    <properties>
        <property name="jobProp1" value="job-value1"/>
    </properties>
    <step id="firstStep">
        <properties>
            <property name="stepProp1" value="value1" />
        </properties>
    <batchlet ref="injectSimpleBatchLet">
        <properties>
        <property name="name" value="#{partitionPlan['name']}" />
        </properties>
    </batchlet>
    <partition>
        <plan partitions="2">
        <properties partition="0">
            <property name="name" value="firstPartition" />
        </properties>
        <properties partition="1">
            <property name="name" value="secondPartition" />
        </properties>
        </plan>
    </partition>
    </step>
</job>
✅ 分区机制允许我们将任务拆分为多个并行子任务。
10. 停止与重启
可以通过 JobOperator 来控制作业的生命周期:
JobOperator jobOperator = BatchRuntime.getJobOperator();
Long executionId = jobOperator.start("simpleBatchlet", new Properties());
jobOperator.stop(executionId);
executionId = jobOperator.restart(executionId, new Properties());
测试示例:
@Test
public void givenBatchLetStarted_whenStopped_thenBatchStopped() throws Exception {
    JobOperator jobOperator = BatchRuntime.getJobOperator();
    Long executionId = jobOperator.start("simpleBatchLet", new Properties());
    JobExecution jobExecution = jobOperator.getJobExecution(executionId);
    jobOperator.stop(executionId);
    jobExecution = BatchTestHelper.keepTestStopped(jobExecution);
    assertEquals(jobExecution.getBatchStatus(), BatchStatus.STOPPED);
}
✅ 已停止的作业可以被重启。
11. 获取作业信息
批处理运行时会创建 JobExecution 和 StepExecution 实例,用于跟踪执行状态。
@Test
public void givenChunk_whenJobStarts_thenStepsHaveMetrics() throws Exception {
    // ... start job and wait for completion
    assertTrue(jobOperator.getJobNames().contains("simpleChunk"));
    assertTrue(jobOperator.getParameters(executionId).isEmpty());
    StepExecution stepExecution = jobOperator.getStepExecutions(executionId).get(0);
    Map<Metric.MetricType, Long> metricTest = BatchTestHelper.getMetricsMap(stepExecution.getMetrics());
    assertEquals(10L, metricTest.get(Metric.MetricType.READ_COUNT).longValue());
    assertEquals(5L, metricTest.get(Metric.MetricType.FILTER_COUNT).longValue());
    assertEquals(4L, metricTest.get(Metric.MetricType.COMMIT_COUNT).longValue());
    assertEquals(5L, metricTest.get(Metric.MetricType.WRITE_COUNT).longValue());
    // ... and many more!
}
✅ 通过 StepExecution 可以获取丰富的执行指标。
12. 缺点与限制
尽管 JSR 352 功能强大,但也存在一些不足:
❌ 缺乏对 JSON 等格式的读写支持
❌ 不支持泛型
❌ 分区只支持单个 Step
❌ 没有内置调度功能(需依赖其他模块)
❌ 异步特性使测试变得困难
❌ API 较为冗长
13. 总结
本文深入介绍了 JSR 352 的核心概念与使用方式,包括 Chunk、Batchlet、Split、Flow、Decision 等机制。虽然我们只触及了冰山一角,但已足够应对大多数批处理场景。
示例代码可在 GitHub 获取。
