1. Overview
The Lightweight Java Game Library (LWJGL) is a powerful open-source library that allows Java developers to interact with native APIs for 3D graphics, sound, and input handling. People commonly use it to create games and render 3D graphics, but it can also apply to other multimedia applications.
In this tutorial, we’ll dive into what LWJGL is, how to set it up and showcase its basic functionalities.
2. What Is LWJGL?
LWJGL is a low-level API that enables Java applications to interact with native libraries such as OpenGL, OpenAL, and OpenCL, allowing access to high-performance multimedia, computing, and audio features.
While Java typically operates within the abstraction of the JVM, LWJGL breaks through that layer by providing bindings that directly access system-level resources, making it ideal for game development and multimedia applications.
3. Advantages of Using LWJGL
LWJGL offers many features that make it an attractive choice for game developers. Let’s take a look at some of the most important capabilities of the library:
3.1. Cross-Platform Support
One main advantage of using LWJGL is its ability to run on multiple platforms. It works on Windows, macOS, and Linux without modifying your code. It provides a consistent API across these platforms, allowing developers to write code once and run it everywhere.
3.2. OpenGL Support for 2D and 3D Graphics
The market offers a variety of GPUs from different manufacturers, each with its own implementation, making it difficult to use natively. OpenGL addresses this by specifying an API that GPU manufacturers include in their drivers. It acts as a software interface to the diverse range of GPUs available in the market.
LWJGL is a low-level API that acts like a wrapper around OpenGL. It provides direct access to the OpenGL API, which means developers can use all the latest features and functionalities of OpenGL in their Java-based games. It also reduces the complexity for Java developers who are not familiar with the API details.
3.3. OpenAL for Audio
Developers use OpenAL as a cross-platform 3D audio API for gaming and other audio applications. It provides a variety of features for working with sound, such as applying environmental effects like reverb, and managing playback of 2D and 3D sound assets.
LWJGL acts as a bridge that allows Java developers to use OpenAL for advanced 3D audio functionality in the applications. With LWJGL’s OpenAL bindings, game developers can integrate complex audio systems into their games.
3.4. Active Community
LWJGL is actively maintained, and there is a strong community of developers who contribute to its growth and offer support through forums and online resources. LWJGL users can rely on a strong network of resources and support to help them develop and refine their projects.
4. LWJGL in Action
Before using LWJGL, we need to ensure that the Java Development Kit (JDK) version 8 or higher is installed on our machine. We can either download the latest library release directly from its official website or integrate it into our project using Maven or Gradle build tools.
To use LWJGL, we need to include the core library dependencies and optional modules, if necessary. Next, we’ll take a look at an example of creating a triangle using LWJGL and also examine the libraries required to make it work.
4.1. Installation of Dependencies
The below command imports the Bill of Materials (BOM) of LWJGL. By importing the lwjgl-bom, we ensure that all LWJGL modules are consistent with the defined version.
<dependencyManagement>
<dependencies>
<dependency>
<groupId>org.lwjgl</groupId>
<artifactId>lwjgl-bom</artifactId>
<version>${lwjgl.version}</version>
<scope>import</scope>
<type>pom</type>
</dependency>
</dependencies>
</dependencyManagement>
Now, along with the core library, we’ll install dependencies of GLFW and OpenGL modules:
<dependencies>
<dependency>
<groupId>org.lwjgl</groupId>
<artifactId>lwjgl</artifactId>
</dependency>
<dependency>
<groupId>org.lwjgl</groupId>
<artifactId>lwjgl-glfw</artifactId>
</dependency>
<dependency>
<groupId>org.lwjgl</groupId>
<artifactId>lwjgl-opengl</artifactId>
</dependency>
<dependency>
<groupId>org.lwjgl</groupId>
<artifactId>lwjgl</artifactId>
<classifier>${lwjgl.natives}</classifier>
</dependency>
<dependency>
<groupId>org.lwjgl</groupId>
<artifactId>lwjgl-glfw</artifactId>
<classifier>${lwjgl.natives}</classifier>
</dependency>
<dependency>
<groupId>org.lwjgl</groupId>
<artifactId>lwjgl-opengl</artifactId>
<classifier>${lwjgl.natives}</classifier>
</dependency>
</dependencies>
Here, we’ve added the core LWJGL library, GLFW, and OpenGL module to the project. The next three dependencies are the same as the previous ones, but they include a classifier for the native libraries (e.g. .dylib files on macOS).
These native libraries are required for LWJGL to interact with the operating system, hardware, and graphics drivers. In this case, lwjgl.natives is set to natives-macos-arm64, which means maven will fetch the correct native libraries for macOS ARM64 architecture.
4.2. Initializing GLFW
OpenGL provides an abstraction layer for rendering graphics but doesn’t create the window of context where the rendering occurs. It also doesn’t manage external inputs such as mouse clicks or keyboard presses. GLFW creates this window and handles input processing, while OpenGL focuses on rendering within the window.
GLFW is an open-source, cross-platform library that provides tools for creating windows, handling user input (such as keyboard, mouse, and joystick events), and managing OpenGL contexts for graphical applications.
We’ll initialize the GLFW library by using the below code:
private void initializeGLFW() {
if (!glfwInit()) {
throw new IllegalStateException("Unable to initialize GLFW");
}
glfwDefaultWindowHints();
glfwWindowHint(GLFW_VISIBLE, GLFW_FALSE);
glfwWindowHint(GLFW_RESIZABLE, GLFW_TRUE);
}
Here glfwInit() initializes the GLFW library. The method glfwDefaultWindowHints() is responsible for resetting all windows to their default values. Similarly, the other methods are responsible for making sure the window is initially hidden and resizeable by the user.
4.3. Creating and Centering the Window
Let’s create a window with a width and height of 500 pixels, with the title “LWJGL Triangle”:
private void createWindow() {
window = glfwCreateWindow(500, 500, "LWJGL Triangle", 0, 0);
if (window == 0) {
throw new RuntimeException("Failed to create the GLFW window");
}
}
4.4. Setup and Initialize OpenGL Context
We need to initialize the OpenGL context using LWJGL’s OpenGL bindings, and also set the context of the window to the current one:
private void setupAndInitializeOpenGLContext() {
glfwMakeContextCurrent(window);
glfwSwapInterval(1);
glfwShowWindow(window);
GL.createCapabilities();
}
GlfwSwapInterval (1) syncs the frame rate with the monitor’s refresh rate to avoid screen tearing. glfwShowWindow() ensures the window is visible after it’s ready.
4.5. Rendering the Triangle
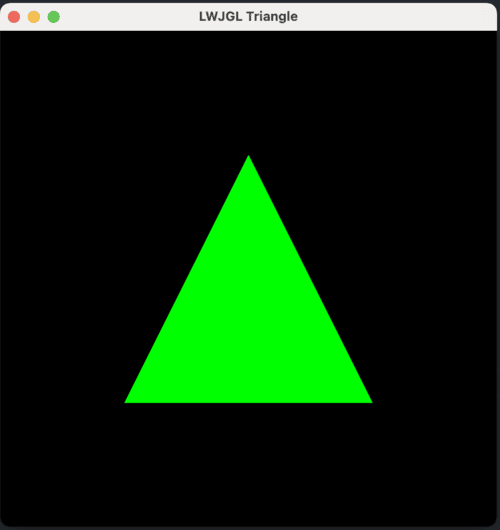
Now, we’ll render the triangle filled with green color. Once it’s rendered we’ll perform the memory cleanup.
Each vertex of the triangle is represented by three floating-point values in 3D space, with the last z-coordinate set to 0.0f for a 2D triangle. memAllocFloat() allocates a FloatBuffer of the required size to hold vertices in the memory. After allocating the buffer, the vertexBuffer.put(vertices).flip() method loads the vertices array into the buffer:
private void renderTriangle() {
float[] vertices = {
0.0f, 0.5f, 0.0f,
-0.5f, -0.5f, 0.0f,
0.5f, -0.5f, 0.0f
};
FloatBuffer vertexBuffer = memAllocFloat(vertices.length);
vertexBuffer.put(vertices).flip();
while (!glfwWindowShouldClose(window)) {
glfwPollEvents();
glClear(GL_COLOR_BUFFER_BIT);
glColor3f(0.0f, 1.0f, 0.0f);
glEnableClientState(GL_VERTEX_ARRAY);
glVertexPointer(3, GL_FLOAT, 0, vertexBuffer);
glDrawArrays(GL_TRIANGLES, 0, 3);
glDisableClientState(GL_VERTEX_ARRAY);
glfwSwapBuffers(window);
}
memFree(vertexBuffer);
glfwDestroyWindow(window);
glfwTerminate();
}
Now, till the window is open, glfwPollEvents() processes keyboard inputs and updates the window state. glClear(GL_COLOR_BUFFER_BIT) clears the screen with a black background color and makes it ready for the new rendering.
Once the screen is ready, we set the triangle color to green using glColor3f(). glVertexPointer() informs OpenGL about vertexBuffer and glDrawArrays() tells OpenGL to draw three vertices as a triangle.
After rendering the triangle, the memFree() function frees the memory used by vertexBuffer, while glfwDestroyWindow() and glfwTerminate() destroy the GLFW window and release any allocated resources.
4.6. Running the Program
We need to pass below VM args while running the program:
-Djava.library.path=~/.m2/repository/org/lwjgl/lwjgl/3.3.4/macos/arm64/org/lwjgl/liblwjgl.dylib
-XstartOnFirstThread
The java.library.path is used to set the liblwjgl.dylib library path. The second argument, –XstartOnFirstThread is specific to macOS as it has restrictions where native threads interacting with UI frameworks need to be started on the main thread.
This is what the output will look like:
5. Conclusion
In this tutorial, we learned about LWJGL and how it can be used to draw a triangle. It’s a fantastic choice for developers creating high-performance, cross-platform games and multimedia applications using Java. Its access to low-level APIs such as OpenGL, OpenAL, and OpenCL makes it extremely versatile for graphics, audio, and compute-heavy applications.
With active support and continued updates, LWJGL remains a robust tool in the Java game development ecosystem.
As always, all the source code is available over on GitHub.