1. Overview
With the advancement of technology in AI and machine learning, we require tools to recognize text within images.
In this tutorial, we’ll explore Tesseract, an optical character recognition (OCR) engine, with a few examples of image-to-text processing.
2. Tesseract
Tesseract is an open-source OCR engine developed by HP that recognizes more than 100 languages, along with the support of ideographic and right-to-left languages. Also, we can train Tesseract to recognize other languages.
It contains two OCR engines for image processing – a LSTM (Long Short Term Memory) OCR engine and a legacy OCR engine that works by recognizing character patterns.
The OCR engine uses the Leptonica library to open the images and supports various output formats like plain text, hOCR (HTML for OCR), PDF, and TSV.
3. Setup
Tesseract is available for download/install on all major operating systems.
For example, if we’re using macOS, we can install the OCR engine using Homebrew:
brew install tesseract
We’ll observe that the package contains a set of language data files, like English, and orientation and script detection (OSD), by default:
==> Installing tesseract
==> Downloading https://homebrew.bintray.com/bottles/tesseract-4.1.1.high_sierra.bottle.tar.gz
==> Pouring tesseract-4.1.1.high_sierra.bottle.tar.gz
==> Caveats
This formula contains only the "eng", "osd", and "snum" language data files.
If you need any other supported languages, run `brew install tesseract-lang`.
==> Summary
/usr/local/Cellar/tesseract/4.1.1: 65 files, 29.9MB
However, we can install the tesseract-lang module for support of other languages:
brew install tesseract-lang
For Linux, we can install Tesseract using the yum command:
yum install tesseract
Likewise, let’s add language support:
yum install tesseract-langpack-eng
yum install tesseract-langpack-spa
Here, we’ve added the language-trained data for English and Spanish.
For Windows, we can get the installers from Tesseract at UB Mannheim.
4. Tesseract Command-Line
4.1. Run
We can use the Tesseract command-line tool to extract text from images.
For instance, let’s take a snapshot of our website:
Then, we’ll run the tesseract command to read the baeldung.png snapshot and write the text in the output.txt file:
tesseract baeldung.png output
The output.txt file will look like:
a REST with Spring Learn Spring (new!)
The canonical reference for building a production
grade API with Spring.
From no experience to actually building stuff.
y
Java Weekly Reviews
We can observe that Tesseract hasn’t processed the entire content of the image. Because the accuracy of the output depends on various parameters like the image quality, language, page segmentation, trained data, and engine used for image processing.
4.2. Language Support
By default, the OCR engine uses English when processing the images. However, we can declare the language by using the -l argument:
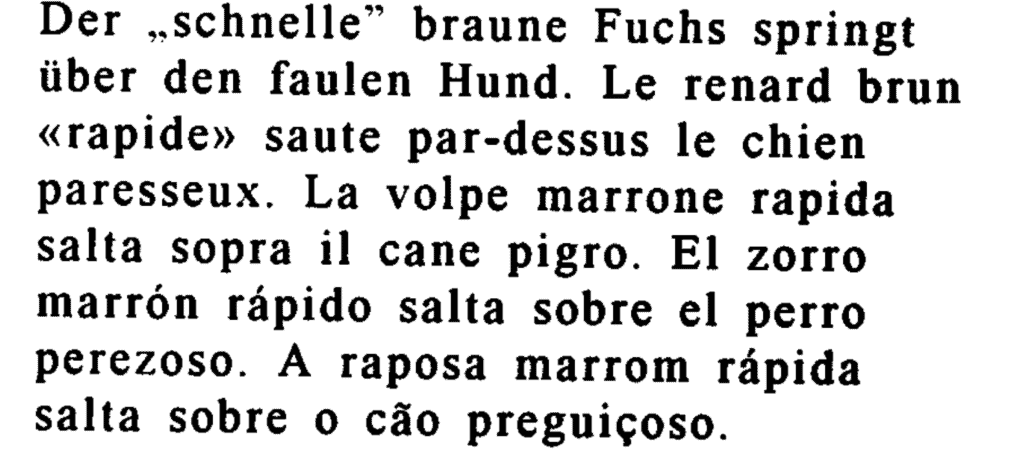
Let’s take a look at another example with multi-language text:
First, let’s process the image with the default English language:
tesseract multiLanguageText.png output
The output will look like:
Der ,.schnelle” braune Fuchs springt
iiber den faulen Hund. Le renard brun
«rapide» saute par-dessus le chien
paresseux. La volpe marrone rapida
salta sopra il cane pigro. El zorro
marron rapido salta sobre el perro
perezoso. A raposa marrom rapida
salta sobre 0 cao preguicoso.
Then, let’s process the image with the Portuguese language:
tesseract multiLanguageText.png output -l por
So, the OCR engine will also detect Portuguese letters:
Der ,.schnelle” braune Fuchs springt
iber den faulen Hund. Le renard brun
«rapide» saute par-dessus le chien
paresseux. La volpe marrone rapida
salta sopra il cane pigro. El zorro
marrón rápido salta sobre el perro
perezoso. A raposa marrom rápida
salta sobre o cão preguiçoso.
Similarly, we can declare a combination of languages:
tesseract multiLanguageText.png output -l spa+por
Here, the OCR engine will primarily use Spanish and then Portuguese for image processing. However, the output can differ based on the order of languages we specify.
4.3. Page Segmentation Mode
Tesseract supports various page segmentation modes like OSD, automatic page segmentation, and sparse text.
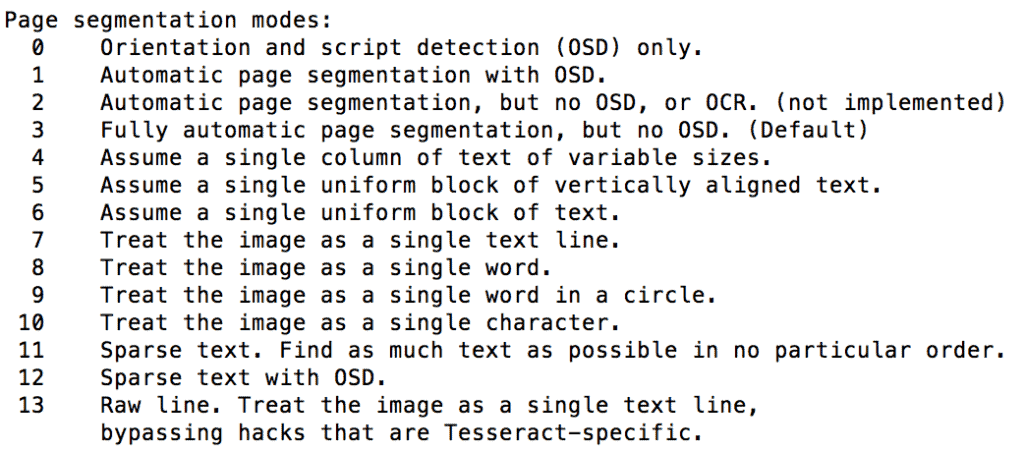
We can declare the page segmentation mode by using the –psm argument with a value of 0 to 13 for various modes:
tesseract multiLanguageText.png output --psm 1
Here, by defining a value of 1, we’ve declared the Automatic page segmentation with OSD for image processing.
Let’s take a look of all the page segmentation modes supported:
4.4. OCR Engine Mode
Similarly, we can use various engine modes like legacy and LSTM engine while processing the images.
For this, we can use the –oem argument with a value of 0 to 3:
tesseract multiLanguageText.png output --oem 1
The OCR engine modes are:
4.5. Tessdata
Tesseract contains two sets of trained data for the LSTM OCR engine – best trained LSTM models and fast integer versions of trained LSTM models.
The former provides better accuracy, and the latter offers better speed in image processing.
Also, Tesseract provides a combined trained data with support for both legacy and LSTM OCR engine.
If we use the Legacy OCR engine without providing the supporting trained data, Tesseract will throw an error:
Error: Tesseract (legacy) engine requested, but components are not present in /usr/local/share/tessdata/eng.traineddata!!
Failed loading language 'eng'
Tesseract couldn't load any languages!
So, we should download the required .traineddata files and either keep them in the default tessdata location or declare the location using the –tessdata-dir argument:
tesseract multiLanguageText.png output --tessdata-dir /image-processing/tessdata
4.6. Output
We can declare an argument to get the required output format.
For instance, to get searchable PDF output:
tesseract multiLanguageText.png output pdf
This will create the output.pdf file with the searchable text layer (with recognized text) on the image provided.
Similarly, for hOCR output:
tesseract multiLanguageText.png output hocr
Also, we can use tesseract –help and tesseract –help-extra commands for more information on the tesseract command-line usage.
5. Tess4J
Tess4J is a Java wrapper for the Tesseract APIs that provides OCR support for various image formats like JPEG, GIF, PNG, and BMP.
First, let’s add the latest tess4j Maven dependency to our pom.xml:
<dependency>
    <groupId>net.sourceforge.tess4j</groupId>
    <artifactId>tess4j</artifactId>
    <version>4.5.1</version>
</dependency>
Then, we can use the Tesseract class provided by tess4j to process the image:
File image = new File("src/main/resources/images/multiLanguageText.png");
Tesseract tesseract = new Tesseract();
tesseract.setDatapath("src/main/resources/tessdata");
tesseract.setLanguage("eng");
tesseract.setPageSegMode(1);
tesseract.setOcrEngineMode(1);
String result = tesseract.doOCR(image);
Here, we’ve set the value of the datapath to the directory location that contains osd.traineddata and eng.traineddata files.
Finally, we can verify the String output of the image processed:
Assert.assertTrue(result.contains("Der ,.schnelle” braune Fuchs springt"));
Assert.assertTrue(result.contains("salta sopra il cane pigro. El zorro"));
Additionally, we can use the setHocr method to get the HTML output:
tesseract.setHocr(true);
By default, the library processes the entire image. However, we can process a particular section of the image by using the java.awt.Rectangle object while calling the doOCR method:
result = tesseract.doOCR(imageFile, new Rectangle(1200, 200));
Similar to Tess4J, we can use Tesseract Platform to integrate Tesseract in Java applications. This is a JNI wrapper of the Tesseract APIs based on the JavaCPP Presets library.
6. Conclusion
In this article, we’ve explored the Tesseract OCR engine with a few examples of image processing.
First, we examined the tesseract command-line tool to process the images, along with a set of arguments like -l, –psm and –oem.
Then, we’ve explored tess4j, a Java wrapper to integrate Tesseract in Java applications.
As usual, all the code implementations are available over on GitHub.


