1. 简介
Kong 是一个开源的 API 网关和微服务管理层。
基于 Nginx 和 lua-nginx-module(特别是 OpenResty),Kong 的可插拔架构使其既灵活又强大。
2. 核心概念
在深入代码示例前,先了解 Kong 的核心概念:
- API 对象 – 封装任何 HTTP(s) 接口的属性,这些接口执行特定任务或提供服务。配置包括 HTTP 方法、接口 URI、指向 API 服务器的上游 URL(用于代理请求)、最大重试次数、速率限制、超时等。
- Consumer 对象 – 封装使用我们 API 接口的用户属性。用于跟踪、访问控制等。
- Upstream 对象 – 描述如何代理或负载均衡传入请求,由虚拟主机名表示。
- Target 对象 – 表示实现和提供服务的目标,由主机名(或 IP 地址)和端口标识。注意:每个 upstream 的 target 只能添加或禁用。upstream 会维护 target 变更历史。
- Plugin 对象 – 可插拔功能,在请求和响应生命周期中丰富应用功能。例如,通过启用相关插件添加 API 认证和速率限制功能。Kong 在其插件库中提供了强大的插件。
- Admin API – RESTful API 接口,用于管理 Kong 配置、接口、消费者、插件等。
下图展示了 Kong 与传统架构的区别,有助于理解为什么引入这些概念:
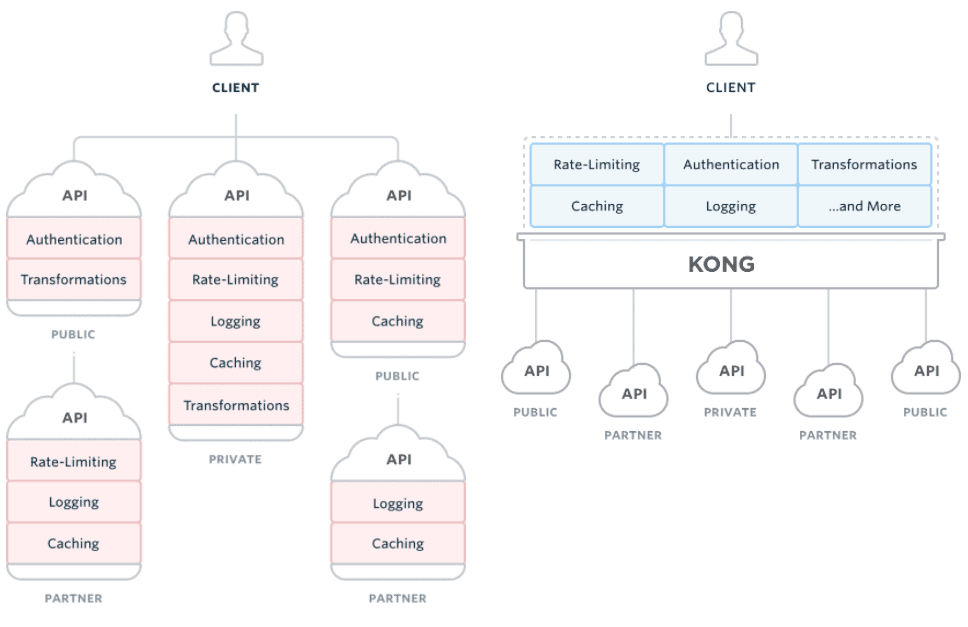
(来源: https://getkong.org/)
3. 安装
官方文档提供了各种环境的详细安装说明。
4. API 管理
本地安装 Kong 后,通过代理简单的股票查询接口来体验其强大功能:
@RestController
@RequestMapping("/stock")
public class QueryController {

    @GetMapping("/{code}")
    public String getStockPrice(@PathVariable String code){
        return "BTC".equalsIgnoreCase(code) ? "10000" : "0";
    }
}
4.1. 添加 API
接下来将查询 API 添加到 Kong。
Admin API 可通过 http://localhost:8001 访问,所有 API 管理操作都使用此基础 URI:
APIObject stockAPI = new APIObject(
  "stock-api", "stock.api", "http://localhost:8080", "/");
HttpEntity<APIObject> apiEntity = new HttpEntity<>(stockAPI);
ResponseEntity<String> addAPIResp = restTemplate.postForEntity(
  "http://localhost:8001", apiEntity, String.class);

assertEquals(HttpStatus.CREATED, addAPIResp.getStatusCode());
这里添加了具有以下配置的 API:
{
    "name": "stock-api",
    "hosts": "stock.api",
    "upstream_url": "http://localhost:8080",
    "uris": "/"
}
- "name" 是 API 的标识符,用于操作其行为
- "hosts" 通过匹配 "Host" 头将传入请求路由到指定的 "upstream_url"
- 相对路径将匹配配置的 "uris"
如果要弃用 API 或配置错误,可直接删除:
restTemplate.delete("http://localhost:8001/stock-api");
添加 API 后,可通过 http://localhost:8000 访问:
String apiListResp = restTemplate.getForObject(
  "http://localhost:8001/", String.class);

assertTrue(apiListResp.contains("stock-api"));

HttpHeaders headers = new HttpHeaders();
headers.set("Host", "stock.api");
RequestEntity<String> requestEntity = new RequestEntity<>(
  headers, HttpMethod.GET, new URI("http://localhost:8000/stock/btc"));
ResponseEntity<String> stockPriceResp
  = restTemplate.exchange(requestEntity, String.class);

assertEquals("10000", stockPriceResp.getBody());
上述代码通过刚添加到 Kong 的 API 查询股票价格。请求 http://localhost:8000/stock/btc 与直接请求 http://localhost:8080/stock/btc 获得相同服务。
4.2. 添加 API 消费者
现在讨论安全性——具体来说,是访问 API 的用户认证。
为股票查询 API 添加消费者,以便后续启用认证功能。
添加消费者与添加 API 同样简单。消费者名称(或 ID)是唯一必需字段:
ConsumerObject consumer = new ConsumerObject("eugenp");
HttpEntity<ConsumerObject> addConsumerEntity = new HttpEntity<>(consumer);
ResponseEntity<String> addConsumerResp = restTemplate.postForEntity(
  "http://localhost:8001/consumers/", addConsumerEntity, String.class);

assertEquals(HttpStatus.CREATED, addConsumerResp.getStatusCode());
这里添加了 "eugenp" 作为新消费者:
{
    "username": "eugenp"
}
4.3. 启用认证
Kong 最强大的功能来了——插件。
现在为代理的股票查询 API 应用认证插件:
PluginObject authPlugin = new PluginObject("key-auth");
ResponseEntity<String> enableAuthResp = restTemplate.postForEntity(
  "http://localhost:8001/stock-api/plugins",
  new HttpEntity<>(authPlugin),
  String.class);
assertEquals(HttpStatus.CREATED, enableAuthResp.getStatusCode());
如果尝试通过代理 URI 查询股票价格,请求将被拒绝:
HttpHeaders headers = new HttpHeaders();
headers.set("Host", "stock.api");
RequestEntity<String> requestEntity = new RequestEntity<>(
  headers, HttpMethod.GET, new URI("http://localhost:8000/stock/btc"));
ResponseEntity<String> stockPriceResp = restTemplate
  .exchange(requestEntity, String.class);

assertEquals(HttpStatus.UNAUTHORIZED, stockPriceResp.getStatusCode());
记住 Eugen 是我们的 API 消费者之一,应通过添加认证密钥允许他使用此 API:
String consumerKey = "eugenp.pass";
KeyAuthObject keyAuth = new KeyAuthObject(consumerKey);
ResponseEntity<String> keyAuthResp = restTemplate.postForEntity(
  "http://localhost:8001/consumers/eugenp/key-auth",
  new HttpEntity<>(keyAuth),
  String.class);
assertTrue(HttpStatus.CREATED == keyAuthResp.getStatusCode());
然后 Eugen 可以像以前一样使用此 API:
HttpHeaders headers = new HttpHeaders();
headers.set("Host", "stock.api");
headers.set("apikey", consumerKey);
RequestEntity<String> requestEntity = new RequestEntity<>(
  headers,
  HttpMethod.GET,
  new URI("http://localhost:8000/stock/btc"));
ResponseEntity<String> stockPriceResp = restTemplate
  .exchange(requestEntity, String.class);

assertEquals("10000", stockPriceResp.getBody());
5. 高级功能
除基本 API 代理和管理外,Kong 还支持 API 负载均衡、集群、健康检查和监控等。
本节将介绍如何使用 Kong 进行负载均衡,以及如何保护 Admin API。
5.1. 负载均衡
Kong 提供两种向后端服务负载均衡请求的策略:动态环形均衡器和简单的基于 DNS 的方法。为简化起见,我们将使用环形均衡器。
如前所述,upstream 用于负载均衡,每个 upstream 可有多个 target。
Kong 支持加权轮询和基于哈希的均衡算法。默认使用加权轮询方案——请求根据权重分发到每个 target。
首先准备 upstream:
UpstreamObject upstream = new UpstreamObject("stock.api.service");
ResponseEntity<String> addUpstreamResp = restTemplate.postForEntity(
  "http://localhost:8001/upstreams",
  new HttpEntity<>(upstream),
  String.class);

assertEquals(HttpStatus.CREATED, addUpstreamResp.getStatusCode());
然后为 upstream 添加两个 target:测试版本(weight=10)和发布版本(weight=40):
TargetObject testTarget = new TargetObject("localhost:8080", 10);
ResponseEntity<String> addTargetResp = restTemplate.postForEntity(
  "http://localhost:8001/upstreams/stock.api.service/targets",
  new HttpEntity<>(testTarget),
  String.class);

assertEquals(HttpStatus.CREATED, addTargetResp.getStatusCode());

TargetObject releaseTarget = new TargetObject("localhost:9090",40);
addTargetResp = restTemplate.postForEntity(
  "http://localhost:8001/upstreams/stock.api.service/targets",
  new HttpEntity<>(releaseTarget),
  String.class);

assertEquals(HttpStatus.CREATED, addTargetResp.getStatusCode());
通过上述配置,可假设 1/5 的请求流向测试版本,4/5 流向发布版本:
APIObject stockAPI = new APIObject(
  "balanced-stock-api",
  "balanced.stock.api",
  "http://stock.api.service",
  "/");
HttpEntity<APIObject> apiEntity = new HttpEntity<>(stockAPI);
ResponseEntity<String> addAPIResp = restTemplate.postForEntity(
  "http://localhost:8001", apiEntity, String.class);

assertEquals(HttpStatus.CREATED, addAPIResp.getStatusCode());

HttpHeaders headers = new HttpHeaders();
headers.set("Host", "balanced.stock.api");
for(int i = 0; i < 1000; i++) {
    RequestEntity<String> requestEntity = new RequestEntity<>(
      headers, HttpMethod.GET, new URI("http://localhost:8000/stock/btc"));
    ResponseEntity<String> stockPriceResp
     = restTemplate.exchange(requestEntity, String.class);

    assertEquals("10000", stockPriceResp.getBody());
}

int releaseCount = restTemplate.getForObject(
  "http://localhost:9090/stock/reqcount", Integer.class);
int testCount = restTemplate.getForObject(
  "http://localhost:8080/stock/reqcount", Integer.class);

assertTrue(Math.round(releaseCount * 1.0 / testCount) == 4);
⚠️ 注意:加权轮询方案按权重比例近似均衡请求,因此只能验证比例的近似值,如上述代码最后一行所示。
5.2. 保护 Admin API
默认情况下,Kong 仅接受来自本地接口的 admin 请求,这在大多数情况下是足够好的限制。但如果要通过其他网络接口管理,可修改 kong.conf 中的 admin_listen 值并配置防火墙规则。
或者,可以让 Kong 作为 Admin API 自身的代理。假设要通过路径 "/admin-api" 管理 API,可这样添加 API:
APIObject stockAPI = new APIObject(
  "admin-api",
  "admin.api",
  "http://localhost:8001",
  "/admin-api");
HttpEntity<APIObject> apiEntity = new HttpEntity<>(stockAPI);
ResponseEntity<String> addAPIResp = restTemplate.postForEntity(
  "http://localhost:8001",
  apiEntity,
  String.class);

assertEquals(HttpStatus.CREATED, addAPIResp.getStatusCode());
现在可使用代理的 admin API 管理 API:
HttpHeaders headers = new HttpHeaders();
headers.set("Host", "admin.api");
APIObject baeldungAPI = new APIObject(
  "baeldung-api",
  "baeldung.com",
  "http://ww.baeldung.com",
  "/");
RequestEntity<APIObject> requestEntity = new RequestEntity<>(
  baeldungAPI,
  headers,
  HttpMethod.POST,
  new URI("http://localhost:8000/admin-api"));
ResponseEntity<String> addAPIResp = restTemplate
  .exchange(requestEntity, String.class);

assertEquals(HttpStatus.CREATED, addAPIResp.getStatusCode());
✅ 当然,我们希望代理的 API 是安全的。通过为代理的 admin API 启用认证插件可轻松实现。
6. 总结
本文介绍了 Kong——一个微服务 API 网关平台,重点介绍了其核心功能:管理 API 和将请求路由到上游服务器,以及负载均衡等高级功能。
还有许多强大的功能有待探索,如果需要,我们还可以开发自己的插件——你可以继续探索官方文档。
一如既往,完整实现可在 GitHub 上找到。