1. Introduction
Although primarily used for servers, Linux can also function as a desktop operating system. As such, we might want to have conveniences such as a web camera (webcam). Short of buying one, we can set up an Android phone as a webcam on Linux using certain tools. Typically, we’ll need to install an app on the Android phone and configure the appropriate tool on our Linux machine.
In this tutorial, we’ll learn how to use an Android mobile phone as a webcam on Linux.
First, we’ll look at using the OBS Studio Linux application alongside the IP Webcam Android tool. Finally, we’ll see how to use our phone as a webcam using the Iriun webcam toolkit.
2. Process Overview
There are five main steps to configure an Android phone as a webcam for OBS Studio:
- download the latest version of OBS Studio on the Linux machine
- install ffmpeg on the Linux machine
- download and install the appropriate plugin on the Linux machine
- download and install the Android tool on the mobile phone
- connect the Android device via Wi-Fi
Notably, OBS Studio has features that enable the use of an Android phone as a webcam for the software. We can achieve this using the IP Webcam and Iriun Webcam tools.
3. OBS Studio
The Open Broadcaster Software (OBS Studio) is free and open-source software for video recording and live streaming. Since we need it as part of our process, let’s download and install OBS Studio on the Linux machine.
To begin with, we add the relevant repository:
$ sudo add-apt-repository ppa:obsproject/obs-studio
Repository: 'deb https://ppa.launchpadcontent.net/obsproject/obs-studio/ubuntu/ jammy main'
Description:
Latest stable release of OBS Studio
More info: https://launchpad.net/~obsproject/+archive/ubuntu/obs-studio
Adding repository.
Press [ENTER] to continue or Ctrl-c to cancel.
Adding deb entry to /etc/apt/sources.list.d/obsproject-ubuntu-obs-studio-jammy.list
Adding disabled deb-src entry to /etc/apt/sources.list.d/obsproject-ubuntu-obs-studio-jammy.list
Adding key to /etc/apt/trusted.gpg.d/obsproject-ubuntu-obs-studio.gpg with fingerprint BC7345F522079769F5BBE987EFC71127F425E228
Get:1 https://download.docker.com/linux/ubuntu jammy InRelease [48.8 kB]
Hit:2 http://ng.archive.ubuntu.com/ubuntu jammy InRelease
...
Fetched 10.8 MB in 7s (1,467 kB/s)
Reading package lists... Done
Here, the add-apt-repository command adds an external Personal Package Archive (PPA) repository to the system list of package sources. In this case, the PPA added is for the OBS Studio software.
Once the PPA is set up, we update and upgrade the Linux system:
$ sudo apt update; sudo apt upgrade
Now, let’s install the OBS Studio software:
$ sudo apt install ffmpeg obs-studio
Reading package lists... Done
Building dependency tree... Done
Reading state information... Done
...
Processing triggers for gnome-menus (3.36.0-1ubuntu3) ...
Processing triggers for libc-bin (2.35-0ubuntu3.6) ...
Processing triggers for man-db (2.10.2-1) ...
Of course, we can see the OBS Studio app icon on the application menu:

Next, let’s configure the software to connect the Linux system to an Android phone as a webcam.
4. Configuring IP Webcam
At this point, we’ll set up the IP Webcam tool on our Android phone.
It requires a few steps to set up:
- download and install the software on the mobile phone from the relevant application store
- start the IP Webcam tool on the mobile device
- enter the IP address from IP Webcam in the Linux machine browser
- connect the OBS Studio using the Window Capture (PipeWire) option
To demonstrate, once the IP Webcam tool is up and running, let’s launch the browser and enter the IP address from the Android phone:
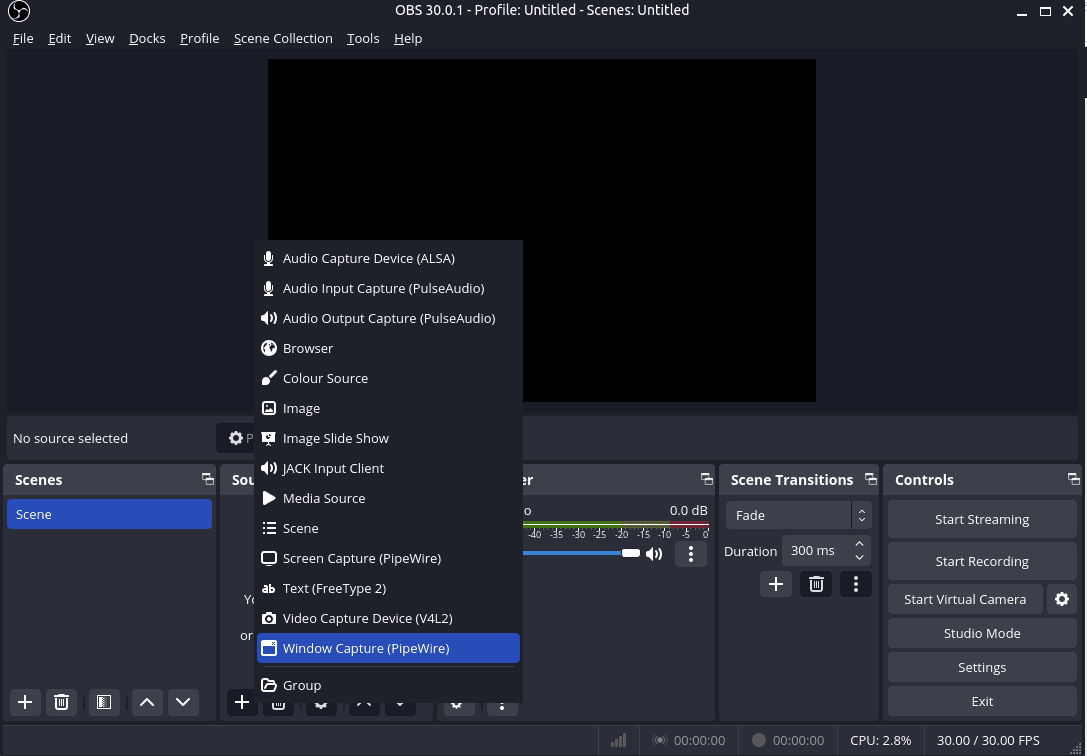
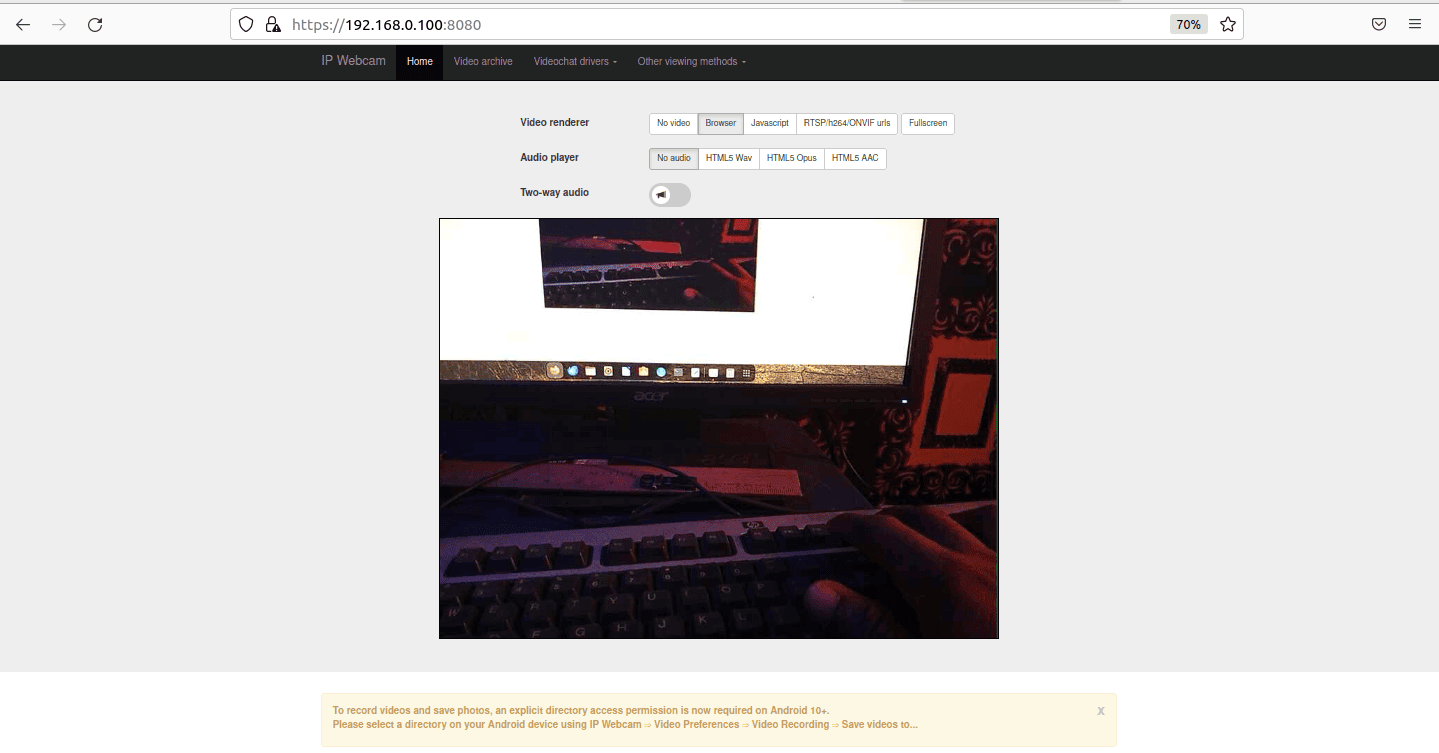 Next, let’s launch OBS Studio and click on the + sign to add a device. Further, we’ll select Window Capture (PipeWire) to connect:
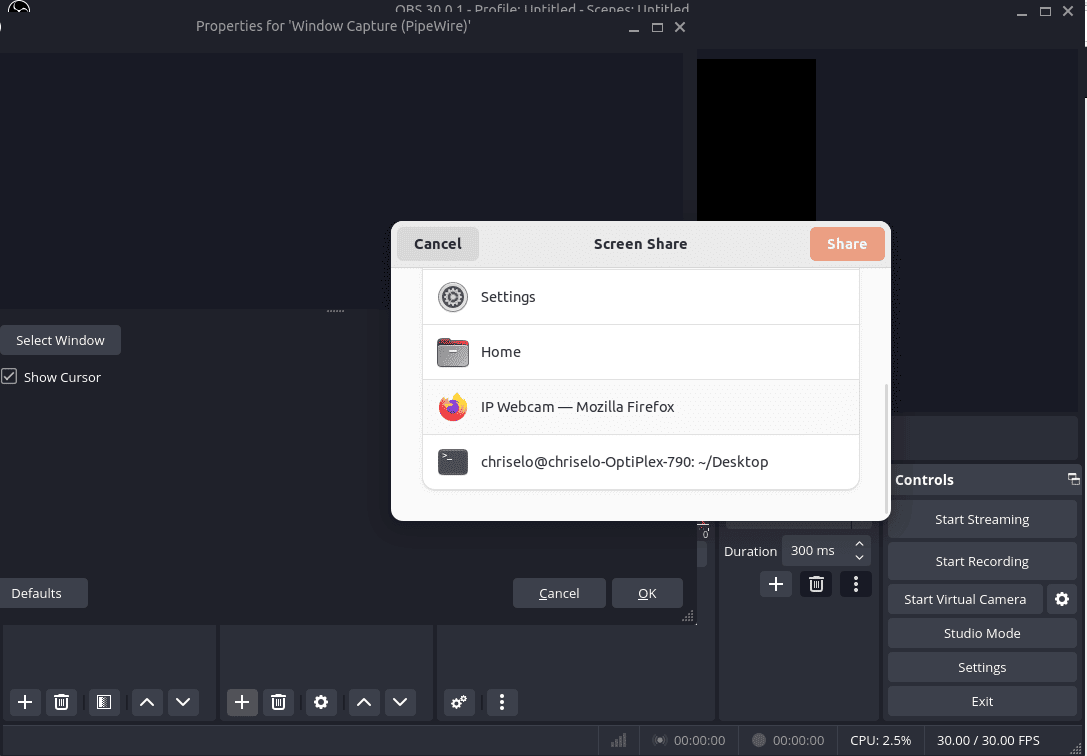
Then, using the Select Window button, let’s select the appropriate browser window and press Share:
This should kickstart the live stream with our phone as the webcam through the IP Webcam browser window:
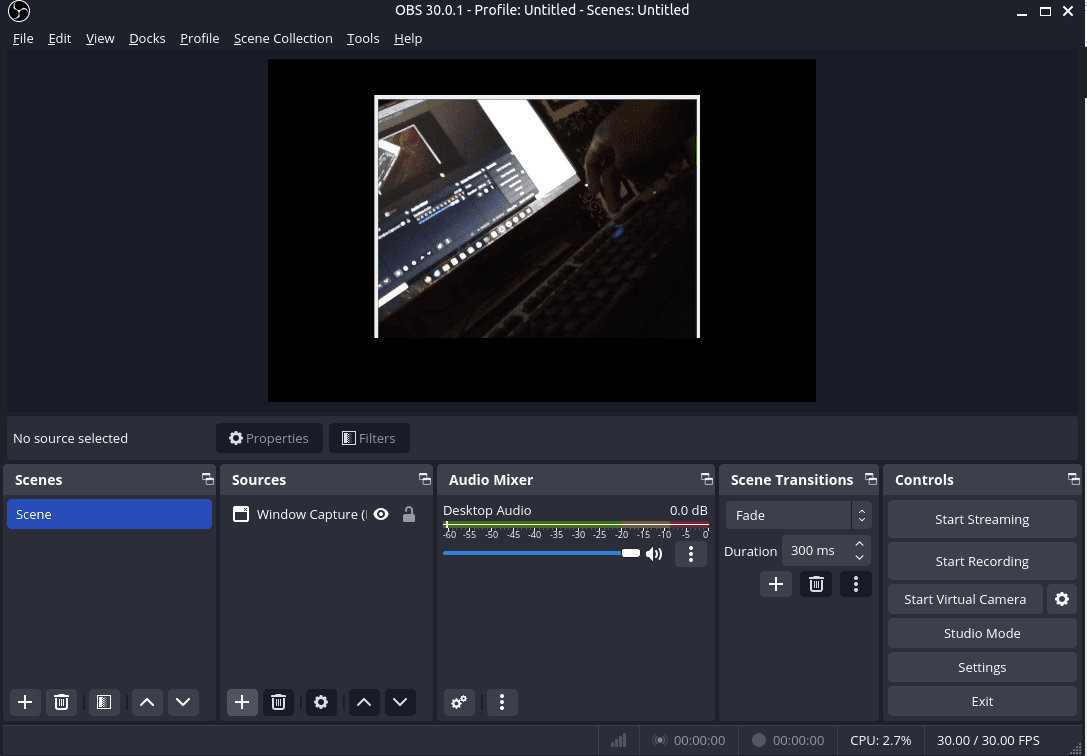
Notably, we can adjust the visible part of the display when we drag from the edge using the cursor.
Moving on, let’s see how to achieve similar results with the Iriun webcam tool.
5. Iriun Webcam
Iriun Webcam is a tool that enables us to use a phone’s camera as a wireless webcam on a Linux machine.
Again, it takes three steps to set up our Android phone as a webcam using this tool:
- download and install Iriun Webcam for Linux on the Linux machine
- download and install Iriun Webcam app on our Android phone from the relevant application store
- set up a wireless connection using WiFi
However, Iriun requires some dependencies to work as expected.
5.1. Dependencies
Importantly, the Iriun Webcam requires qt5 and v4l2loopback-dkms as dependencies. So, let’s install both:
$ sudo apt install qt5-default
This command installs the necessary development files and default configurations for Qt5 on our system. Qt is a popular cross-platform application framework. In addition, these packages are often required when building or compiling software that uses Qt.
Now, let’s install the loopback package:
$ sudo apt-get install v4l2loopback-dkms
Reading package lists... Done
Building dependency tree... Done
Reading state information... Done
...

v4l2loopback.ko:
Running module version sanity check.
 - Original module
 - Installation
   - Installing to /lib/modules/5.15.0-43-generic/updates/dkms/
depmod.................
Building initial module for 6.5.0-15-generic
EFI variables are not supported on this system
/sys/firmware/efi/efivars not found, aborting.
Done.

v4l2loopback.ko:
Running module version sanity check.
 - Original module
 - Installation
   - Installing to /lib/modules/6.5.0-15-generic/updates/dkms/
depmod................
Processing triggers for libc-bin (2.35-0ubuntu3.6) ...
Processing triggers for man-db (2.10.2-1) ...
In essence, this command installs the Video4Linux2 loopback device package with Dynamic Kernel Module Support (DKMS) on our system. The DKMS ensures that the module is automatically rebuilt when we install a new kernel. Also, this is crucial for modules like v4l2loopback that are closely tied to the kernel.
5.2. Deploy and Run Iriun Webcam
With our dependencies ready, we can download the Iriun Webcam from the official source. Then, we install the software via dpkg on the command line:
$ sudo dpkg -i './Downloads/iriunwebcam-2.8.1.deb'
(Reading database ... 208837 files and directories currently installed.)
Preparing to unpack .../iriunwebcam-2.8.1.deb ...
Unpacking iriunwebcam (2.8.1) over (2.8.1) ...
Setting up iriunwebcam (2.8.1) ...
Processing triggers for mailcap (3.70+nmu1ubuntu1) ...
Processing triggers for gnome-menus (3.36.0-1ubuntu3) ...
Finally, when the setup process is completed, we can connect to the Android device OBS Studio.
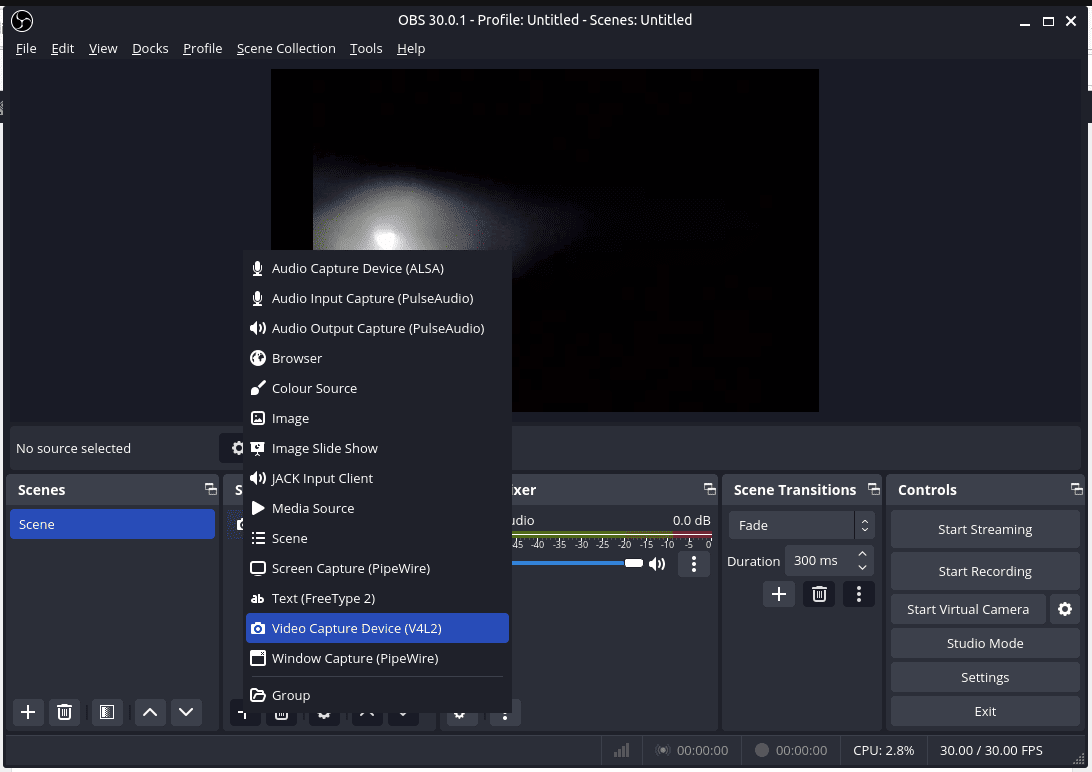
To do so, let’s click on the + sign and select the Video Capture Device (V4L2) 2 option:
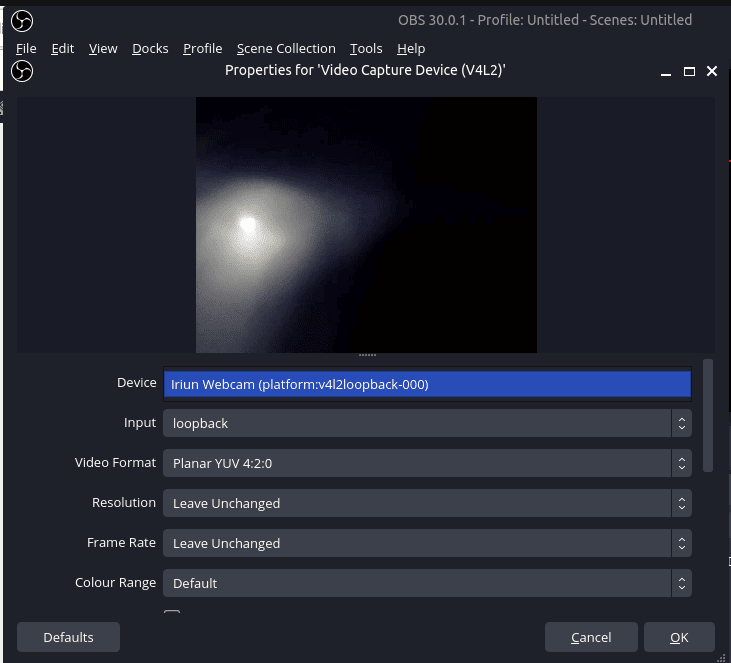
Upon pressing OK, we should see the next window, where we can choose Iriun Webcam from the Device drop-down and then press OK:
Again, the two devices must be connected to the same WiFi network.
6. Conclusion
In this article, we learned how to use an Android mobile phone as a webcam on Linux. Both methods used the OBS Studio software.
Initially, we saw how to use the IP Webcam tool to set up an Android device as a webcam. Then, we set up the Iriun Webcam and demonstrated how to use our Android phone as a webcam through WiFi.