1. Overview
Apache is a popular cross-platform web server. It supports virtual hosts, which are different websites that share the same physical server, saving costs and resources. Virtual hosts can be either name-based or IP-based, depending on how the server identifies the requested website.
In this tutorial, we’ll see how to use the ServerName and ServerAlias directives to configure our virtual hosts. For some concrete examples, we’ll use a test server with a public IPv4 address and several domains pointing to that IP.
2. Basic Concepts
Before we look at specific examples of ServerName and ServerAlias, we need to understand some basic concepts using a fresh Apache installation.
Let’s note that our examples will focus on Ubuntu-based servers. If we’re using a different distribution, we should consult Apache’s DistrosDefaultLayout guide.
2.1. HTTP Host Request Header
Our test machine is an updated Ubuntu 22.04 LTS server with the public IP 209.250.243.142. For the sake of simplicity, we disabled all firewalls so that we could focus solely on configuring Apache.
Let’s ask tasksel to install a LAMP stack that includes Apache 2.4:
# apt install lamp-server^
[...]
# apache2 -v
Server version: Apache/2.4.52 (Ubuntu)
Server built:   2023-03-01T22:43:55
After installation, let’s examine the sample page at http://209.250.243.142/ with the Network tab of Firefox’s Developer Tools open. Let’s focus on the HTTP request headers:
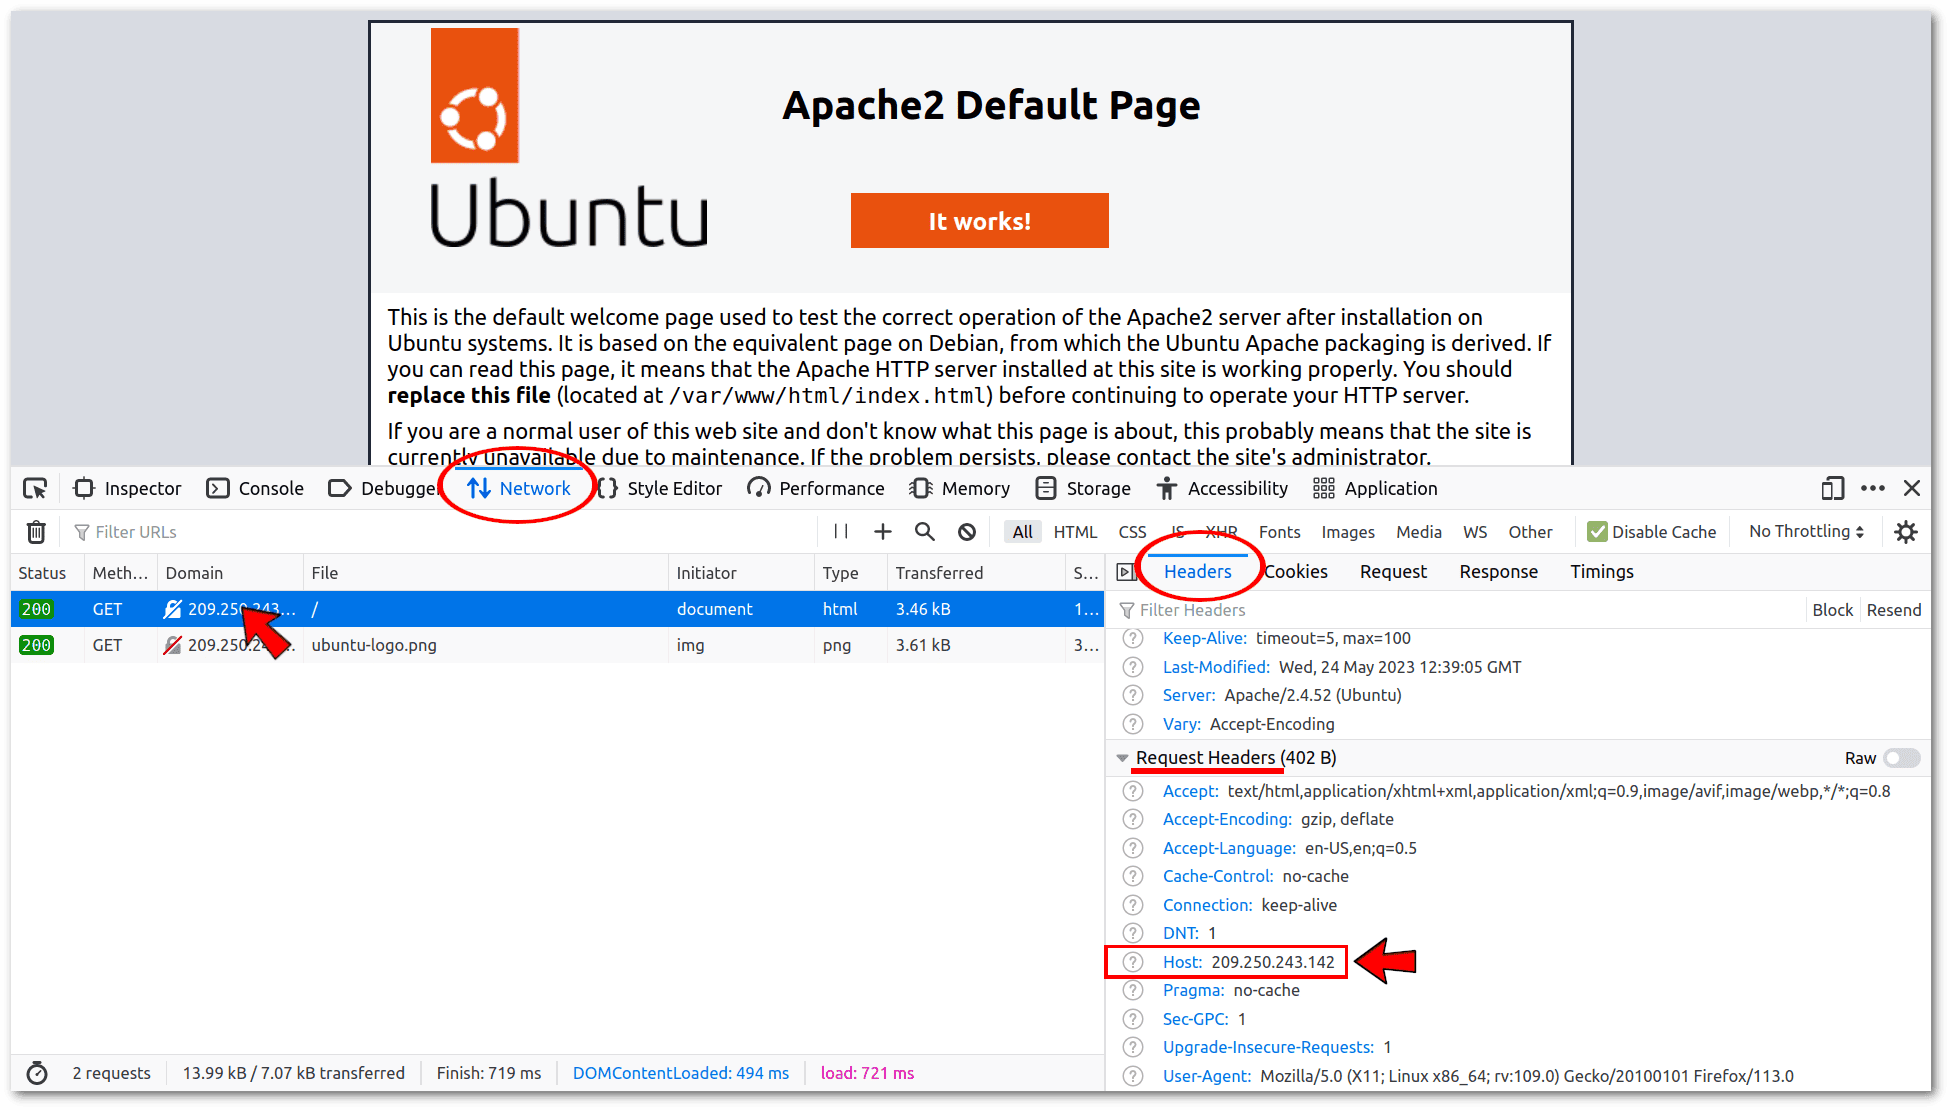 We’ve highlighted the Host request header, which specifies the domain or IP the client wants to communicate with. Apache compares the value of this Host header with the ServerName and ServerAlias directives of each virtual host, in the order listed by apache2ctl -S, and chooses the first one that matches. If there is no match, Apache serves the first name-based virtual host if there is one. We can take a closer look at how Apache chooses the virtual host if it behaves differently than we expect.
2.2. Virtual Hosts Configuration Files
The matching order of virtual hosts is alphanumeric, so we can easily sort them using numeric prefixes in their configuration file names, such as 000-, 001-, 002-, and so on. Let’s look at the current list of virtual hosts:
# apache2ctl -S
[...]
VirtualHost configuration:
*:80    127.0.1.1 (/etc/apache2/sites-enabled/000-default.conf:1)
[...]
In this case, there is only the sample virtual host created by the installer. The file /etc/apache2/sites-enabled/000-default.conf contains its configuration, all enclosed in the
# cat /etc/apache2/sites-enabled/000-default.conf
<VirtualHost *:80>
    [...]
    #ServerName www.example.com
    ServerAdmin webmaster@localhost
    DocumentRoot /var/www/html
    ErrorLog ${APACHE_LOG_DIR}/error.log
    CustomLog ${APACHE_LOG_DIR}/access.log combined
    [...]
</VirtualHost>
In Ubuntu-based servers, there are typically two main directories involved in the management of virtual hosts:
- /etc/apache2/sites-available contains all the configuration files, each of which represents a virtual host
- /etc/apache2/sites-enabled contains symbolic links pointing to the configuration files in the sites-available directory
The ServerName and ServerAlias directives are usually included in such configuration files. To enable or disable a virtual host, we can use the a2ensite and a2dissite commands to create and remove the symbolic links in the sites-enabled directory.
3. ServerName and ServerAlias Examples
Now that the basic concepts are clear let’s move on to some examples.
First, let’s disable and then delete the virtual host created by the installer:
# a2dissite 000-default
Site 000-default disabled.
[...]
# rm /etc/apache2/sites-available/*.conf
# service apache2 restart
These commands leave both sites-available and sites-enabled folders empty.
Before proceeding further, let’s note that using ServerName and ServerAlias assumes that we’ve already set up our DNS records correctly, as stated in the documentation on using multiple sites on a single IP.
3.1. Test Domains
We set up five test domains with the following A and CNAME records:
$ nslookup -q=A testd1.brasilia.me
[...]
Name:    testd1.brasilia.me
Address: 209.250.243.142

$ nslookup -q=cname gotestd1.brasilia.me
[...]
gotestd1.brasilia.me    canonical name = testd1.brasilia.me.

$ nslookup -q=cname livetestd1.brasilia.me
[...]
livetestd1.brasilia.me    canonical name = testd1.brasilia.me.

$ nslookup -q=A testd2.mysecuritycamera.com
[...]
Name:    testd2.mysecuritycamera.com
Address: 209.250.243.142

$ nslookup -q=cname logind2.mysecuritycamera.com
[...]
logind2.mysecuritycamera.com    canonical name = testd2.mysecuritycamera.com.
Basically, all five test domains point to our test server’s IP.
3.2. Example /var/www Content
The /var/www directory is Apache’s web root. It contains a subdirectory for each virtual host that Apache serves. Each subdirectory contains the files and folders that make up a website, such as HTML, CSS, JavaScript, PHP, images, etc.
Let’s remove the default html folder and create new folders for our virtual hosts:
# cd /var/www
# rm -fR html
# mkdir directIP brasilia.me mysecuritycamera.com default
Now let’s write a PHP file that displays the HTTP Host request header received by Apache and the virtual host it serves:
# cd /var/www
# echo "<pre>
<?php echo \"HTTP Request Host Header: \"; print_r(\$_SERVER['HTTP_HOST']); echo \"\n\";
      echo \"Virtual host: \" . getcwd();
?></pre>" > index.php
# ln index.php brasilia.me/index.php
# ln index.php default/index.php
# ln index.php directIP/index.php
# ln index.php mysecuritycamera.com/index.php
Now we’re ready to test ServerAdmin and ServerAlias by writing the configuration files for the virtual hosts.
3.3. Direct IP Access on a Non-Standard Port
For this first example, let’s assume we have a web service on port 8085, accessible from the public IP of the server and also locally from IP 127.0.0.1.
First, we need to configure Apache to listen on the desired ports:
# sed -i '/Listen 80/a Listen 8085' /etc/apache2/ports.conf
# cat /etc/apache2/ports.conf
[...]
Listen 80
Listen 8085
[...]
Next, let’s create and enable the virtual host configuration file:
# echo "<VirtualHost *:8085>
    ServerName    127.0.0.1:8085
    ServerAlias   209.250.243.142:8085
    DocumentRoot  /var/www/directIP
</VirtualHost>" > /etc/apache2/sites-available/000-directIP.conf
# a2ensite 000-directIP
Enabling site 000-directIP
[...]
Finally, let’s not forget to reload Apache and check its configuration:
# service apache2 reload
# apache2ctl -S
[...]
VirtualHost configuration:
*:8085                 127.0.0.1 (/etc/apache2/sites-enabled/000-directIP.conf:1)
[...]
In this and the following examples, we’ll use Lynx, a text-only web browser that is convenient for testing our minimal PHP script from an ssh connection to our server or in a local terminal:
# apt install lynx
[...]
# lynx -dump 127.0.0.1:8085
HTTP Request Host Header: 127.0.0.1:8085
Virtual host: /var/www/directIP
# lynx -dump 209.250.243.142:8085
HTTP Request Host Header: 209.250.243.142:8085
Virtual host: /var/www/directIP
The result is as expected. If instead, we tried to access http://209.250.243.142/ without specifying the port, we’d get a 404 error.
3.4. Name-Based Virtual Hosts
Let’s create two virtual hosts which match the following domains:
- testd1.brasilia.me
- gotestd1.brasilia.me
- livetestd1.brasilia.me
- testd2.mysecuritycamera.com
- logind2.mysecuritycamera.com
For each virtual host, the ServerName is only one, while the ServerAlias supports any number of hosts, including the use of wildcards:
# echo "<VirtualHost *:80>
    ServerName    testd1.brasilia.me
    ServerAlias   *testd1.brasilia.me
    DocumentRoot  /var/www/brasilia.me
</VirtualHost>" > /etc/apache2/sites-available/001-brasilia.me.conf

# echo "<VirtualHost *:80>
    ServerName    testd2.mysecuritycamera.com
    ServerAlias   logind2.mysecuritycamera.com
    DocumentRoot  /var/www/mysecuritycamera.com
</VirtualHost>" > /etc/apache2/sites-available/002-mysecuritycamera.com.conf

# a2ensite 001-brasilia.me
Enabling site 001-brasilia.me.
[...]

# a2ensite 002-mysecuritycamera.com
Enabling site 002-mysecuritycamera.com.
After reloading Apache, let’s check the new configuration. Let’s remember that Apache chooses the first name-based virtual host as the default. It serves it in the absence of a match with other virtual hosts:
# service apache2 reload
# apache2ctl -S
[...]
VirtualHost configuration:
*:8085                 127.0.0.1 (/etc/apache2/sites-enabled/000-directIP.conf:1)
*:80                   is a NameVirtualHost
         default server testd1.brasilia.me (/etc/apache2/sites-enabled/001-brasilia.me.conf:1)
         port 80 namevhost testd1.brasilia.me (/etc/apache2/sites-enabled/001-brasilia.me.conf:1)
                 wild alias *testd1.brasilia.me
         port 80 namevhost testd2.mysecuritycamera.com (/etc/apache2/sites-enabled/002-mysecuritycamera.com.conf:1)
                 alias logind2.mysecuritycamera.com
[...]
Finally, let’s ensure that all virtual hosts are properly served:
# lynx -dump testd1.brasilia.me
HTTP Request Host Header: testd1.brasilia.me
Virtual host: /var/www/brasilia.me

# lynx -dump gotestd1.brasilia.me
HTTP Request Host Header: gotestd1.brasilia.me
Virtual host: /var/www/brasilia.me

# lynx -dump livetestd1.brasilia.me
HTTP Request Host Header: livetestd1.brasilia.me
Virtual host: /var/www/brasilia.me

# lynx -dump testd2.mysecuritycamera.com
HTTP Request Host Header: testd2.mysecuritycamera.com
Virtual host: /var/www/mysecuritycamera.com

# lynx -dump logind2.mysecuritycamera.com
HTTP Request Host Header: logind2.mysecuritycamera.com
Virtual host: /var/www/mysecuritycamera.com
The result is as expected.
3.5. Default Name-Based Virtual Host
Let’s try direct IP access again:
# lynx -dump 209.250.243.142
HTTP Request Host Header: 209.250.243.142
Virtual host: /var/www/brasilia.me

# lynx -dump 209.250.243.142:8085
HTTP Request Host Header: 209.250.243.142:8085
Virtual host: /var/www/directIP
Only in the latter case is the result as desired, while in the former, Apache serves the default virtual host.
It’s good practice to prevent unwanted access to our virtual hosts via direct IP access or via unintended domains managed by third parties. This prevents possible indexing problems in search engines and other issues.
To do this, let’s add a virtual host that is always last in alphanumeric order and will match any possible request because of a ServerAlias consisting of a single wildcard character:
# echo "<VirtualHost *:80>
    ServerName    localhost
    ServerAlias   *
    DocumentRoot /var/www/default
</VirtualHost>" > /etc/apache2/sites-available/999-default.conf

# a2ensite 999-default
Enabling site 999-default.
[...]

# service apache2 reload
# apache2ctl -S
[...]
VirtualHost configuration:
*:8085                 127.0.0.1 (/etc/apache2/sites-enabled/000-directIP.conf:1)
*:80                   is a NameVirtualHost
         default server testd1.brasilia.me (/etc/apache2/sites-enabled/001-brasilia.me.conf:1)
         port 80 namevhost testd1.brasilia.me (/etc/apache2/sites-enabled/001-brasilia.me.conf:1)
                 wild alias *testd1.brasilia.me
         port 80 namevhost testd2.mysecuritycamera.com (/etc/apache2/sites-enabled/002-mysecuritycamera.com.conf:1)
                 alias logind2.mysecuritycamera.com
         port 80 namevhost localhost (/etc/apache2/sites-enabled/999-default.conf:1)
                 wild alias *
[...]
Even if the last output still contains default server testd1.brasilia.me, it will never happen that Apache finds no matches because the last virtual host matches everything. Let’s check it:
# lynx -dump 209.250.243.142
HTTP Request Host Header: 209.250.243.142
Virtual host: /var/www/default

# lynx -dump 209.250.243.142:8085
HTTP Request Host Header: 209.250.243.142:8085
Virtual host: /var/www/directIP
This time, both outputs are as expected. Of course, in real use cases, the 999-default virtual host will have to serve an error message.
4. Conclusion
In this article, we’ve seen how to use the ServerName and ServerAlias directives to configure our virtual hosts. We used a clean installation of Ubuntu Server and configured Apache on it step-by-step with real-world examples that are easily adaptable to other use cases.
We can find more ServerName and ServerAlias examples in the official documentation.