1. Overview
Efficient file compression is crucial for optimizing storage, speeding up data transfer, and managing resources effectively. Luckily, Linux offers a diverse set of compression tools tailored for different types of data and use cases, enabling users to select the most appropriate method for their specific needs.
In this tutorial, we’ll discuss the key factors to consider when selecting a compression method, such as speed, compression ratio, resource usage, and compatibility. By examining and comparing popular compression tools, we aim to determine the best compression method for various scenarios in Linux environments, balancing performance and efficiency.
2. Factors to Consider
Selecting the right compression tool in Linux involves evaluating several key factors that can influence efficiency, performance, and suitability for specific tasks.
2.1. File Characteristics
Large files benefit from high compression ratio tools like bzip2 and bzip3, while small files might be more efficiently handled by faster tools like gzip and lz4. The file type also matters, with textual data typically compressing well with gzip, bzip2, or bzip3, while binary and multimedia files might see better results with zstd.
2.2. Performance Requirements
Performance requirements also play an important role in selecting a compression method. If speed is critical, especially in real-time processing scenarios, tools like compress offer excellent performance with reasonable compression ratios.
Conversely, when storage space is at a premium and speed is less of a concern, tools like bzip3 and bzip2 provide higher compression ratios at the cost of longer processing times. Additionally, we must consider system resource usage, as some tools demand more CPU and memory.
2.3. Operational Context
The operational context, such as whether the files are for local storage or network transfer, and whether they’re part of real-time or batch processing workflows, further influences the choice of tool. Tools like gzip balance speed and efficiency well for network transfers, while bzip3 and bzip2 might be better for local storage due to their superior compression ratios.
Compatibility and integration with existing workflows and systems also guide the selection, with widely supported tools like gzip and bzip2 being preferred for their reliability and ease of integration.
3. Example File for Testing
For our experiment, we’ll be using the Silesia Corpus:
The Silesia Corpus is a collection of files used for compression benchmarks. It includes various types of data – text, images, and executables – and provides a diverse set of files for testing compression algorithms.
Let’s clone the Silesia Corpus GitHub repository:
$ git clone https://github.com/MiloszKrajewski/SilesiaCorpus.git
Alternatively, we can download the ZIP file, named SilesiaCorpus-master.zip, and then decompress it using unzip.sh:
$ cat unzip.sh
#!/bin/bash

# Check if the script is given exactly one argument
if [ "$#" -ne 1 ]; then
  echo "Usage: $0 <zip-file>"
  exit 1
fi

# Get the ZIP file from the argument
MAIN_ZIP="$1"

# Verify if the file exists and is a regular file
if [ ! -f "$MAIN_ZIP" ]; then
  echo "File $MAIN_ZIP not found!"
  exit 1
fi

# Create a base directory name from the ZIP file name
BASE_DIR="${MAIN_ZIP%.zip}_extracted"

# Extract the main ZIP file
unzip -q "$MAIN_ZIP" -d "$BASE_DIR" || { echo "Failed to unzip $MAIN_ZIP"; exit 1; }
cd "$BASE_DIR" || { echo "Failed to enter directory $BASE_DIR"; exit 1; }

# Loop until no more nested ZIP files are found
while true; do
  # Find all ZIP files
  ZIP_FILES=$(find . -name '*.zip')

  # Break the loop if no ZIP files are found
  if [ -z "$ZIP_FILES" ]; then
    break
  fi

  # Extract each found ZIP file
  for zip_file in $ZIP_FILES; do
    dir="${zip_file%.zip}"
    mkdir -p "$dir" && unzip -q "$zip_file" -d "$dir" && rm -f "$zip_file"
  done

  echo "Unzipping further nested ZIP files..."
done

echo "All ZIP files have been extracted."
Running this script should extract the main folder, as well as all the ZIP folders within it:
$ chmod u+x unzip.sh
$ ./unzip.sh SilesiaCorpus-master.zip
Unzipping further nested ZIP files...
All ZIP files have been extracted.
After that, we’ll roll it into a tarball for easier handling:
$ tar -cvf SilesiaCorpus.tar SilesiaCorpus-master_extracted
Finally, let’s note the size of the tarball:
$ du -sh SilesiaCorpus-master_extracted
203M    SilesiaCorpus-master_extracted
Knowing the size, we can now work with different compression methods and compare the results.
4. Lempel-Ziv (LZ) Algorithms
Lempel-Ziv algorithms work by finding repetitive sequences in the data and encoding these sequences in a manner that reduces the overall size of the data. There are several variants of LZ algorithms, with LZ77 and LZ78 being the foundational types.
4.1. LZ4 Compression
This is a fast compression algorithm that focuses on speed, leveraging LZ77 with additional optimizations.
First, let’s install it:
$ sudo apt-get install lz4
After that, let’s use it to compress the tarball:
$ time lz4 -12 SilesiaCorpus.tar SilesiaCorpus.tar.lz4
Compressed 211957760 bytes into 77385494 bytes ==> 36.51%
real    37.71s
user    15.28s
sys     21.98s
cpu     98%
With LZ4, we achieved a compression ratio of 2.7 in 37.71 seconds. The -12 flag refers to our desired compression level, with 12 giving us the best compression ratio at the slowest speed.
4.2. Zstandard Compression
Let’s repeat the process using Zstandard compression, starting with the installation:
$ sudo apt-get install zstd
Next, let’s compress the SilesiaCorpus.tar file using the Zstandard algorithm:
$ time zstd -19 SilesiaCorpus.tar SilesiaCorpus.tar.zst
2 files compressed : 40.00% (   253 MiB =>    101 MiB)
real    196.09s
user    193.23s
sys     3.02s
cpu     100%
The compression ratio here is 2.5, and the duration is 196.09 seconds. Similarly, the -19 flag gives us the best compression ratio at the slowest speed.
5. Lempel-Ziv-Welch (LZW) Compression
Lempel-Ziv-Welch (LZW) is a variant of the LZ77 and LZ78 algorithms, but it differs in its dynamic dictionary construction and encoding approach. LZW is used in formats like GIF and TIFF and is implemented in Unix utilities such as compress.
LZW works by scanning the input data and adding new sequences of characters to a dictionary as they are encountered. Each sequence is replaced with a reference to its index in the dictionary. The dictionary grows dynamically during the compression process, allowing LZW to adapt to the specific characteristics of the input data.
First, let’s install the compress tool:
$ sudo apt-get install ncompress
Next, let’s perform the compression:
$ time compress -kv SilesiaCorpus.tar
SilesiaCorpus.tar:  -- replaced with SilesiaCorpus.tar.Z Compression: 57.05%
real    13.03s
user    6.87s
sys     5.73s
cpu     96%
The -k flag is for keeping the original files, while -v indicates the verbose option, making the compression statistics visible.
In this case, we record a compression ratio of 1.7 in 13.03 seconds. Unlike the previous methods, we don’t get to decide the compression level.
6. Huffman Coding
Huffman coding is an algorithm for lossless data compression, particularly effective for files with a known probability distribution of symbols. This algorithm is the foundation for various compression formats, including DEFLATE, which is used by popular tools like gzip and in file formats such as PNG.
Huffman coding works by creating a binary tree where the most frequent symbols are represented by shorter codes, while less frequent symbols have longer codes.
First, we’ll install gzip:
$ sudo apt-get install gzip
Let’s see it in action:
$ time gzip -9kv SilesiaCorpus.tar
SilesiaCorpus.tar:       68.1% -- created SilesiaCorpus.tar.gz
real    33.99s
user    20.36s
sys     13.58s
cpu     99%
Similar to what we saw in the previous sections, the -9 flag represents the compression level, while -k is for keeping the original files, and -v indicates a verbose output. In this instance, we get a compression level of 1.5 in 33.99 seconds.
7. Burrows-Wheeler Transform (BWT)
The Burrows-Wheeler Transform (BWT) is a complex algorithm used in data compression and text indexing. BWT rearranges the characters of a string into runs of similar characters, which makes the string more amenable to compression algorithms.
BWT itself doesn’t compress data but transforms it to facilitate more effective compression by algorithms like Move-To-Front (MTF) coding, run-length encoding (RLE), or entropy coding like Huffman or arithmetic coding.
7.1. bzip2
Common tools that implement BWT include bzip2, which combines BWT with Huffman coding for compression.
Let’s install it:
$ sudo apt-get install bzip2
Let’s run it on the SilesiaCorpus folder:
$ time bzip2 -9kv SilesiaCorpus.tar
  SilesiaCorpus.tar:  3.885:1,  2.059 bits/byte, 74.26% saved, 211957760 in, 54563698 out.
real    57.01s
user    48.75s
sys     7.07s
cpu     97%
We achieve a compression ratio of 3.9 in 57.01 seconds.
7.2. bzip3
bzip3 was developed as an improvement over bzip2. It uses entropy coding and run-length encoding (RLE), in addition to BWT. Additionally, it supports larger block sizes up to 511 MiB, which can improve compression ratios for large files.
Let’s install bzip3:
$ sudo apt-get install bzip3
Next, we’ll compress using bzip3:
$ time bzip3 -kv SilesiaCorpus.tar
 SilesiaCorpus.tar:     211957760 -> 47344748 bytes, 22.34%, 1.79 bpb
real    45.05s
user    39.17s
sys     4.93s
cpu     97%
The compression is better and faster than that of bzip2, yielding a compression ratio of 4.5 in 45.05 seconds.
8. Comparison
Let’s create a chart of all the compression methods we’ve explored so far to get a clearer picture:
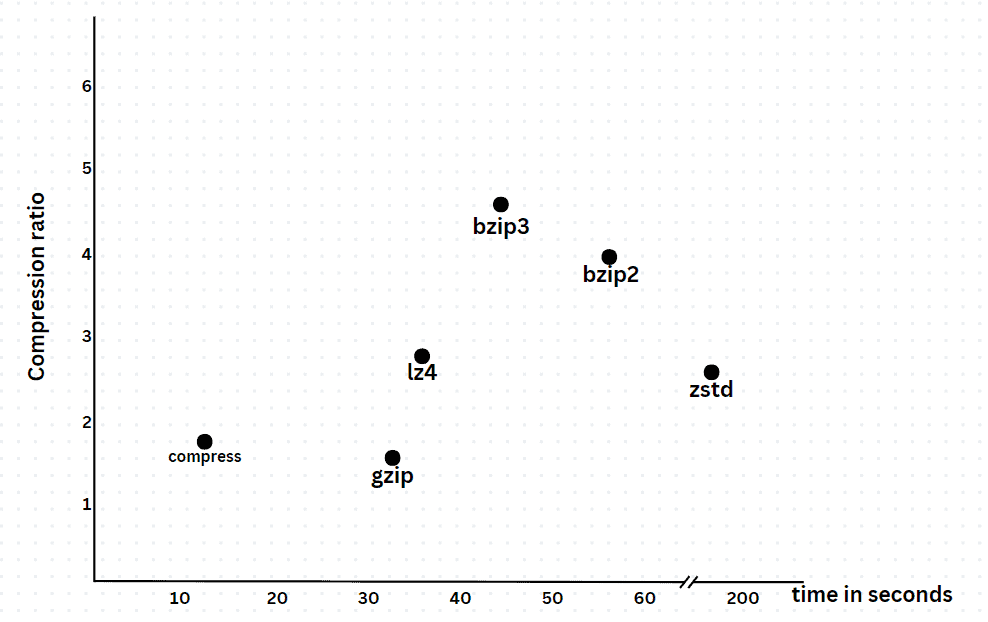
Analyzing the data from the methods we tested, we note that each has its trade-off in terms of compression ratio and compression time.
compress completes the compression in the fastest time but with a compression ratio lower than most of the other methods. Huffman (gzip) has the least compression ratio. It’s just a little bit faster than LZ4, yet we notice a substantial difference in their compression ratios. Zstandard is noticeably slower than the rest, without producing better results than LZ4.
bzip2 stands out for providing a higher compression ratio than the earlier ones, but it comes with significantly longer compression times. On the other hand, bzip3 offers a better compression ratio and time compared to bzip2.
9. Conclusion
In this article, we’ve explored different compression methods in Linux by running them on a sample test file.
Ultimately, the selection of a compression method depends on the specific requirements of the task at hand. For tasks prioritizing speed, compress and LZ4, with a lower compression level, are excellent choices. For those requiring high compression ratios, bzip2 provides optimal results, although at the cost of longer compression times. bzip3 offers an improvement in both the compression ratio and compression time compared to bzip2.