1. Introduction
In this tutorial, we’ll explore the basic concepts of container technology and understand how they have evolved. The focus will be primarily on exploring Linux containers.
This will lead us to understand how Docker came into existence and how it inherits and differs from the Linux containers.
2. What Are Containers?
Containers abstract applications from the environment in which they run by providing a logical packaging mechanism. But, what are the benefits of this abstraction? Well, containers allow us to deploy applications in any environment easily and consistently.
We can develop an application on our local desktop, containerize it, and deploy it on a public cloud with confidence.
The concept is not very different from virtual machines, but how containers achieve it is quite different. Virtual machines have been around far longer than containers, at least in the popular space.
If we recall, virtual machines allow us to run multiple guest operating systems on top of the host operating system with the help of a virtual machine monitor like a hypervisor.
Both virtual machines and containers virtualize access to underlying hardware like CPU, memory, storage, and network. But virtual machines are costly to create and maintain if we compare them to containers:
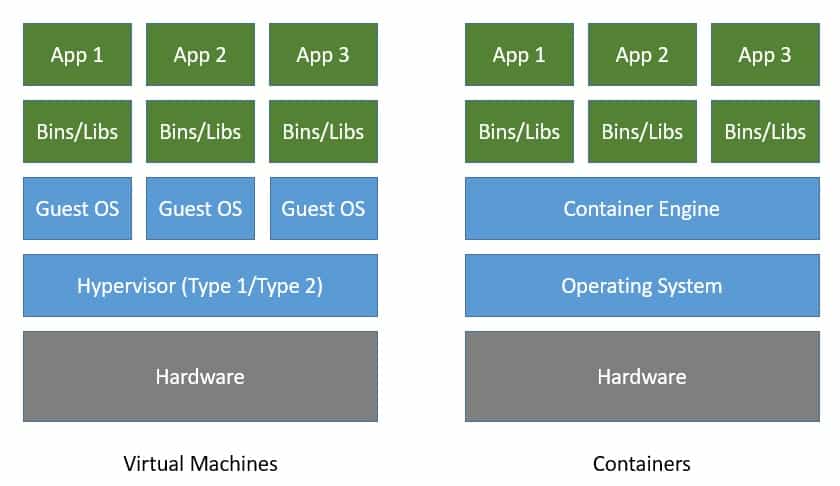
As we can see in the image above, containers virtualize at the level of the operating system instead of virtualizing the hardware stack. Multiple containers share the same operating system kernel.
This makes containers more lightweight compared to virtual machines. Consequently, containers start much faster and use far fewer hardware resources.
3. Early Evolution of Containers
Now that we understand what containers are, it’ll be helpful to understand how they’ve evolved to put things in perspective. Although the mass appeal for containers among developers is quite new, the concept of containers in some shape and form has been around for decades.
The main concept of containers is to provide isolation to multiple processes running on the same host. We can trace back the history of tools offering some level of process isolation to a couple of decades back. The tool chroot, introduced in 1979, made it possible to change the root directory of a process and its children to a new location in the filesystem.
Of course, chroot didn’t offer anything more than that in terms of process isolation. A few decades later, FreeBSD extended the concept to introduce jails in 2000 with advanced support for process isolation through operating-system-level virtualization. FreeBSD jails offered more explicit isolation with their own network interfaces and IP addresses.
This was closely followed by Linux-VServer in 2001 with a similar mechanism to partition resources like the file system, network addresses, and memory. The Linux community further came up with OpenVZ in 2005 offering operating-system-level virtualization.
There were other attempts as well, but none of them were comprehensive enough to come close to virtual machines.
4. Understanding Linux Containers
Linux Containers, often referred to as LXC, was perhaps the first implementation of a complete container manager. It’s operating-system-level virtualization that offers a mechanism to limit and prioritize resources like CPU and memory between multiple applications. Moreover, it allows complete isolation of the application’s process tree, networking, and file systems.
The good thing about LXC is that it works with the vanilla Linux kernel with no need for any additional patches. This is in contrast to its predecessors like Linux-VServer and OpenVZ. The first version of LXC had its own share of issues, including security, but those were overcome in later versions.
Moreover, there were other alternatives that followed suit, like LXD and LXCFS.
4.1. Introducing Control Groups (cgroups)
The LXC that is part of every Linux distribution now was created in 2008 largely based on the efforts from Google. Among other kernel features that LXC uses to contain processes and provide isolation, cgroups are a quite important kernel feature for resource limiting.
The cgroups feature was started by Google under the name process containers way back in 2007 and was merged into the Linux kernel mainline soon after. Basically, cgroups provide a unified interface for process isolation in the Linux kernel.
Let’s have a look at the rules we can define to restrict resource usage of processes:
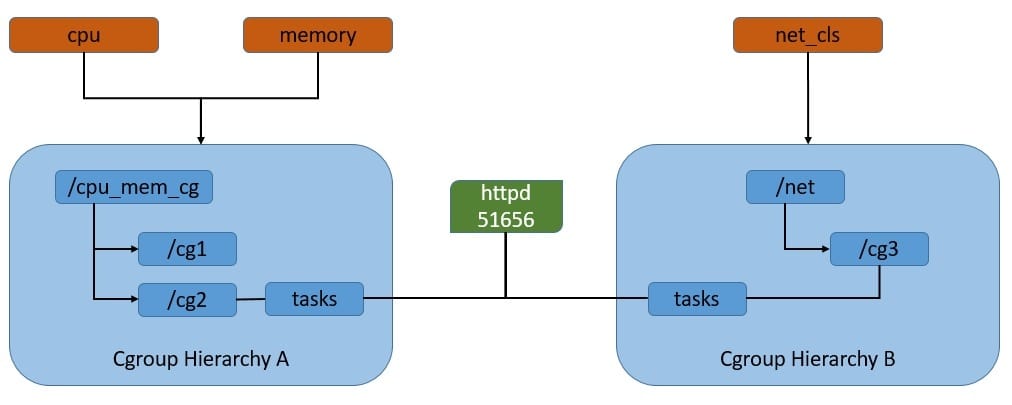
As we can see here, cgroups work by associating subsystems that represent a single kernel resource like CPU time or memory. They’re organized hierarchically, much like processes in Linux. Hence, child cgroups inherit some of the attributes from their parent. But unlike processes, cgroups exist as multiple separate hierarchies.
We can attach each hierarchy to one or more subsystems. However, a process can belong to only a single cgroup in a single hierarchy.
4.2. Introducing Namespaces
Another Linux kernel feature that is critical for LXC to provide process isolation is namespaces — it allows us to partition kernel resources such that one set of processes is able to see resources that aren’t visible to other processes. These resources include process trees, hostnames, user mounts, and file names, among others.
This is in fact an evolution from chroot, which allows us to assign any directory as the root of the system for a process. However, there were issues with chroot, and applications in different namespaces could still interfere. Linux namespaces provide more secure isolation for different resources and hence came to be the foundation of the Linux container.
Let’s see how the process namespace works. As we know, the process model in Linux works as a single hierarchy, with the root process starting during system boot-up. Technically, any process in this hierarchy can inspect other processes — of course, with certain limitations. This is where the process namespace allows us to have multiple nested process trees:
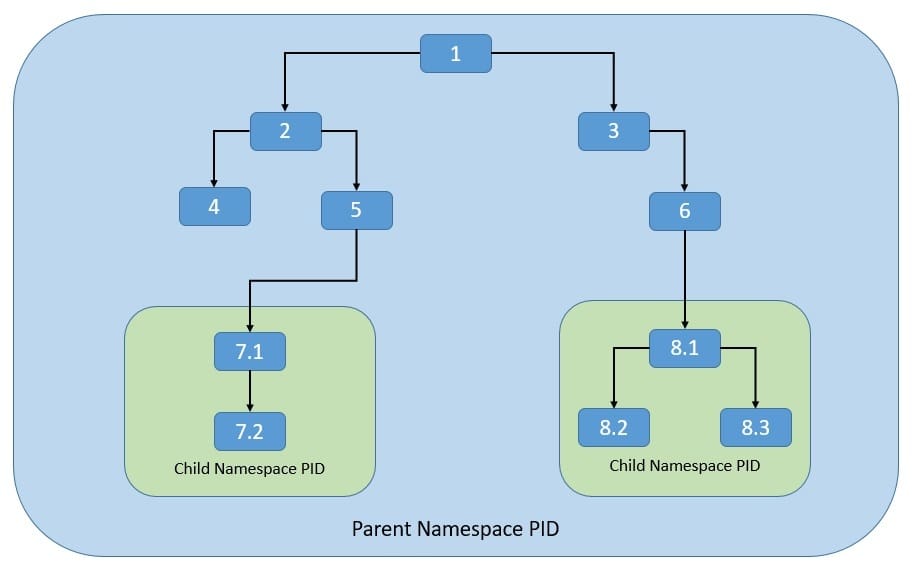
Here, processes in one process tree remain completely isolated from processes in sibling or parent process trees. However, processes in the parent namespace can still have a complete view of processes in the child namespace.
Moreover, a process can now belong to multiple namespaces and, hence, can have multiple PIDs.
4.3. LXC Architecture
We’ve already seen now that cgroups and namespaces are the foundation of the Linux container. However, LXC takes away the complexities of configuring cgroups and namespaces by automating the process.
Moreover, LXC uses a few other kernel features like Apparmor and SELinux profiles, as well as Seccomp policies. Now, let’s understand the general architecture of LXC:
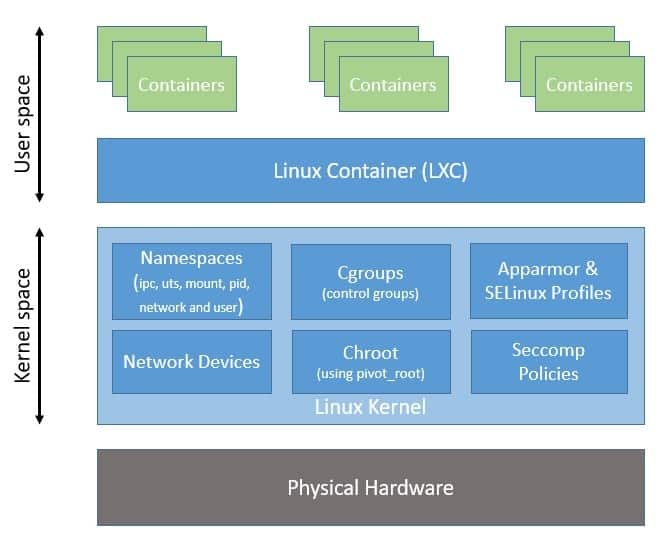
Here, as we can see, LXC provides a userspace interface for multiple Linux kernel containment features like namespaces and cgroups. Hence, LXC makes it easier to sandbox processes from one another and control their resource allocation in Linux.
Please note that all processes share the same kernel space, which makes containers quite lightweight compared to virtual machines.
5. Arrival of Docker
Although LXC provides a neat and powerful interface at the userspace level, it’s still not that easy to use, and it didn’t generate mass appeal. This is where Docker changes the game. While abstracting most of the complexities of dealing with kernel features, it provides a simple format for bundling an application and its dependencies into containers.
Further, it comes with support for automatically building, versioning, and reusing containers. We’ll discuss some of these later in this section.
5.1. Relation to LXC
The Docker project was started by Solomon Hykes as part of dotCloud, a platform-as-a-service company. It was later released as an open-source project in 2013.
When it started, Docker used LXC as its default execution environment. However, that was short-lived, and close to a year later, LXC was replaced with an in-house execution environment, libcontainer, written in the Go programming language.
Please note that while Docker has stopped using LXC as its default execution environment, it’s still compatible with LXC and, in fact, with other isolation tools like libvert and systemd-nspawn. This is possible through the use of an execution driver API, which also enables Docker to run on non-Linux systems:
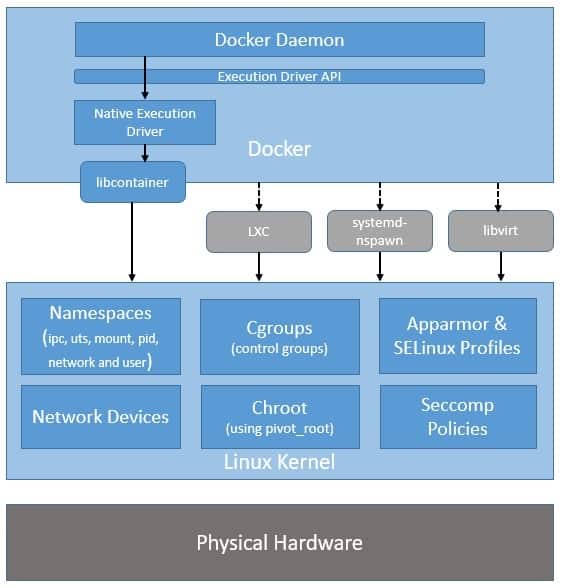
The switch to libcontainer allowed Docker to freely manipulate namespaces, cgroups, AppArmor profiles, network interfaces, and firewall rules – all this in a controlled and predictable manner – without depending upon an external package like LXC.
This insulated Docker from side-effects of different versions and distributions of LXC.
5.2. Advantages Compared to LXC
Basically, both Docker and LXC provide operating-system-level virtualization for process isolation. So, how is Docker better than LXC? Let’s see some of the key advantages of Docker over LXC:
- Application-centricity: LXC focuses on providing containers that behave like light-weight machines. However, Docker is optimized for the deployment of applications. In fact, Docker containers are designed to support a single application, leading to loosely-coupled applications.
- Portability: LXC provides a useful abstraction to leverage kernel features for process sandboxing. However, it does not guarantee the portability of the containers. Docker, on the other hand, defines a simple format for bundling an application and its dependencies into containers that are easily portable.
- Layered-containers: While LXC is largely neutral to file systems, Docker builds containers using read-only layers of file systems. These layers form what we call intermediate images and represent a change over other images. This enables us to re-use any parent image to create more specialized images.
Please note that Docker is not just an interface to kernel isolation features like LXC, as it comes with several other features that make it powerful as a complete container manager:
- Sharing: Docker comes with a public registry of images known as the Docker Hub. There are thousands of useful, community-contributed images available there that we can use to build our own images.
- Versioning: Docker enables us to version containers and allows us to diff between different versions, commit new versions, and roll-back to a previous version, all with simple commands. Moreover, we can have complete traceability of how a container was assembled and by whom.
- Tool-ecosystem: There’s a growing list of tools that support integration with Docker to extend its capabilities. These include configuration management tools like Chef and Puppet, continuous integration tools like Jenkins and Travis, and many more.
6. Understanding Docker Containers
So, we’ve seen how Docker has evolved from LXC as a container manager providing much better flexibility and ease of use. We also understood how Docker is different from LXC and what its defining features are.
In this section, we’ll understand the core architecture of Docker and some of those defining features in more detail.
6.1. Docker Architecture
Although it hasn’t been long since Docker was introduced, its core architecture has evolved a couple of times already. For instance, we saw earlier that LXC was replaced with libcontainer as the default execution environment. There were other changes as well, but we’ll only focus on the current architecture of Docker.
Docker has a modular architecture and relies on some key components to provide its services:
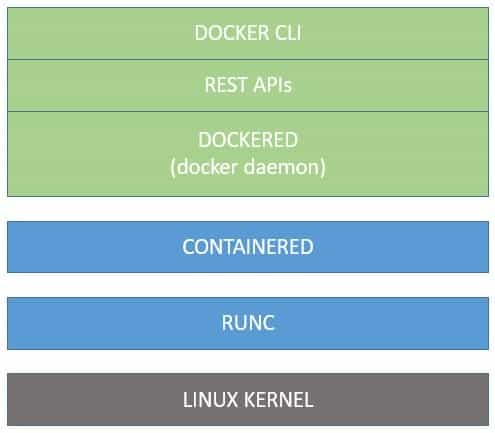
This architecture allows the core components to evolve and standardize independently. Let’s understand these core components in more detail:
- dockerd: This is the central part of Docker — we also know it as the Docker Engine. It comprises the Docker daemon that listens to the API requests and manages Docker objects. It also provides an API interface and a command-line interface to interact with the Docker daemon.
- containerd: To manage Docker objects, dockerd uses containerd, which is another daemon service that helps to perform tasks like downloading images and running them as containers. Most importantly, it follows a standard API for clients like dockerd to connect to.
- runc: Finally, containerd needs a component to interact with kernel features, and that component is known as runc. It provides a standard mechanism to create namespaces and control groups. It’s basically a repackaging of libcontainer to conform to the OCI specifications.
6.2. A Typical Docker Workflow
Apart from the core components that we saw in the last section, there are other components of Docker that enable a typical workflow. A typical workflow can be packaging an application as an image, publishing it to the registry, and running it as containers, possibly with persistence.
Let’s see how we can achieve this with Docker:
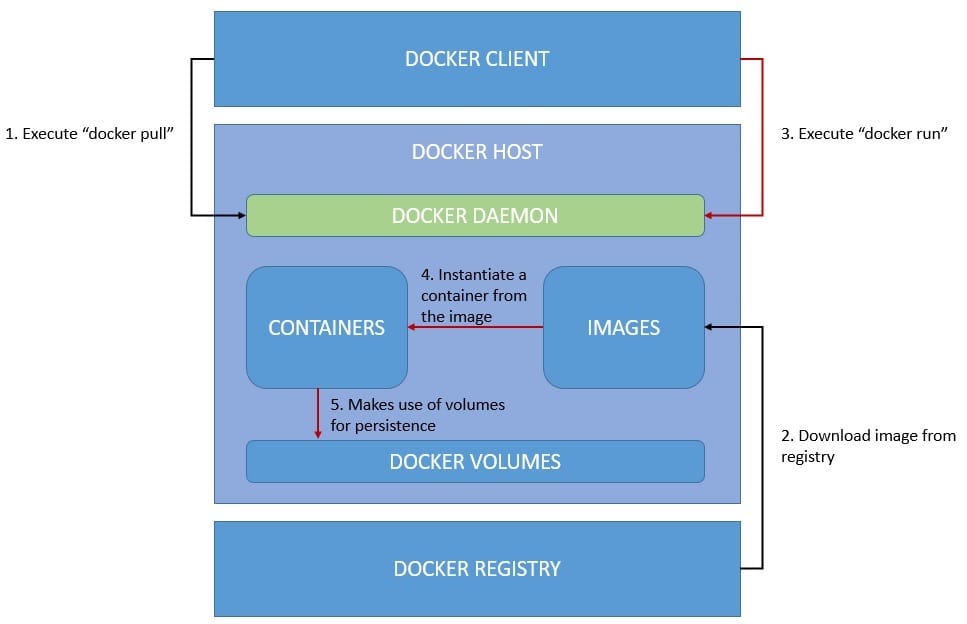
The workflow above isn’t complete as it doesn’t include creating an image from the application and publishing it to the registry. However, it’s quite intuitive and covers the parts necessary to understand the typical process.
Let’s understand some of the important components that are in play here:
- Docker Client: a way to interact with the Docker daemon through a command-line interface or REST APIs. This enables a client-server architecture and allows the client to be located on a different host than the daemon.
- Containers and Images: Docker daemon creates containers using images, which are the fundamental aspect of portability in Docker. Images are layers of read-only file systems that package applications, libraries, and other dependencies. Hence, containers are instances of the image.
- Volumes: The data that a Docker container creates is ephemeral and dies along with the container. The standard mechanism to persist or even share data in Docker is using volumes. There are other alternatives available as well: “bind mount” and “tmpfs mount“.
- Docker Registry: This is what makes images portable. It’s a repository of images for the daemon to pull from. We can create a public or private repository, or use the default public registry known as Docker Hub. Docker registries provide git-like semantics to work with.
6.3. Understanding Docker Images
We’ve already seen that images are layers of the read-only filesystem that Docker uses to instantiate a container. In this section, we’ll explore in detail exactly how we create these layers and what they actually represent.
The most common and convenient way to create Docker images is by using Dockerfile, a simple text format describing the instructions to build an image.
Let’s say we want to package a Spring Boot application into a Docker container:
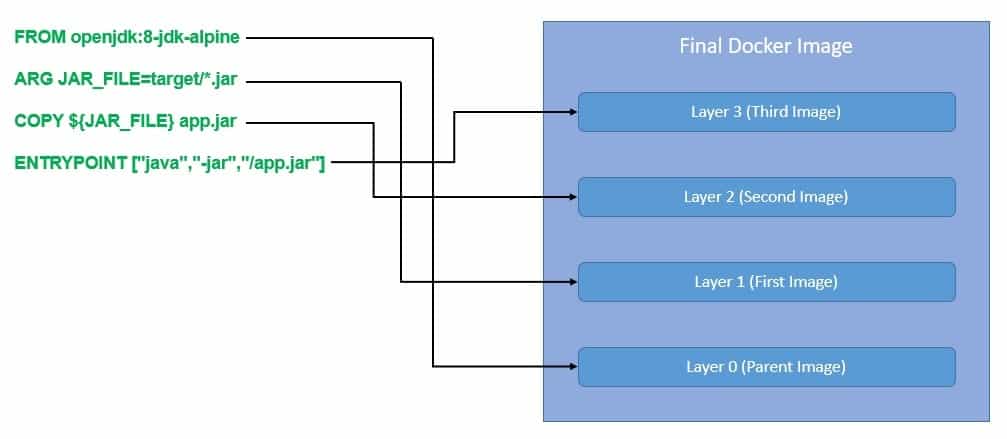
As we can see above, we most often start from a parent image like 8-jdk-alpine and build more layers on top of it. Each instruction in the Dockerfile results in a layer on top of the parent image. However, many instructions only create temporary intermediate layers.
We can also start from an empty image, also known as the scratch image. We often use the scratch image to build other parent images.
Please note that all the layers in this final image are read-only. When the Docker daemon instantiates a container from this image, it adds a writable layer on the top for the use of the running container:
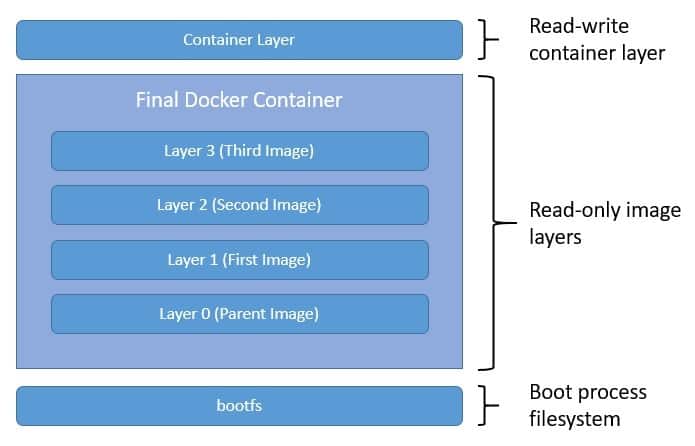
Of course, to benefit from this layered structure of images, we should follow certain best practices in the Dockerfile. We should be careful to keep the build context as minimal as possible to get smaller images. There are also techniques like defining exclusion patterns in .dockerignore, using multi-stage builds to further reduce the image size.
6.4. Storage with Docker
So, we know now that the layers of the filesystem are stacked one over another in a Docker container. But, where are they stored and how do they interact with each other? This is where a storage driver comes into the picture.
Docker uses a storage driver to manage the contents of the image layers and the writable container layer. There are several storage drivers available like aufs, overlay, overlay2, btrfs, and zfs. While each storage driver varies in implementation, they all use stackable image layers and a copy-on-write (CoW) strategy. The CoW is basically a strategy of sharing and copying files for maximum efficiency.
The choice of storage driver depends upon the operating system, distribution of Docker, and the overall performance and stability required. overlay2 is the default and recommended storage driver for most of the Linux distributions.
The data created by a running container goes into the writable container layer with the help of a storage driver. But this way of managing data doesn’t perform very well, and also, the data cease to exist with the container. Docker provides multiple options to manage data in a more performant and persistent manner, like volumes, bind mounts, and tmpfs:
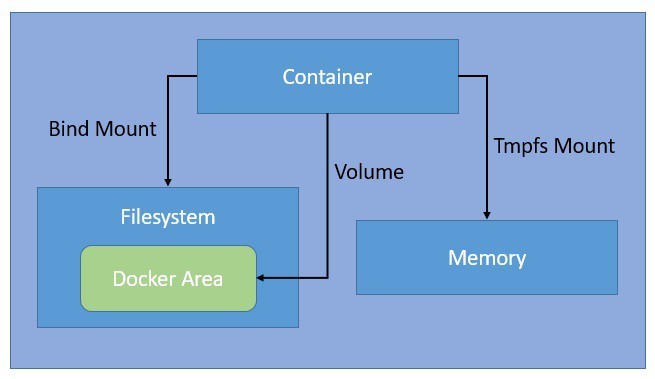
Bind mounts are the simplest and oldest way available in Docker for managing data. They allow us to mount any arbitrary file or directory on the host machine into a container. Volumes also work in a similar fashion, but Docker completely manages them in a specific part of the filesystem.
Since non-Docker processes cannot modify this part of the filesystem, volumes are a better way to manage persistent data in Docker. The tmpfs mounts only remain in the memory of the host machine and never persist on the filesystem.
6.5. Networking with Docker
Docker containers can connect to each other and also with non-Docker workloads without any explicit knowledge of the type of other workloads. This is possible because of the networking subsystem of Docker, which is completely pluggable.
There are several network drivers that we can use to provide this networking functionality:
- bridge: We can use the bridge driver to communicate between applications running in standalone containers
- host: The host driver is useful for when we want to remove the network isolation between container and host and use the host network directly
- overlay: We can use the overlay driver to connect multiple Docker daemons together — for instance, to let swarm services communicate with each other
- macvlan: The macvlan driver enables us to assign a MAC address to a container so that the Docker daemon can route traffic to containers by their MAC address
Apart from this, we can disable networking for a container by using the none driver. Moreover, we can also install and use third-party network plugins or write a network driver plugin to create our own custom drivers.
If we don’t specify a driver, the bridge driver is the default network driver in Docker. There’s a bridge network available by default, which is what Docker launches the container with unless otherwise specified.
We can also create our own bridge network and launch containers with it.
Let’s see how the bridge network works:
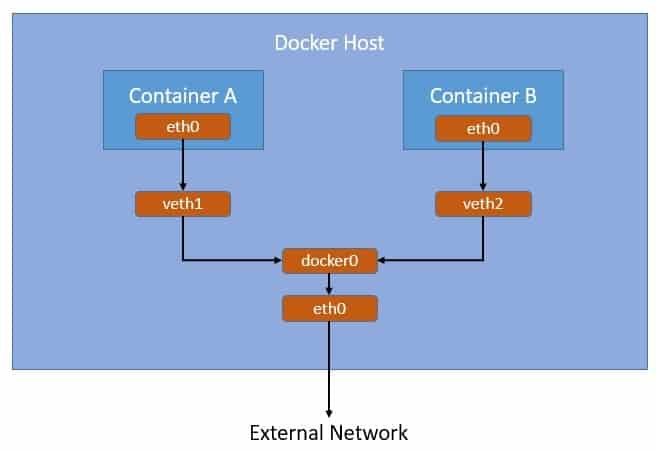
Here, as we can see, Docker creates a bridge network “docker0” by default and links all container networks to it through “vethxx”. Containers connected to this default bridge network can communicate with each other through IP addresses. Further, the bridge network “docker0” connects to the host network “eth0”, hence providing a connection to the external network.
7. Standardization Efforts
We’ve seen how the concept of process isolation has evolved from chroot to modern-day Docker. Today, apart from LXC and Docker there are several other alternatives to choose from. Mesos Containerizer from Apache Foundation and rkt from CoreOS are among the popular ones.
What is essential for interoperability among these container technologies is the standardization of some of the core components. We have already seen how Docker has transformed itself into a modular architecture benefitting from standardizations like containerd and runc.
In this section, we’ll discuss some of the industry collaborations that are driving standardizations in container technology.
7.1. Open Container Initiative
Open Container Initiative (OCI) was established in 2015 by Docker and other industry leaders as a Linux Foundation project. It drives industry standards around container formats and runtime. They maintain two specifications at present: an Image Specification (image-spec) and a Runtime Specification (runtime-spec).
Basically, an OCI implementation downloads an OCI image and then unpacks that image into an OCI runtime filesystem bundle. Then, that OCI runtime bundle can be run by an OCI runtime. There’s a standard reference implementation of OCI runtime known as runc that was originally developed by Docker. There are several other OCI compliant runtimes like Kata Containers.
7.2. Cloud-Native Computing Foundation
Cloud-Native Computing Foundation (CNCF) was also established in 2015 as a Linux Foundation project with an aim to advance container technologies and align the industry around its evolution. It maintains a number of hosted sub-projects including containerd, Kubernetes, Prometheus, Envoy, CNI, and CoreDNS, to name a few.
Here, containerd is a graduated CNCF project that aims to provide an industry-standard core container runtime available as a daemon for Linux and Windows. Container Network Interface (CNI) is an incubating CNCF project that was originally developed by CoreOS and consists of specifications and libraries for writing plugins to configure network interfaces.
8. Container Orchestration and Beyond
Containers present a convenient way to package an application in a platform-neutral manner and run it anywhere with confidence. However, as the number of containers grows, it becomes another challenge to manage them. It’s not trivial to manage deployment, scaling, communication, and monitoring of hundreds of containers.
This is where container orchestration technologies like Kubernetes have started to gain popularity. Kubernetes is another graduated CNCF project that was started originally at Google. Kubernetes provides automation for deployment, management, and scaling of containers. It supports multiple OCI-compliant container runtimes like Docker or CRI-O through Container Runtime Interface (CRI).
Another challenge is related to connecting, securing, controlling, and observing a number of applications running in containers. While it’s possible to set up separate tools to address these concerns, it’s definitely not trivial. This is where a service mesh like Istio comes into the picture — it’s a dedicated infrastructure layer controlling the way applications share data with one another.
9. Conclusion
In this tutorial, we learned the basics of containers and how they are different from virtual machines.
We went through the evolution of containers from the early days of chroot to present-day Docker. Then, we examined the architecture of LXC and understood how it led to the development of Docker. We also discussed in detail the architecture of Docker containers.
Finally, we saw how the container technologies are moving towards standardizing and developing more complex tools for managing containers at scale.