1. Overview
Soft links and hard links are the two types of file links in Linux. A special file that is a reference to another file or directory is described as a soft link, symbolic link or symlink. A hard link, on the other hand, is a direct reference to the same physical location of a file on disk. A soft link can cross file systems and point to non-existent files, while a hard link cannot.
In this tutorial, we’ll see some CLI and GUI tools for automatically replacing files that have identical content with hard links. Typically, the goal of this operation is to save disk space.
2. Precautions
Replacing duplicate files with hard links saves disk space by storing only one copy of the data. However, this approach has several limitations and drawbacks.
2.1. Limitations
Hard links can only be created within the same file system, in the same partition, and on the same device. Also, hard links can’t be created for directories — they’re only for regular files.
We should use hard links with caution, and only when it’s clear that the files should be identical in all aspects, including permissions, ownership, timestamps, and content. If one hard link is modified, the changes are reflected in all other hard links that point to the same file. Therefore, hard links can cause confusion or inconsistency if we need the files to have different future changes, as in the case of configuration files or log files.
We should also note that some backup tools don’t preserve the structure of hard links, or we have to use special options to enable their support. As a result, hard links can make backup or synchronization difficult.
2.2. The Order Doesn’t Matter
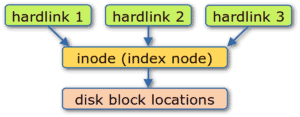
File systems that use inodes, such as ext2, ext3, ext4, XFS, Btrfs, and ZFS, support hard links:
 A hard link is essentially another name for the same inode that contains the file’s metadata and location. For example, if we have a file named A and we create a hard link named B, both A and B are the same file. So, when we use the tools highlighted in this article to replace duplicate files with hard links, we don’t have to worry about which name is the original and which is the hard link because they’re interchangeable.
3. Creating a Test Folder
Let’s start by writing a Bash script that creates a testfiles folder containing various files with random contents, distributed in different subfolders, and with some duplicates:
#!/usr/bin/env bash

directory="testfiles"

# Creates the $directory folder if it doesn't exist
if [ ! -d "$directory" ]; then
    mkdir "$directory"
    echo "Folder \"$directory\" created"
else
    echo "$directory already exists, exiting..."
    exit 1
fi

# Creates five subdirectories with five random files each
for i in {1..5}
do
    subdir="$directory/subdir$i"
    mkdir $subdir
    echo "Subfolder $subdir created"
    for j in {1..5}
    do
        file="$subdir/file$j.bin"
        dd if=/dev/urandom of="$file" bs=1024 count=1024 2>/dev/null
        echo "File $file created (1MiB)"
    done
done

# Creates five duplicate files
cp $directory/subdir1/file1.bin $directory/duplicate1.bin
cp $directory/subdir1/file1.bin $directory/duplicate2.bin
cp $directory/subdir3/file3.bin $directory/duplicate3.bin
cp $directory/subdir5/file4.bin $directory/duplicate4.bin
cp $directory/subdir5/file4.bin $directory/duplicate5.bin
echo "Created five duplicate files"

# Check total space occupied (rounded down in MiB)
totalSize=$(( `du -hks testfiles | cut -f 1 -d \t` / 1024 ))
echo "Total space occupied: $totalSize" MiB

exit 0
As this self-explanatory code suggests, it creates a total of 30 files of 1 MiB each, five of which are duplicates. Let’s run it and take a look at the log:
$ ./testfiles.sh
Folder "testfiles" created
Subfolder testfiles/subdir1 created
File testfiles/subdir1/file1.bin created (1MiB)
[...]
Subfolder testfiles/subdir2 created
[...]
Subfolder testfiles/subdir3 created
[...]
Subfolder testfiles/subdir4 created
[...]
Subfolder testfiles/subdir5 created
[...]
File testfiles/subdir5/file5.bin created (1MiB)
Created five duplicate files
Total space occupied: 30 MiB
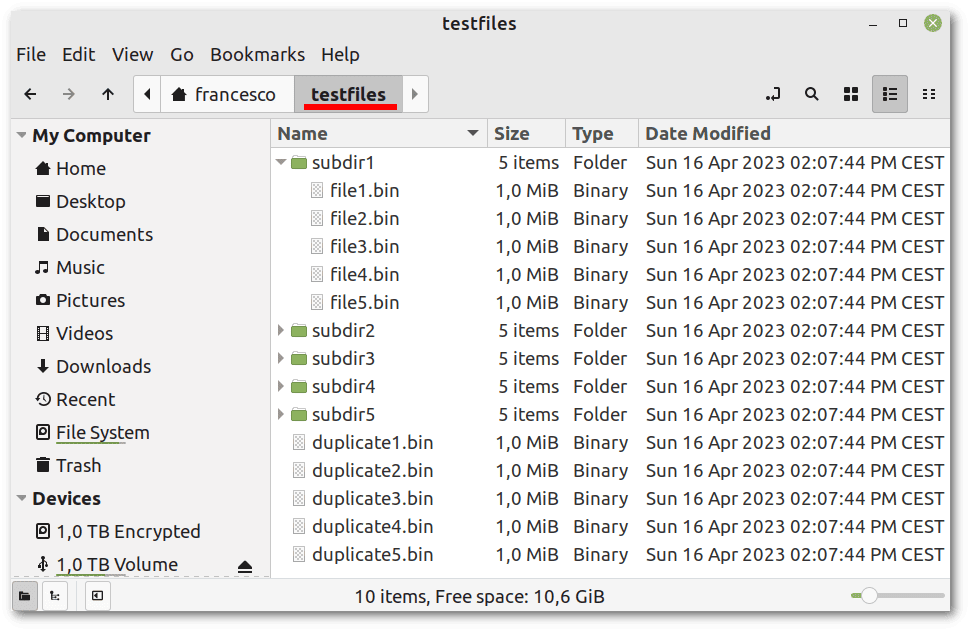
In the distribution’s file manager, let’s see the test files we just created:
 Let’s remember to delete the testfiles folder and recreate it using the above script before testing each tool.
4. CLI Tools
fdupes, rdfind, and jdupes are CLI utilities that can reduce disk space usage by replacing duplicate files with hard links. They’re all available in the package managers of most Linux distributions.
4.1. fdupes
fdupes can show us all duplicate files it finds in the specified folders (and their subfolders, with the -r option). Let’s note that the order of the files in the output of fdupes can change and is irrelevant since only sets of duplicates are important:
$ fdupes -r ./testfiles
./testfiles/subdir1/file1.bin
./testfiles/duplicate1.bin
./testfiles/duplicate2.bin

./testfiles/subdir3/file3.bin
./testfiles/duplicate3.bin

./testfiles/duplicate5.bin
./testfiles/duplicate4.bin
./testfiles/subdir5/file4.bin
This output is correct and parseable by the Bash built-in readarray command, taking into account that each set of duplicate files is separated by a blank line.
Based on that, let’s write another Bash script, which we can save as noDuplicates.sh, that parses the output of fdupes and replaces duplicates with hard links:
#!/usr/bin/env bash
if [ -z "$1" ]
then
  echo "Please specify the directory in which to search for duplicates"
  exit 1
fi
echo "Looking for all duplicates in the $1 folder and its subfolders..."

totalSizeBefore=$(( `du -hks testfiles | cut -f 1 -d \t` / 1024 ))

readarray -t myarray <<<`fdupes -r "$1"`
myfile=""
count=0
for i in "${myarray[@]}"
do
    count=$(( $count + 1 ))
    if (( count == 1 )); then
        myfile=$i
        continue
    fi

    if test -z "$i" # test if $i is empty
    then
        count=0
        continue
    else
        ln -f "$myfile" "$i" # the -f flag avoids the need of "rm $i"
        echo "\"$i\" hard linked to --> \"$myfile\""
    fi

    myfile=$i
done

totalSizeAfter=$(( `du -hks testfiles | cut -f 1 -d \t` / 1024 ))
echo "Total space occupied before: $totalSizeBefore" MiB
echo "Total space occupied after:  $totalSizeAfter" MiB
In short, this Bash script uses an algorithm that reads the output of fdupes line by line and replaces each file with a hard link to the previous one, if one exists. This implementation has two positive aspects:
- support for filenames containing spaces or other special characters
- no use of rm, so no accidental deletion of files
Let’s see how it runs after removing and recreating our test folder:
$ rm -fR testfiles
$ ./testfiles.sh
Folder "testfiles" created
[...]
Created five duplicate files
Total space occupied: 30 MiB
$ ./noDuplicates.sh ./testfiles
Looking for all duplicates in the ./testfiles folder and its subfolders...
"./testfiles/duplicate1.bin" hard linked to --> "./testfiles/subdir1/file1.bin"
"./testfiles/duplicate2.bin" hard linked to --> "./testfiles/duplicate1.bin"
"./testfiles/duplicate3.bin" hard linked to --> "./testfiles/subdir3/file3.bin"
"./testfiles/duplicate4.bin" hard linked to --> "./testfiles/duplicate5.bin"
"./testfiles/subdir5/file4.bin" hard linked to --> "./testfiles/duplicate4.bin"
Total space occupied before: 30 MiB
Total space occupied after:  25 MiB
The result is as expected.
4.2. rdfind
rdfind can find duplicate files, delete them, or replace them with either soft or hard links. For the latter, the -makehardlinks true option is sufficient without any additional scripting on our part.
By default, a log file named results.txt is created. However, to customize the name of the log file, we can use the -outputname
Let’s test rdfind using our testfiles folder:
$ rm -fR ./testfiles
$ ./testfiles.sh
$ rdfind -makehardlinks true -outputname rdfind.log ./testfiles
Now scanning "./testfiles", found 30 files.
Now have 30 files in total.
Removed 0 files due to nonunique device and inode.
Total size is 31457280 bytes or 30 MiB
[...]
It seems like you have 8 files that are not unique
Totally, 5 MiB can be reduced.
Now making results file rdfind.log
Now making hard links.
Making 5 links.
The result is as expected: five hard links and 5 MiB saved. rdfind.log contains lines such as:
# duptype id depth size device inode priority name
DUPTYPE_FIRST_OCCURRENCE 3 0 1048576 2053 1193566 5 ./testfiles/duplicate3.bin
We can see the Files section of the manual for details on understanding the meaning of these log lines.
4.3. jdupes
jdupes is an improved fork of fdupes that aims to provide more features and better performance. In particular, it allows the replacement of duplicates with hard links via the -L option, without the need for additional scripting on our part.
Let’s test jdupes using our testfiles folder:
$ rm -fR ./testfiles
$ ./testfiles.sh
$ jdupes --recurse -L ./testfiles
Scanning: 30 files, 6 items (in 1 specified)
[SRC] ./testfiles/duplicate3.bin
----> ./testfiles/subdir3/file3.bin

[SRC] ./testfiles/duplicate1.bin
----> ./testfiles/duplicate2.bin
----> ./testfiles/subdir1/file1.bin

[SRC] ./testfiles/duplicate4.bin
----> ./testfiles/duplicate5.bin
----> ./testfiles/subdir5/file4.bin
Again, the result is as expected. The output is clear and easy to understand.
5. GUI Tools
FSlint and Czkawka are both free and open source GUI tools that can find and remove unnecessary files, even replacing duplicate files with hard links.
5.1. FSlint
FSlint is a utility that finds various forms of “lint” on a file system, such as duplicate files, bad symbolic links, empty directories, temporary files, and more. It has both GUI and command-line modes. FSlint is no longer actively maintained, but it still works well on some modern systems.
Assuming we have snapd installed, installing FSlint is straightforward:
$ sudo snap install fslint-unofficial
Download snap "fslint-unofficial" (73) from channel "stable" [...]
[...]
fslint-unofficial v0.1.14 from Tomasz (tgagor) installed
Let’s recreate our testfiles folder:
$ rm -fR ./testfiles
$ ./testfiles.sh
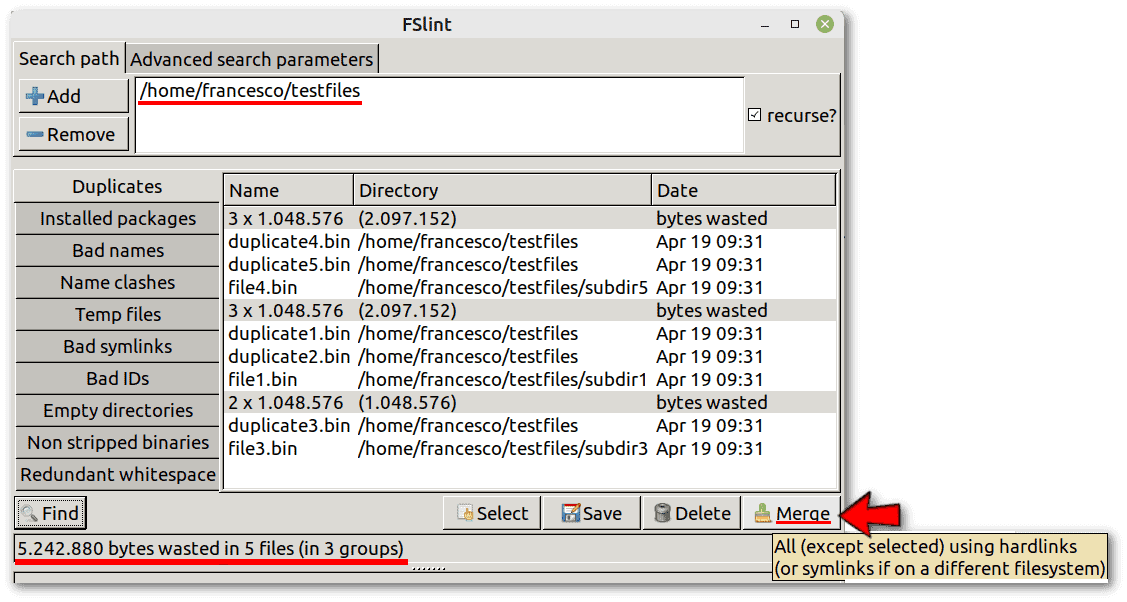
Then, let’s run FSlint from the icon that was automatically added to the applications menu of our distribution. The default options are fine as they are. All we have to do is choose the search path, click Find and then Merge:
 Using the file manager of our distribution, we can easily verify that the size of the testfiles folder has been reduced from 30MiB to 25MiB, as expected.
5.2. Czkawka
Czkawka is an actively-developed multifunctional application that can find duplicates, empty folders, similar images, similar videos, same music, invalid symbolic links, corrupted files, and more. In this case, also, we can use snapd for installation. However, this time, the installation is time-consuming because it requires downloading a lot of dependencies:
$ sudo snap install czkawka
[...]
czkawka 4.1.0 from Rafał Mikrut (turkimlafarq) installed
Again, let’s recreate our testfiles folder:
$ rm -fR ./testfiles
$ ./testfiles.sh
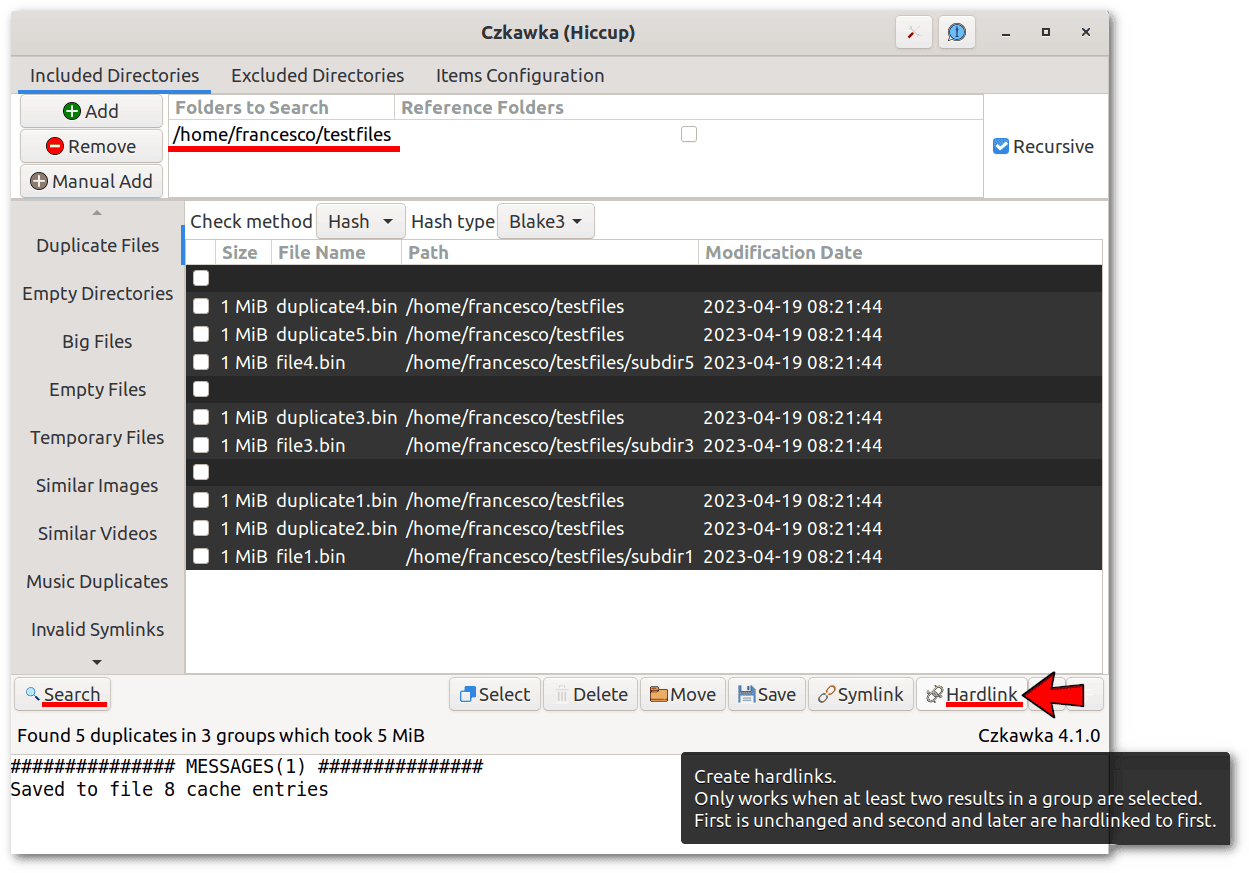
Then, let’s start Czkawka from the applications menu of our distribution. Again, the default options are fine. The interface is very similar to the FSlint interface we saw earlier.
Let’s select the testfiles folder, click on Duplicate Files, then on Find, select all duplicate files in the list, and finally, click on Hardlink:
 Again, we can easily verify with our distribution’s file manager that the size of the testfiles folder has been reduced from 30MiB to 25MiB, as expected.
6. Conclusion
In this article, we’ve seen some CLI and GUI tools for Linux that replace duplicate files with hard links to save disk space.
However, before using hard links, it’s advisable to check the compatibility and impact of this operation with the specific files and tools involved. Alternatively, we can use other methods to reduce disk space usage, such as compression, moving some files or directories from one file system to another to balance disk space usage, or safely deleting unnecessary or temporary files that we no longer need using BleachBit or similar utilities.