1. Overview
In this tutorial, we’ll explore gocryptfs, a little-known but actively developed project to perform file-based encryption on Linux. It’s fast, lightweight, well-documented, and usually easy to install or compile manually.
In contrast to disk-encryption software, which operates on whole disks, gocryptfs works on individual files that can be backed up or synchronized efficiently using standard tools like rsync or Dropbox-like apps.
2. Basic Concepts of gocryptfs
gocryptfs has two modes of operation, forward and reverse, making it suitable for different use cases.
It works in forward mode if files on disk are encrypted and decrypted on the fly on a FUSE virtual file system.
Conversely, it works in reverse mode if files on disk are unencrypted and encrypted on the fly on a FUSE virtual file system.
In either mode, when we add, remove or modify the unencrypted files, gocryptfs automatically updates their corresponding encrypted copies. This is well illustrated in the following animation, taken from the official documentation: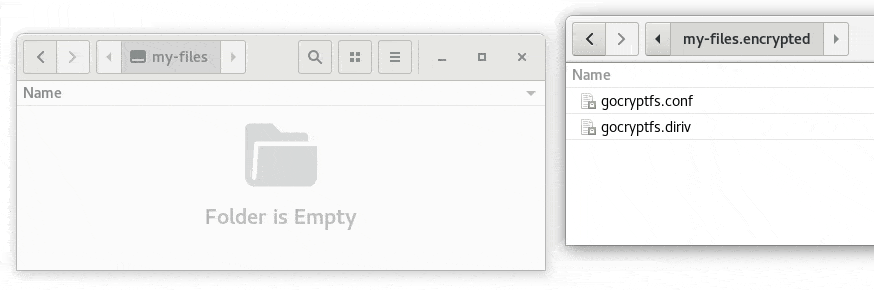 Let’s note that the directory on the right contains the files gocryptfs.conf and gocryptfs.diriv.
2.1. gocryptfs.conf and gocryptfs.diriv
We only really need to delve into the contents of these files if we want to study the details of the gocryptfs implementation. But it’s not our tutorial case. For our purposes, some basic information is enough.
In short, every directory gets a 128-bit initialization vector stored as gocryptfs.diriv, a binary file necessary to encrypt and decrypt file names. So, as we’ll see later, if we don’t encrypt file names, there’ll be no gocryptfs.diriv file.
Instead, gocryptfs.conf is an inspectable JSON file containing a password-encrypted master key and other data. Let’s look at an example, omitting most of the information for brevity:
{
    "Creator": "gocryptfs v2.3.0-5-g7ee4c8e",
    "EncryptedKey": "+wDafl3HQYQ/coWSM10ag8fahkcXAplsK2jFLCP0+54SxMwgidhRRonW6hC0bNy7S2XDJc94+XDStMxWjtwZ+A==",
    "ScryptObject": {
        [...]
    },
    "Version": 2,
    "FeatureFlags": [
        [...]
    ]
}
If we lose this file, we can no longer decrypt our data unless we saved the master key in its unencrypted form in a safe place, as explained below.
However, the gocryptfs.the conf file is useless in an attacker’s hands, so we can safely include it in our backup, except if our password is too simple. We’ll explore this detail about security later.
2.2. Advantages of Not Encrypting File Names
In the case of a privacy-oriented encrypted backup, the right balance between total privacy and backup usability is a matter of trade-offs. Undoubtedly, the encryption of all file and directory names makes it impossible for an attacker to guess the backup contents and where to find a specific file. The problem is that this impossibility is also there for us, the legitimate backup owners. In fact, let’s suppose we have hundreds of thousands or millions of files and want to recover a particular one. In that case, it’s an absolute nightmare if all the names are encrypted.
It’s possible to encrypt and decrypt file names from the Linux terminal, as it only takes a few commands. The problem is that it’s not a practical solution for large amounts of files and directories.
For instance, let’s suppose we have a cipher directory containing the encrypted files and a plain directory containing the corresponding decrypted files. Inside chiper is a file aDTGcrLcHbx83G07V2ZU4w. Let’s decrypt its name using gocryptfs in conjunction with gocryptfs-xray:
$ gocryptfs -ctlsock myfs.sock cipher plain
Password:
Decrypting master key
Filesystem mounted and ready.
$ gocryptfs-xray -decrypt-paths myfs.sock
aDTGcrLcHbx83G07V2ZU4w
test.txt
We successfully decrypted the file name, which is test.txt. However, we want to avoid repeating these manual commands for many files. So, in the rest of this tutorial, we’ll use the -plaintextnames option of gocryptfs to prevent encryption of file names.
3. Forward Mode
Let’s now explore the forward and the reverse modes in more detail, keeping in mind what we’ve seen so far.
First, let’s create the cipher and plain directories. As in the previous example, the former contains the encrypted files and the latter the unencrypted ones:
$ mkdir cipher plain
Let’s initialize the new encrypted filesystem via -init, followed by the required options, such as -plaintextnames in our case. This command instructs gocryptfs to create the gocryptfs.conf file, and we only need to run it once:
$ gocryptfs -init -plaintextnames cipher
Choose a password for protecting your files.
Password:
Repeat:

Your master key is:

    4f60abc1-d3bc8e0e-4391fd09-b7c690ba-
    20b46e81-9f05d415-e8535b42-b9e97c1c

[...]
Let’s save the master key safely away from prying eyes. Moreover, let’s verify that the gocryptfs.conf file has been created:
$ ls ./cipher
gocryptfs.conf
$ cat ./cipher/gocryptfs.conf
{
    "Creator": "gocryptfs v2.3.0-5-g7ee4c8e",
    "EncryptedKey": "M9m/VFuN3H40HgFm2JAp5gHONwaDKy31D03h1YS1eSlb7+Mzu/xslWPc7v3zUVbu1TSZ+R4yHML+XUFEhoT/aw==",
    [...]
}
Let’s mount the plain directory:
$ gocryptfs cipher plain
Password:
Decrypting master key
Filesystem mounted and ready.
Inside plain, let’s download an image and check the file type using the file command:
$ wget -O ./plain/testimg.jpg https://testimages.org/img/testimages_screenshot.jpg
[...]
$ file ./plain/testimg.jpg
./plain/testimg.jpg: JPEG image data, JFIF standard 1.01, [...]
Let’s verify that the encrypted version of this file is in cipher. Its expected file type is “data“*,* meaning a binary file not corresponding to any known file type:
$ file ./cipher/testimg.jpg
./cipher/testimg.jpg: data
Encrypted files have a small storage overhead. That is, they take up slightly more space than their unencrypted version. Let’s check the size in bytes:
$ stat -c "%s" ./plain/testimg.jpg
90999
$ stat -c "%s" ./cipher/testimg.jpg
91753
Finally, when we no longer need the plain directory, we can unmount it:
$ fusermount -u ./plain
Let’s keep in mind that forward mode can be prone to corruption problems, with the risk of losing all data. This is a generic issue that applies to all file-based encryption tools that keep only encrypted versions of files on disk. It’s a problem from which gocryptfs is not exempt. From this point of view, the reverse mode is more reliable.
4. Reverse Mode
Reverse mode is similar to forward, with the only significant difference being that files on disk are unencrypted, and those mounted in the virtual file system are encrypted. Let’s quickly review analogous examples to the previous ones:
$ mkdir plainReverse cipherReverse
$ gocryptfs -reverse -init -plaintextnames plainReverse
Choose a password for protecting your files.
[...]
Your master key is:
[...]
$ gocryptfs -reverse plainReverse cipherReverse
Password:
Decrypting master key
Filesystem mounted and ready.
$ cat ./cipherReverse/gocryptfs.conf
{
    "Creator": "gocryptfs v2.3.0-5-g7ee4c8e",
    [...]
}
$ wget -O ./plainReverse/testimg.jpg https://testimages.org/img/testimages_screenshot.jpg
[...]
$ file ./plainReverse/testimg.jpg
./plainReverse/testimg.jpg: JPEG image data, JFIF standard 1.01 [...]
$ file ./cipherReverse/testimg.jpg
./cipherReverse/testimg.jpg: data
Compared to forward mode, we have an extra configuration file hidden in the plainReverse directory, named .gocryptfs.reverse.conf. It’s nothing more than a copy of gocryptfs.conf and must not be deleted under any circumstances:
$ diff -s ./plainReverse/.gocryptfs.reverse.conf ./cipherReverse/gocryptfs.conf
Files ./plainReverse/.gocryptfs.reverse.conf and ./cipherReverse/gocryptfs.conf are identical
Unlike forward mode, which provides read and write mounting, reverse mode allows read-only mounting exclusively:
$ cat /proc/mounts|awk '{print $1 "\011" substr($4,0,2)}' | grep plainReverse
/home/francesco/plainReverse    ro
In this output, “ro” stands for read-only. A read-only file system is perfect with rsync and dramatically reduces the chance of data corruption or unintentional errors. However, for proper synchronization with rsync, the modification date of the original unencrypted files and their encrypted versions must be the same. Let’s verify that:
$ date -r ./plainReverse/testimg.jpg
Wed Jan 31 12:04:44 PM CET 2018
$ date -r ./cipherReverse/testimg.jpg
Wed Jan 31 12:04:44 PM CET 2018
In the end, let’s remember to unmount cipherReverse:
$ fusermount -u ./cipherReverse
As a side note, the reverse mode’s encryption algorithm (AES-SIV) differs from the forward mode’s (AES-GCM). However, as we’d expect, the forward mode smoothly decrypts files encrypted with reverse mode.
5. Best Security Practices
A good security practice is to keep the unencrypted master key in a safe place, as it may come in handy in emergencies.
Besides that, our password must be resistant to brute-force attacks, and we must use an updated version of gocryptfs.
As for the password, it must have at least 64 bits of entropy. In simple words, it must contain a nontrivial sequence of uppercase and lowercase characters, numbers, and special symbols and be at least ten characters long.
About using an updated version of gocryptfs, if our Linux distribution includes an outdated version, we have to compile it manually.
We can quickly check which version we’re using:
$ gocryptfs -version
gocryptfs v2.3.0-5-g7ee4c8e without_openssl; [...]
The releases page on GitHub indicates the latest version available.
6. Recovering gocryptfs.conf Using the Master Key
In the previous forward mode example, gocryptfs provided us with our unencrypted master key after performing initialization via -init. Let’s see how to recreate gocryptfs.conf if needed, using that master key.
First, let’s rename gocryptfs.conf to simulate that we no longer have it:
$ mv ./cipher/gocryptfs.conf ./cipher/gocryptfs.conf.old
$ gocryptfs cipher plain
Cannot open config file: open /home/francesco/cipher/gocryptfs.conf: no such file or directory
Then, we need to create a new gocryptfs.conf file in a temporary directory before moving it to our encrypted directory. It’s crucial to run -init with the same parameters used previously, in our case -plaintextnames:
$ mkdir temp
$ gocryptfs -init -plaintextnames temp
[...]
$ mv ./temp/gocryptfs.conf ./cipher/
$ rm -fR ./temp
After that, let’s replace the newly created master key with the old one we saved:
$ gocryptfs -passwd -masterkey 4f60abc1-d3bc8e0e-4391fd09-b7c690ba-20b46e81-9f05d415-e8535b42-b9e97c1c cipher
Using explicit master key.
[...]
That’s everything. Let’s verify that we can access our encrypted files:
$ gocryptfs cipher plain
Password:
Decrypting master key
Filesystem mounted and ready.
$ file ./plain/testimg.jpg
./plain/testimg.jpg: JPEG image data, [...]
As an optional security measure, let’s clean up the list of all commands executed from the terminal so that our master key does not remain stored in it:
$ history -c
Finally, in the cipher directory, we can remove the temporary files gocryptfs.conf.old and gocryptfs.conf.bak. We had created the former at the beginning of this procedure, and gocryptfs created the latter when we changed the master key.
7. Conclusion
In this article, we’ve explored the most common uses of gocryptfs. However, the official documentation deals with more specific use cases, such as various ways to achieve automatic gocryptfs mounting at user login. We can also ask for help by writing on the Issues page on GitHub.
However, we should rely on an encryption solution only if we have a complete data backup. This is the first rule to mitigate the effect of possible data loss or corruption.