1. Overview
IP camera viewer tools allow us to view and record live video streams from multiple IP cameras simultaneously. In addition to real-time viewing, we can use them to manage, monitor, and detect a particular movement in the video stream.
Moreover, IP camera viewer tools are particularly useful in remote monitoring, home security, and surveillance. We can easily integrate them with home automation systems to enhance security.
In this tutorial, we’ll explore two IP camera viewer tools in Linux.
2. Using Motion
Motion is a multifunctional IP camera viewer tool in Linux. Notably, it provides various features such as motion detection, image capturing, web interface, and customizable configuration setting options. Additionally, we can integrate the Motion tool with other systems using scripts and APIs.
2.1. Installation
Before using the Motion tool, let’s ensure it’s installed in our system.
To install the Motion tool in Debian-based systems, we utilize the apt command:
$ sudo apt install motion
Furthermore, if we’re using Arch and Arch-based derivatives, we need the yay tool, an AUR helper, to install Motion.
Hence, let’s install the yay tool using the pacman command:
$ sudo pacman -S yay
After successful execution, we can use the yay tool to install Motion via the motion-git package:
$ yay -S motion-git
Finally, let’s verify the installation status of the Motion tool:
$ motion -h
motion Version 4.3.2, Copyright 2000-2019 Jeroen Vreeken/Folkert van Heusden/Kenneth Lavrsen/Motion-Project maintainers
Home page : https://motion-project.github.io/
...
As the output indicates, we’ve successfully installed the tool in our system, and it’s ready to use.
2.2. Configuration
The next step is to configure the Motion tool properly so that we can connect it to an IP camera.
Let’s open the configuration file of the Motion tool, which we can find inside the /etc/motion/ directory. Moreover, we use the nano editor to open the configuration file:
$ sudo nano /etc/motion/motion.conf
# This config file was generated by motion 4.3.2
# Documentation:  /usr/share/doc/motion/motion_guide.html
#
# This file contains only the basic configuration options to get a
# system working.  There are many more options available.  Please
# consult the documentation for the complete list of all options.

############################################################
# System control configuration parameters
############################################################

# Start in daemon (background) mode and release terminal.
daemon off

# Start in Setup-Mode, daemon disabled.
setup_mode off
...
Furthermore, we need to make some changes to the configuration file so that it can connect with the targeted IP camera.
First, we need to enable the daemon mode in the configuration file. This ensures that the Motion tool runs uninterruptedly in the background:
# Start in daemon (background) mode and release terminal.
daemon on
Moreover, we set the port number in the configuration file to correctly access the video stream from the IP camera. In this case, we specify port 8081 for serving the streamed video:
# The port number for the live stream.
stream_port 8081
The final step is to add the IP address of the IP camera:
# The IP address of the IP camera
netcam_url http://192.168.1.100:8080/video
Here, the IP address of the IP camera is 192.168.1.100, and 8080 denotes the port where the IP camera is streaming its video feed.
After setting all the necessary parameters, we save the configuration file and exit from the nano editor.
2.3. Usage
Now, it’s time to run the Motion tool. We’re using the systemctl command to start the tool:
$ sudo systemctl start motion
After the successful execution of the command, we open the web browser and enter the URL of the Motion server, which is the IP address of the system in which Motion is running. Along with the IP address of the Motion server, we also specify the port number used for streaming the IP camera, which we set earlier. Therefore, considering the IP address of the system is 192.168.1.5, let’s take a look at the URL we need to enter:
http://192.168.1.5:8081
Now, the web browser should display the live video feed from the IP camera.
3. Using VLC
VLC is a popular and versatile media player tool in Linux that supports an extensive list of audio and video formats. Additionally, we can use it to stream video from local networks, record videos, manage playlists, and convert files.
Moreover, VLC supports both a graphical user interface (GUI) and a command-line interface (CLI) in Linux.
3.1. Installation
First, let’s make sure we’ve installed VLC in our system.
In Debian-based systems, we can utilize the apt command to install VLC from the terminal:
$ sudo apt install vlc
Moreover, in the case of Arch and Arch-based derivatives, we can utilize the pacman command to install VLC:
$ sudo pacman -S vlc
Furthermore, let’s check the version of the tool to ensure that we’ve installed it correctly:
$ vlc --version
VLC media player 3.0.16 Vetinari (revision 3.0.13-8-g41878ff4f2)
...
As we can see, the installation is completed.
3.2. Usage
After the installation, we can start VLC by searching for it in the start menu or by executing the vlc command:
$ vlc
Let’s take a look at the GUI of VLC:

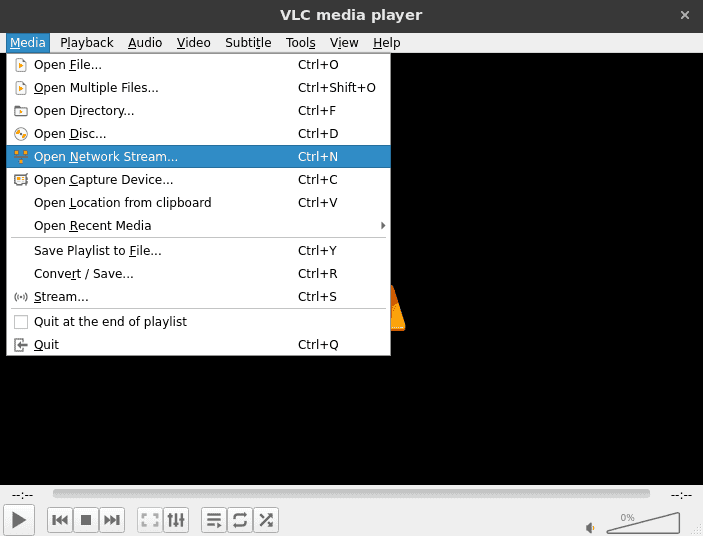
Now, we go to the Media tab and click on the Open Network Stream option:
When we click on the Open Network Steam option, a dialog box will open where we need to enter a URL:
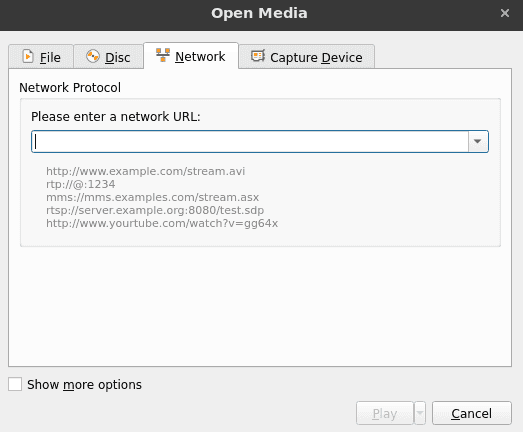
IP cameras often utilize the Real-Time Streaming Protocol (RTSP) for streaming video. Therefore, we must insert the IP camera’s RTSP URL in the network URL field. Let’s take a look at the typical format of an RTSP URL:
rtsp://[username]:[password]@[IP address]:[port]/[path]
Thus, we can gather the username, password, IP address, and port number of the IP camera from the manual. For example, let’s consider the following details for an IP camera:
- username: ipcam
- password: 123456
- IP address: 192.168.1.100
- port number: 8080
- path: video
Hence, as per the example, the RTSP URL of the IP camera would be:
rtsp://ipcam:[email protected]:8080/video
After entering the RTSP address, we click on the Play button in VLC to start streaming the video feed from the IP camera.
4. Conclusion
In this article, we discussed two tools in Linux that can stream video from IP cameras: Motion and VLC.
Along with video streaming, the Motion tool provides advanced functionalities, such as motion detection and a web interface to send user instructions to the IP cameras, which can play a crucial role in surveillance. However, before using the Motion tool, users need to configure it properly.
On the other, VLC can be readily configured to stream video from IP cameras. Additionally, new users can easily use VLC as it provides an easy-to-use GUI in Linux.