1. Overview
LVM (Logical Volume Management) is a concept that splits up one virtual partition into numerous chunks. Also, these chunks can be on different physical partitions or drives.
In this tutorial, we’ll learn how to combine two logical volumes on a single physical volume with LVM.
2. The Concept of LVM
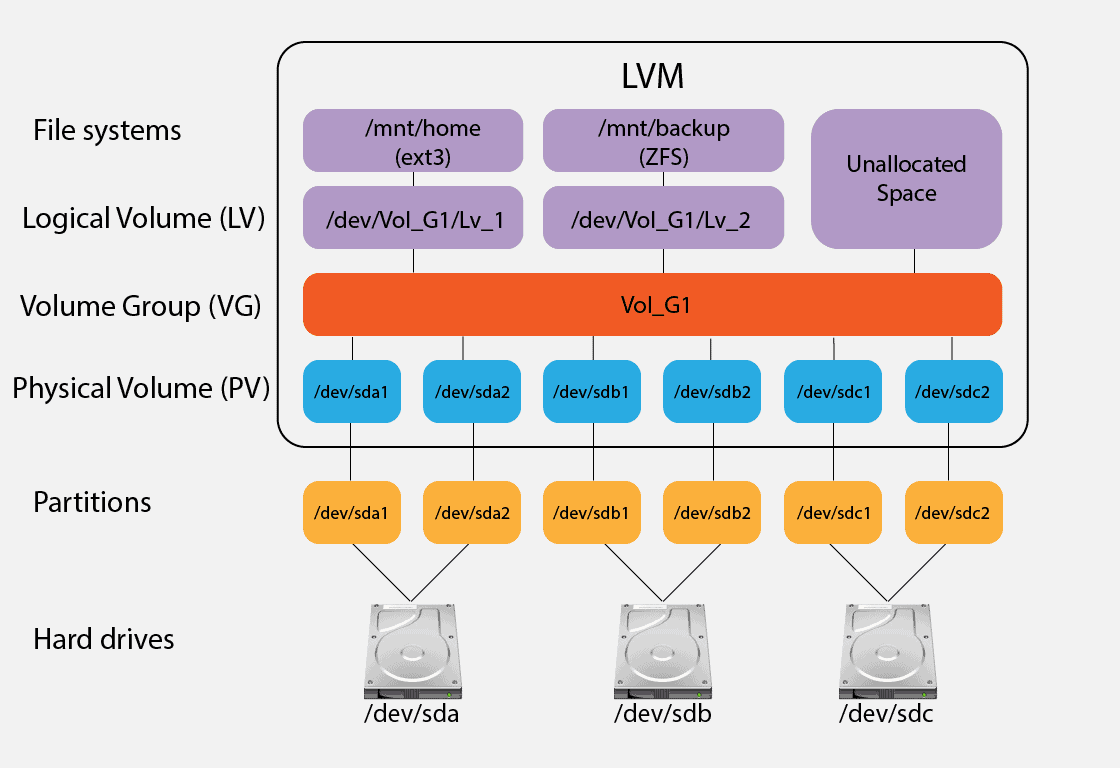
The concept of LVM entails that we can group physical volumes (partitions) into a volume group. Further, we can split the volume group into logical volumes, which look like the system’s normal physical partitions, but can use any number of physical devices.
Thus, we can set up these logical volumes to consist of mountable filesystems:

The space in a volume group is divided into extents with a default size of 4MB. However, we can alter the size when allocating the space in the volume group. In any case, extents are the primary block of LVM allocation.
3. Sample LVM Setup
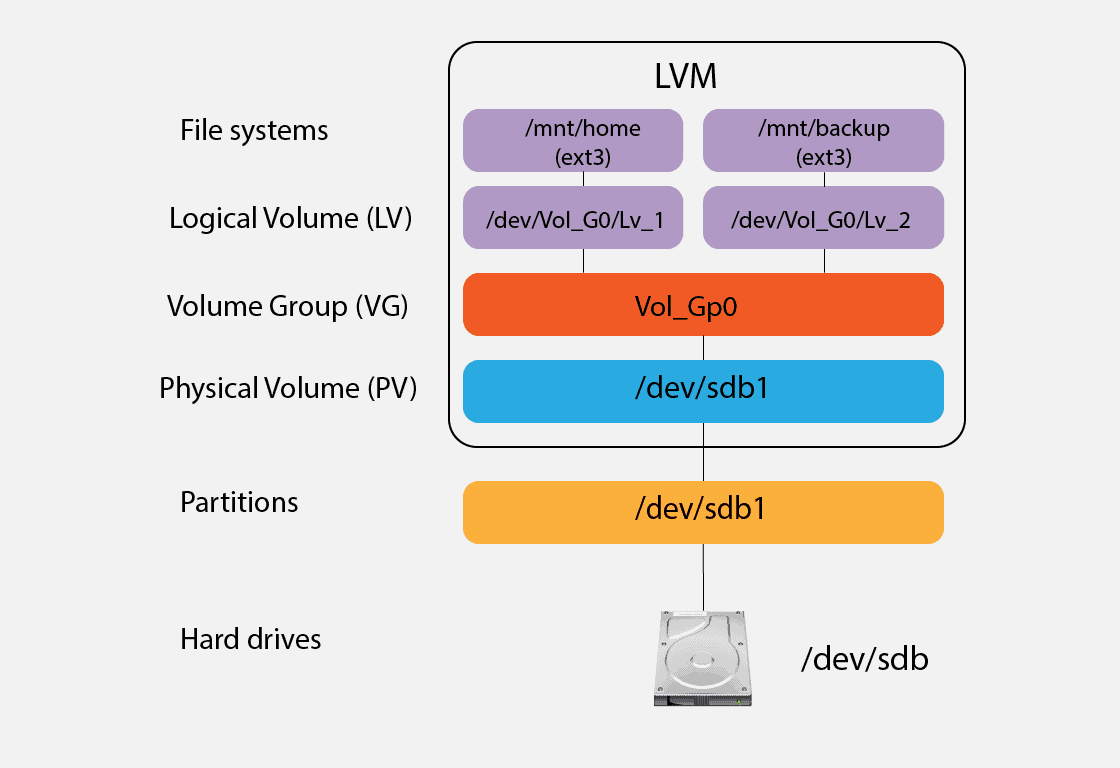
Now, let’s illustrate what our working system LVM setup looks like:

Following the diagram, our target is to combine the logical volumes LV_1 and LV_2.
We can check out the setup via lsblk:
$ lsblk
NAME             MAJ:MIN RM   SIZE RO TYPE  MOUNTPOINTS
sda                8:0    0 465.8G  0 disk
├─sda1             8:1    0     1M  0 part
├─sda2             8:2    0   513M  0 part  /boot/grub
│                                           /boot/efi
├─sda3             8:3    0     2G  0 part
│ └─cryptoswap   253:1    0     2G  0 crypt [SWAP]
├─sda4             8:4    0     2G  0 part
└─sda5             8:5    0 461.3G  0 part
sdb                8:16   1  58.6G  0 disk
└─sdb1             8:17   1  58.6G  0 part
  ├─Vol_Gp0-Lv_1 253:2    0    20G  0 lvm   /mnt/logVol
  └─Vol_Gp0-Lv_2 253:3    0  38.6G  0 lvm   /mnt/logVol2
                                            /media/userX/B3BD-DC87
Here’s what we can deduce from the output:
- physical storage sdb contains the physical volume sdb1
- volume group Vol_Gp0 is based on sdb1
- logical volumes Lv_1 and Lv_2 are based on Vol_Gp0
Thus, we have two logical volumes on the same physical volume. Let’s now proceed to combine these logical volumes.
4. Combining Logical Volumes
First, to work with LVM, we need to have an lvm2 version higher than 2.02.96. Let’s check our lvm version:
$ sudo lvm version
  LVM version:     2.03.11(2) (2021-01-08)
  Library version: 1.02.175 (2021-01-08)
  Driver version:  4.45.0
...
If the lvm version isn’t up-to-date, we need to install the latest version. We can use apt to do this:
$ sudo apt install lvm2
Importantly, logical volumes have their own filesystems, so it might not be possible to merge two logical volumes directly. To do so, we need to adhere to the following steps:
- Unmount the filesystem on one logical volume, Lv_2
- Remove the logical volume
- Extend the size of the remaining logical volume, Lv_1
This is a destructive process, so any information on Lv_2 is going to be lost. Backups of important information on both Lv_1 and Lv_2 are recommended.
4.1. Unmount and Check Filesystems
To unmount the filesystem on a logical volume, we can use the umount command:
$ sudo umount /mnt/logVol2
Notably, /mnt/logVol2 is the mount point of Lv_2.
Further, let’s run a check on the logical volume to ensure it’s in a good state:
$ sudo e2fsck -f /dev/mapper/Vol_Gp0-Lv_2
e2fsck 1.46.5 (30-Dec-2021)
Pass 1: Checking inodes, blocks, and sizes
Pass 2: Checking directory structure
Pass 3: Checking directory connectivity
Pass 4: Checking reference counts
Pass 5: Checking group summary information
/dev/mapper/Vol_Gp0-Lv_2: 11/2531328 files (0.0% non-contiguous), 236728/10116096 blocks
Here, the -f flag of e2fsck forces a check of the filesystem, which may take a while.
4.2. Remove One Logical Volume
Again, it’s usually not possible to directly merge two logical volumes. Hence, we’ll alter one of the logical volumes and extend the other.
To remove Lv_2, let’s use the lvremove command:
$ sudo lvremove /dev/mapper/Vol_Gp0-Lv_2
Do you really want to remove and DISCARD active logical volume Vol_Gp0/Lv_2? [y/n]: y
  Logical volume "Lv_2" successfully removed
Further, we can check the volume group to ascertain our changes using vgs:
$ sudo vgs
  VG      #PV #LV #SN Attr   VSize   VFree
  Vol_Gp0   1   1   0 wz--n- <58.59g <38.59g
From the output, we verify that volume Lv_2 is gone and the volume group now has free space.
4.3. Extend the Other Logical Volume
Next, we can extend Lv_1 to take up the free space left by Lv_2 in Vol_Gp0:
$ sudo lvextend -l +100%FREE Vol_Gp0/Lv_1
  Size of logical volume Vol_Gp0/Lv_1 changed from 20.00 GiB (5120 extents) to <58.59 GiB (14999 extents).
  Logical volume Vol_Gp0/Lv_1 successfully resized.
In this case, the lvextend command extends the Lv_1 logical volume to occupy the entire space provided by volume group Vol_Gp0. The option +100%FREE means that Lv_1 will extend to all the remaining free space available in the volume group.
Now, let’s check the status of our logical volume via lvdisplay:
$ sudo lvdisplay
  --- Logical volume ---
  LV Path                /dev/Vol_Gp0/Lv_1
  LV Name                Lv_1
  VG Name                Vol_Gp0
  LV UUID                U3MrQ8-IFYI-52Wj-tCCg-ckKu-QtcG-VOMbsp
  LV Write Access        read/write
  LV Creation host, time chrisnzoka-OptiPlex-790, 2023-01-28 07:57:46 +0100
  LV Status              available
  # open                 1
  LV Size                <58.59 GiB
  Current LE             14999
  Segments               1
  Allocation             inherit
  Read ahead sectors     auto
  - currently set to     256
  Block device           253:0
As per the output, the LV Size has indeed increased, and the logical volume has been extended.
However, to utilize the space, we should extend the filesystem as well.
4.4. Extend the Filesystem
Lastly, let’s extend the filesystem to make the added storage capacity available. To do that, we’ll use the resize2fs utility:
$ sudo resize2fs /dev/mapper/Vol_Gp0-Lv_1
resize2fs 1.46.5 (30-Dec-2021)
Filesystem at /dev/mapper/Vol_Gp0-Lv_1 is mounted on /media/chrisnzoka/d364dbd1-1ea8-48ea-8072-607f556924f7; on-line resizing required
old_desc_blocks = 3, new_desc_blocks = 8
The filesystem on /dev/mapper/Vol_Gp0-Lv_1 is now 15358976 (4k) blocks long.
Now, we can see from the data block change that the filesystem has been extended and is now ready to use.
5. Conclusion
In this article, we learned how to merge two logical volumes on a single physical volume with LVM. First, we briefly discussed LVM. Next, we looked at our sample setup. Finally, we freed space from one logical volume in a volume group and expanded another to take that space.