1. Overview
The Media Transfer Protocol (MTP) is a protocol that enables us to transfer data between two devices. MTP is primarily used in devices running the Android operating system.
In this article, we’ll discuss how we can mount the MTP devices under Linux. We’ll cover the gvfs-mtp package, which comes with most major Linux distributions. Afterward, we’ll take a look at the jmtpfs, which allows us to mount and unmount MTP devices using the command line.
2. GVfs
GNOME Virtual File System (GVfs) is a userspace virtual filesystem wrapper around the GNOME Input-Output (GIO) library. GVfs abstracts the inner workings of the GIO library, allowing us to access various filesystems and services without any special technical knowledge.
2.1. gvfs-mtp
GVfs comes with several backends for file systems and services like Apple Mobile Devices (AFC), Google Online Accounts (GOA), and SMB. One of these modules is gvfs-mtp.
The gvfs-mtp module is designed to work solely with MTP devices. It lets us access the MTP devices through a FUSE file system.
2.2. Installation
If we’re on the GNOME desktop environment, chances are we have gvfs-mtp already installed. However, if that’s not the case, we can install it from our distro’s official package repository using a package manager:
# Ubuntu-based
$ apt install gvfs-mtp
# Fedora and RHEL
$ dnf install gvfs-mtp
# Arch-based
$ pacman -S gvfs-mtp
2.3. Connecting the MTP Device
Before we connect our device using MTP:
- our device screen needs to be unlocked first for security reasons
- our device should allow the required privileges to be mounted
- the device should be connected via a USB data cable
Once that’s done, we’ll check whether our device is successfully connected to our machine using lsusb:
$ lsusb | grep -i smartphone
Bus 001 Device 006: ID 12d1:107e Huawei Technologies Co., Ltd. P10 smartphone
Alternatively, we can also use gio to detect our device:
$ gio mount -li | grep activation_root
activation_root=mtp://HUAWEI_HUAWEI_VNS-L21_BUC4C16523021942/
- mount is a sub-command that we can use to mount devices
- -l lists all the mountable devices
- -i prints out a detailed report of each mountable device
If you don’t see your device, refer to system logs to troubleshoot any issues.
2.4. Mount MTP Device Using the CLI
With the gvfs-mtp package installed, we can now mount our MTP device either using the gio utility or a graphical file manager such as GNOME Files.
We can mount our device using the path found in the activation_root field of the gio command:
$ gio mount "mtp://HUAWEI_HUAWEI_VNS-L21_BUC4C16523021942/"
Now, we can access our mounted device using the directory that begins with the mtp:host= directory located in /run/user/$UUID/gvfs:
$ ls -l /run/user/1000/gvfs
2 dr-x------ 1 hey hey 0 Jan  1  1970 'mtp:host=HUAWEI_HUAWEI_VNS-L21_BUC4C16523021942'
Alternatively, we can also mount our device using the Bus and Device Number found in the lsusb output:
$ gio mount "mtp://[usb:001,006]/"
2.5. Unmount MTP Device
We can unmount the device using the -u or –unmount flag of the mount sub-command:
$ gio mount -u "mtp://HUAWEI_HUAWEI_VNS-L21_BUC4C16523021942/"
2.6. Mounting MTP Devices in File Manager
File managers that support GVfs will try to automount the MTP device — depending on how the distro is configured.
However, we can easily mount the MTP device with a click, as we can see in the following illustration:
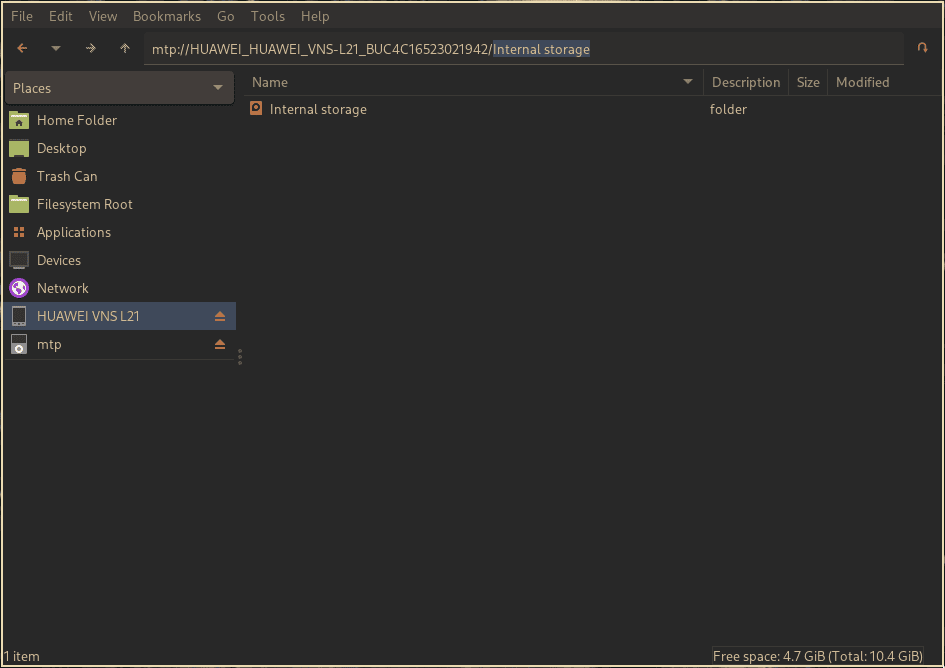
Similarly, we can unmount the device using the eject button shown to the right of the device label.
3. jmtpfs
jmtpfs is a lightweight utility based on libmtp, which we use to read and write data to MTP devices.
3.1. Installation
By default, Linux distros don’t come with jmtps, and it’s not available on most package repositories. Therefore, we need to build it from the source.
Before we install jmtpfs, we should install the libmtp dependency from the official package repository using a package manager.
Now, let’s clone the jmtpfs repository:
$ git clone https://github.com/JasonFerrara/jmtpfs
Now, let’s configure and compile jmtpfs:
$ ./configure
$ make
$ make install
Once that’s successful, let’s verify it:
$ jmtpfs
jmtpfs version: 0.5
3.2. Mounting
By default, MTP devices are only readable/writable by root users. Therefore, we should first allow other users to read and write to the MTP devices.
So, uncomment the user_allow_other option in the /etc/fuse.conf file:
$ sed -i '/user_allow_other/s/^#//g' /etc/fuse.conf
Now, we’re going to mount our MTP device on a directory that has read and write permissions:
$ jmtpfs ~/mtp
3.3. Unmounting
Similarly, we can unmount our device using fusermount:
$ fusermount -u ~/mtp
3.4. Coherence with the Rest of Linux
Additionally, we can make this mount process cohere with the rest of Linux — allowing us to use the regular mount and unmount commands.
First, we’ll create a soft symbolic link of jmtpfs. The link’s name is going to be consistent with the Linux mount conventions like mount.jmtpfs:
$ ln -s /usr/local/bin/jmtpfs /usr/local/bin/mount.jmtpfs
Then, we’ll add an entry for our MTP device in the fstab file:
jmtpfs /home/user/mtp fuse nodev,allow_other,rw,user,noauto,noatime,uid=1000,gid=1000 0 0
Now, we’re ready to mount our device using mount:
$ mount /home/user/mtp
Similarly, we can now unmount our device with umount:
$ umount /home/user/mtp
4. Conclusion
In this article, we covered how we can mount and unmount MTP devices under Linux. We briefly went over what GVfs is and how we can use its gvfs-mtp module to mount and unmount MTP devices in the CLI and File managers.
Finally, we covered the alternative jmtpfs utility to mount and unmount MTP devices and how we can make this utility blend with the Linux mounting convention.