1. Overview
The human factor remains the greatest cybersecurity risk. So, one of the countermeasures is promoting less hacker-prone passwords. On the other hand, let’s notice that less obvious passwords call for facilities to handle them, e.g., automatic login. Therefore, we’re at risk of forgetting the password.
In this tutorial, we’ll study ways to reset the forgotten user’s password.
2. Linux Administration Background
We can allow any user to perform administrative tasks in Linux systems. In detail, we need to be a sudoer to run certain commands. So let’s notice that conclusive is membership of a specific group (sudo or wheel) and configuration of the sudo command. The latter allows fine-grained granting of privileges.
Usually, the first user we’ve created during installation becomes the sudoer.
2.1. Toggling the root Account
Let’s notice that root is a truly administrative user in Linux. However, we should abandon using this account in favor of sudo. So, some Linux distributions lock this account. Thus, let’s check the root account status with passwd:
$ sudo passwd -S root
root LK 2022-09-03 0 99999 7 -1 (Password locked.)
LK tells us that the password is locked. Now, let’s enable root login by setting the password:
$ sudo passwd root
Then, let’s check the status again to find PS indicating a usable password:
$ sudo passwd -S root
root PS 2022-09-04 0 99999 7 -1 (Password set, unknown crypt variant.)
So, we can log in as root and use its shell.
Finally, let’s disable this account by locking the password:
$ sudo passwd -l root
Locking password for user root.
passwd: Success
3. Let’s Ask Colleagues
Surely the first thing we should do if we’ve lost our password is to ask sudoers for help. So let’s look at how joe changes john‘s password:
$ sudo passwd john
Now let’s increase security by forcing john to change the password during the next login:
$ sudo passwd -e john
Expiring password for user john.
passwd: Success
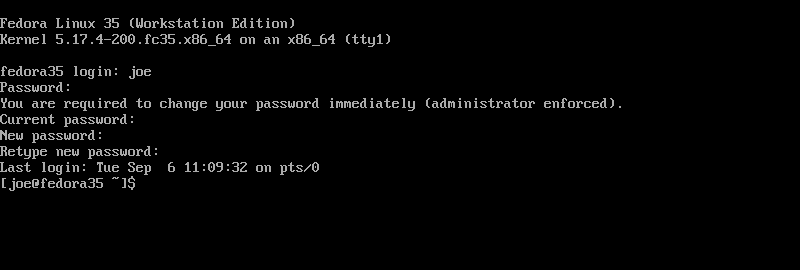
In this way, when logging in to Fedora 35 as john, we’re going to encounter:
4. Password Reset With GRUB
Now let’s use GRUB (GRand Unified Bootloader) to recover the user’s access. To do so, we’ll disrupt the normal startup sequence. Subsequently, we’ll drop to the root shell. So, after the BIOS phase of the booting, we should enter into the GRUB menu.
4.1. The GRUB Recovery Mode
Let’s examine the Ubuntu 22.04 example. So, in the GRUB menu, we’re going to choose ‘Advanced options for Ubuntu’:
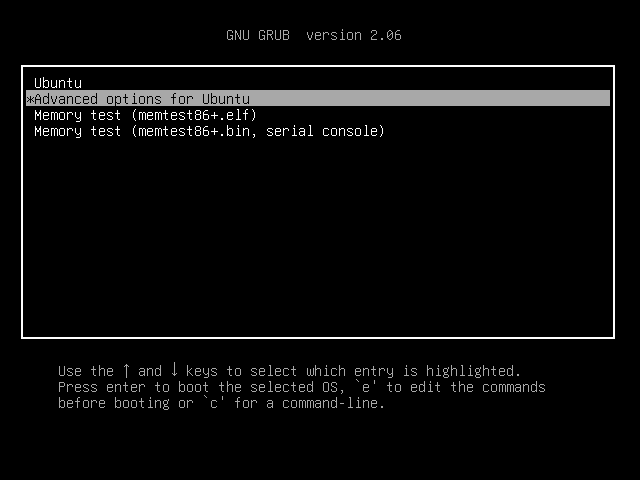
Then, let’s choose an entry labeled as ‘recovery mode’:
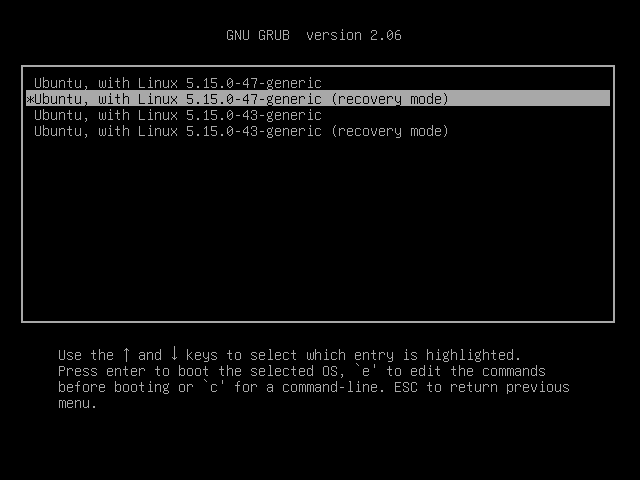
Now we find another menu. So, let’s choose the root entry: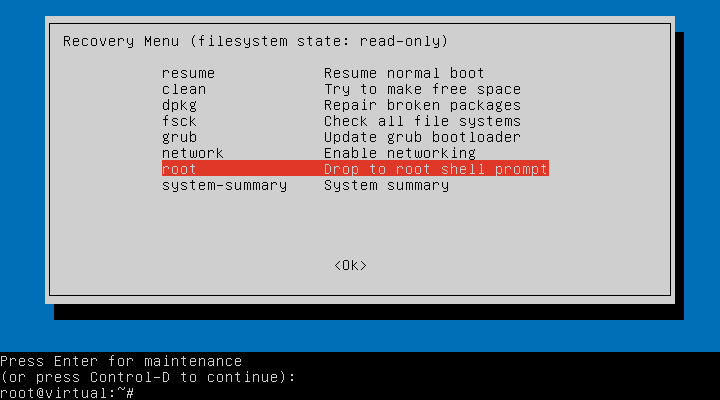
Now we’re in the root console. Then, let’s remount the root/partition in the read/write mode with mount:
# mount -o remount,rw /
So, we can change the user’s password:
$ passwd joe
Finally, we should be aware of the drawback of this method. Thus, if we’ve enabled the root account by setting the password, the system asks us to enter it. So, if it’s the root password that we’ve lost, we’re in trouble now.
4.2. GRUB init Modification
Let’s find out that the GRUB menu may not contain the recovery entry. So, let’s take a look at the Fedora 35 menu:
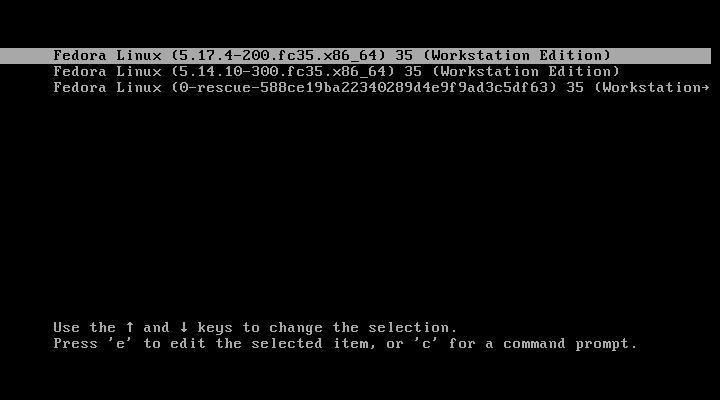
Now we can edit the selected entry with e. Then, we should add init=/bin/bash at the end of the linux line. Let’s notice that init usually points to the systemd system manager. So, we substitute it with the bash shell:
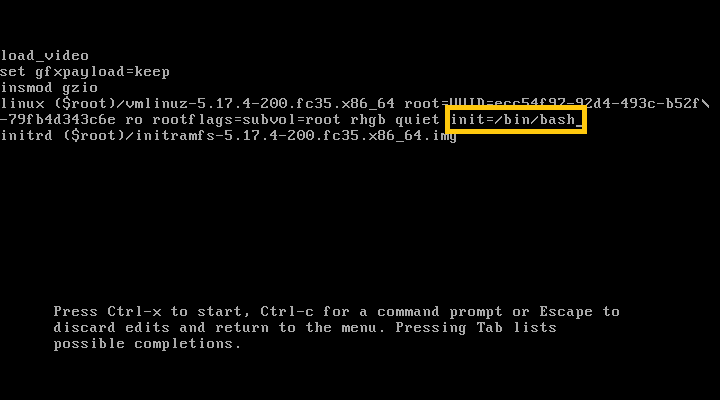
After pressing Ctrl-x, we’re going to end up in the root shell again. Moreover, with this method, we don’t need to know a root password, even if it’s set.
Now, we need to remount the root partition:
# mount -o remount,rw /
Subsequently, we can change the password:
# passwd joe
In the case of Fedora distributions, we should do an additional step:
# touch /.autorelabel
In this way, we force relabelling of the SELinux target policy, as the selinux context of the passwords file has been modified.
Finally, let’s reboot immediately:
# /sbin/reboot -f
4.3. Jumping Into the Text Terminal
Now let’s login into the text terminal from GRUB. This way may be helpful if, after resetting of password, we have trouble login in the graphic mode. For example, some login splash screens don’t manage an expired password. So, let’s again edit the GRUB entry and add 2 at the end of the linux line:
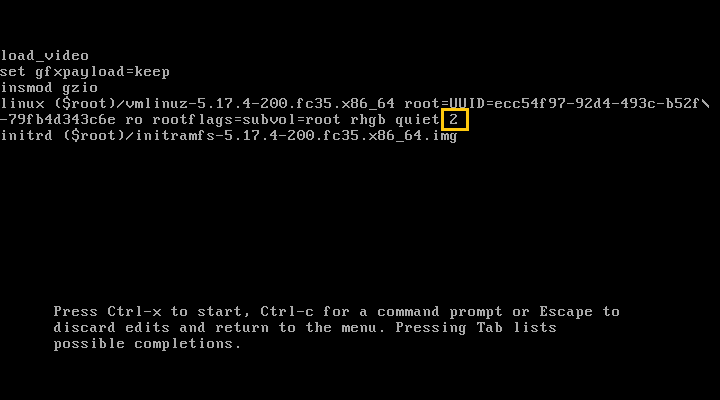
Now let’s take a look at how joe is asked to change an expired password:
We can use numbers 2 through 5 to be prompted to log in as any user. Let’s notice that his parameter is just passed to the init service. Moreover, if we use 1 (also S, s, single, rescue or rd.rescue), we’re going to drop into the root shell. However, with Fedora 35, we need to enable the root account first and know the password to log in.
5. The Live Linux Solution
Let’s consider a case when for some reason, we can’t use GRUB. So, we have no way to login into the original system. However, we can prepare a bootable medium with a live Linux distribution. Then, after booting the live system, we’ll access partitions of the original system.
5.1. Using chroot
We can use chroot to run commands from another root directory. In other words, we’re going to effectively change the location of the root/folder.
First, let’s open a terminal of the live Linux system and list all partitions with fdisk. So we make out that the original system is located most likely on the sda device:
$ sudo fdisk -l
...
Disk /dev/sda: 232.89 GiB, 250059350016 bytes, 488397168 sectors
Disk model: WDC WD2500AAKX-6
Units: sectors of 1 * 512 = 512 bytes
Sector size (logical/physical): 512 bytes / 512 bytes
I/O size (minimum/optimal): 512 bytes / 512 bytes
Disklabel type: gpt
Disk identifier: 6434B434-733C-4AF5-ADFB-703EC6038518

Device         Start       End   Sectors   Size Type
/dev/sda1       2048   7999487   7997440   3.8G Linux filesystem
/dev/sda2    7999488 109561855 101562368  48.4G Linux filesystem
/dev/sda3  109561856 479502335 369940480 176.4G Linux filesystem
/dev/sda4  479502336 488396799   8894464   4.2G Linux swap
...
Now let’s mount the sda1 partition in the mnt folder of the live system:
$ sudo mount /dev/sda1 /mnt
Subsequently, let’s use chroot to switch to the original system:
$ sudo chroot /mnt
chroot: failed to run command ‘/bin/bash’: No such file or directory
As we learned from the error message, sda1 is not the original root partition. So let’s unmount it:
$ sudo unmount /mnt
And try the next one:
$ sudo mount /dev/sda2 /mnt
$ sudo chroot /mnt
#
Now we’re inside a new shell, where we can act as the root of the original system. So, let’s modify joe‘s password:
# passwd joe
New password:
Retype new password:
passwd: password updated successfully
In addition, we can perform other administrative tasks on the user. So, let’s make joe a sudoer by adding him to the sudo group:
# usermod -a -G sudo joe
5.2. The shadow File
Let’s try a way that should be considered as a last resort. Now we’re going to remove the user’s password, or more precisely, leave it empty. So, let’s notice that Linux systems stores the encrypted password in the /etc/shadow file.
First, let’s mount the original root partition:
$ sudo mount /dev/sda2 /mnt
Now we can edit the passwords file with e.g., nano:
$ sudo nano /mnt/etc/shadow
Now let’s just examine what the edition looks like. So, an encrypted password is stored between the first pair of colons:
$ tail -n 1 /etc/shadow
joe:$6$jMciBeIBMdYkFQsy$9IH0vuJHU9vBxZLtlszCp21Ll7clvLZF7U3As7IIF5n0eqQDLu2ydDHId.FBZexGF.vDkufrHHBuIXs7MnkcX/:19239:0:99999:7:::
Thus, we should remove the whole content to obtain:
$ tail -n 1 /etc/shadow
joe::19239:0:99999:7:::
Then, during the next login, joe will enter an empty password.
6. Conclusion
In this tutorial, we reviewed various ways to reset a lost user’s password and recover this person’s account. First, we very briefly covered the Linux privileges system. Then we learned how to manipulate passwords as sudoers and to toggle the root account.
Subsequently, we look through means to reset the password, from mildest to most drastic. First, we used GRUB recovery mode. Then, we modified the parameters passed to init and finally substituted the init itself.
As the next step, we used Linux live distribution to access and run the original system with chroot. Finally, we edited the file which stores passwords.