1. Overview
Securing our local network is essential for protecting sensitive information and communicating safely between devices. One way to enhance security is installing SSL (Secure Sockets Layer) certificates, even on local servers or devices.
SSL certificates encrypt data transmitted between devices. While SSL is commonly associated with websites, implementing it within a local network adds an extra layer of security — more so, when we deal with sensitive information or access web applications internally.
In this tutorial, we’ll go through the process of installing SSL for a local network.
2. Generate SSL Certificate
Generating an SSL certificate is a crucial step in securing communication between clients and servers by encrypting the data transmitted. This process involves creating a public-private key pair and deploying it for the local network. Let’s begin by generating an SSL certificate.
2.1. Using OpenSSL
Using OpenSSL, we create a self-signed certificate for our local network. So, we need to first install OpenSSL to generate the certificate:
$ sudo apt-get install openssl
Generating a Self-Signed Certificate involves creating a .key file and a .crt file. We may simply use the openssl command to generate these files:
$ openssl req -newkey rsa:2048 -keyout localhost.key -out localhost.crt
Let’s break down this command:
- -newkey rsa:2048: Generates a new private key using the RSA algorithm with a 2048-bit length
- -keyout localhost.key: Specifies the output file for the private key
- -out localhost.crt: Specifies the output file for the certificate
The openssl command generates a .key file and a .crt file that we can use when deploying the SSL certificate on the local network.
2.2. Using mkcert
Let’s see how to generate certificates with mkcert. First, we need to install mkcert:
$ mkcert -install
With the installation of mkcert, a new local CA is installed in the system trust store. Nevertheless, let’s now create a local CA (Certificate Authority) valid for ‘localhost’. We do so by generating a .pem and .key file:
$ mkcert localhost 127.0.0.1 ::1
This command generates certificate files (localhost.key and localhost-key.pem) for the specified domain (localhost) and IP addresses (127.0.0.1 and ::1). These files are typically stored in the same directory where the command is run and are used in a development environment to enable SSL.
2.3. Using certbot
Another approach to generate SSL certificates involves using the certbot tool.
Let’s install certbot:
$ sudo apt-get install certbot
This command installs the Certbot tool on our system, allowing us to manage SSL certificates.
Once Certbot is installed, we generate the SSL certificate using the command:
$ sudo certbot certonly --standalone -d domain.local
Let’s understand the parameters it takes:
- certonly –standalone: Instructs Certbot to obtain a certificate without automatically configuring a web server. The standalone mode runs a temporary web server to complete the verification process.
- -d domain.local: Specifies the domain for which the SSL certificate will be generated.
This method usually helps access servers publicly. We may as well use it locally if our domain points to a local IP.
2.4. Using Docker
Another modern approach that we may employ to install a certificate is by using Docker. Before we begin to install SSL, we need to ensure that Docker is installed and running on our system. We then have to generate a .crt and a .key file using openssl or mkcert.
Once generated, let’s write the docker-compose file or Dockerfile to configure SSL for our containerized environment:
FROM nginx:alpine
COPY ./localhost.crt /etc/ssl/certs/
COPY ./localhost.key /etc/ssl/private/
COPY ./nginx.conf /etc/nginx/nginx.conf
EXPOSE 443
CMD ["nginx", "-g", "daemon off;"]
The second and third lines of the Dockerfile handle copying the SSL certificate files into the appropriate directories within the container. These two locations are the standard directories for SSL certificates and key files on many Linux distributions.
By placing the certificate and the key file respectively in /etc/ssl/certs and /etc/ssl/private, the Nginx server within the container will easily access it when configuring SSL.
Once the docker-compose file is written and saved, let’s create a Docker Container with SSL by simply running the container:
$ docker build -t my-ssl-app .
$ docker run -p 443:443 my-ssl-app
The running container then ensures that our server is configured to use SSL.
3. Configure Web Server
Let’s now discuss how to configure a web server like Apache or Nginx to use the SSL certificate. This involves updating the server configuration file to include the path to the SSL certificate. This gets done along with other relevant settings such as the SSL protocol version and cipher suites.
We’ll need to update the server configuration file by adding the following to the configuration of Apache and Nginx respectively:
SSLCertificateFile "/path/to/localhost.crt"
SSLCertificateKeyFile "/path/to/localhost.key"

ssl_certificate /path/to/localhost.crt;
ssl_certificate_key /path/to/localhost.key;
By updating the appropriate configuration files, we ensure that our server is configured to use SSL.
4. Trust the Certificate
Trusting an SSL certificate on all devices within a local network ensures that these devices recognize and trust the certificate as valid. This process involves importing the SSL certificate into the “Trusted Root Certification Authorities” store of each device’s browser or operating system. Let’s see how we do this with examples for different operating systems and browsers.
Before we import the SSL certificate into other devices, we need to export it from our server or from the device where it was generated.
After generating the certificate using either of the methods mentioned above, we would typically have a .crt file (for example, localhost.crt).
Next, let’s import the SSL certificate into a CA Store. This typically involves simply copying the .crt files to the directory /usr/local/share/ca-certificates/:
$ sudo cp your_certificate.crt /usr/local/share/ca-certificates/your_certificate.crt
After the import is complete, we need to run the command to update the system’s CA certificates:
$ sudo update-ca-certificates
The certificate is now trusted across all browsers and applications on our device.
5. Test SSL Connection
Once the certificate is imported and trusted on a device, we can verify it by visiting the site or service that uses the SSL certificate.
We may do so by simply accessing the site locally by navigating to https://our-local-site in a browser on the device.
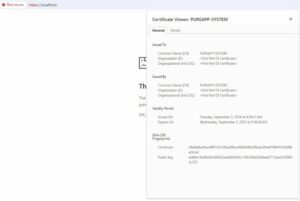
Now, to check the certificate, we click on the padlock in the browser’s address bar and view the certificate details. The browser should now recognize the certificate as valid and trusted:
6. Renew Certificate Periodically
Self-signed certificates have a limited validity period, typically one to two years. Therefore, we have to renew the SSL certificate before it expires to prevent any disruptions in secure communication within our local network.
Let’s say an encrypted certificate is valid for 90 days, so to renew this certificate, we set up a crontab entry to renew it automatically:
$ sudo crontab -e
0 0,12 * * * /usr/bin/certbot renew --quiet --post-hook "systemctl reload nginx"
7. Conclusion
In this article, we discussed how installing SSL for our local network enhances security and protects sensitive information exchanged between devices.
By following the steps outlined in this article, we can create a safer environment for our local network. This also ensures that we mitigate potential security risks effectively. Finally, we need to regularly update and maintain our SSL certificates for continuous protection against emerging threats.