1. Overview
Configuring Linux as a router offers us flexibility, control, and customization options for managing network traffic effectively.
In this tutorial, we’ll look at setting up a Linux server as a router. This will involve configuring network interfaces, enabling routing, setting up firewalld rules, and potentially configuring services like DHCP and DNS.
2. Routing, IP Forwarding, and Network Interfaces
In this section, we’ll look at some of the major networking features we’ll utilize to make our Linux machine act as a router. To maintain proper connectivity, we configure these features to work together.
2.1. Routing
The routing process determines the best path for data packets to reach their destinations within a network. It plays a crucial role in enabling communication between devices in complex networks. Routers exchange routing information and populate their routing tables using a set of rules known as routing protocols.
Some of the most common routing protocols are static and dynamic routing. In static routing, network administrators manually configure routing information into the routing table. Dynamic routing automatically updates routes based on the information exchanged between routers using routing protocols like RIP, OSPF, BGP, and EIGRP.
We can view our current routing information by running the ip route command:
$ ip route
default via 192.168.169.104 dev eth0
192.168.169.0/24 dev eth0 proto kernel scope link src 192.168.169.126
2.2. IP Forwarding
IP forwarding is a core functionality in network routing and plays a crucial role in ensuring that data packets reach their intended destinations across interconnected networks. It’s also a networking feature that enables devices, like routers or servers, to pass network packets from one network interface to another efficiently.
IP forwarding is also commonly known as packet forwarding/internet routing. It utilizes routing information to make decisions and is designed to send a packet/packets over multiple networks. If we enable IP forwarding, the device forwards the packet to the specified next hop or outgoing interface. Otherwise, the packets are discarded, as it is not configured to forward packets between interfaces.
Let’s check if IP forwarding is enabled:
$ cat /proc/sys/net/ipv4/ip_forward
IP forwarding is disabled if the output is 0. Otherwise, if it’s 1, it’s enabled.
Let’s enable it:
$ sudo sysctl -w net.ipv4.ip_forward=1
To enable IP forwarding permanently, we need to edit the /etc/sysctl.conf file and add the line:
$ sudo vi /etc/sysctl.conf
net.ipv4.ip_forward=1
2.3. Network Interfaces
IP aliasing in Linux allows assigning multiple IP addresses to a single network interface. To add these IP addresses, we can use the nmtui command-line tool. We can utilize it to host multiple services or network configurations on one physical interface.
By creating virtual interfaces with unique IP addresses, our Linux systems can handle diverse network tasks efficiently, like providing different services over unique IP addresses. This flexibility optimizes resource utilization and streamlines network administration.
Alternatively, if our computer has more ports, we can utilize them all.
To route packets from one network to another, our computer needs at least two network interfaces. In this tutorial, we’ll use eth0, eth1, and eth2. We’ll then configure eth0 to obtain IP addresses through DHCP for internet access and eth1 as a private network.
In this tutorial, we’ll use three computers: a Linux machine as the router, a Linux machine as the first client, and a Windows machine as the second client. Additionally, we’ll set up private networks on eth1 and eth2 (192.168.200.0/24 and 192.168.100.0/24, respectively).
3. Configuring Static Routes
As we begin our configuration, let’s ensure our setup has a few key configurations established. First, our router (Linux Computer) should have at least two/three interfaces. Between these interfaces, eth0 is configured to access the internet while eth1 and eth2 should have IPs from different networks.
Let’s configure our router’s interfaces to contain the three networks we’ll use. We need to check the current IP information on our interfaces using the ip a command: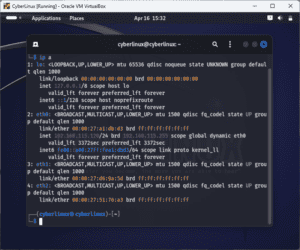
From the above snippet, we learn that eth0 obtains its IP address through DHCP. We also see that eth1 and eth2 have no configurations yet, apart from their MAC addresses.
Now, we’ll add our private network to eth1 and eth2. Let’s open the /etc/networking/interface file and make the following configurations:
$ sudo vi /etc/network/interface
#Lets add the following below eth0

auto eth1
iface eth1 inet static
        address 192.168.200.254
        netmask 255.255.255.0

auto eth2
iface eth2 inet static
        address 192.168.100.254
        netmask 255.255.255.0
We’ve configured the gateway information on our eth1 and eth2 ports. On eth1, we’ve set an IP of 192.168.200.254, and we’ve set an IP of 192.168.100.254 for eth2.
Now, let’s save the editor and restart the networking service:
$ sudo systemctl restart networking
Next, let’s run ping to confirm our client machines can reach their respective gateways:
$ ping 192.168.100.254
$ ping 192.168.200.254
We’ve successfully received the ping responses from the gateway: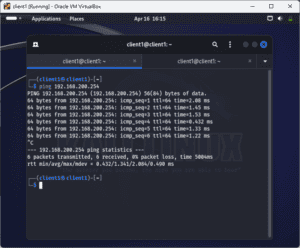
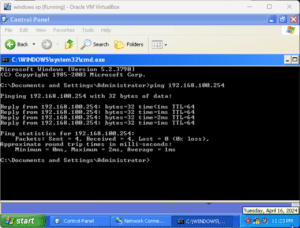
Since our machines can ping their gateways, let’s ping the machines:
$ ping 192.168.100.10
$ ping 192.168.200.15
Both machines can ping each other successfully:
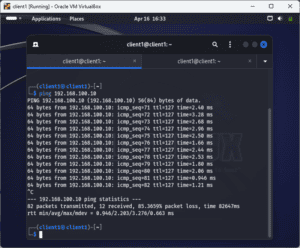
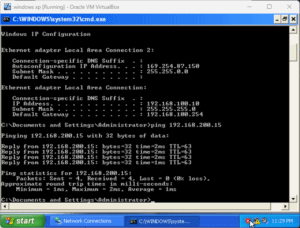
In the above examples, the machines can successfully ping each other because we’ve enabled IP forwarding on our Linux router.
4. Alternative Routing Utilities
Now that we’ve successfully connected our computers to different private networks, let’s allow the clients to connect to the internet via the Linux router. We’ll use Linux network utilities to add more functionality to our setup. Here, we’ll look at iptables, nftables, and firewalld.
4.1. Using iptables to Access the Internet
When a Linux computer serves as a router, iptables is crucial for packet filtering and network address translation (NAT). It allows administrators to define rules for forwarding, masquerading, and redirecting traffic between network interfaces.
Using iptables, we can permit or deny specific packets based on criteria like source/destination IP, protocols, and port numbers. Masquerading helps in hiding internal network addresses when packets go out to external networks. By configuring iptables rules, the Linux router can efficiently manage incoming and outgoing traffic, enhancing network security and performance while enabling complex routing.
Let’s add some iptables rules to allow our client computers to access the internet:
$ sudo iptables -t nat -A POSTROUTING -o eth0 -j MASQUERADE
$ sudo iptables -A FORWARD -i eth0 -o eth1 -m state --state RELATED,ESTABLISHED -j ACCEPT
$ sudo iptables -A FORWARD -i eth0 -o eth2 -m state --state RELATED,ESTABLISHED -j ACCEPT
$ sudo iptables -A FORWARD -i eth1 -o eth0 -j ACCEPT
$ sudo iptables -A FORWARD -i eth2 -o eth0 -j ACCEPT
First, we’ve configured NAT to allow the computers in the private network to access the network using the router’s public IP. We then allow packets that are part of established or related connections to pass through from eth0 to eth1 and eth2. Finally, we allow port forwarding.
By default, iptables rules are transient. The iptables-persistent package makes our configuration persistent by saving it to /etc/iptables/rules.v4 and loading it at boot time.
Let’s save the iptables rules:
$ sudo iptables-save > /etc/iptables/rules.v4
4.2. Using nftables to Access the Internet
Similar to iptables, nftables facilitates routing functions for Linux routers. It enables us to create rules for packet filtering, NAT, and traffic redirection.
With nftables, we can specify filtering criteria such as source/destination IP, ports, and protocols, ensuring secure and optimized network traffic flow. nftables‘ enhanced performance and flexibility make it ideal for managing complex routing setups, including load balancing and Quality of Service configuration. By leveraging nftables, Linux routers can efficiently handle routing tasks while enhancing network security and optimizing traffic management.
If we’re using nftables, let’s use the following configuration instead:
$ sudo nft add chain inet filter forward '{type filter hook forward priority 0; policy accept; }'
$ sudo nft add table inet nat
$ sudo nft add chain inet nat prerouting '{ type nat hook prerouting priority -100; }'
$ nft add chain inet nat postrouting '{ type nat hook postrouting priority 100; }'
$ nft add rule inet nat postrouting masquerade
4.3. Using firewalld to Access the Internet
Lastly, we can also use firewalld to establish internet connectivity for our client machines. To enable Internet access, we need to configure firewalld zones and rules.
During configuration, we designate the external interface as the public zone that allows outbound traffic, essential for web browsing and other Internet services. We set specific rules within the public zone to permit outgoing connections based on protocols such as TCP ,UDP) and ports 80 for HTTP.
Additionally, NAT can also be managed through firewalld, ensuring internal network traffic is properly translated to the router’s external IP. These firewalld configurations enable secure Internet connectivity while using Linux as a router.
Let’s add a few settings to enable internet connectivity using firewalld:
$sudo firewall-cmd --zone=public --s set-target=ACCEPT --permanent
success
$sudo firewall-cmd --complete-reload
success
$sudo firewall-cmd --zone=public --add-f forward
success
$sudo firewall-cmd --zone=public --add-rich-rule='rule family=ipv4 source address=192.168.200.0/24 masquerade'
success
$sudo firewall-cmd --zone=public --add-rich-rule='rule family=ipv4 source address=192.168.100.0/24 masquerade'
success
5. Dynamic Routing
Alternatively, we can utilize available software to improve our Linux router capabilities. Some of the common ones are isc-dhcp-server and Quagga. Let’s check the first one.
isc-dhcp-server streamlines network administration by centralizing and automating IP address management, enhancing network efficiency and scalability. It automates IP address assignment and listens for DHCP requests from devices seeking network configuration. Based on our defined settings, it dynamically assigns IP addresses, subnet masks, default gateways, DNS servers, and other parameters. Further, it allows static IP assignments for specific devices.
The server manages leases, ensuring IP address availability and, thus, preventing IP conflicts.
We can install isc-dhcp-server through:
$ sudo apt install isc-dhcp-server -y
After the installation is complete, let’s add these configurations:
$ sudo vi /etc/dhcp/dhcpd.conf
#below the lease time, let's add

subnet 192.168.200.0 netmask 255.255.255.0 {
 range 192.168.200.100 192.168.200.240;
 option routers 192.168.200.254;
 option domain-name-servers 192.168.200.254, 8.8.8.8;
}
Next, let’s edit the file /etc/default/isc-dhcp-server to contain:
INTERFACESv4="eth1"
Let’s save the file and then restart the dhcpd service:
$ sudo systemctl restart isc-dhcp-server.service
Next, let’s edit the client computer to use DHCP:
$ sudo vi /etc/network/interfaces
#change static to dhcp

auto eth1
iface eth1 inet dhcp
After saving the file, let’s restart the networking service:
$ sudo systemctl restart networking
Our client machine now receives its IP address automatically from the Linux router:
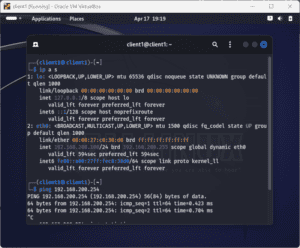
Finally, when setting up our static and dynamic routes, we need to ensure rules and DNS are configured correctly to ensure a smooth and seamless connection to the private and public networks.
6. Conclusion
In this article, we saw how using Linux as a router gives us full control and customization over our network. We can choose which Linux distribution, kernel version, packages, and tools to use, and tailor them to our specific needs and preferences.
Moreover, depending on our requirements and security policies, we can add or remove features such as VPN, QoS, NAT, DHCP, DNS, web filtering, and more. Lastly, we can monitor and troubleshoot our network performance and traffic with various commands and utilities available in Linux.