1. Overview
In the Linux system, services are the background processes that run on the system to perform certain tasks or provide particular functionality. These services include system monitoring services, network services, web servers, database servers, and many more.
While working on the Linux operating system, we may need to manage these services, i.e., enable or disable them. This could be for various reasons, such as to improve the system’s performance by optimizing the system resources, troubleshooting system issues, enhancing security by disabling unnecessary services, etc.
In this tutorial, we’ll learn various methods for enabling or disabling services on the Ubuntu 22.04 Linux system.
2. Enabling Services in Linux
Enabling services means allowing specific processes to run automatically when the system boots up. We enable services to access their functionalities without starting them manually.
We can enable required services using various Linux commands, by editing configuration files, or via graphical user interface (GUI).
2.1. Using systemctl Command
The systemctl command is the commonly used command for managing services in Linux. We can use this command to enable the specified service to ensure that it starts automatically when the system boots up.
Here is the basic syntax to enable any service through the systemctl command:
$ sudo systemctl enable [service-name]
For example, let’s enable the nginx service for setting it to start at bootup:
$ sudo systemctl enable nginx
Synchronizing state of nginx.service with SysV service script with /lib/systemd/systemd-sysv-install.
Executing: /lib/systemd/systemd-sysv-install enable nginx
Created symlink /etc/systemd/system/multi-user.target.wants/nginx.service → /lib/systemd/system/nginx.service.
Moreover, we can also use the –now flag to enable and start a particular service, e.g., nginx immediately:
$ sudo systemctl enable --now nginx
Synchronizing state of nginx.service with SysV service script with /lib/systemd/systemd-sysv-install.
Executing: /lib/systemd/systemd-sysv-install enable nginx
To ensure that the service has been enabled, we use the is-enabled option with the systemctl command:
$ sudo systemctl is-enabled nginx
enabled
Alternatively, we can check the status of the nginx service for verification:
$ sudo systemctl status nginx
● nginx.service - A high performance web server and a reverse proxy server
     Loaded: loaded (/lib/systemd/system/nginx.service; enabled; vendor preset: enabled)
     Active: active (running) since Wed 2024-05-08 22:41:54 PKT; 1h 11min ago
       Docs: man:nginx(8)
   Main PID: 10113 (nginx)
      Tasks: 3 (limit: 3423)
     Memory: 3.3M
        CPU: 113ms
     CGroup: /system.slice/nginx.service
             ├─10113 "nginx: master process /usr/sbin/nginx -g daemon on; master_process on;"
             ├─10114 "nginx: worker process" "" "" "" "" "" "" "" "" "" "" "" "" "" "" "" "" "" "" ">
             └─10115 "nginx: worker process" "" "" "" "" "" "" "" "" "" "" "" "" "" "" "" "" "" "" ">

May 08 22:41:54 linux systemd[1]: Starting A high performance web server and a reverse proxy server.>
May 08 22:41:54 linux systemd[1]: Started A high performance web server and a reverse proxy server.
The output shows that the nginx service is enabled and currently active (running).
2.2. Using update-rc.d Command
The update-rc.d command is also used to enable or disable certain services during the system boot-up. We can use this command along with a particular service name to enable it.
First, we start the required service, i.e., nginx, using the service command:
$ sudo service nginx start
Then, we use the update-rc.d command to enable the nginx service:
$ sudo update-rc.d nginx enable
This command sets the nginx service to start automatically at boot.
Let’s now check the nginx status via the service command for verification:
$ sudo service nginx status
● nginx.service - A high performance web server and a reverse proxy server
Loaded: loaded (/lib/systemd/system/nginx.service; enabled; vendor preset: enabled)
Active: active (running) since Fri 2024-05-03 02:11:37 PKT; 1 day 22h ago
Docs: man:nginx(8)
Process: 4261 ExecStartPre=/usr/sbin/nginx -t -q -g daemon on; master_process on; (code=exi>
Process: 4262 ExecStart=/usr/sbin/nginx -g daemon on; master_process on; (code=exited, stat>
Main PID: 4263 (nginx)
Tasks: 3 (limit: 3423)
Memory: 3.3M
CPU: 109ms
CGroup: /system.slice/nginx.service
├─4263 "nginx: master process /usr/sbin/nginx -g daemon on; master_process on;"
├─4264 "nginx: worker process" "" "" "" "" "" "" "" "" "" "" "" "" "" "" "" "" "" >
Thus, the output indicates that the nginx service is currently active (running) and successfully enabled.
2.3. Editing Configuration Files
Some services can be enabled by editing their configuration file. We have to edit the file of the desired service to configure it to start automatically on the system bootup.
For example, let’s open the configuration file of the apport service in the text editor to enable it:
$ sudo nano /etc/default/apport
Next, we enable the apport service by setting the enabled option’s value to 1 in the apport configuration file and save changes by pressing Ctrl + X.
Finally, let’s display the apport file’s content for verification:
$ cat /etc/default/apport
# set this to 0 to disable apport, or to 1 to enable it
# you can temporarily override this with
# sudo service apport start force_start=1
enabled=1
As a result, we can see that the apport service is enabled.
2.4. Via Graphical User Interface
We can also enable services to launch at startup via GUI. We use the GNOME Startup Applications that provide a graphical interface to add, configure, and enable services to start automatically at boot time.
First, we search for Startup Applications and open it:

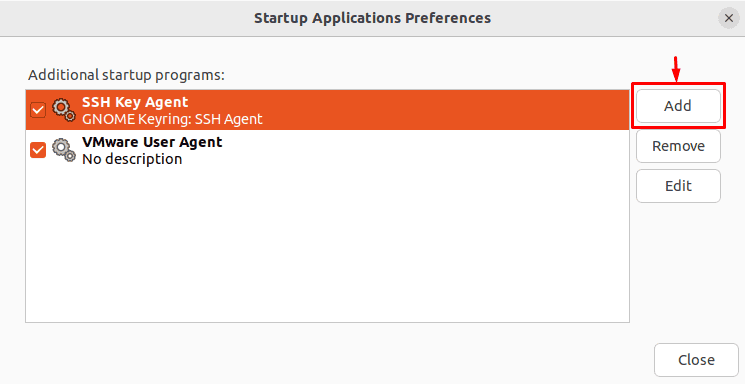
Then, let’s click on the Add button to add the new service to the startup programs list:

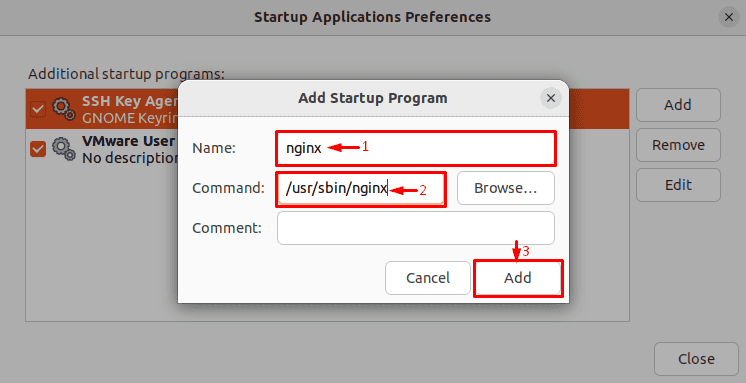
Next, we type the name of the required service and its full path to the executable binary in the Name and Command fields respectively. After that, let’s click on the Add button. For instance, we add the nginx service and its path to add it to the startup programs list:

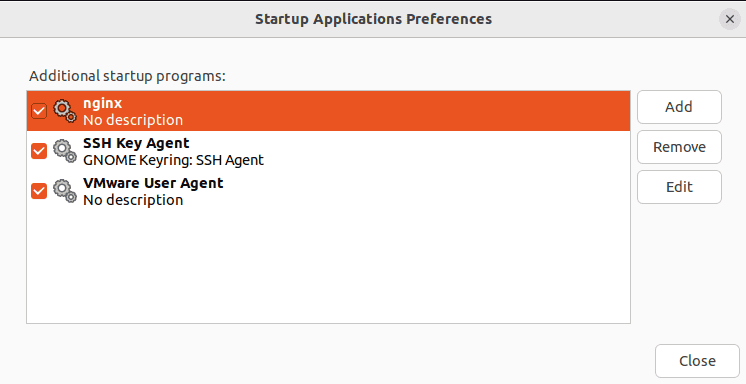
We can see that we successfully added the nginx service:

Thus, the nginx service now automatically starts at system startup.
3. Disabling Services in Linux
Disabling services means preventing certain services from starting automatically at boot time. If we don’t want a particular program or service to run at startup, we can disable it using the command line or via GUI.
3.1. Using systemctl Command
We can use the systemctl command to disable any specific service and prevent it from automatically starting during the system startup.
Here is the basic syntax to disable any service through the systemctl command:
$ sudo systemctl disable [service-name]
Let’s use the systemctl command to disable the nginx service:
$ sudo systemctl disable nginx
Synchronizing state of nginx.service with SysV service script with /lib/systemd/systemd-sysv-install.
Executing: /lib/systemd/systemd-sysv-install disable nginx
Removed /etc/systemd/system/multi-user.target.wants/nginx.service.
We can also disable and stop a specific service, e.g., nginx, immediately by using the –now flag with the systemctl command:
$ sudo systemctl disable --now nginx
Synchronizing state of nginx.service with SysV service script with /lib/systemd/systemd-sysv-install.
Executing: /lib/systemd/systemd-sysv-install disable nginx
For verification, we check the nginx service’s status:
$ sudo systemctl status nginx
○ nginx.service - A high performance web server and a reverse proxy server
     Loaded: loaded (/lib/systemd/system/nginx.service; disabled; vendor preset: en>
     Active: inactive (dead)
       Docs: man:nginx(8)

May 03 00:01:44 linux systemd[1]: Starting A high performance web server and a reve>
May 03 00:01:45 linux systemd[1]: Started A high performance web server and a rever>
The output shows that the nginx service is currently inactive (dead) and disabled.
3.2. Using update-rc.d Command
The update-rc.d command can be used to disable certain services during the boot process.
Let’s disable the nginx service using the update-rc.d command:
$ sudo update-rc.d nginx disable
As a result, the nginx service is disabled and won’t launch when the system starts up.
3.3. Editing Configuration Files
We can also disable a particular service by editing its configuration file. For instance, to disable the apport service, we open its configuration file in the text editor:
$ sudo nano /etc/default/apport
Then, we set the value of the enabled option to 0 in the apport configuration file to disable it.
For verification, let’s display the apport file’s content:
$ cat /etc/default/apport
# set this to 0 to disable apport, or to 1 to enable it
# you can temporarily override this with
# sudo service apport start force_start=1
enabled=0
Thus, we disabled the apport service.
3.4. Via Graphical User Interface
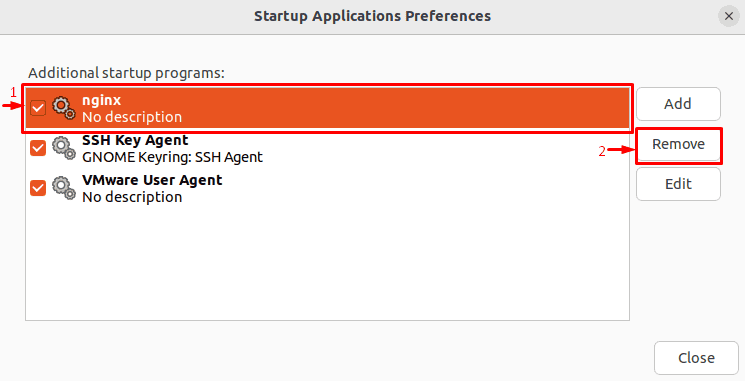
To disable the specific service via GUI, we remove it from the list of Startup Applications. For example, we select the nginx service and click on the Remove button to remove and disable it:

Hence, the nginx service won’t automatically start on the boot process.
3.5. Remove Service Package
We can also remove the package of a particular service from the system to prevent it from automatically starting at bootup.
Let’s remove the nginx package using the apt package manager:
$ sudo apt purge nginx
Reading package lists... Done
Building dependency tree... Done
Reading state information... Done
The following packages will be REMOVED:
  nginx*
0 upgraded, 0 newly installed, 1 to remove and 0 not upgraded.
Removing nginx (1.18.0-6ubuntu14.4) ...
This removes the nginx package along with its configuration files from the system.
4. Conclusion
In this article, we discussed several methods for enabling and disabling services in Linux. We used the systemctl and update-rc.d commands, editing configuration files, and GUI methods to enable and disable a particular service in the Linux system.
Ultimately, we can utilize any of these methods for managing the system’s services, i.e., for enabling or disabling them.