1. Overview
When we want to debug an HTTPS connection, we often need to obtain the server certificate. This certificate is transmitted when the SSL handshake happens, so we have multiple ways to get it.
In this quick tutorial, we’ll see how we can fetch the server certificate using a web browser or the OpenSSL command-line utility.
2. Using a Web Browser
The simplest way we can get the certificate is through a web browser. Let’s see how we can do this in Firefox.
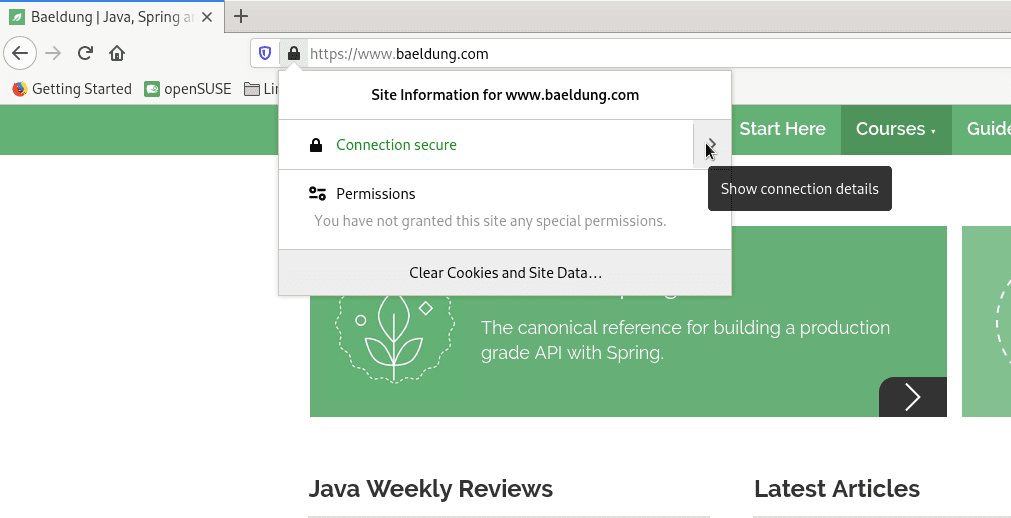
First, let’s click on the site information (the lock symbol) in the address bar:
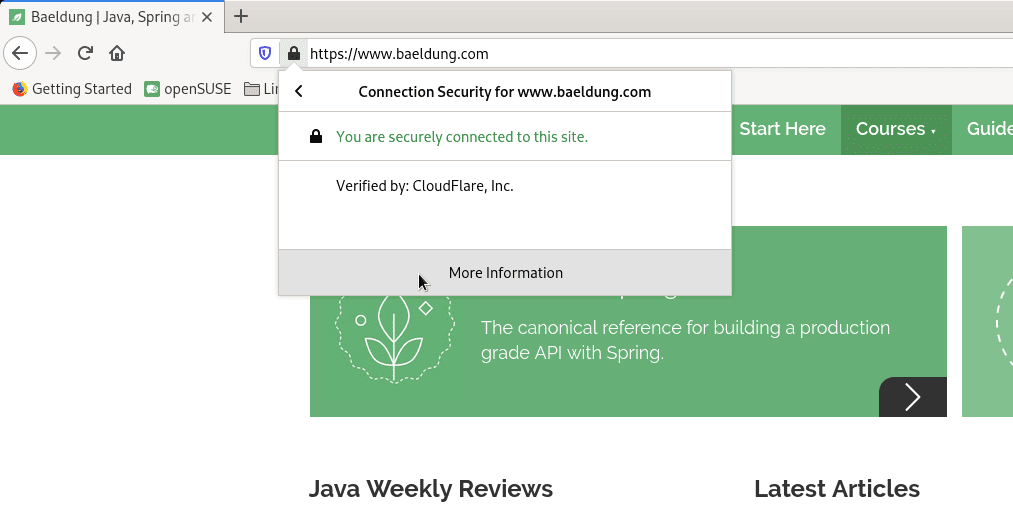
Next, in the connection details menu, let’s click on More Information:
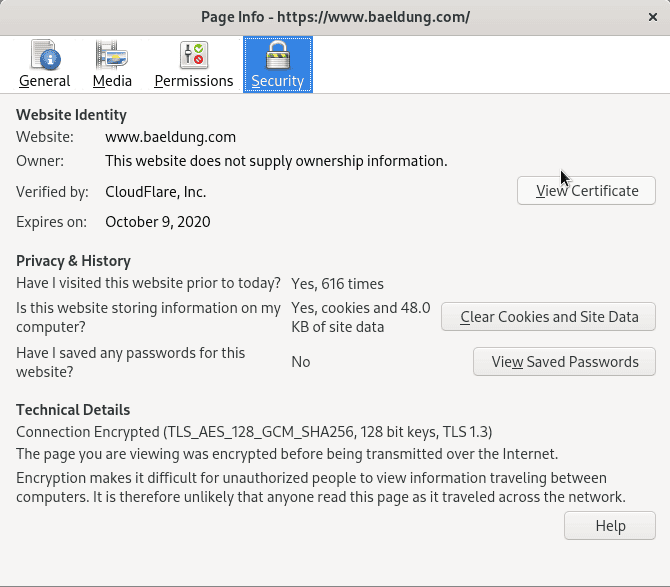
Now, let’s click on View Certificate:

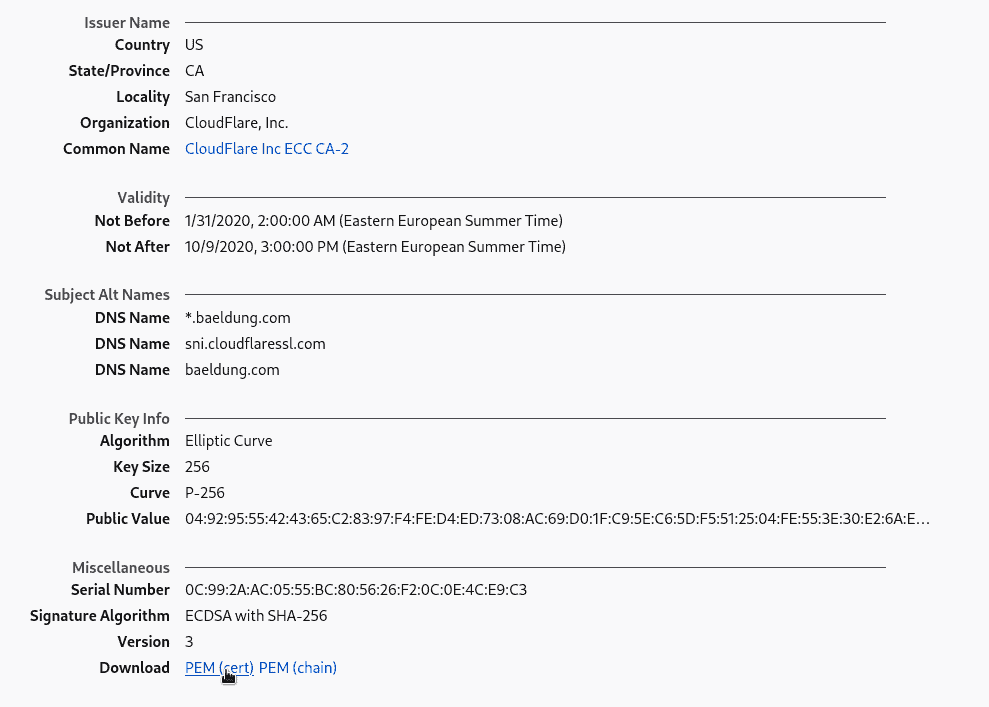
After this, a new tab opens:
Here, we can save the certificate in PEM format, from the Miscellaneous section, by clicking the link in the Download field.
We can also get the complete certificate chain from the second link.
3. Using OpenSSL
When we don’t have access to a browser, we can also obtain the certificate from the command line.
We can get an interactive SSL connection to our server, using the openssl s_client command:
$ openssl s_client -connect baeldung.com:443

CONNECTED(00000003)

# some debugging output

-----BEGIN CERTIFICATE-----
MIIE6DCCBI2gAwIBAgIQDJkqrAVVvIBWJvIMDkzpwzAKBggqhkjOPQQDAjBvMQsw
CQYDVQQGEwJVUzELMAkGA1UECBMCQ0ExFjAUBgNVBAcTDVNhbiBGcmFuY2lzY28x
GTAXBgNVBAoTEENsb3VkRmxhcmUsIEluYy4xIDAeBgNVBAMTF0Nsb3VkRmxhcmUg
SW5jIEVDQyBDQS0yMB4XDTIwMDEzMTAwMDAwMFoXDTIwMTAwOTEyMDAwMFowbTEL
# certificate output trimmed
-----END CERTIFICATE-----

# some more output

Q
This keeps the interactive session open until we type Q (quit) and press
We can use the -showcerts option to get the complete certificate chain:
$ openssl s_client -showcerts -connect baeldung.com:443

CONNECTED(00000003)

# some debugging output

-----BEGIN CERTIFICATE-----
MIIE6DCCBI2gAwIBAgIQDJkqrAVVvIBWJvIMDkzpwzAKBggqhkjOPQQDAjBvMQsw
CQYDVQQGEwJVUzELMAkGA1UECBMCQ0ExFjAUBgNVBAcTDVNhbiBGcmFuY2lzY28x
GTAXBgNVBAoTEENsb3VkRmxhcmUsIEluYy4xIDAeBgNVBAMTF0Nsb3VkRmxhcmUg
SW5jIEVDQyBDQS0yMB4XDTIwMDEzMTAwMDAwMFoXDTIwMTAwOTEyMDAwMFowbTEL
# certificate output trimmed
-----END CERTIFICATE-----
-----BEGIN CERTIFICATE-----
MIIDozCCAougAwIBAgIQD/PmFjmqPRoSZfQfizTltjANBgkqhkiG9w0BAQsFADBa
MQswCQYDVQQGEwJJRTESMBAGA1UEChMJQmFsdGltb3JlMRMwEQYDVQQLEwpDeWJl
clRydXN0MSIwIAYDVQQDExlCYWx0aW1vcmUgQ3liZXJUcnVzdCBSb290MB4XDTE1
MTAxNDEyMDAwMFoXDTIwMTAwOTEyMDAwMFowbzELMAkGA1UEBhMCVVMxCzAJBgNV
# certificate output trimmed
-----END CERTIFICATE-----

# some more output
We could just copy-paste these outputs into a file, and do further processing. However, let’s use some Linux magic, and extract only the certificates from the whole output:
$ openssl s_client -showcerts -connect baeldung.com:443 </dev/null | sed -n -e '/-.BEGIN/,/-.END/ p' > certifs.pem
Let’s now take a look at the certifs.pem file:
$ cat certifs.pem

-----BEGIN CERTIFICATE-----
MIIE6DCCBI2gAwIBAgIQDJkqrAVVvIBWJvIMDkzpwzAKBggqhkjOPQQDAjBvMQsw
CQYDVQQGEwJVUzELMAkGA1UECBMCQ0ExFjAUBgNVBAcTDVNhbiBGcmFuY2lzY28x
GTAXBgNVBAoTEENsb3VkRmxhcmUsIEluYy4xIDAeBgNVBAMTF0Nsb3VkRmxhcmUg
SW5jIEVDQyBDQS0yMB4XDTIwMDEzMTAwMDAwMFoXDTIwMTAwOTEyMDAwMFowbTEL
# certificate output trimmed
-----END CERTIFICATE-----
-----BEGIN CERTIFICATE-----
MIIDozCCAougAwIBAgIQD/PmFjmqPRoSZfQfizTltjANBgkqhkiG9w0BAQsFADBa
MQswCQYDVQQGEwJJRTESMBAGA1UEChMJQmFsdGltb3JlMRMwEQYDVQQLEwpDeWJl
clRydXN0MSIwIAYDVQQDExlCYWx0aW1vcmUgQ3liZXJUcnVzdCBSb290MB4XDTE1
MTAxNDEyMDAwMFoXDTIwMTAwOTEyMDAwMFowbzELMAkGA1UEBhMCVVMxCzAJBgNV
# certificate output trimmed
-----END CERTIFICATE-----
Let’s break the command down:
- First, we call the openssl s_client command and redirect the null device (/dev/null) to its standard input
- As a result, the interactive session closes because it reads EOF
- Finally, we use sed to filter the output and dump the certificates to a file
3.1. Servers Behind Reverse Proxies
In some situations, our server might sit behind a reverse proxy for load-balancing purposes.
First, let’s find our host IP using nslookup:
$ nslookup baeldung.com

Server:        192.168.0.1
Address:    192.168.0.1#53

Non-authoritative answer:
Name:    baeldung.com
Address: 172.64.104.34

# some more output
Let’s run our previous example but with the host IP address instead:
$ openssl s_client -showcerts -connect 172.64.104.34:443

CONNECTED(00000003)

140695394247936:error:14094410:SSL routines:ssl3_read_bytes:sslv3 alert handshake
failure:ssl/record/rec_layer_s3.c:1543:SSL alert number 40
---
no peer certificate available
---
No client certificate CA names sent
---
SSL handshake has read 7 bytes and written 293 bytes

# some more output
We get an error. The reverse proxy (identified by the 172.64.104.34 address) serves multiple web-servers, including our own.
As a result, we need to send a servername to it, so that it knows which certificate to return. This mechanism is called Server Name Indication.
But why did our first example work without this option? By default, OpenSSL populates servername with the same value passed to connect.
Let’s pass baeldung.com and see what happens:
$ openssl s_client -servername baeldung.com -showcerts -connect 172.64.104.34:443

CONNECTED(00000003)

# some debugging output

-----BEGIN CERTIFICATE-----
MIIE6DCCBI2gAwIBAgIQDJkqrAVVvIBWJvIMDkzpwzAKBggqhkjOPQQDAjBvMQsw
CQYDVQQGEwJVUzELMAkGA1UECBMCQ0ExFjAUBgNVBAcTDVNhbiBGcmFuY2lzY28x
GTAXBgNVBAoTEENsb3VkRmxhcmUsIEluYy4xIDAeBgNVBAMTF0Nsb3VkRmxhcmUg
SW5jIEVDQyBDQS0yMB4XDTIwMDEzMTAwMDAwMFoXDTIwMTAwOTEyMDAwMFowbTEL
# certificate output trimmed
-----END CERTIFICATE-----
-----BEGIN CERTIFICATE-----
MIIDozCCAougAwIBAgIQD/PmFjmqPRoSZfQfizTltjANBgkqhkiG9w0BAQsFADBa
MQswCQYDVQQGEwJJRTESMBAGA1UEChMJQmFsdGltb3JlMRMwEQYDVQQLEwpDeWJl
clRydXN0MSIwIAYDVQQDExlCYWx0aW1vcmUgQ3liZXJUcnVzdCBSb290MB4XDTE1
MTAxNDEyMDAwMFoXDTIwMTAwOTEyMDAwMFowbzELMAkGA1UEBhMCVVMxCzAJBgNV
# certificate output trimmed
-----END CERTIFICATE-----

# some more output

Q
Now, we get the same result as before.
4. Conclusion
In this quick tutorial, we saw how to obtain an SSL server certificate.
In the first part, we saw how to do it with a web browser. Next, we used OpenSSL to fetch it from the command line. Finally, we saw what Server Name Indication is used for.


