1. Overview
Vim is a versatile editor that supports an integrated terminal that allows us to execute shell commands and scripts without leaving the editor. Additionally, it offers robust window and tab management commands to open the terminal in different layouts, such as horizontal and vertical splits.
In this tutorial, we’ll learn how to open and effectively position a terminal in Vim.
2. The :sus and :sh Commands
Let’s start by learning about the :sus and :sh commands in Vim, which we can use to execute shell commands and access the terminal.
2.1. :sus Command
The :sus command temporarily suspends the current Vim session and takes us to the original shell.
Let’s check the process ID of the current shell using the $$ special variable and then open sample.txt in Vim:
$ echo $$
5308
$ MY_VAR=sample_value vim sample.txt
We’ve set the MY_VAR temporary environment available only to the process running the vim command.
Now, from within the Vim session, let’s execute the :sus command in command mode:
:sus
We notice that the current Vim session is suspended, and we’re back to the original Shell session:
[1]+  Stopped                 vim sample.txt
$ echo $$
5308
Next, let’s execute the date command to verify and check the value defined in the MY_VAR variable:
$ date; echo $MY_VAR
Sun Apr 21 10:23:40 UTC 2024
As expected, the MY_VAR is undefined in this shell.
Lastly, let’s execute the fg command to resume the Vim session:
$ fg
vim sample.txt
Great! We’re back to the editing session safely. Moreover, let’s note that if we don’t use fg and try opening the same file in a new vim session, we’ll get a warning about the swap file.
2.2. :sh Command
Alternatively, we can use the :sh command from the command mode to spawn a new shell as a child process:
:sh
Now, we can verify that we can execute shell commands, such as date, along with accessing the MY_VAR environment variable:
$ date; echo $MY_VAR
Sun Apr 21 14:38:02 UTC 2024
sample_value
Furthermore, let’s use the ps command to inspect the process hierarchy:
$ ps -ef
root      5337  5308  0 14:42 pts/2    00:00:00 vim sample.txt
root      5338  5337  0 14:42 pts/2    00:00:00 sh
# other entries omitted for brevity
$ echo $$
5338
$ echo ${PPID}
5337
#
We can confirm from the output that the new shell process is a child process of the process running the vim command. Lastly, we can resume the Vim session by pressing Ctrl-d keys.
3. The terminal Command
Although we can access the terminal using the :sus and :sh commands and then execute shell commands, we don’t get to see the editor window and terminal window at the same time. In this section, let’s learn about the terminal command that addresses this issue.
3.1. Basics
Vim supports the terminal command starting version 8.0. So, let’s start by verifying that we’ve got a supported version of Vim installed on our system:
$ vim --version | head -1
VIM - Vi IMproved 8.2 (2019 Dec 12, compiled Mar 14 2024 09:05:11)
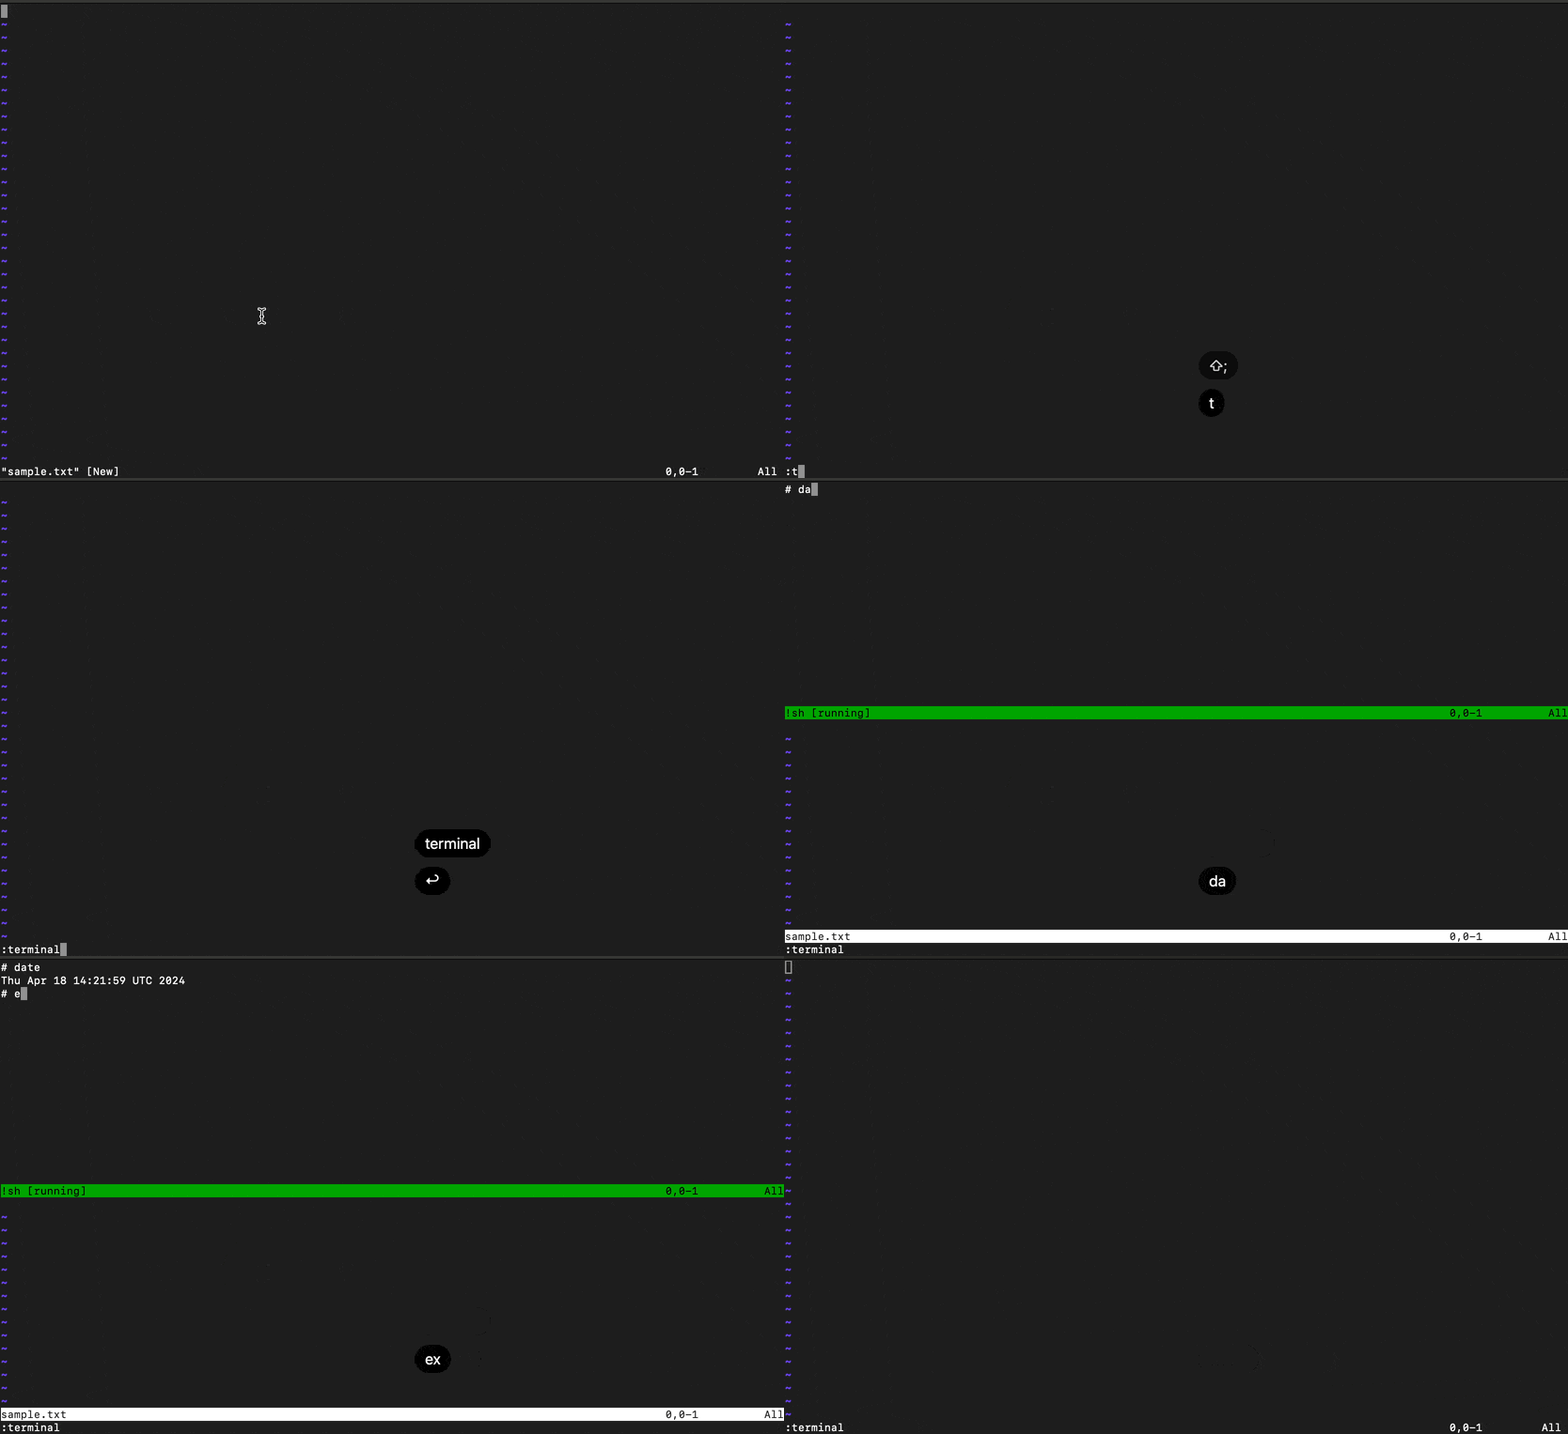
Now, let’s go ahead and execute the :terminal command from Vim’s command mode:
:terminal
We can see that Vim splits the original window horizontally and places the new terminal window on top.
Lastly, let’s execute one of the shell commands from the terminal window and then use the exit command to terminate the session:
As expected, we could execute shell commands while the editor window is open. Moreover, we can switch between the editor and terminal windows by pressing Ctrl-w + w keys.
3.2. Positioning the Terminal Window
By default, Vim splits the window horizontally to open a new terminal window. However, we can add the :vert[ical] modifier before the terminal command to split the window vertically.
We must be in Vim’s command mode to split the terminal vertically:
:vertical terminal
Further, let’s open a terminal in the vertical orientation by using the vertical modifier and its abbreviated form, vert:
That’s it. We can now split terminal windows in both directions.
3.3. Terminal Layouts
Additionally, Vim supports a few more modifiers, such as lefta[bove], abo[veleft], bel[owright], rightb[elow]**, to specify the position of the terminal relative to the current window.
First, let’s see lefta[bove] in action while splitting the window vertically and horizontally:
We placed the terminal window on the left with a vertical split and above the current buffer with a horizontal split. Further, we used the Ctrl-w + w keys to cycle through the existing windows and activate the editor buffer where we can execute the Vim commands.
Next, let’s use the bel[owright] modifier to place the terminal window in the right position with a vertical split and below the current buffer with a horizontal split:
Further, we must remember that abo[veleft] and rightb[elow] are just alternatives to using leftabo[ve] and bel[owright], respectively.
Lastly, vim supports the to[pleft] and bo[tright] modifiers for opening a full-width or full-height terminal window. It’s best to learn this visually:
Fantastic! It looks like we’ve nailed this.
3.4. Opening Terminal in Tabs
Sometimes, we might want to open the terminal in a dedicated tab. In such scenarios, we can use the :tab terminal command to open a new terminal tab:
:tab terminal
Further, let’s see this in action visually:
With this approach, we can open as many tabs as we need. Moreover, we’ll also learn how to switch between these tabs in the next section.
4. Managing Position and Size
In this section, we’ll focus on learning how to manage the positions of the open terminals.
4.1. Toggle Terminal Mode
We’ll need to switch between Vim’s terminal, normal, and command modes to manage the position and size of the open terminal. For this purpose, we can use the Ctrl-\ + Ctrl-n key combination to switch from terminal mode to normal mode. Additionally, we can press the i or a key to return to the terminal mode.
Let’s see this in action:
Notice that when we’re in normal mode, we can navigate through the terminal text like a text buffer using the h,j,k, and l keys.
4.2. Navigation Across Terminal Windows and Tabs
When we have multiple terminal windows open, we can navigate across them using key combinations with the Ctrl-w prefix:
- Ctrl-w w: Cycle through windows.
- Ctrl-w h: Move to the terminal window on the left.
- Ctrl-w j: Move to the terminal window below.
- Ctrl-w k: Move to the terminal window above.
- Ctrl-w l: Move to the terminal window on the right.
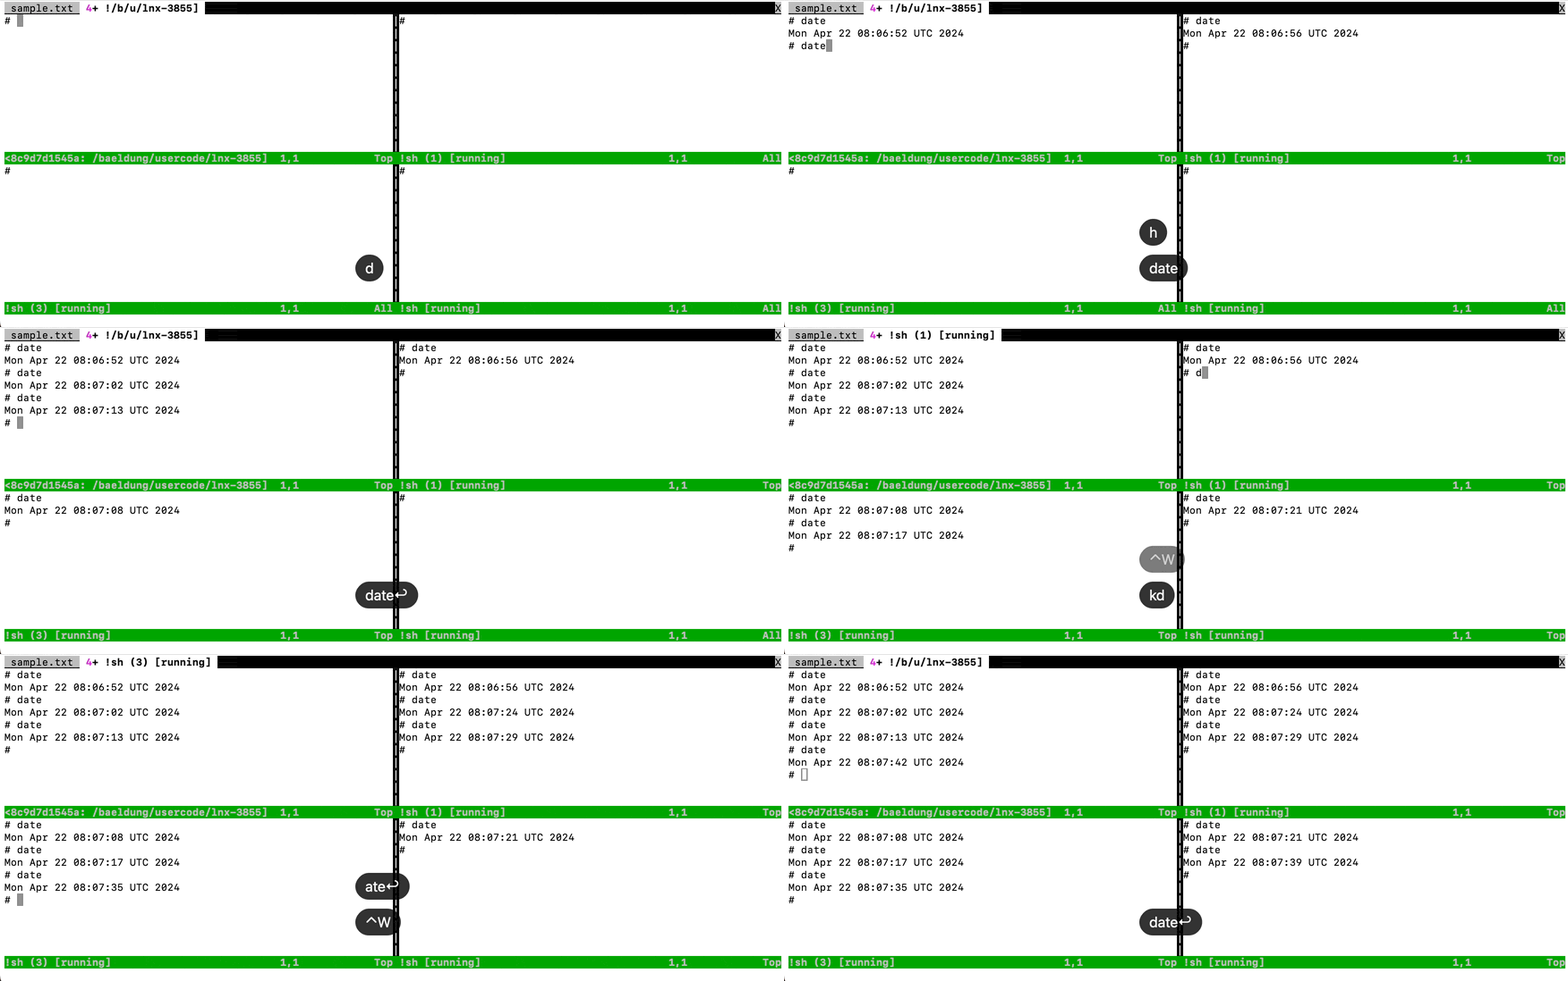
Let’s see this in action visually by navigating between four terminal windows:
We can switch between terminal windows without leaving the terminal mode.
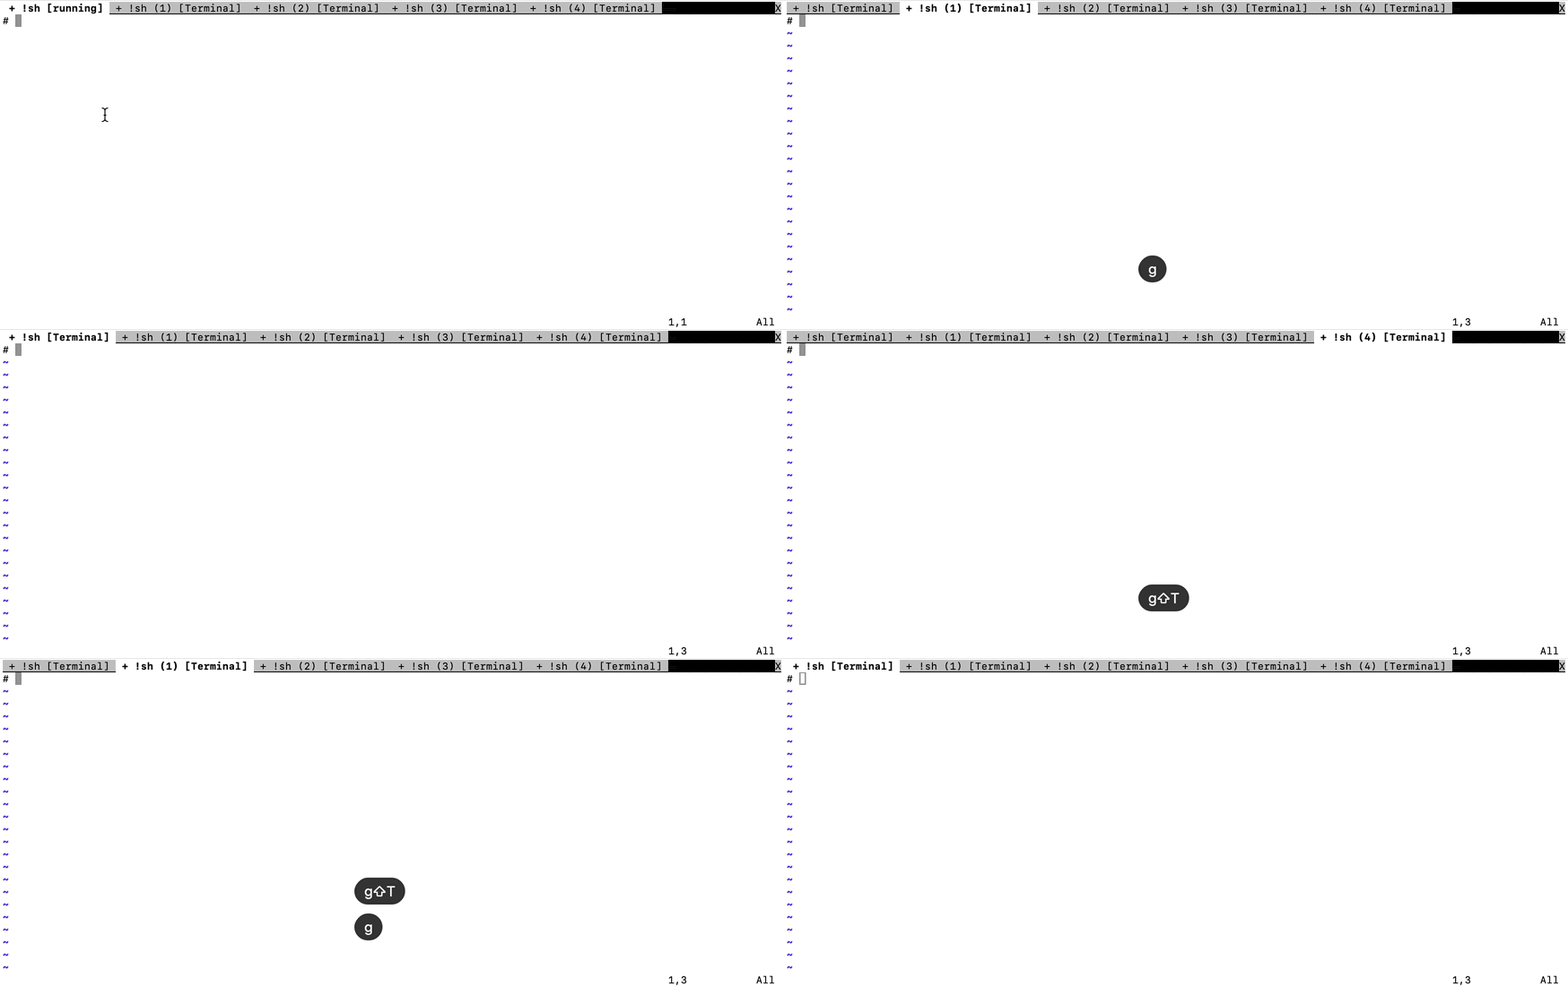
Unlike terminal windows, we must be in normal mode while switching between the terminal tabs. Further, we can use the gt or gT key combination to switch between the next and previous tabs, respectively.
Let’s see this in action visually by navigating five terminal tabs:
Although we can use <tab_number>gt to jump to a specific tab directly, it’s important to note that tabs follow 1-based indexing, while terminal names follow 0-based indexing. So, the third tab is identified as “!sh (2) Terminal”.
4.3. Resizing and Repositioning
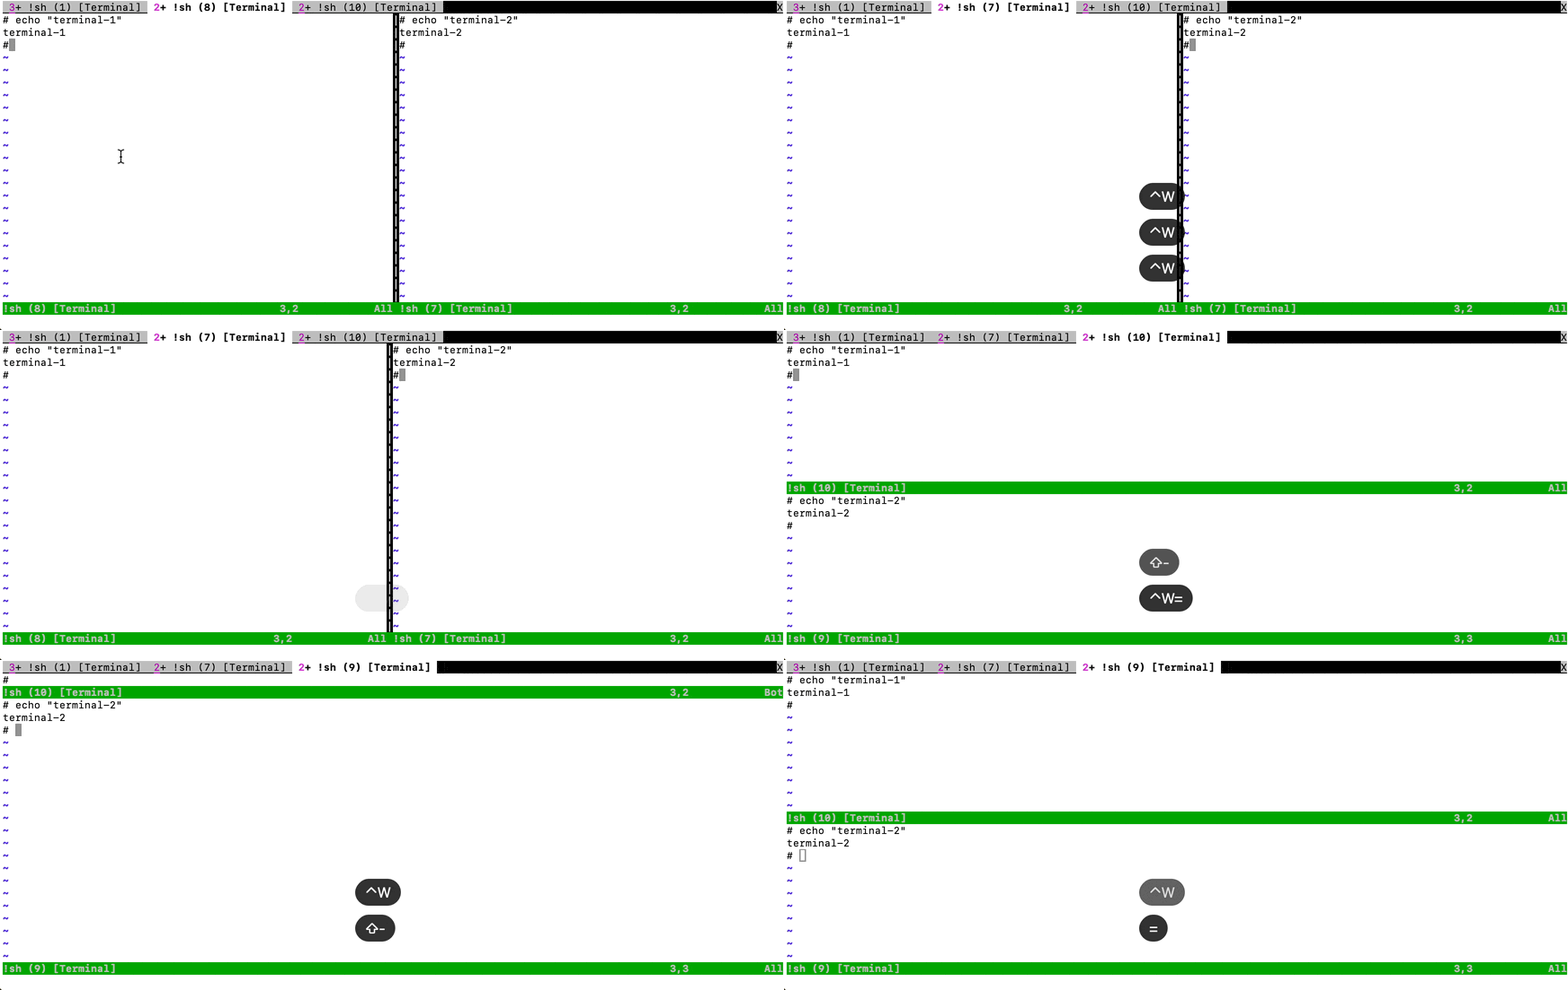
Sometimes, we might want to adjust the sizes of the terminal windows. For such scenarios, we can *use the Ctrl-w prefix key followed by +, –, <*, *>, or = keys to change the window size*:
- Ctrl-w +: Increase the height of the current window.
- Ctrl-w –: Decrease the height of the current window.
- Ctrl-w >: Increase the width of the current window.
- Ctrl-w <: Decrease the width of the current window.
- Ctrl-w =: Equalize the size of all windows.
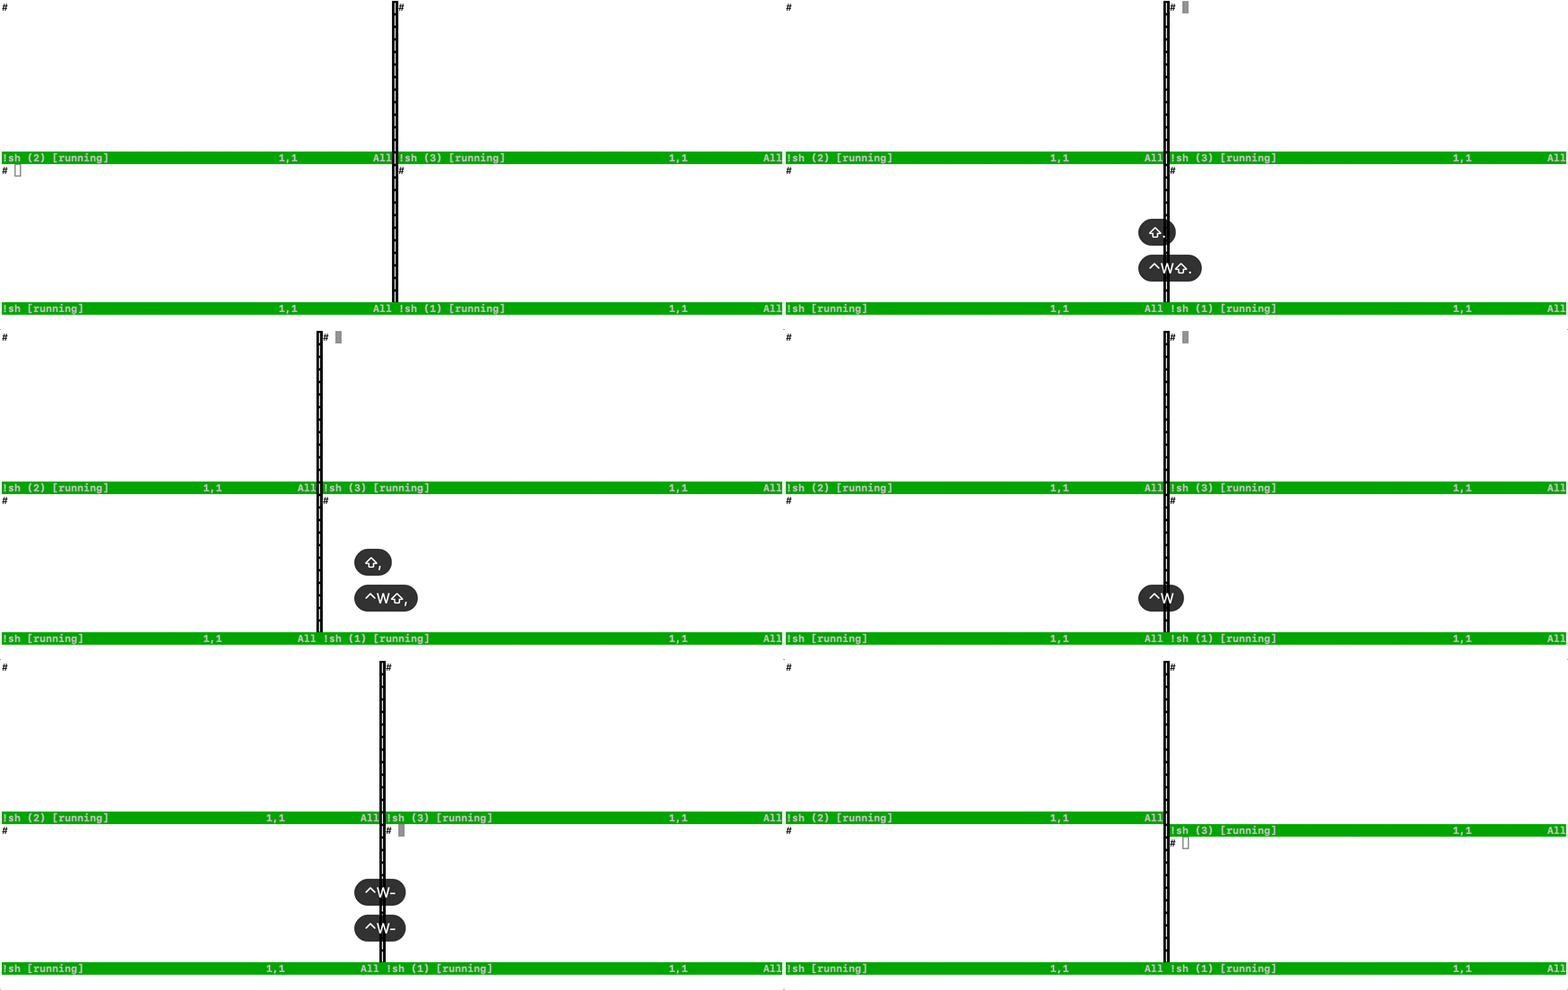
It’s best to see this in action and visualize the resizing operations within a layout of four terminal windows:
We can add a quantifier prefix before +, –, >, or < for larger step sizes.
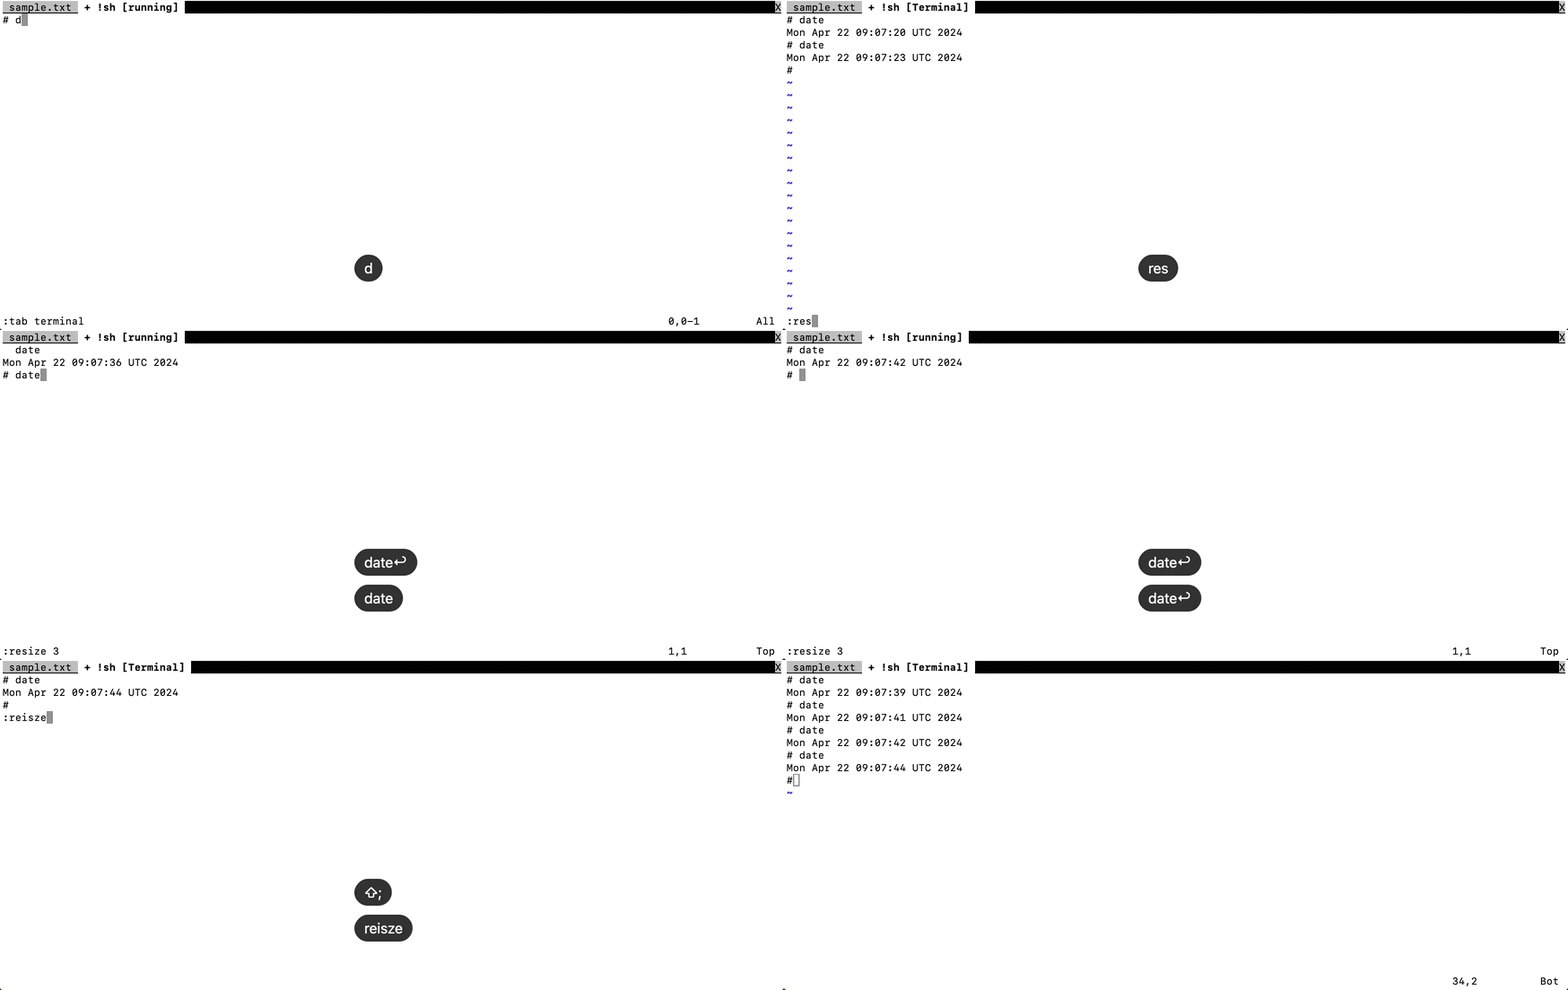
Alternatively, we can also change the size of the terminal window using the resize command from command mode:
:resize [+-]N
We can either specify the size of the current terminal window or increase and decrease the size by adding the + and – modifiers, respectively.
Lastly, let’s check this out in action:
Great! We’ve got this one right.
4.4. Moving and Rearranging
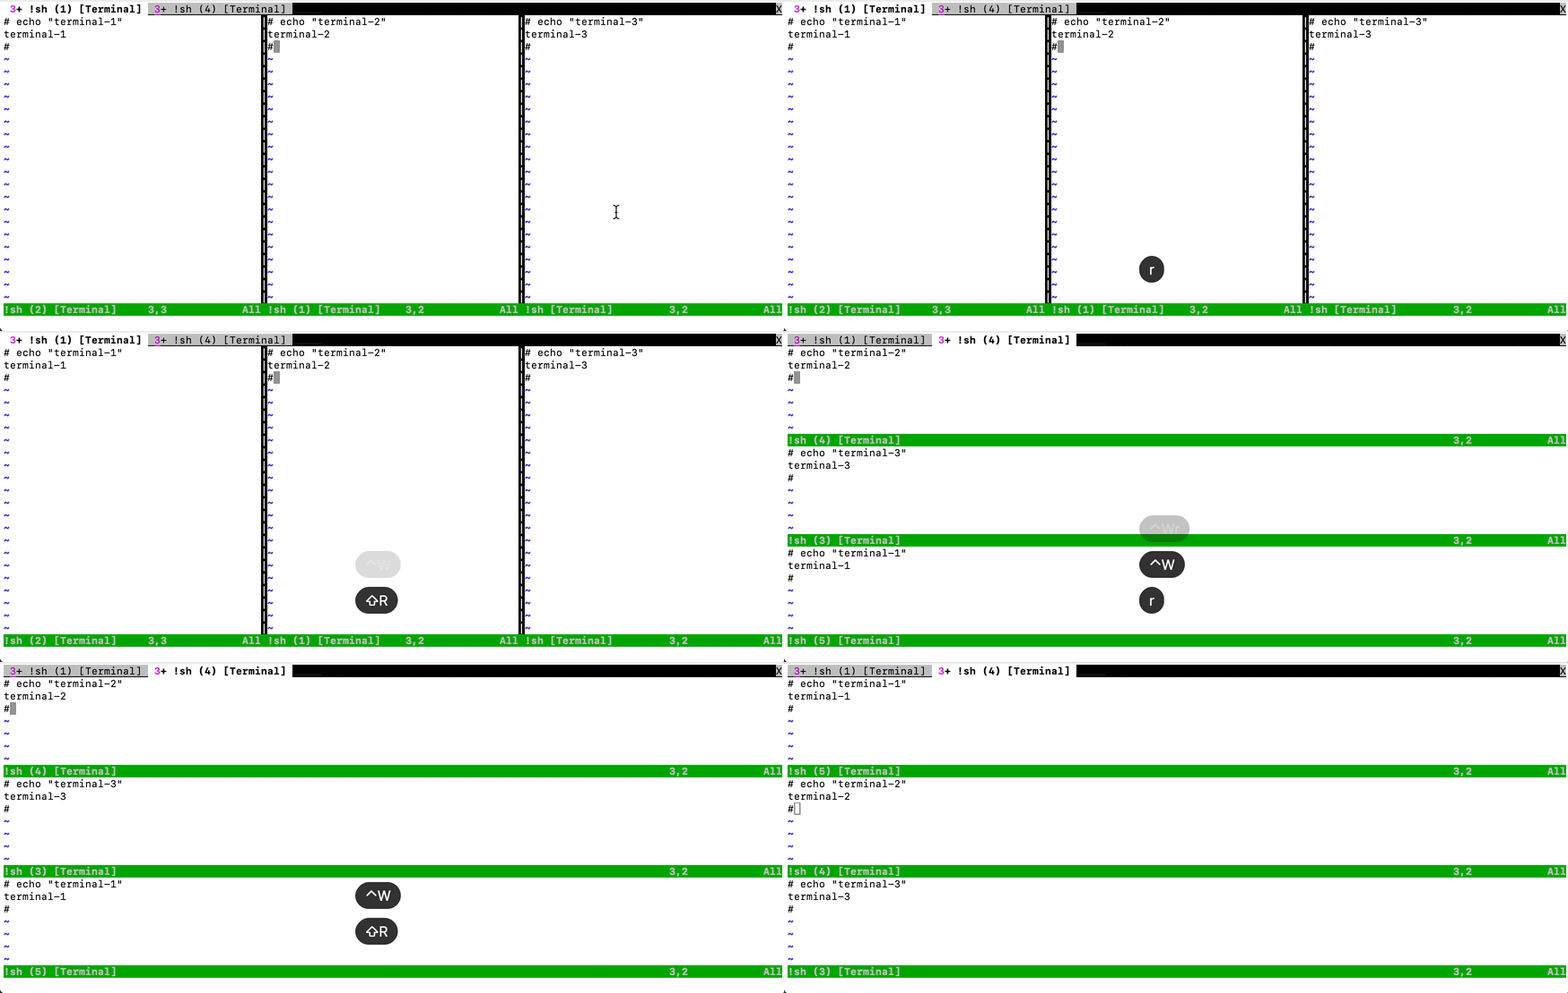
While working with multiple terminal windows, we might want to move their relative positions. To do this, we can use the Ctrl-w + r keys to rotate the windows downwards or to the right. Further, Ctrl-w + R will do just the opposite.
Now, let’s visualize both scenarios by rearranging multiple terminal windows in two different tabs:
It’s important to note that the left and right, or upward and downward rotation, is based on whether we use a vertical or horizontal split.
Lastly, we can maximize the height and width of terminal windows by using the Ctrl-w + _ and Ctrl-w + | keys, respectively:
We’ve now developed a good understanding of managing multiple terminal windows in Vim.
5. Conclusion
In this article, we learned how to open and position a terminal efficiently in Vim. Further, we explored the :sus, :sh, :terminal, and :resize Vim commands, along with modifier keywords, to control their behavior.
Additionally, we learned each concept visually to see the immediate effect of the key presses.
