1. Introduction
The WebM format is a fairly new open-source format for video content. In particular, it stores audio as Vorbis (Ogg Vorbis) and video using VP8 compression. The WebM format provides an alternative to patented formats that require a commercial license.
In this tutorial, we’ll learn how to convert video from the WebM format to other formats in Linux.
The code in this tutorial underwent testing on a Debian 12 system using GNU Bash 5.1.16.
2. Environment Setup
Before we dive into the details, let’s ensure the necessary prerequisites are ready. They include the MediaInfo tool and a sample video file in WebM format.
2.1. Sample File
First, we create a new directory and download the WebM file using wget:
$ mkdir video && cd video
$ wget -q -O sample.webm https://dl6.webmfiles.org/big-buck-bunny_trailer.webm
The mkdir command creates a video directory, while the cd command changes the current directory to the newly created video directory.
Next, the -q flag of the wget command suppresses the output, while -O specifies the output filename.
Thus, we have a WebM file (sample.webm) inside the newly created video directory.
2.2. MediaInfo Installation
MediaInfo is a command-line utility that extracts and displays media file metadata. This utility isn’t pre-installed on most Linux distributions.
So, let’s install it via a native package manager such as apt:
$ sudo apt install mediainfo
Now, we can check the installed version of MediaInfo:
$ mediainfo --version
MediaInfo Command line,
MediaInfoLib - v21.09
As we can see, the current installation of MediaInfo is v21.09.
2.3. Verify File Metadata
Next, we can check the multimedia files and their metadata:
$ mediainfo sample.webm
General
Unique ID                                : 94077224337973666327274415816295077565 (0x46C69D45A185A9294D3D0A2F750056BD)
Complete name                            : sample.webm
Format                                   : WebM
Format version                           : Version 1
File size                                : 2.06 MiB
Duration                                 : 32 s 480 ms
Overall bit rate mode                    : Variable
Overall bit rate                         : 533 kb/s
Encoded date                             : UTC 2010-05-20 08:21:12
Writing application                      : Sorenson Squeeze
Writing library                          : http://sourceforge.net/projects/yamka

Video
ID                                       : 1
Format                                   : VP8
Codec ID                                 : V_VP8
Duration                                 : 32 s 480 ms
Bit rate                                 : 439 kb/s
Width                                    : 640 pixels
Height                                   : 360 pixels
Display aspect ratio                     : 16:9
Frame rate mode                          : Constant
Frame rate                               : 25.000 FPS
Compression mode                         : Lossy
Bits/(Pixel*Frame)                       : 0.076
Stream size                              : 1.70 MiB (82%)
Language                                 : English
Default                                  : Yes
Forced                                   : No

Audio
ID                                       : 2
Format                                   : Vorbis
Format settings, Floor                   : 1
Codec ID                                 : A_VORBIS
Duration                                 : 32 s 480 ms
Bit rate mode                            : Variable
Bit rate                                 : 64.0 kb/s
Channel(s)                               : 1 channel
Sampling rate                            : 44.1 kHz
Compression mode                         : Lossy
Stream size                              : 254 KiB (12%)
Writing library                          : libVorbis (Everywhere) (20100325 (Everywhere))
Language                                 : English
Default                                  : Yes
Forced                                   : No
The output of the mediainfo command is divided into three parts:
- General
- Video
- Audio
The sample.webm file is in the WebM format, and the video and audio streams are stored in the VP8 and Vorbis formats, respectively.
3. Using FFmpeg
FFmpeg is a free, open-source, and cross-platform multimedia framework that provides efficient and versatile ways to process multimedia files.
3.1. Installation
First, let’s verify that we have FFmpeg installed on the system:
$ ffmpeg -version
ffmpeg version 4.4.2-0ubuntu0.22.04.1 Copyright (c) 2000-2021 the FFmpeg developers
built with gcc 11 (Ubuntu 11.2.0-19ubuntu1)
...
In case it’s not already available, we should again be able to install FFmpeg via the local package manager:
$ sudo apt install ffmpeg
Alternatively, we can use snap to install FFmpeg.
3.2. Format Conversion
The default behavior of FFmpeg to re-encode processed input media files makes it quite straightforward to convert formats.
For example, we can convert a WebM file to an mp4 format:
$ ffmpeg -i sample.webm sample1_ffmpeg.mp4
This command takes an input (-i) WebM file, sample.webm, and converts it to the specified output file, in this case, sample1_ffmpeg.mp4. The input and output formats are auto-detected based on the file extensions. So, we can change the output file’s extension to change the format.
Furthermore, we can control the output quality with the -qscale (-q for short) or the -crf (Constant Rate Factor) options:
$ ffmpeg -i sample.webm -q 0 sample2_ffmpeg.mkv
This command converts the sample.webm file to the mkv format and saves it as sample2_ffmpeg.mkv.
Additionally, we can also convert the WebM file to MP3 format.
3.3. Format Verification
Let’s verify the format of one of the resulting files:
$ mediainfo sample1_ffmpeg.mp4
General
Complete name                            : sample1_ffmpeg.mp4
Format                                   : MPEG-4
Format profile                           : Base Media
Codec ID                                 : isom (isom/iso2/avc1/mp41)
File size                                : 1.62 MiB
Duration                                 : 32 s 508 ms
Overall bit rate                         : 418 kb/s
Writing application                      : Lavf58.76.100
...
The output confirms the MPEG4 (mp4) format.
Similarly, we can verify the format of other output files. The output of the mediainfo command for an audio file (mp3) is divided into two parts, i.e., General and Audio, and lacks the Video section.
4. Using FF Multi Converter
FF Multi Converter is a GUI file format converter that supports many popular video, audio, image, and document formats. It uses FFmpeg to convert media file formats, so it functions more or less like a front-end.
4.1. Installation
Let’s start by cloning the official repository using git:
$ git clone https://github.com/ilstam/FF-Multi-Converter.git
Next, we’re going to install it from within the cloned Git repository, which requires python3 with the PyQt5 library:
$ cd ./FF-Multi-Converter/
$ sudo python3 setup.py install
The cd command changes the current directory to the cloned repository, while the python3 command installs the FF Multi Converter program.
Alternatively, we can also use the FF Multi Converter without installing it, by running the launcher script from the downloaded archive:
$ ./launcher
This script launches the FF Multi Converter application, irrespective of the installation process.
4.2. Format Conversion
After installation, we can open the FF Multi Converter either from the Applications menu or from the command line:
$ ffmulticonverter sample.webm
This command opens up a graphical interface with the sample.webm file as an input:
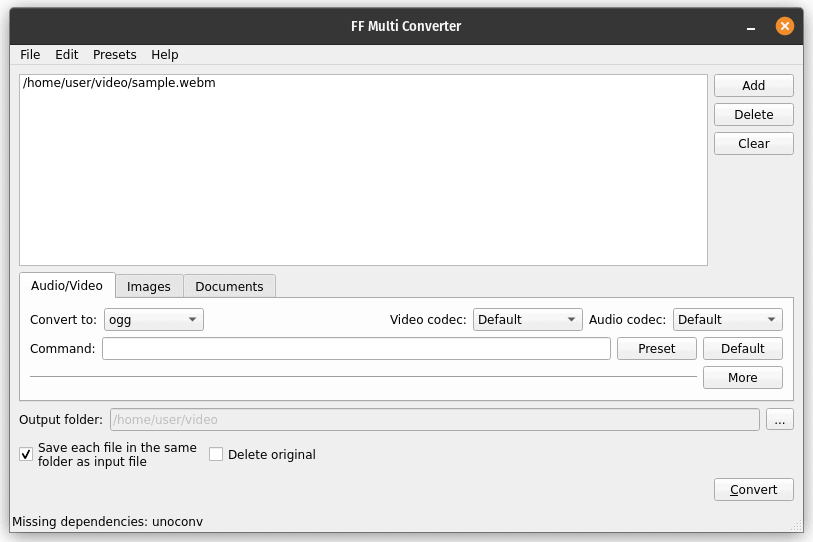
We can select the output format from the drop-down menu of the Convert to: option, in this case, ogg. Then, we select the checkbox at the bottom left side to save the file in the same folder as the input file or provide the path for the output folder. Next, we click on the Convert button at the bottom right corner of the window to convert the file format.
Additionally, we can also convert multiple WebM files to a destination format in batch mode, such as 3gp, mkv, mp4, ogg, etc.
5. Using VLC
VLC (VideoLAN Client) is a free, open-source, cross-platform multimedia player and framework that plays most multimedia files.
5.1. Installation
VLC isn’t pre-installed on most Linux distributions. So, let’s proceed with the installation:
$ sudo apt install vlc
Now, we can check the installed version of VLC:
$ vlc --version
VLC media player 3.0.16 Vetinari (revision 3.0.13-8-g41878ff4f2)
VLC version 3.0.16 Vetinari (3.0.13-8-g41878ff4f2)
Compiled by buildd on lcy02-amd64-108.buildd (Mar 13 2022 08:00:10)
Compiler: gcc version 11.2.0 (Ubuntu 11.2.0-18ubuntu1)
...
As we can see, the installed version of VLC is 3.0.16.
5.2. Format Conversion
We can use the VLC interface and the vlc command to convert WebM files to other formats.
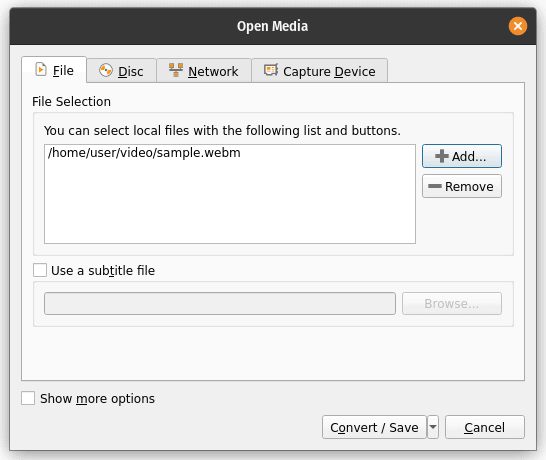
Let’s open VLC from the Applications menu. Then, we click on the Media menu from the VLC application window followed by a click on the Convert/Save button. It opens a new window to select the input file:
Next, we click on the Convert /Save button to specify the output details including format and filename. Finally, we click on the Start button to start the format conversion process.

Moreover, we can get the same result using the command line:
$ vlc sample.webm --sout='#transcode{vcodec=h264,acodec=mpga,ab=128,channels=2,samplerate=44100,scodec=none}:std{access=file,mux=mp4,dst=sample1_vlc.mp4' vlc://quit
This command takes the sample.webm file, transcodes the video to H.264 (vcodec=h264), the audio to MPGA (acodec=mpga) with an audio bitrate of 128 kbps (ab=128), and a sample rate of 44.1 kHz (samplerate=44100). Then, it saves the output as sample2_vlc.mp4 in the MP4 container format.
6. Conclusion
In this article, we learned several ways to convert files from WebM format to other formats in Linux.
Firstly, we installed and tested MediaInfo to verify the format for both the sample and output files. Secondly, we used FFmpeg to convert the WebM file to the mp4 and mkv formats. Then, we used the graphical interface of the FF Multi Converter tool and converted the WebM file to the ogg format. Finally, we installed and discussed the usage of VLC to convert WebM files to other formats.