1. Overview
The Eclipse IDE is one of the most common tools for Java application development. It comes with default settings that enable us to build and execute our code right away within the IDE.
However, these default settings are sometimes not sufficient when we try to build using Maven in Eclipse. Consequently, we’ll encounter build errors.
In this quick tutorial, we’ll demonstrate the configuration changes we need to make so that we can build Maven-based Java projects within the IDE.
2. Java Compilation in Eclipse
Before we start, let’s try to understand a little bit about the compilation process in Eclipse.
The Eclipse IDE comes bundled with its own Java compiler called Eclipse Compiler for Java (ECJ). This is an incremental compiler that can compile only the modified files instead of having to always compile the entire application.
This capability makes it possible for code changes that we make through the IDE to be compiled and checked for errors instantaneously as we type.
Due to the usage of Eclipse’s internal Java compiler, we don’t need to have a JDK installed in our system for Eclipse to work.
3. Compiling Maven Projects in Eclipse
The Maven build tool helps us to automate our software build process, and Eclipse comes bundled with Maven as a plugin. However, Maven doesn’t come bundled with any Java compilers. Instead, it expects that we have the JDK installed.
To see what happens when we try to build a Maven project inside Eclipse, assuming that Eclipse has the default settings, let’s open any Maven project in Eclipse.
Then, from the Package Explorer window, let’s right-click on the project folder and then left-click on Run As > 3 Maven build:
This will trigger the Maven build process. As expected, we’ll get a failure:
[INFO] BUILD FAILURE
[INFO] ------------------------------------------------------------------------
[ERROR] Failed to execute goal org.apache.maven.plugins:maven-compiler-plugin:3.8.0:compile
(default-compile) on project one: Compilation failure
[ERROR] No compiler is provided in this environment. Perhaps you are running on a JRE rather than a JDK?
The error message indicates that Maven is unable to find the Java compiler, which comes only with a JDK and not with a JRE.
4. JDK Configuration in Eclipse
Let’s now fix the Maven build issue in Eclipse.
First, we need to download the latest version of JDK and install it in our system.
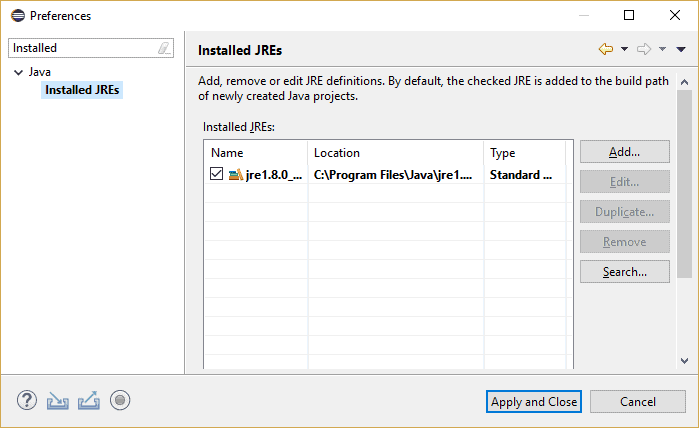
After that, let’s add the JDK as a runtime in Eclipse by navigating to Window > Preferences > Java > Installed JREs:
We can see that Eclipse already has Java configured. However, this is the JRE and not the JDK so let’s proceed with the next steps.
Now, let’s click on the Add… button to invoke the Add JRE wizard. This will ask us to select the type of JRE.
Here, we’ve selected the default option, Standard VM:
Clicking on Next will take us to the window where we’ll specify the location of the JRE home as the home directory of our JDK installation.
Following this, the wizard will validate the path and fetch the other details:
We can now click on Finish to close the wizard.
This will bring us back to the Installed JREs window, where we can see our newly added JDK and select it as our runtime in Eclipse:
Let’s click on Apply and Close to save our changes.
5. Testing the JDK Configuration
Let’s now trigger the Maven build one more time, in the same way as before.
We can see that it’s successful:
[INFO] ------------------------------------------------------------------------
[INFO] BUILD SUCCESS
[INFO] ------------------------------------------------------------------------
6. Conclusion
In this tutorial, we saw how we could configure Eclipse for Maven builds to work within the IDE.
By doing this one-time configuration, we’re able to leverage the IDE itself for our builds without having to set up Maven externally.