1. Introduction
MongoDB is a popular NoSQL database that offers scalability, performance, high availability, and support for real-time data processing.
In this introductory article, we’ll discuss about MongoDB Atlas, a fully managed Database as a Service provided by MongoDB with multi-cloud support (AWS, GCP, and Azure).
2. What Is MongoDB Atlas?
MongoDB Atlas is a cloud-based service that manages the deployment, monitoring, security, and scaling of MongoDB databases.
The database service provided by MongoDB efficiently hides the complexity of managing the database infrastructure and allows integration with modern web/mobile applications through various ways like MongoDB Shell, language-specific MongoDB drivers, and MongoDB Atlas API.
3. MongoDB Atlas UI
Let’s use the MongoDB Atlas website‘s intuitive UI to setup our first cluster.
3.1. Create an Account
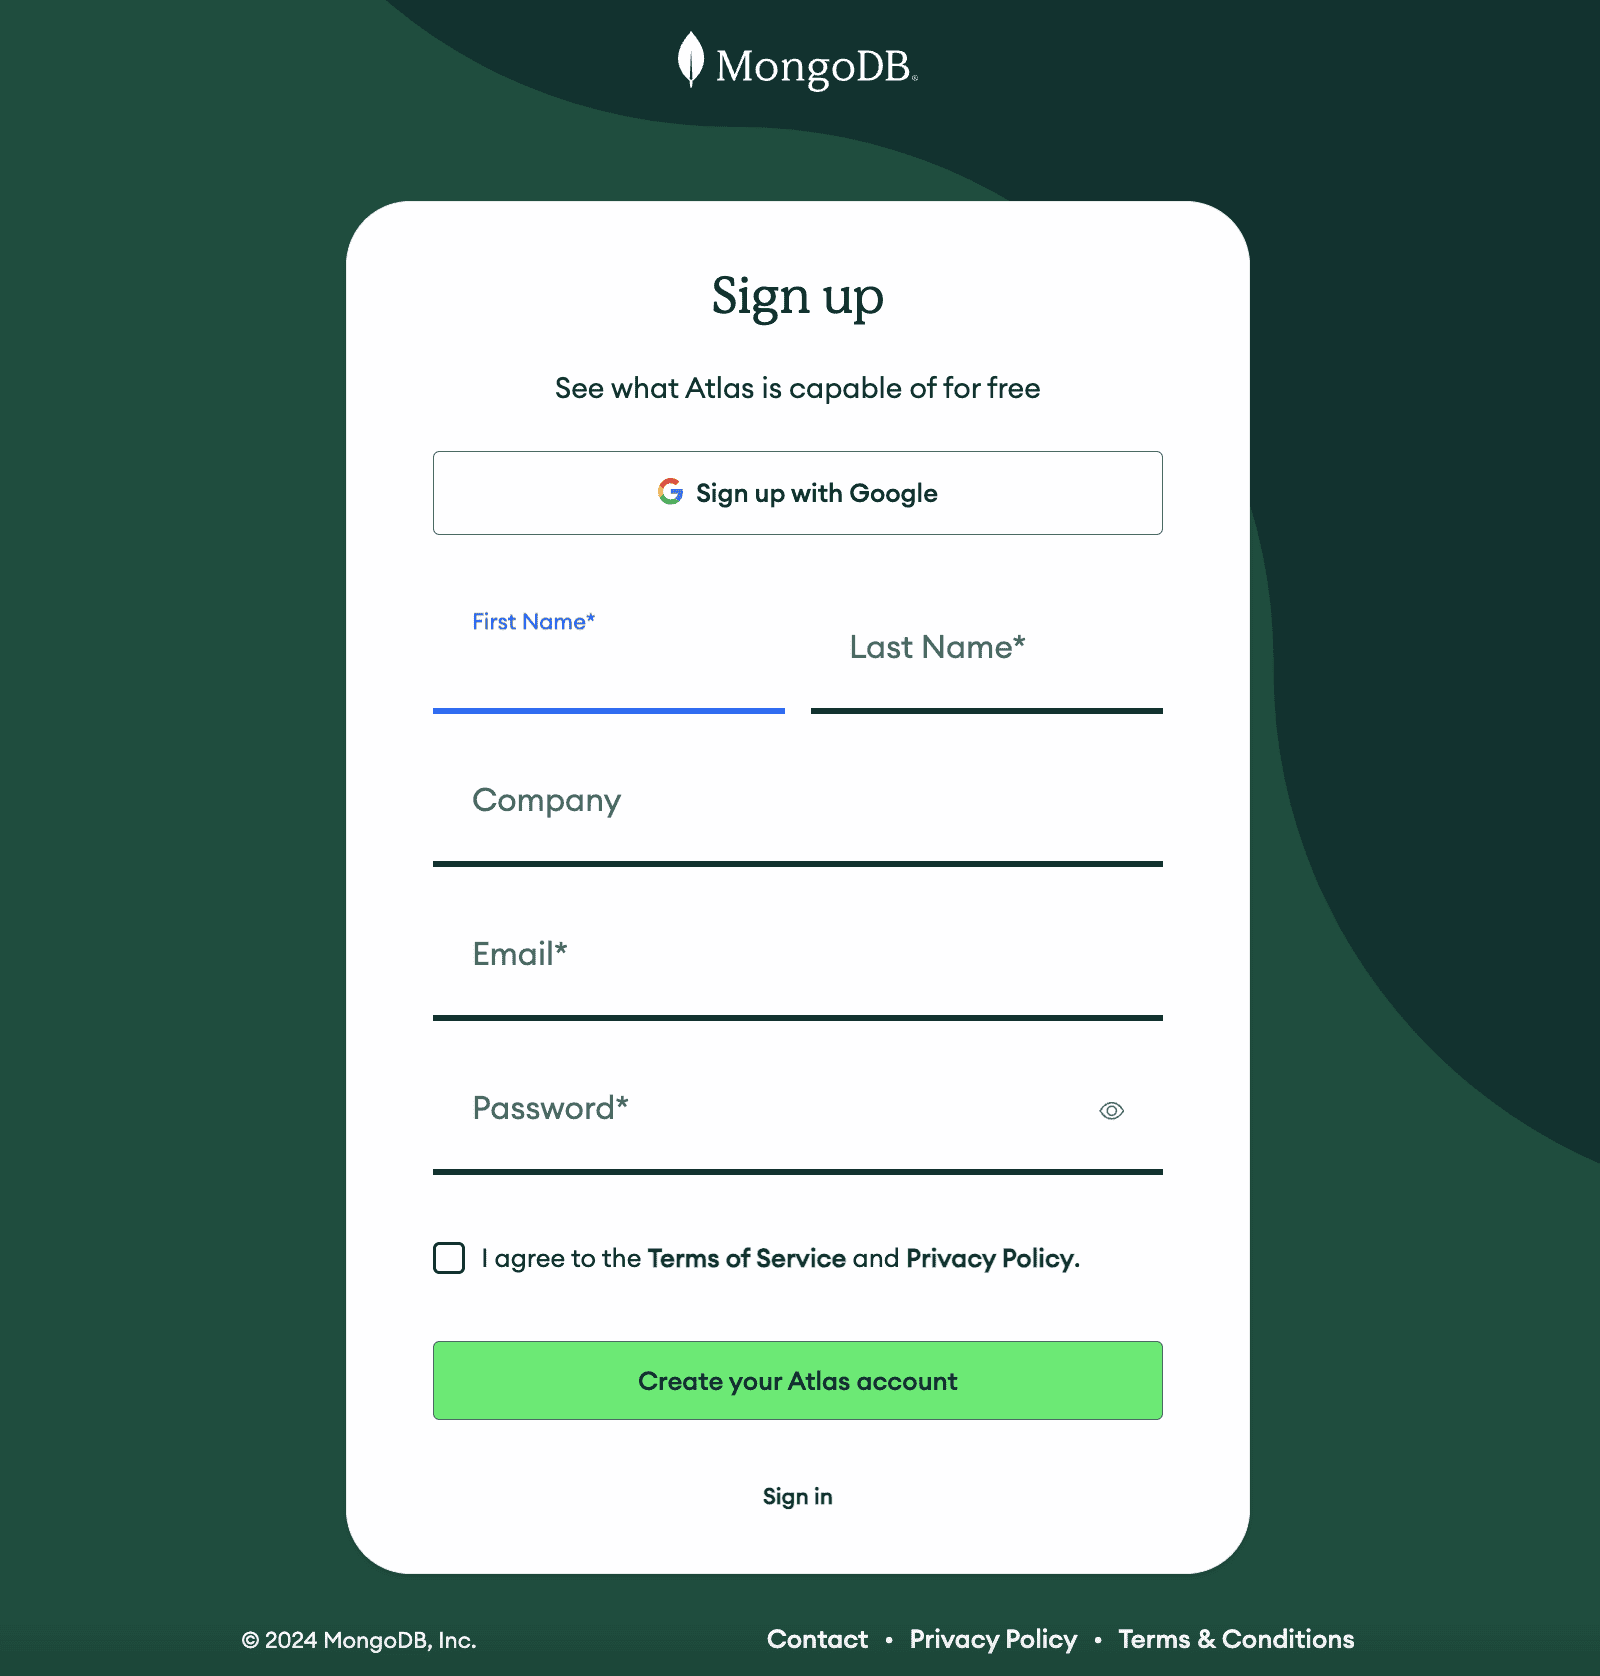
First, let’s sign up and create an account:
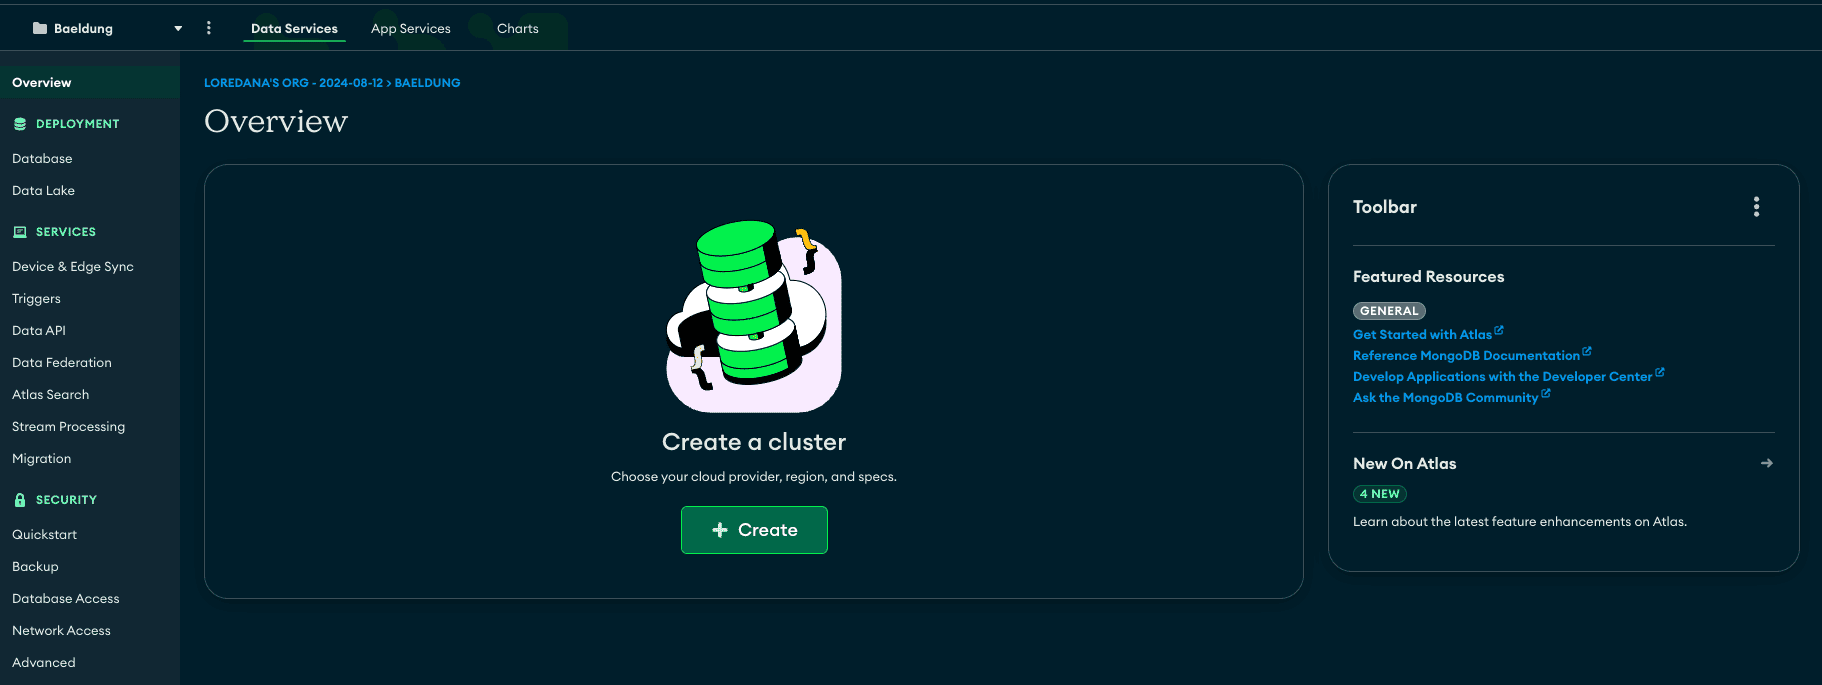
After signing in, we can view the dashboard to access deployment, services, and security settings.
3.2. Create a Cluster
Next, we can create a cluster using the Create button on the dashboard:
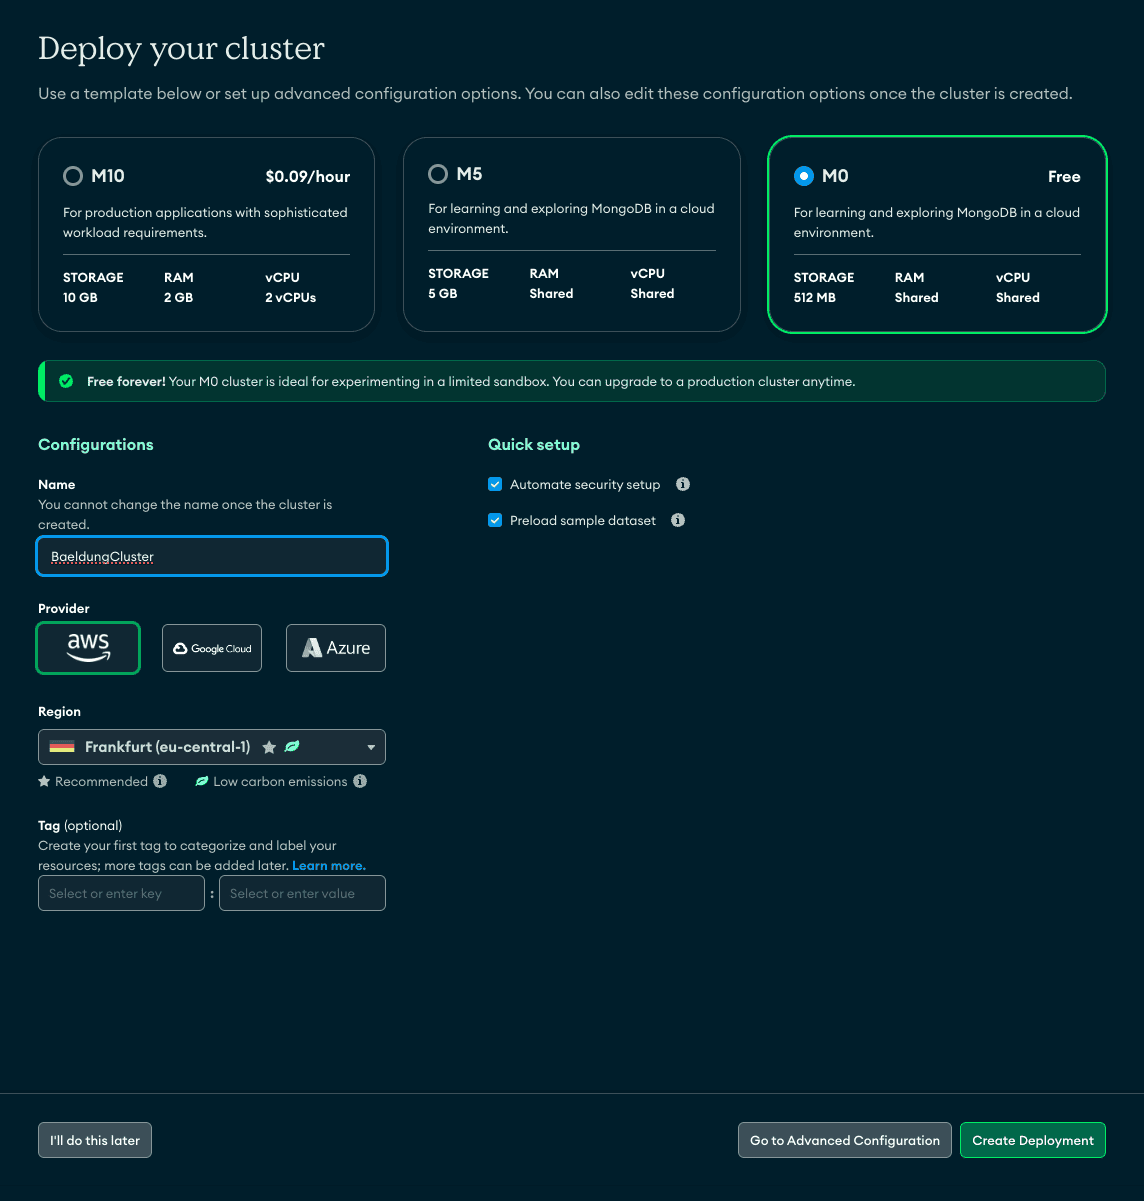
When creating a new cluster, the MongoDB Atlas UI lets us choose the type of server, like M10, M5, and M0, based on various needs.
Also, it provides the choices for the cloud provider, region, and security settings to deploy a cluster:
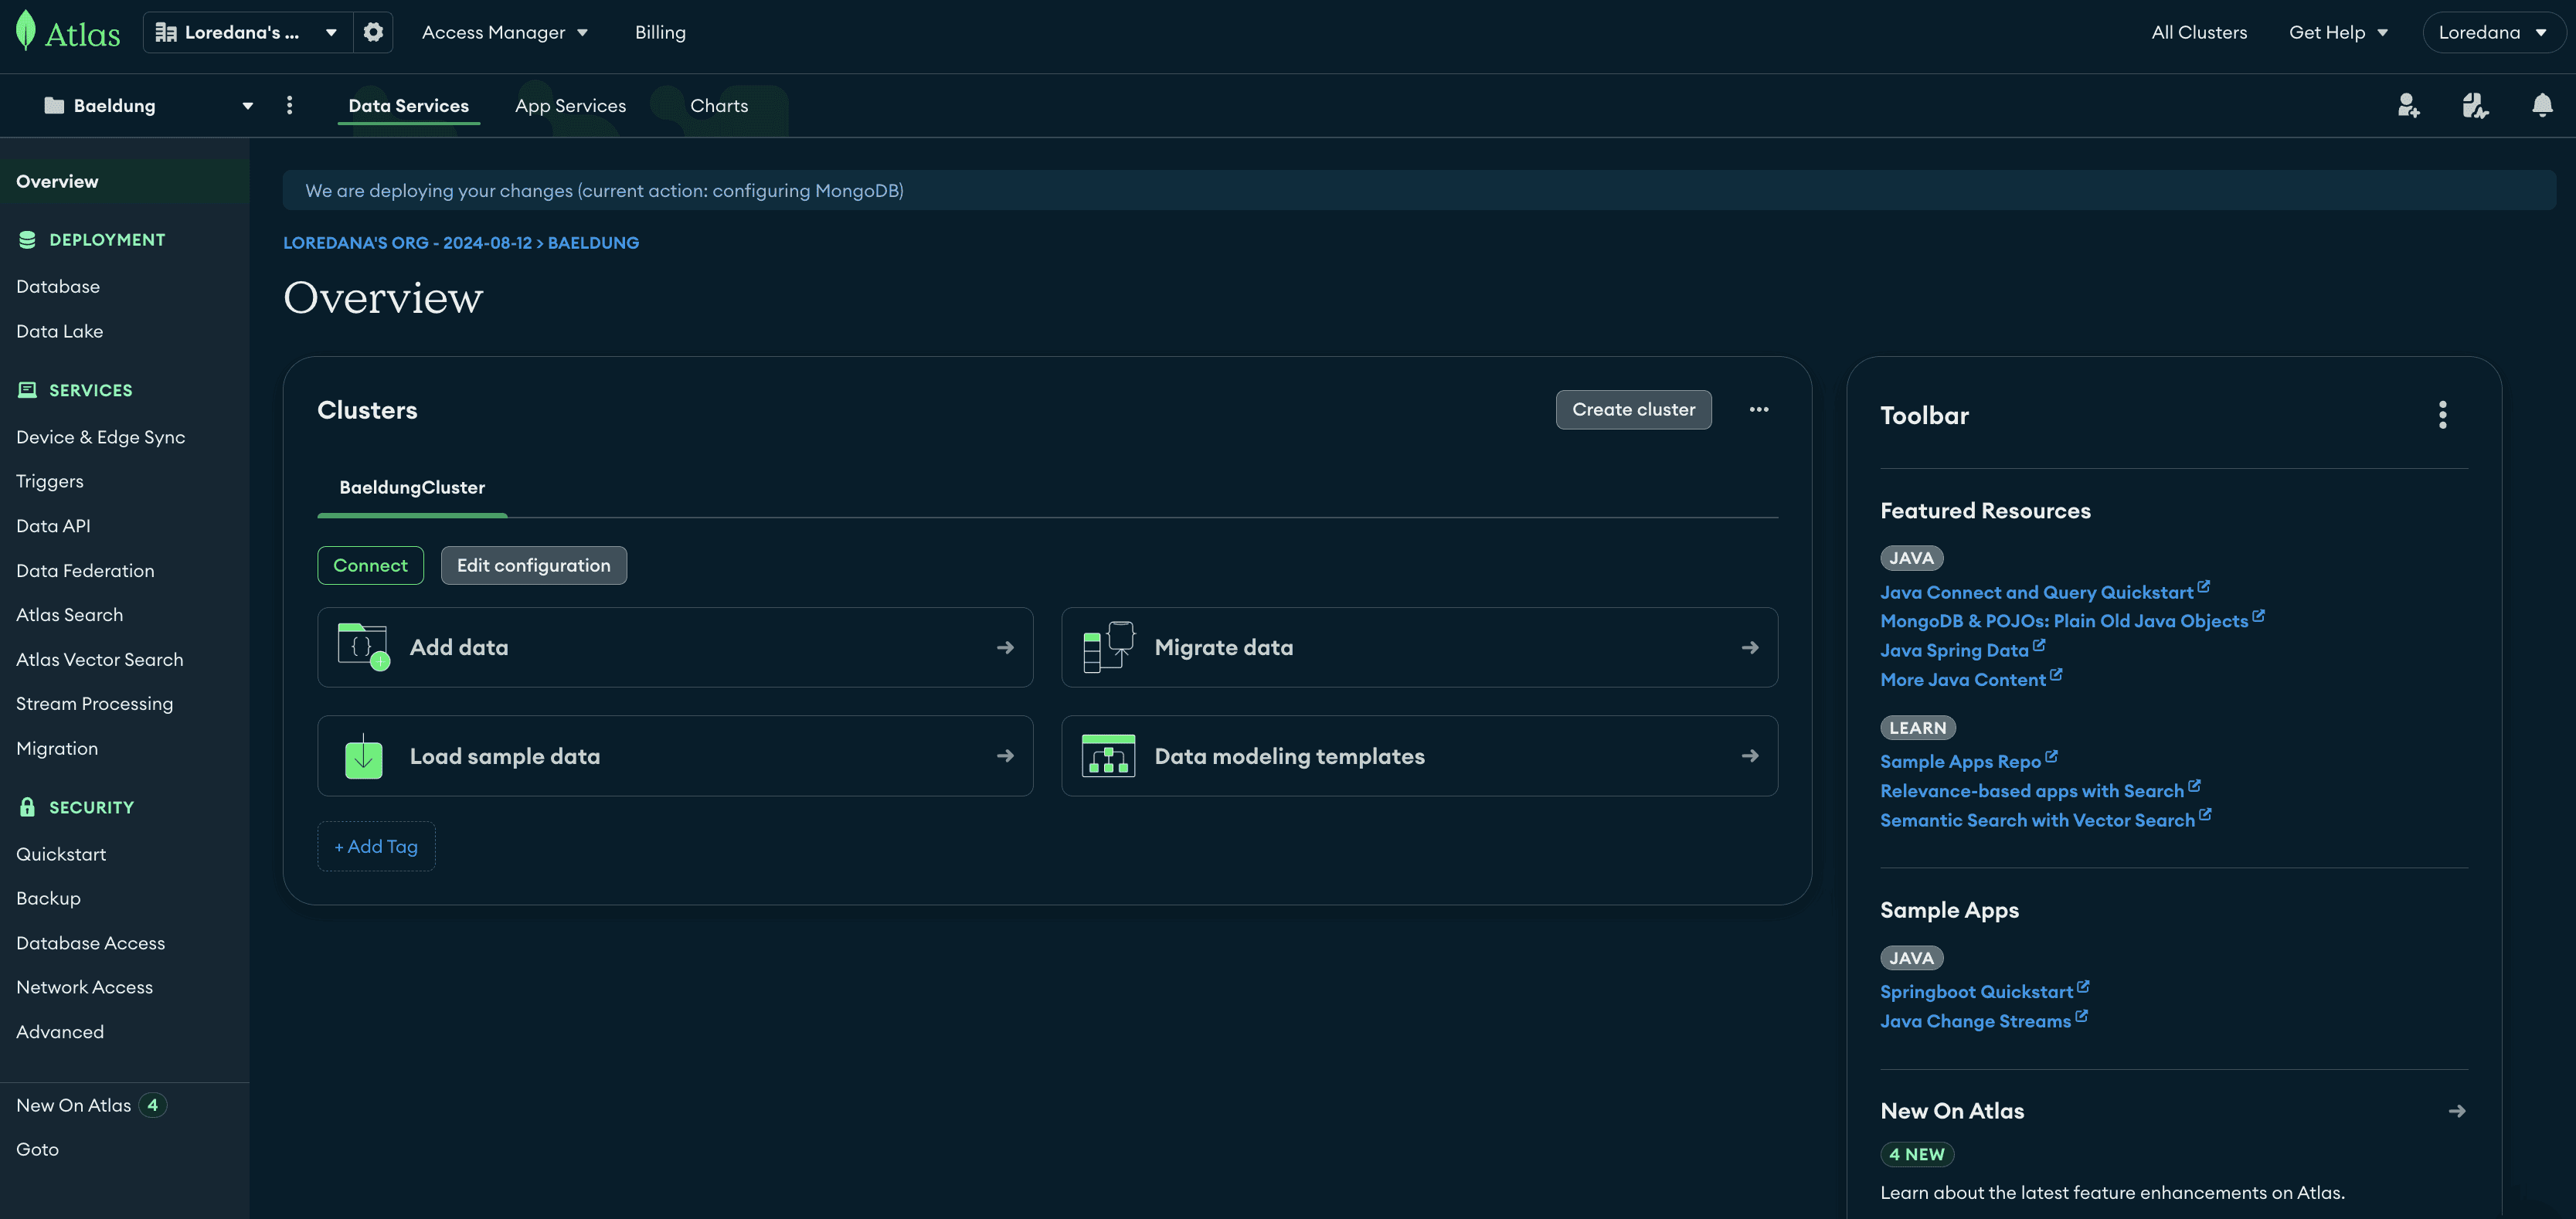
Once the BaeldungCluster named cluster is created and deployed, we can check its details and choose to either add data, migrate, or load the sample data (which creates the sample_mflix database):
Also, we can notice the toolbar section on the right that features a few handy samples for the developer’s interests.
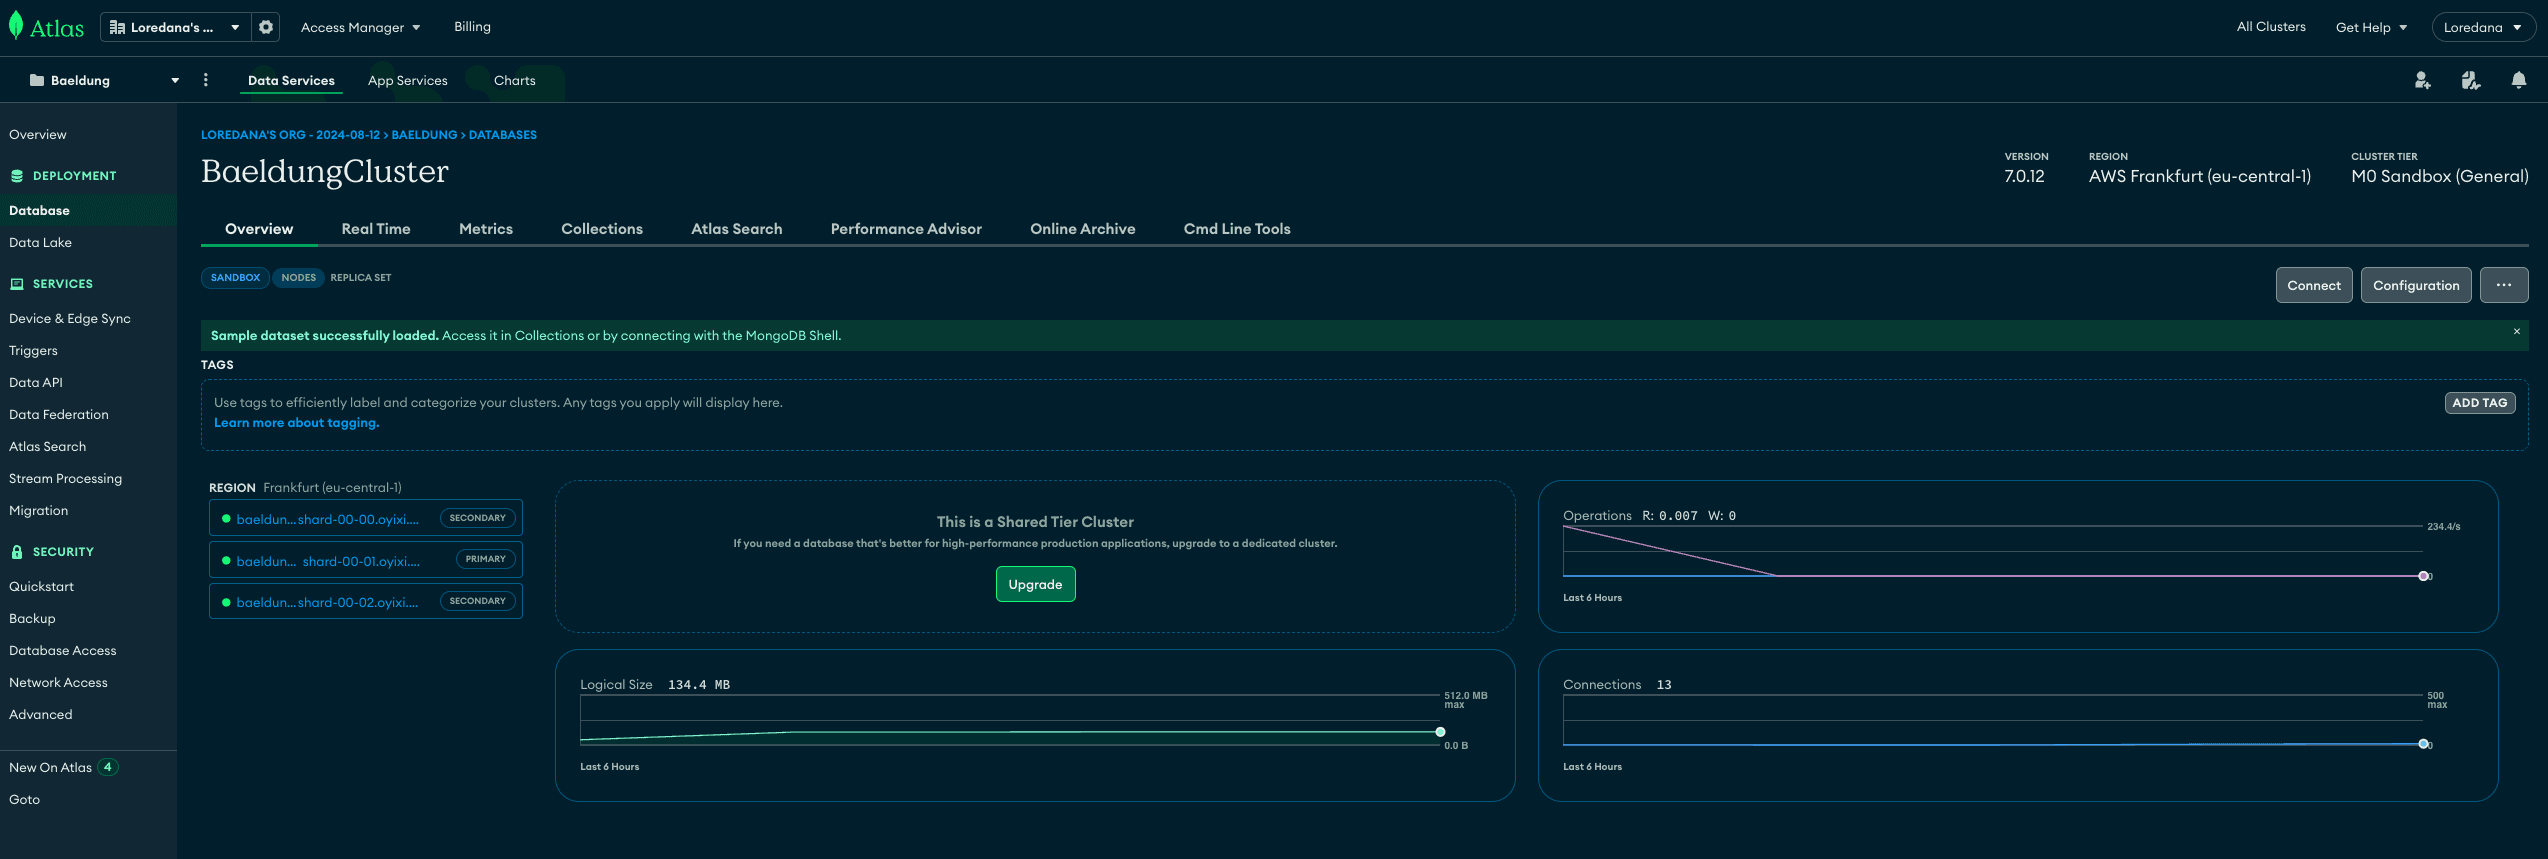
Once sample data is loaded, we can check out our BaeldungCluster on the dashboard with a few handy statistics like read and write operations, logical size, and connections over the last six hours:
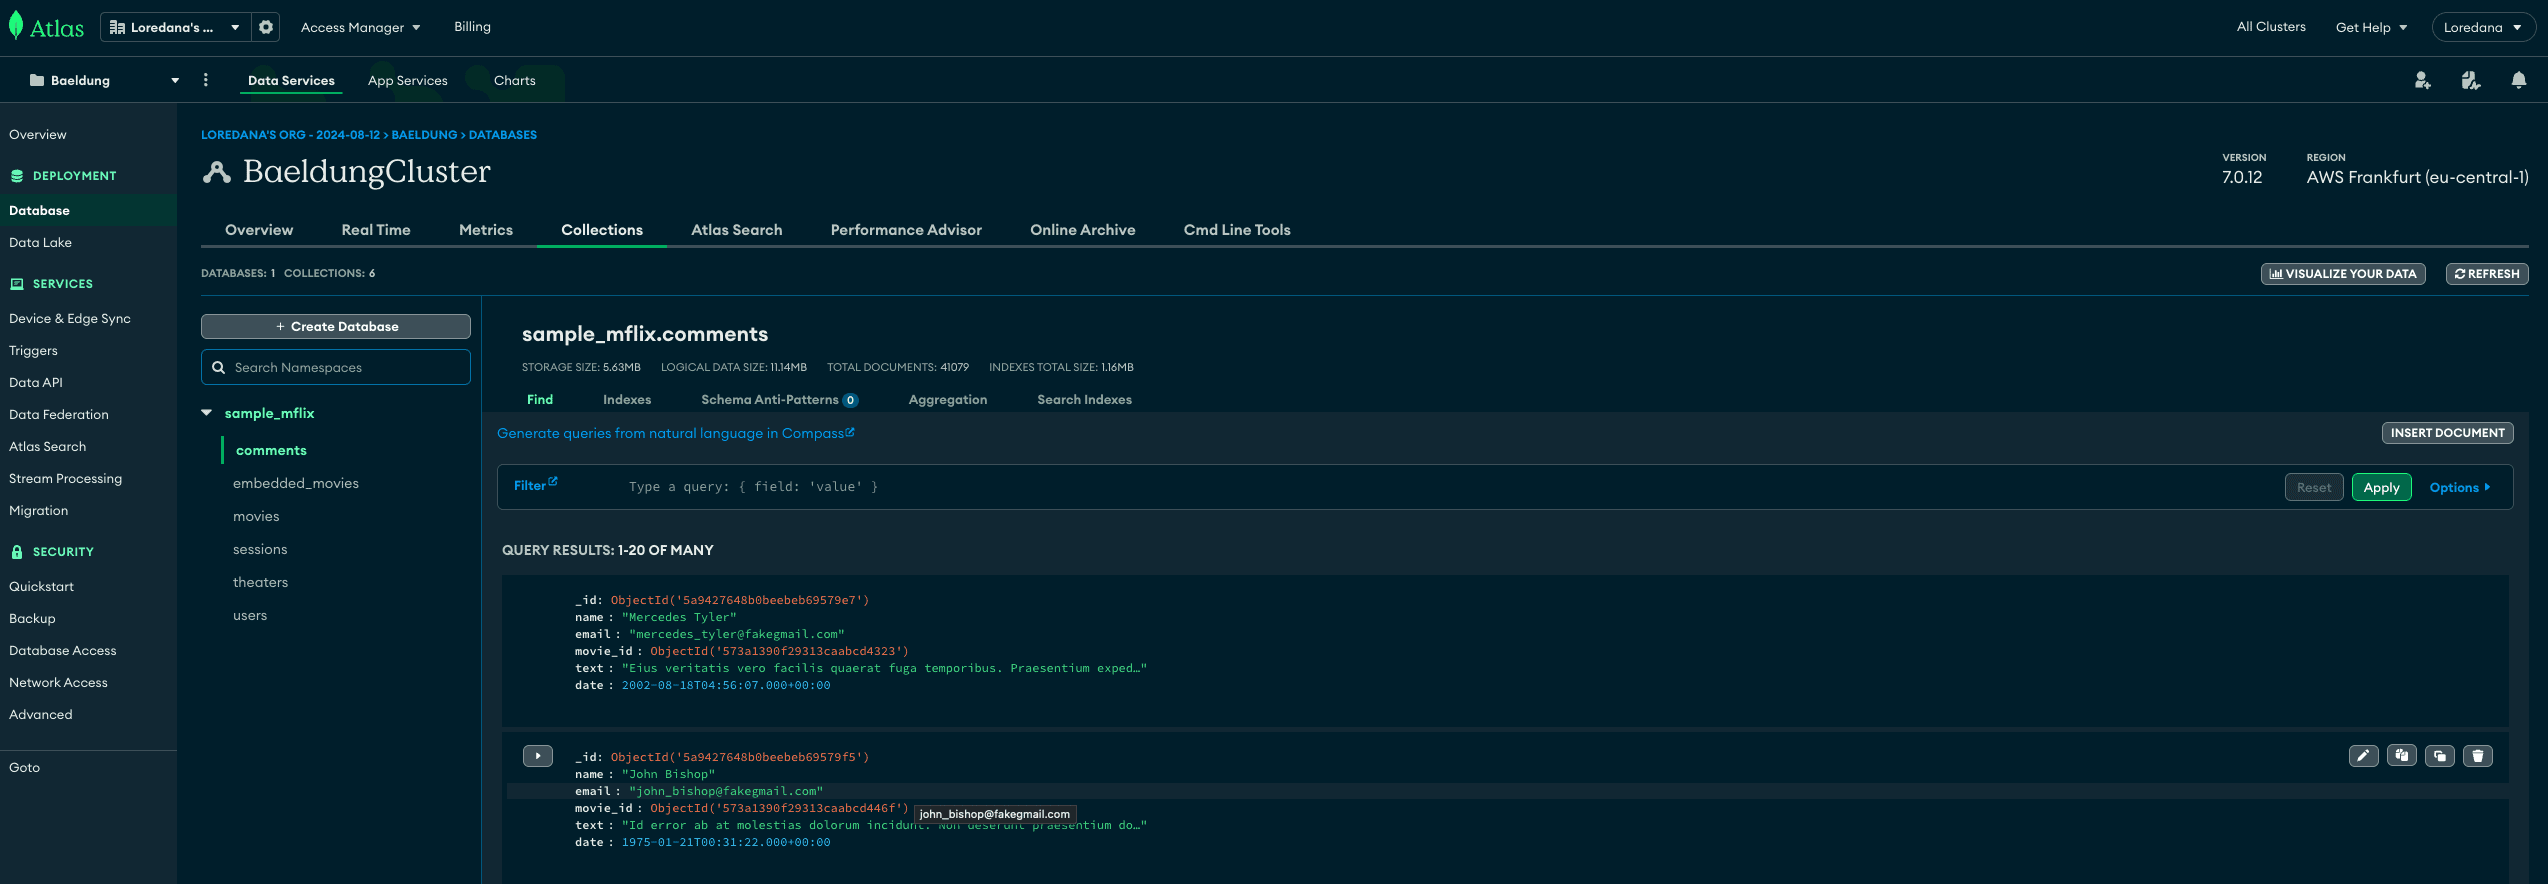
Also, we can visualize the sample data through the set of collections:
Here, we can check out that the sample_mflix database includes collections such as comments, movies, and theatres. Also, the UI allows us to find, insert, and aggregate the document.
3.3. Connect to Cluster
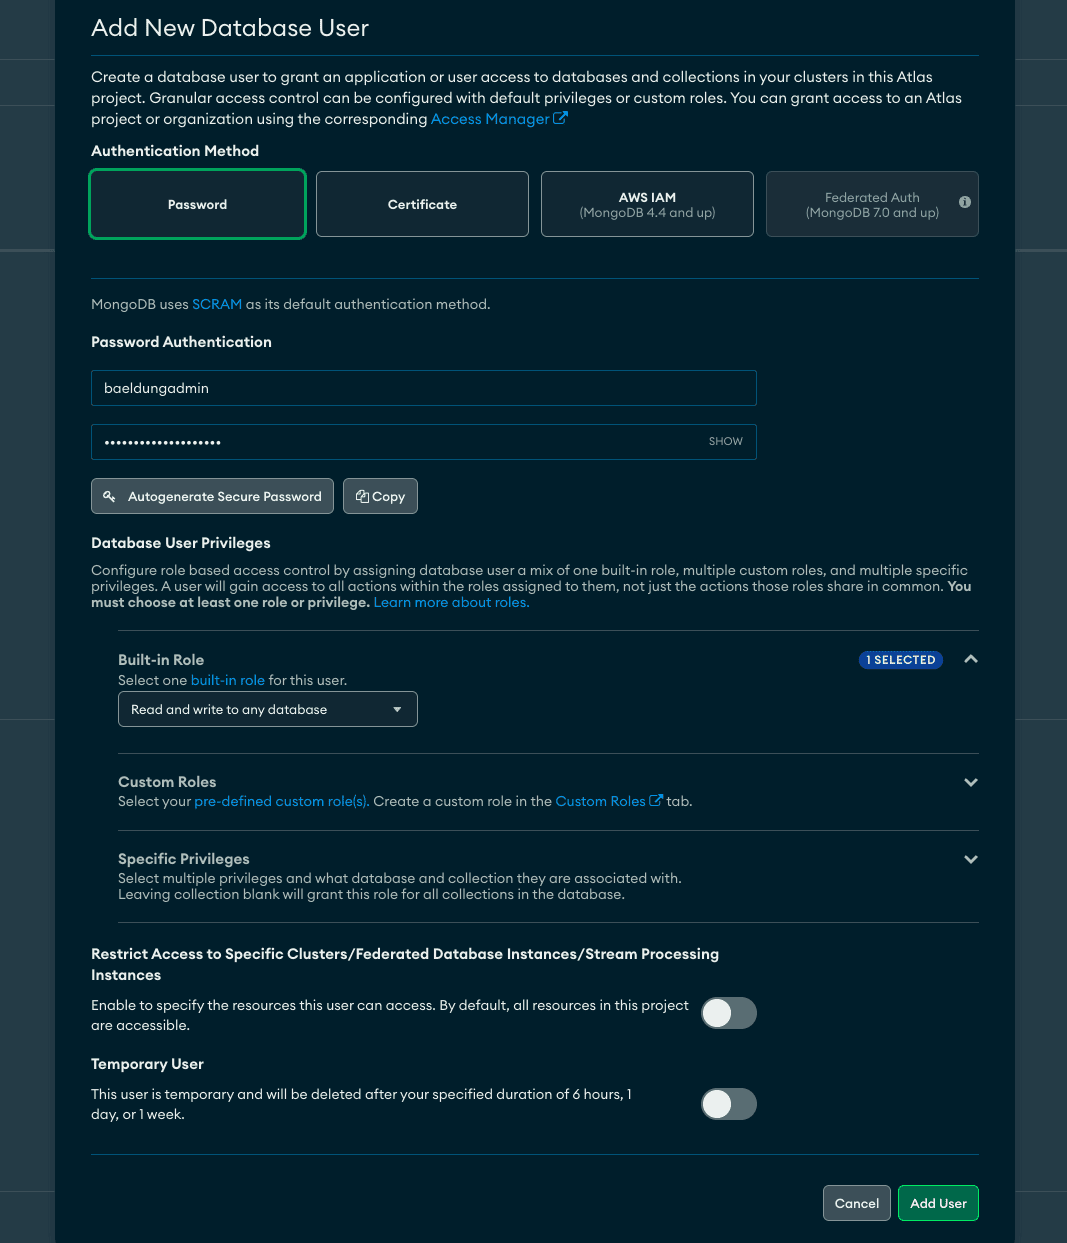
Let’s create a new database user to connect to our BaeldungCluster, through either the MongoDB Shell or the MongoDB driver in our application:
Once the user is ready, we’ll see the configuration details on the Database Access screen:
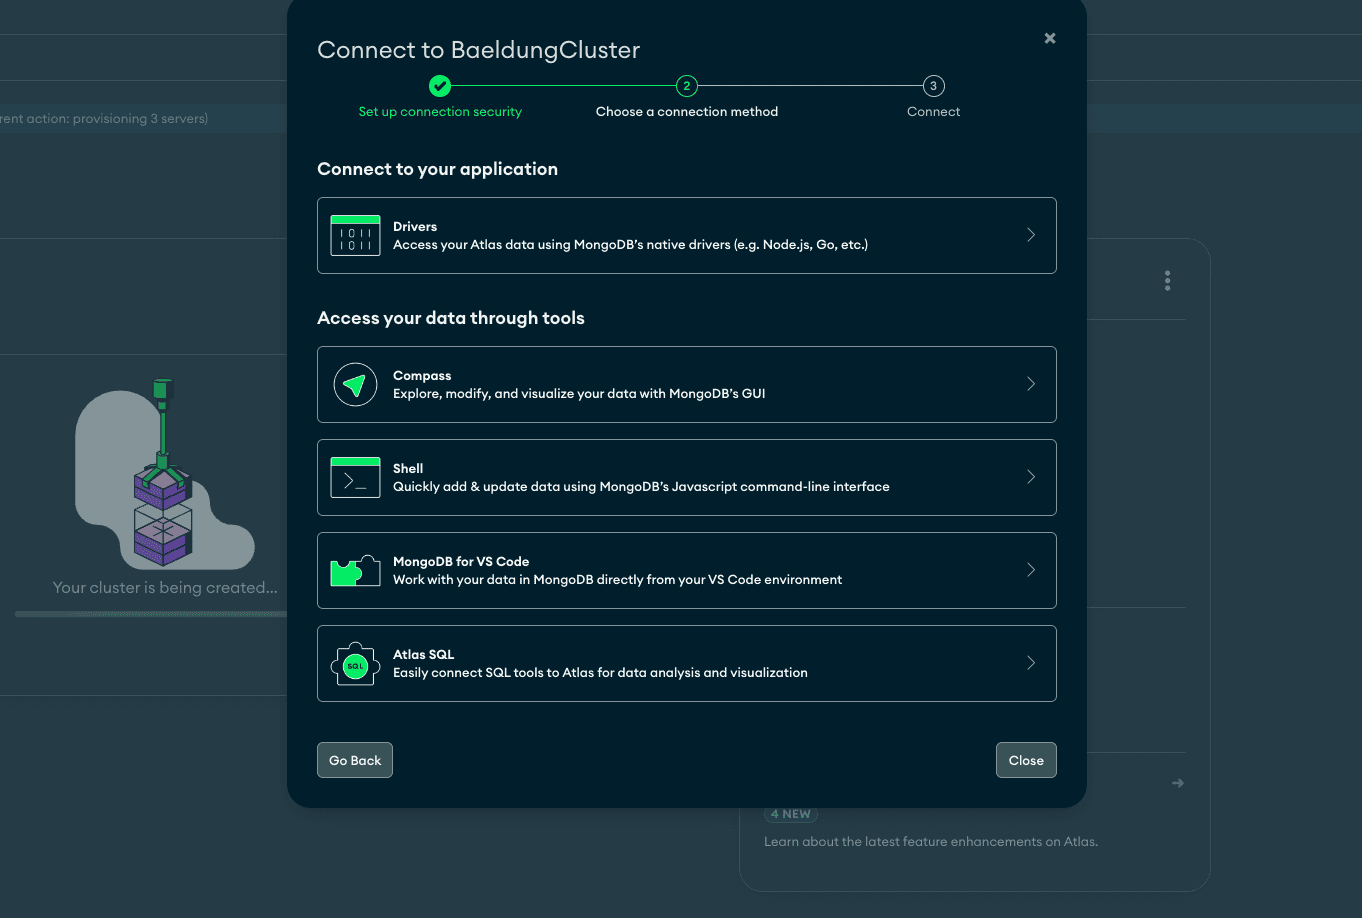
Next, on the dashboard, clicking the Connect button shows options to connect to the BaeldungCluster using drivers, Compass, or the Shell:
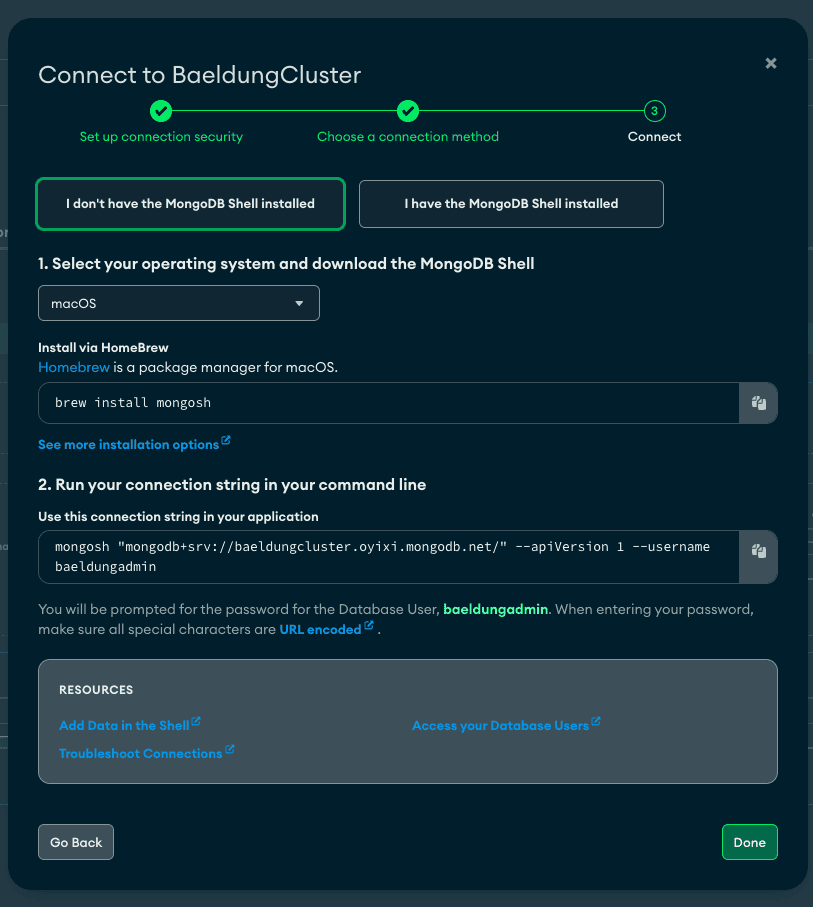
Then, let’s review the steps to connect to the BaeldungCluster using MongoDB Shell:
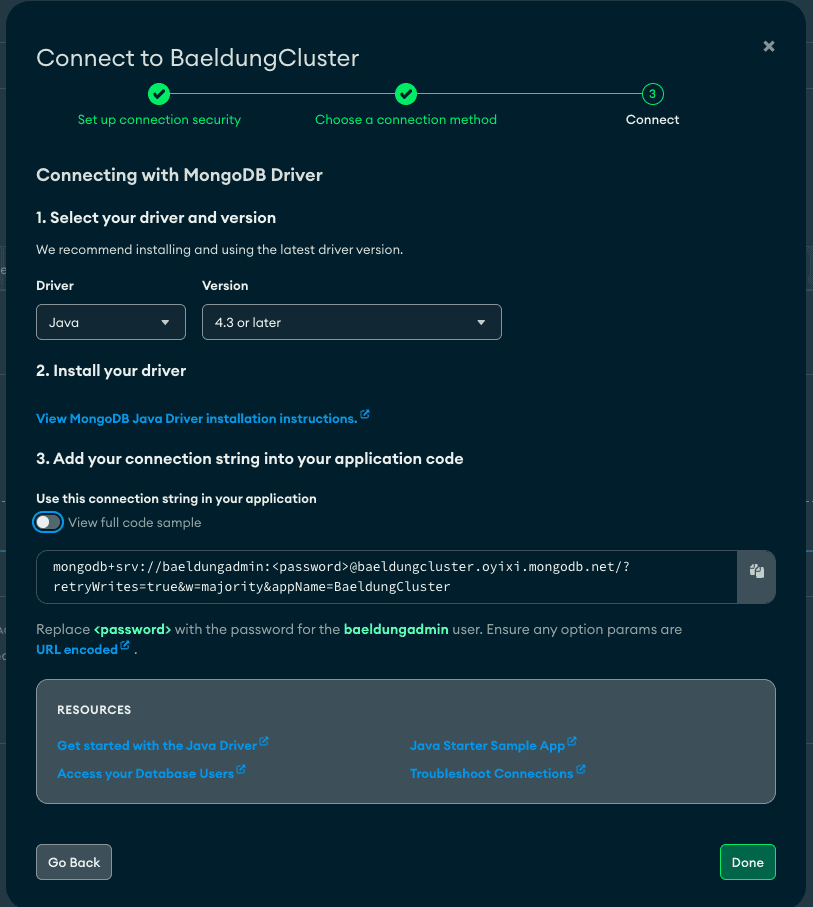
Similarly, we can also get the connection string for our Java application by selecting the Java driver to connect to the BaeldungCluster:
Likewise, if required, we can explore other ways like Compass and Atlas SQL to connect to our cluster.
3.4. Query Data
MongoDB Atlas UI lets us query data through Atlas search by providing various options like Atlas Vector Search, Autocomplete, and Rich Query DSL:
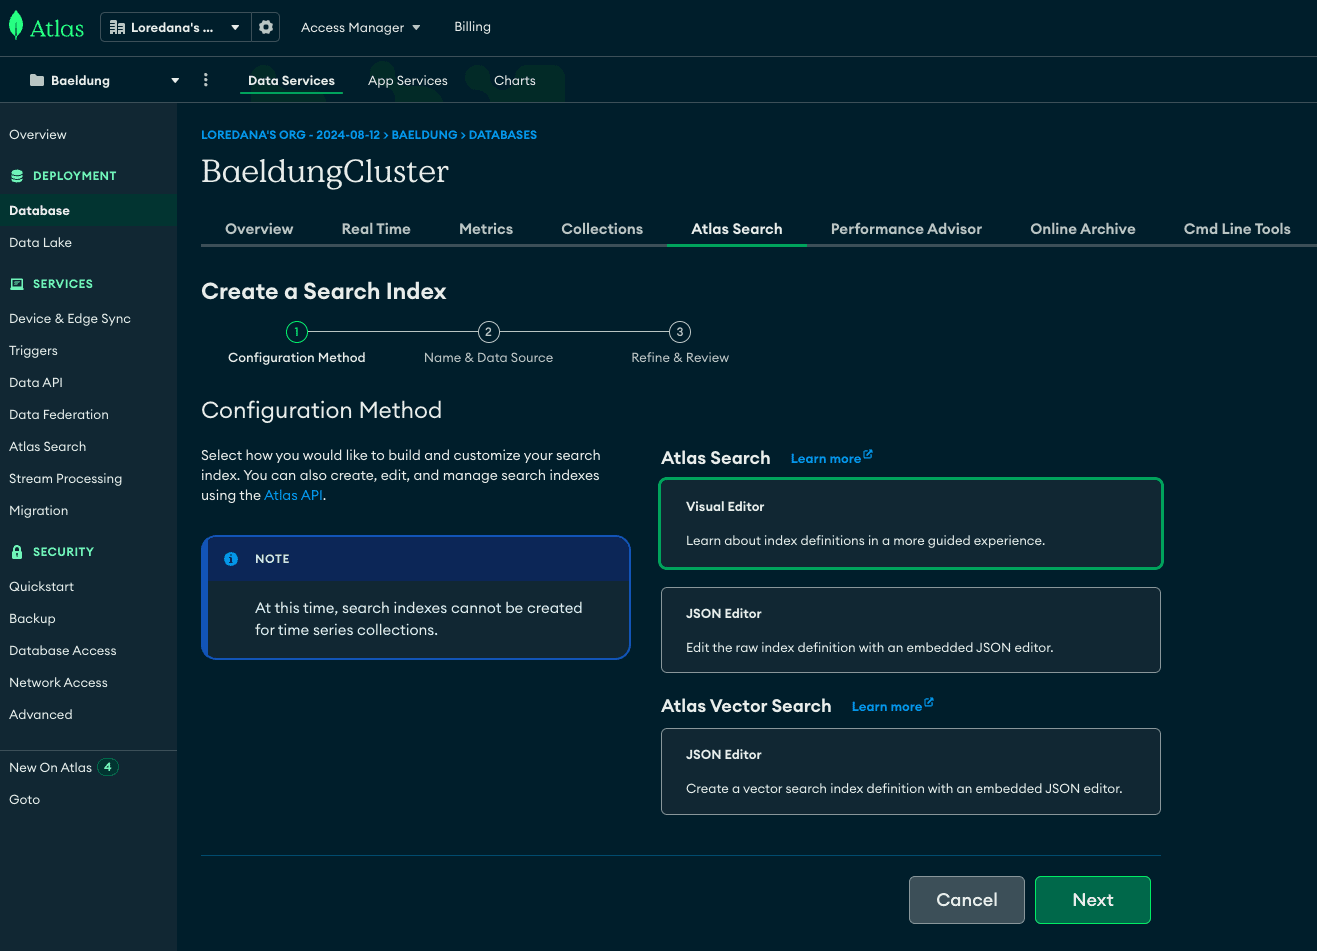
First, let’s create a search index for our BaeldungCluster and choose the Visual Editor option:
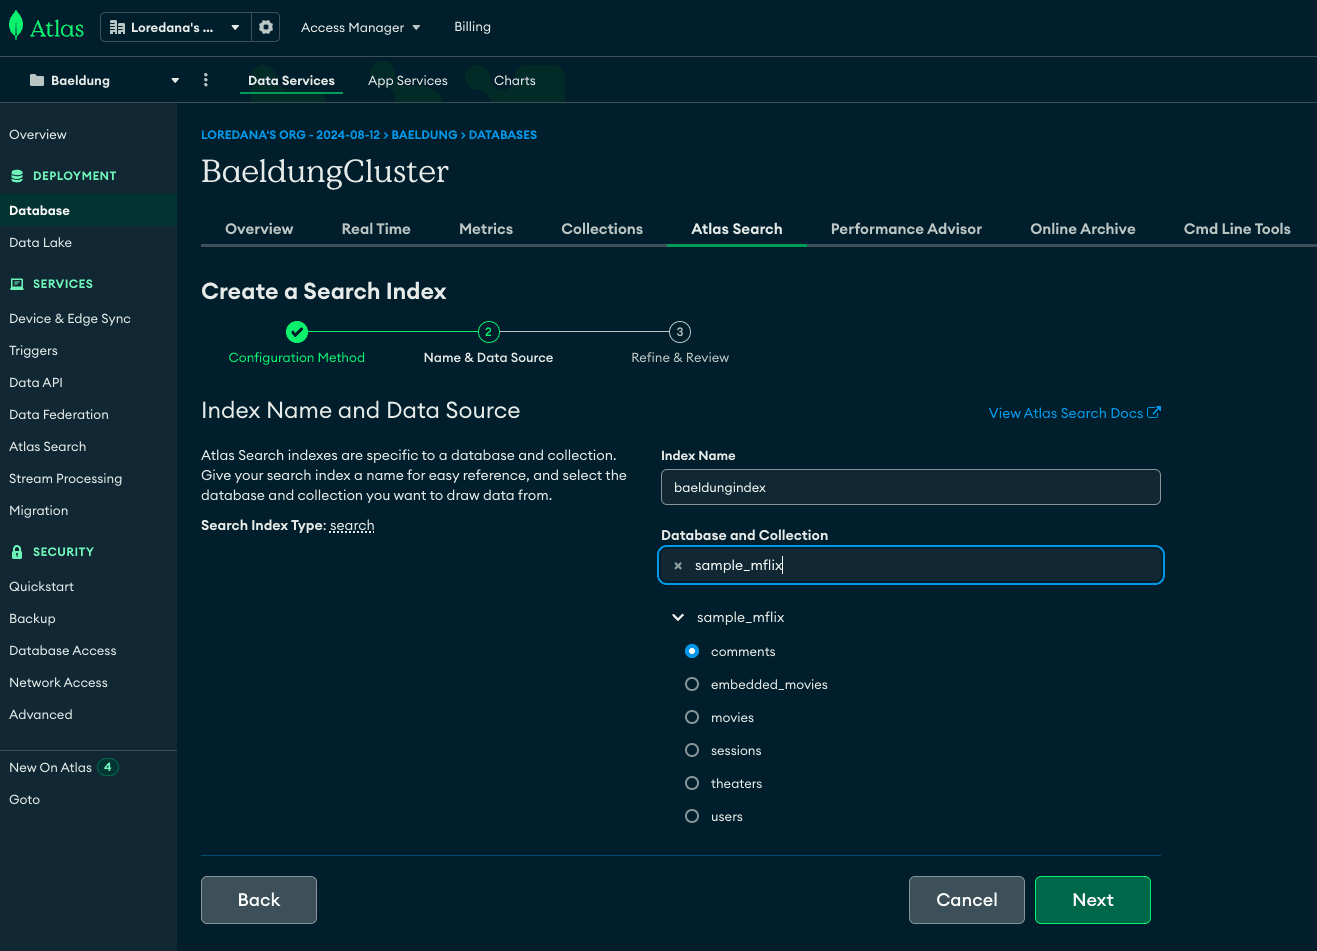
Next, we can name the index – baeldungindex and select the sample_mflix database, which is the sample data loaded on our BaeldungCluster:
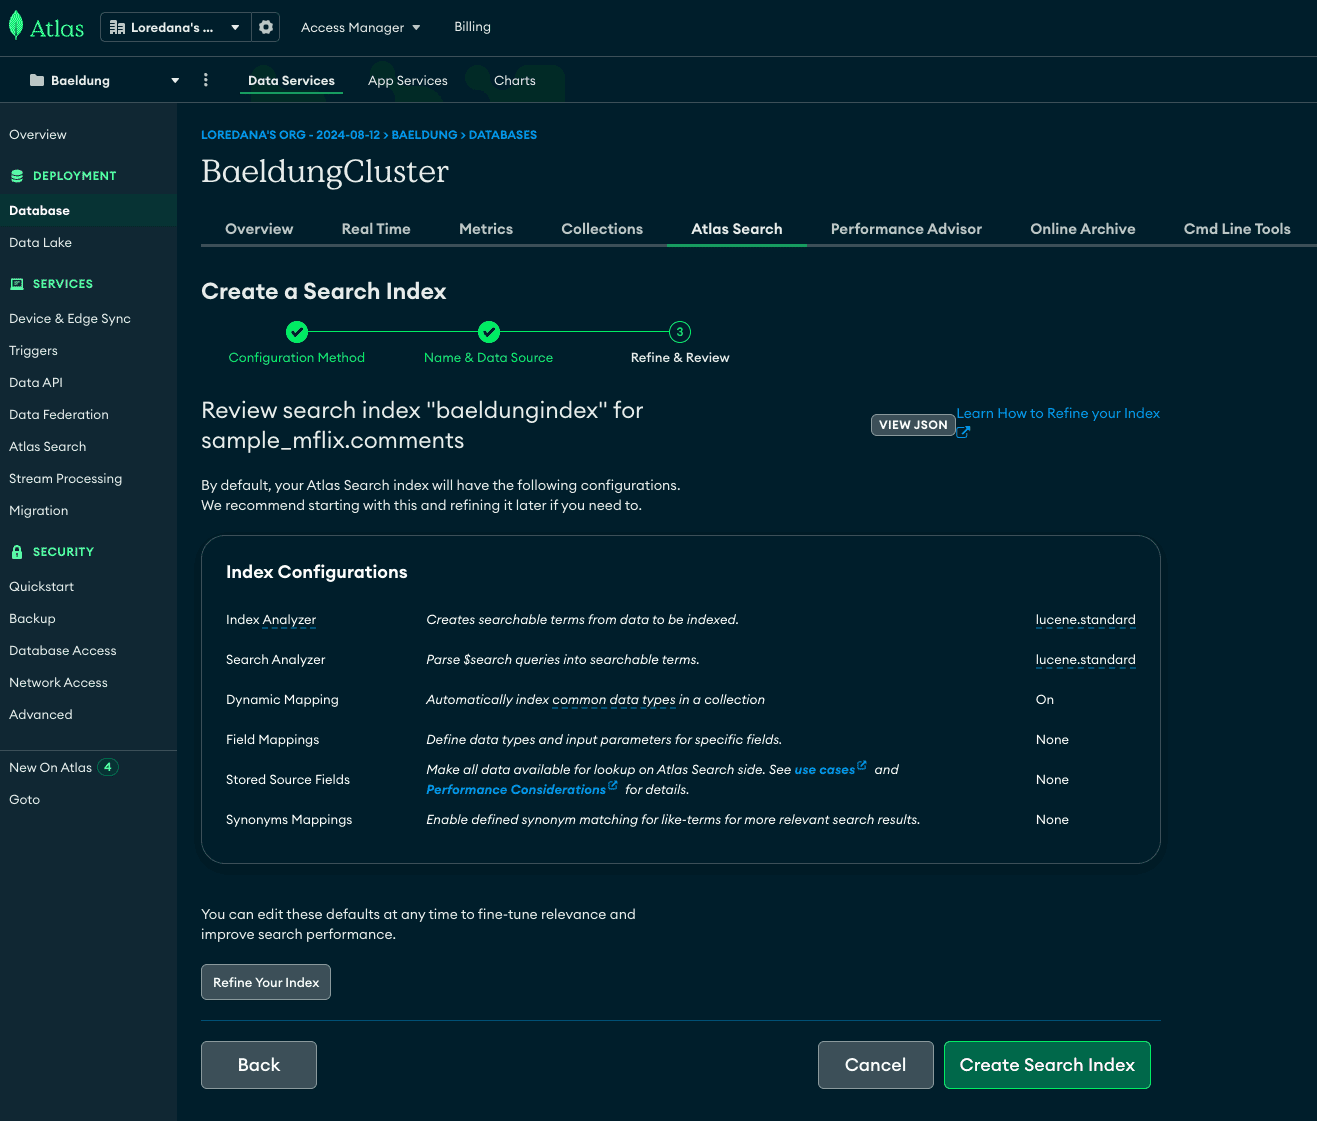
Also, the UI lets us refine the default index configuration in the next step:
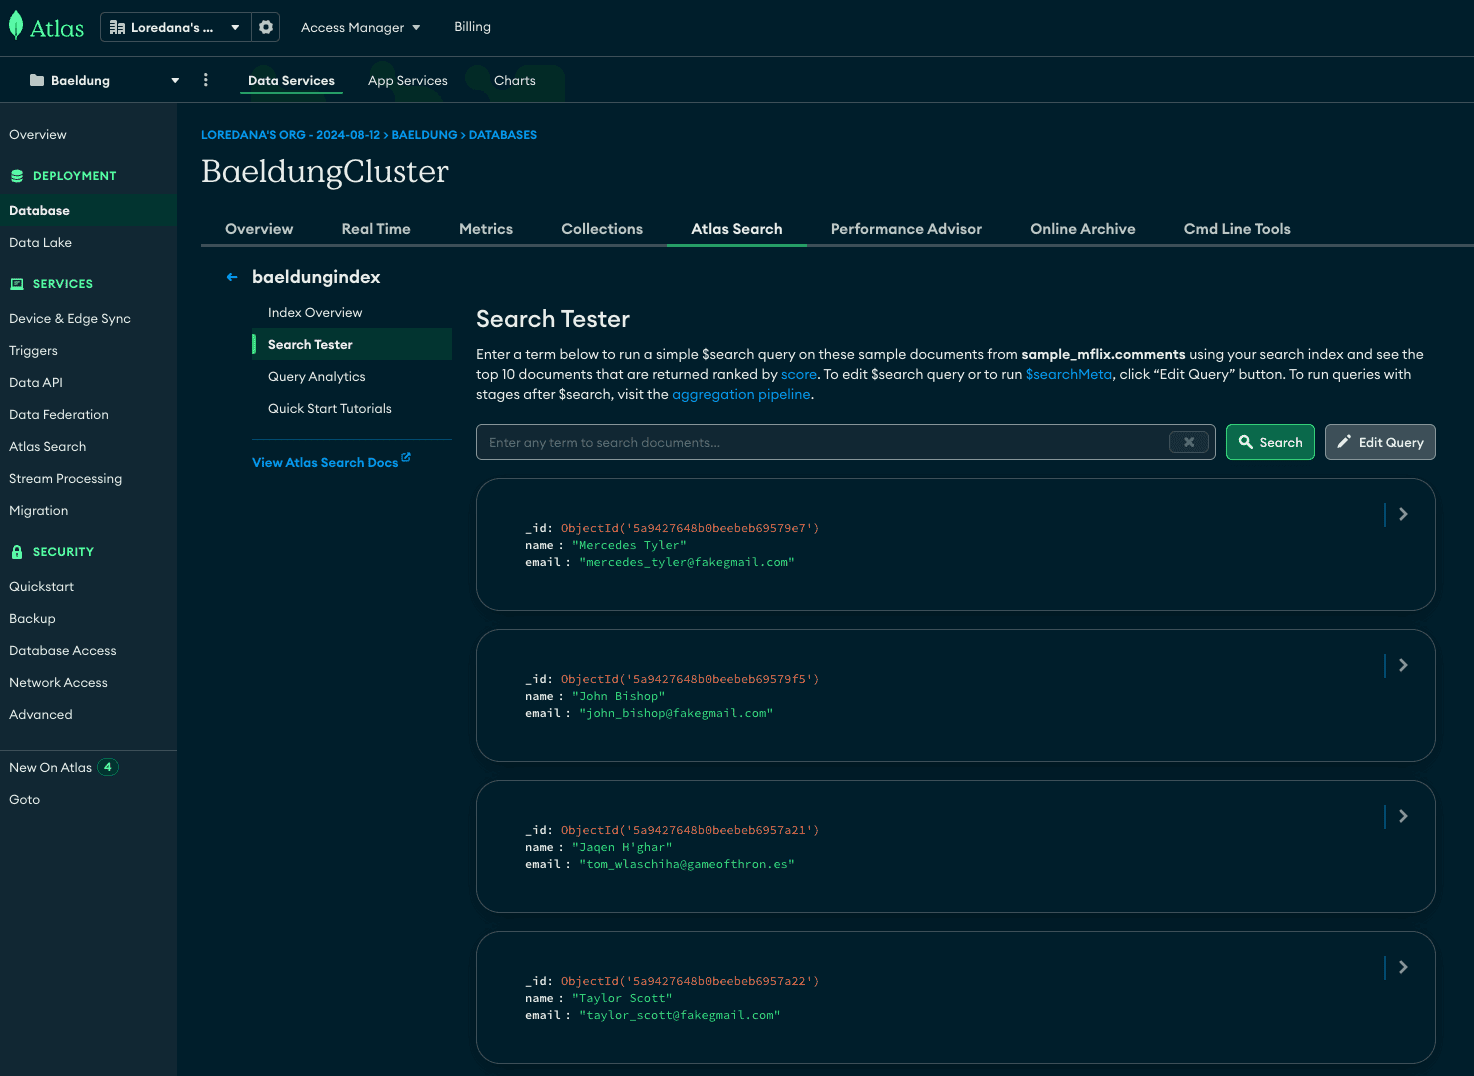
Once the baeldungindex named search index is ready, we can use it to search the data:
Here, the Search Tester dialog allows us to enter any text as the wildcard search.
4. Basic Operations Using MongoDB Shell
Let’s use the MongoDB Shell to connect the cluster and run a few commands to see them in action.
4.1. Connect Cluster
First, let’s follow the instructions shown above to install the MongoDB Shell.
Once installed, we can use MongoDB Shell to connect our BaeldungCluster:
mongosh "mongodb+srv://baeldungcluster.oyixi.mongodb.net/" --apiVersion 1 --username baeldungadmin
When creating a connection, the mongosh command asks for the password for the username baeldungadmin.
Then, the MongoDB Shell establishes the connection and logs the details:
Enter password: ********************
Current Mongosh Log ID: 66cb11d7d082639cbff99270
Connecting to: mongodb+srv://<credentials>@baeldungcluster.oyixi.mongodb.net/?appName=mongosh+2.2.15
Using MongoDB: 7.0.12 (API Version 1)
Using Mongosh: 2.2.15
mongosh 2.3.0 is available for download: https://www.mongodb.com/try/download/shell
For mongosh info see: https://docs.mongodb.com/mongodb-shell/
Atlas atlas-2e83ir-shard-0 [primary] test>
Here, we can also see the cluster name and its node type, which is primary.
4.2. Find Document
First, let’s follow the use command to select the sample_mflix database:
use sample_mflix;
Next, we can use the following command to show all the collections:
show collections;
Last, we can use the find command to check all the documents in the comments collection:
db.comments.find();
We’ll see the following results in the command line:
[{
_id: ObjectId('5a9427648b0beebeb69581b9'),
name: 'Sandor Clegane',
email: '[email protected]',
movie_id: ObjectId('573a1392f29313caabcdbceb'),
text: 'Totam facilis ad amet a sunt aut quia.',
date: ISODate('2010-01-11T08:07:56.000Z')
},
{
_id: ObjectId('5a9427648b0beebeb69581cf'),
name: 'Catelyn Stark',
email: '[email protected]',
movie_id: ObjectId('573a1392f29313caabcdbd59'),
text: 'Explicabo voluptatum soluta sed optio ea.',
date: ISODate('1983-12-23T05:39:52.000Z')
},
...
]
Also, we can observe that the results are already presented in the readable JSON format.
4.3. Add Document
Next, let’s use the insertOne command to add a document to the comments collection:
db.comments.insertOne({
"name": "Anshul Bansal",
"movie": "Matrix",
"text": "nice sci-fi movie"
})
Then, the following acknowledgment would be returned:
{
acknowledged: true,
insertedId: ObjectId('66cb372ad082639cbff99271')
}
Note the automatically generated ObjectId for a new document.
4.4. Use Search Index
Similarly, we can use the aggregate command to search the collection using the previously created baeldungindex:
db.comments.aggregate([
{
$search: {
index: "baeldungindex",
text: {
query: "Anshul Bansal",
path: {
wildcard: "*"
}
}
}
}
])
Here’s the output of the above command:
[
{
_id: ObjectId('66cb372ad082639cbff99271'),
name: 'Anshul Bansal',
movie: 'Matrix',
text: 'nice sci-fi movie'
}
]
We can confirm that the ObjectId of the returned document exactly matches the one created in the previous step.
5. MongoDB Atlas CLI
MongoDB Atlas also offers a dedicated command-line interface for interaction with the database service through its intuitive commands.
Let’s check out the setup and a few handy commands.
5.1. Setup
First, similar to the MongoDB Shell, we’ll be required to install the MongoDB Atlas CLI:
brew install mongodb-atlas
After installation, we can use the Atlas CLI by starting commands with the atlas keyword:
atlas --version
Here, the command returns the installed version 1.26.0 of the Atlas CLI.
5.2. Login
Then, we can log in using the Atlas CLI:
atlas auth login
This opens the browser window to let us sign in using the username and password.
And, it also logs the one-time verification code that is required to enter into the activation screen:
To verify your account, copy your one-time verification code:
7QGP-TQXH
Paste the code in the browser when prompted to activate your Atlas CLI. Your code will expire after 10 minutes.
To continue, go to https://account.mongodb.com/account/connect
Once authorized, we can run a few commands to confirm the access.
5.3. List Projects, Users, and Clusters
For example, let’s check the list of projects:
atlas projects list
ID NAME
66b9bcede5fc6d307bbc8e48 Baeldung
Similarly, we can check the list of database users:
atlas dbusers list
USERNAME DATABASE
baeldungadmin admin
Note that the command returns the database user baeldungadmin we created in the previous step.
Likewise, let’s check out the clusters through the MongoDB Atlas CLI command:
atlas clusters list
ID NAME MDB VER STATE
66ca41392ed10b3dd115e87f BaeldungCluster 7.0.12 IDLE
Here, we can see the ID, Version, and State of the BaeldungCluster named cluster.
5.4. Create Cluster
Next, let’s use the Atlas CLI to create a cluster:
atlas clusters create baeldungatlascluster --provider AWS --region EU_CENTRAL_1
Here, we’ve provided the name of the cluster, the cloud provider, and the region.
6. MongoDB Atlas APIs
MongoDB Atlas offers programmatic access to manage deployments, clusters, and data through its set of well-designed APIs.
Let’s familiarize ourselves with the setup and a few handy APIs.
6.1. Create API Key
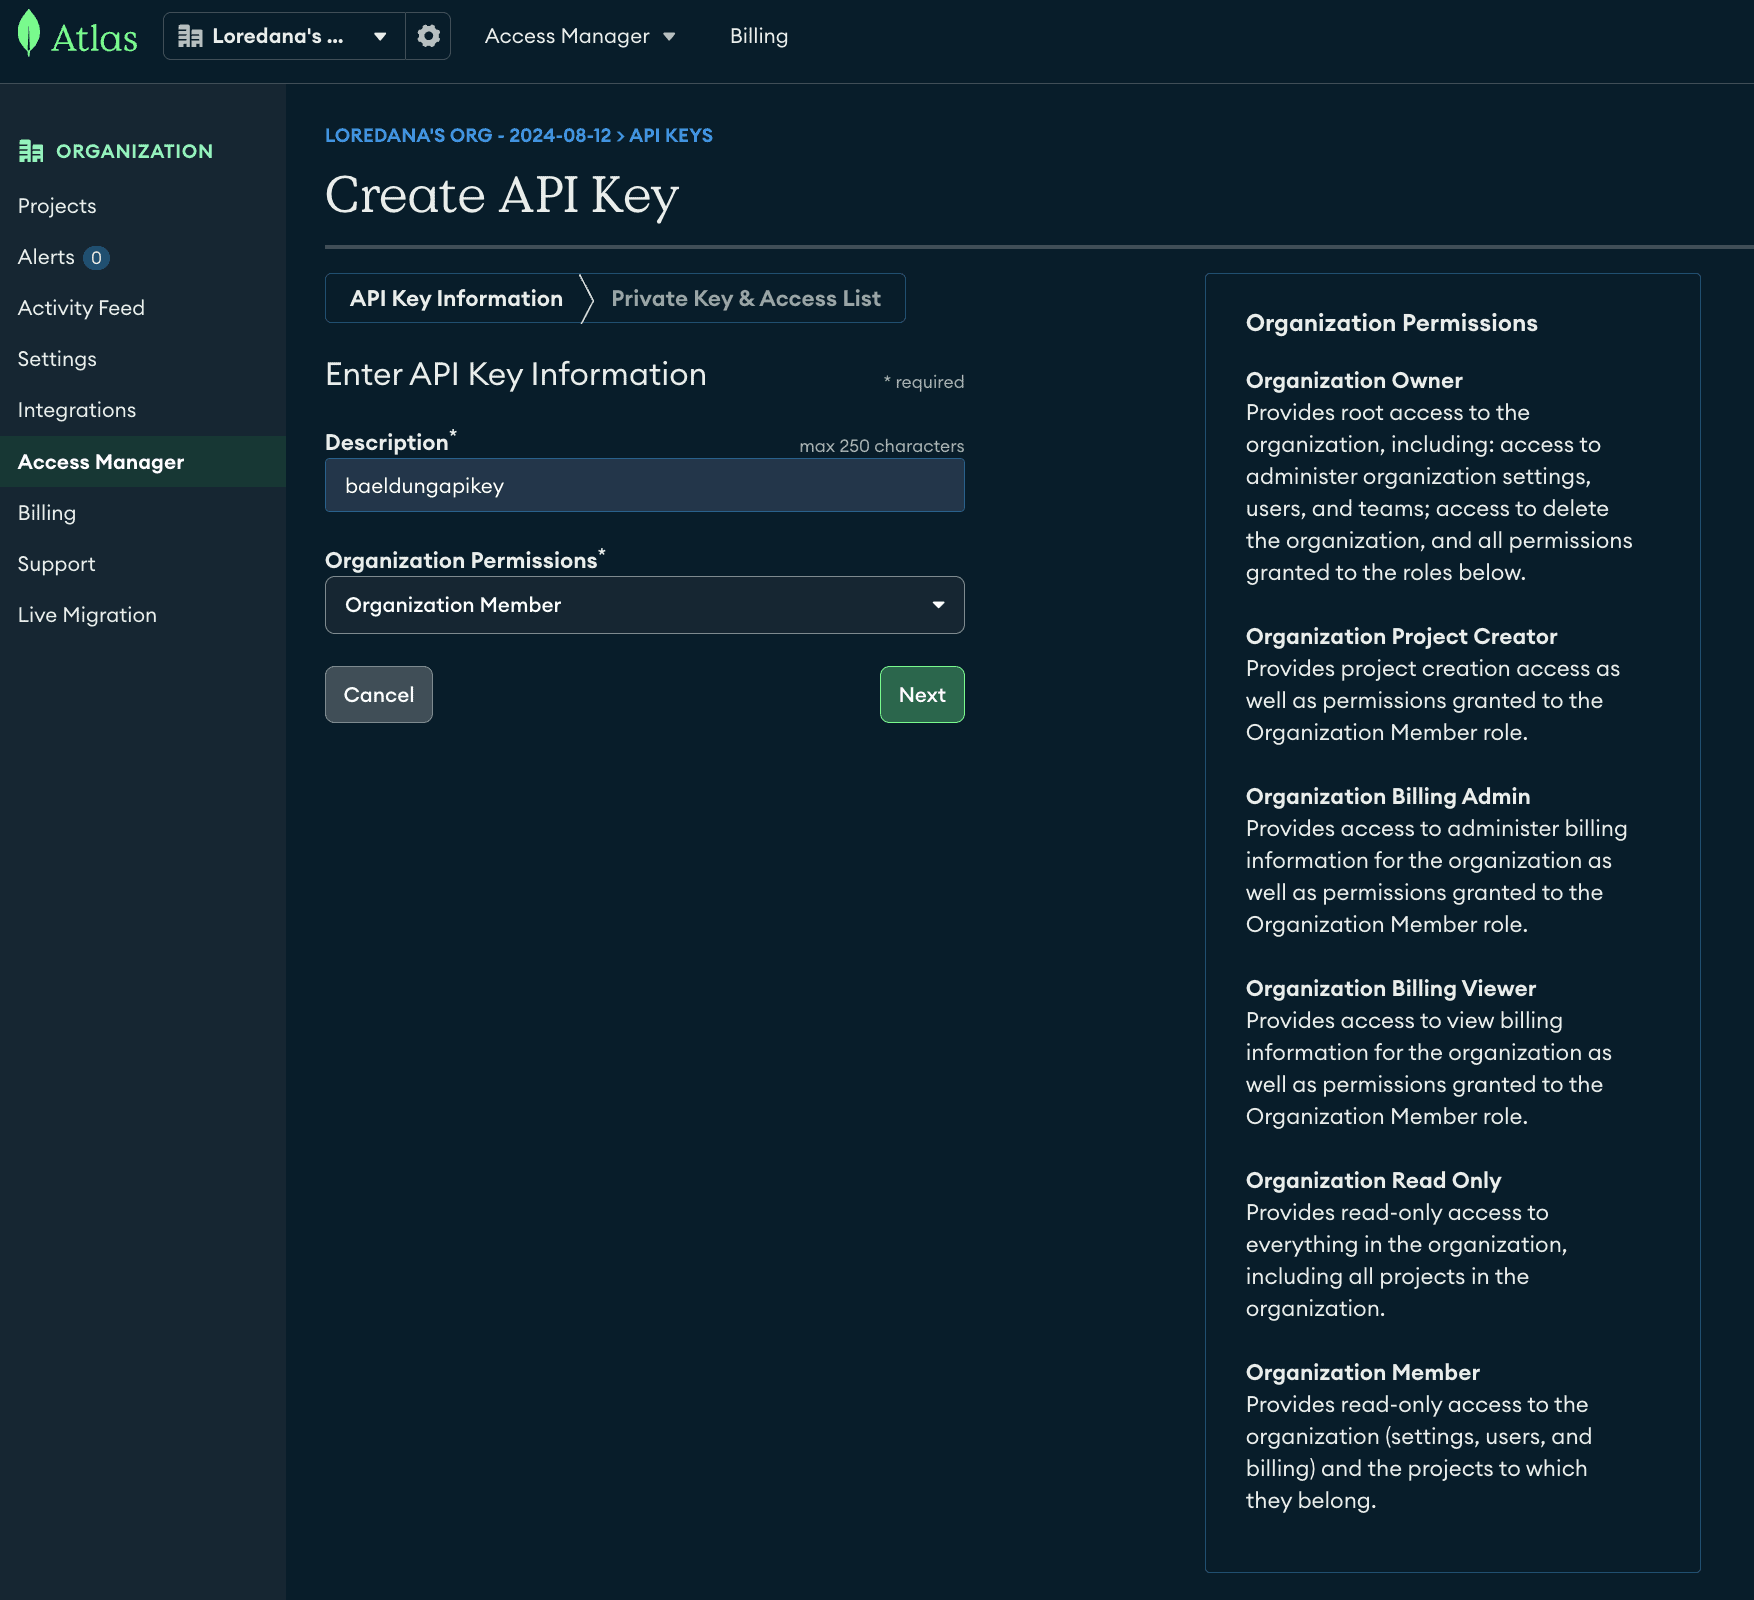
First, we’ll be required to create an API key with the required permissions for the programmatic access through MongoDB Atlas API:
After we create an API key, the UI will show us the private key only once. We should store it safely, as it’s needed for API access.
We can also find the public key on the Organization Access Manager screen.
6.2. List Groups
Let’s use the MongoDB Atlas API to get a list of all groups on our MongoDB Atlas account:
curl --user "<publickey>:<privatekey>" --digest \
--header "Content-Type: application/json" \
--header "Accept: application/vnd.atlas.2023-02-01+json" \
--request GET "https://cloud.mongodb.com/api/atlas/v2/groups?pretty=true"
Here, we should fill in the values of the publicKey and privateKey we stored in the previous step.
The JSON response of the above command would look like the following:
{
"links": [
{
"href": "https://cloud.mongodb.com/api/atlas/v2/groups?pageNum=1&itemsPerPage=100",
"rel": "self"
}
],
"results": [
{
"clusterCount": 1,
"created": "2024-08-12T07:42:46Z",
"id": "66b9bcede5fc6d307bbc8e48",
"links": [
{
"href": "https://cloud.mongodb.com/api/atlas/v2/groups/66b9bcede5fc6d307bbc8e48",
"rel": "self"
}
],
"name": "Baeldung",
"orgId": "66b9bcede5fc6d307bbc8dc5",
"tags": []
}
],
"totalCount": 1
}
Here, we should copy the ID of the group/project to list all clusters under the Baeldung group.
6.3. List Clusters
So, let’s use the following cURL command to get a list of all clusters on our MongoDB Atlas account:
curl --user "<publickey>:<privatekey>" --digest \
--header "Content-Type: application/json" \
--header "Accept: application/vnd.atlas.2023-02-01+json" \
--request GET "https://cloud.mongodb.com/api/atlas/v2/groups/66b9bcede5fc6d307bbc8e48/clusters?pretty=true"
Then, we can check out the elaborated response of the above command:
{
"links": [
{
"href": "https://cloud.mongodb.com/api/atlas/v2/groups/66b9bcede5fc6d307bbc8e48/clusters?pageNum=1&itemsPerPage=100",
"rel": "self"
}
],
"results": [
{
"backupEnabled": false,
"biConnector": {
"enabled": false,
"readPreference": "secondary"
},
"clusterType": "REPLICASET",
"connectionStrings": {
"standard": "mongodb://baeldungcluster-shard-00-00.oyixi.mongodb.net:27017,baeldungcluster-shard-00-01.oyixi.mongodb.net:27017,baeldungcluster-shard-00-02.oyixi.mongodb.net:27017/?ssl=true&authSource=admin&replicaSet=atlas-2e83ir-shard-0",
"standardSrv": "mongodb+srv://baeldungcluster.oyixi.mongodb.net"
},
"createDate": "2024-08-24T20:23:21Z",
"diskSizeGB": 0.5,
"diskWarmingMode": "FULLY_WARMED",
"encryptionAtRestProvider": "NONE",
"globalClusterSelfManagedSharding": false,
"groupId": "66b9bcede5fc6d307bbc8e48",
"id": "66ca41392ed10b3dd115e87f",
"labels": [],
"mongoDBMajorVersion": "7.0",
"mongoDBVersion": "7.0.12",
"name": "BaeldungCluster",
"paused": false,
"pitEnabled": false,
"replicationSpecs": [
{
"id": "66ca41392ed10b3dd115e83d",
"numShards": 1,
"regionConfigs": [
{
"electableSpecs": {
"instanceSize": "M0"
},
"backingProviderName": "AWS",
"priority": 7,
"providerName": "TENANT",
"regionName": "EU_CENTRAL_1"
}
],
"zoneId": "66ca41392ed10b3dd115e84f",
"zoneName": "Zone 1"
}
],
"rootCertType": "ISRGROOTX1",
"stateName": "IDLE",
"tags": [],
"terminationProtectionEnabled": false,
"versionReleaseSystem": "LTS"
}
],
"totalCount": 1
}
We can notice various details of the cluster like connectionStrings, id, and replicationSpecs.
6.4. List Indexes
Similarly, we can access the list of all indexes available on the BaeldungCluster:
curl --user "<publickey>:<privatekey>" --digest \
--header "Content-Type: application/vnd.atlas.2024-05-30+json" \
--header "Accept: application/vnd.atlas.2024-05-30+json" \
--request GET "https://cloud.mongodb.com/api/atlas/v2/groups/66b9bcede5fc6d307bbc8e48/clusters/BaeldungCluster/search/indexes?pretty=true"
So, the JSON response would mention the baeldungindex created in the previous steps:
[ {
"collectionName" : "comments",
"database" : "sample_mflix",
"indexID" : "66cb362f60a4c668404a1372",
"latestDefinition" : {
"mappings" : {
"dynamic" : true
}
},
"latestDefinitionVersion" : {
"createdAt" : "2024-08-25T13:48:31Z",
"version" : 0
},
"name" : "baeldungindex",
"queryable" : true,
"status" : "READY",
"statusDetail" : [ {
"hostname" : "atlas-2e83ir-shard-00-00",
"mainIndex" : {
"definition" : {
"mappings" : {
"dynamic" : true,
"fields" : { }
}
},
"definitionVersion" : {
"createdAt" : "2024-08-25T13:48:31Z",
"version" : 0
},
"queryable" : true,
"status" : "READY"
},
"queryable" : true,
"status" : "READY"
}, {
"hostname" : "atlas-2e83ir-shard-00-02",
"mainIndex" : {
"definition" : {
"mappings" : {
"dynamic" : true,
"fields" : { }
}
},
"definitionVersion" : {
"createdAt" : "2024-08-25T13:48:31Z",
"version" : 0
},
"queryable" : true,
"status" : "READY"
},
"queryable" : true,
"status" : "READY"
}, {
"hostname" : "atlas-2e83ir-shard-00-01",
"mainIndex" : {
"definition" : {
"mappings" : {
"dynamic" : true,
"fields" : { }
}
},
"definitionVersion" : {
"createdAt" : "2024-08-25T13:48:31Z",
"version" : 0
},
"queryable" : true,
"status" : "READY"
},
"queryable" : true,
"status" : "READY"
} ]
} ]
Also, among other details, we can observe the status of the index on various hosts.
7. Conclusion
In this tutorial, we discussed MongoDB Atlas, a cloud-hosted MongoDB service.
We started by outlining the steps to create, deploy, and access a cluster using the UI. Next, we explored basic operations with MongoDB Shell.
Finally, we examined the MongoDB Atlas CLI and API for interacting with database services.