1. Introduction
In this tutorial, we’ll learn about Coordinated Restore at Checkpoint (CRaC), an OpenJDK project that allows us to start Java programs with a shorter time to the first transaction. Further, we’ll understand how Alpaquita Containers can make it easy for us to achieve CRaC in a Spring Boot application.
2. How Does OpenJDK CRaC Approach the Slow Warmup Problem in Java?
Java applications historically have received their fair share of criticism for slow startup and longer warmup time, the time they need to reach stable peak performance. Moreover, they consume more computing resources during warm-up than they need during stable operation.
This behavior can largely be attributed to how the HotSpot Java Virtual Machine (JVM) works fundamentally. When an application starts, JVM looks for hotspots in the code and compiles them for better performance. But, this requires time and computing resources to achieve:
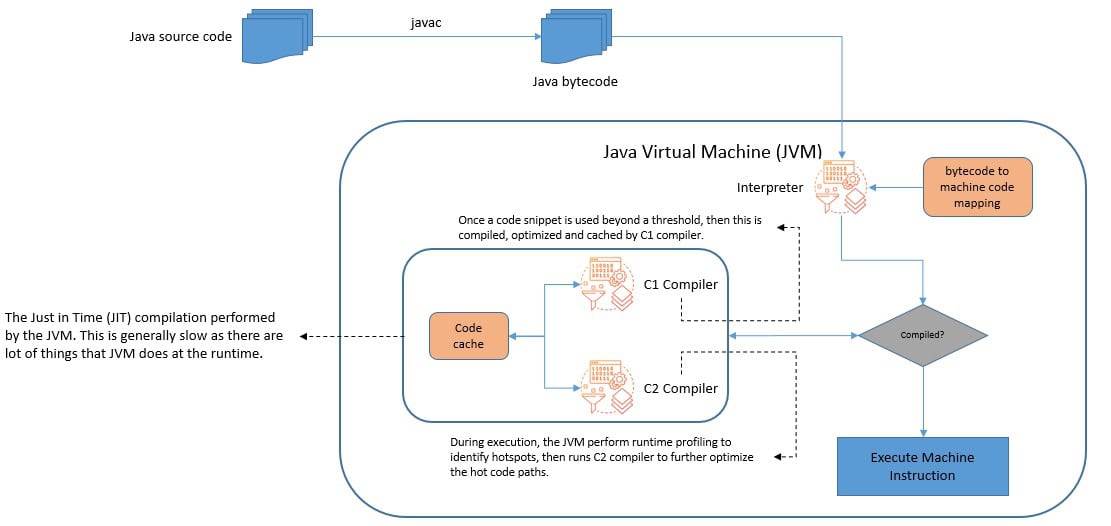
Moreover, this has to be repeated for every instance of the application. The problem is more exacerbated in a cloud-native architecture like microservices and serverless. Here, we need the warm-up time to be as low as possible with a fairly stable resource consumption.
What if we can run an application to its peak performance and checkpoint that state? Then, we can use this checkpoint to start multiple instances of the application without having to spend that much time on the warm-up. This is fundamentally what the OpenJDK CRaC API promises us:
CRaC is based on Checkpoint & Restore In Userspace (CRIU), a project to implement checkpoint and restore functionality for Linux. CRIU allows freezing a container or an individual application and restoring it from the saved checkpoint files.
However, CRaC takes the generic approach of CRIU and adds several enhancements and adjustments to make it suitable for Java applications. For instance, CRaC imposes certain restrictions on the state of the application to guarantee the consistency and safety of the checkpoint.
3. Challenges with CRaC Adoption
CRaC opens new opportunities for Java-based applications to be more efficient in the cloud environment. Here, Spring is one of the popular frameworks to develop Java-based applications. With the release of Spring Boot 3.2, we now have initial support for CRaC in the Spring framework.
But, CRaC is not as portable a solution as it may seem. As we already discussed, CRaC works only on Linux as CRIU is a Linux-specific feature. On other operating systems, CRaC has a no-op implementation for creating and loading snapshots.
Moreover, CRaC requires all files and network connections to be closed before taking a snapshot. These files and network connections have to be re-opened after restoring the checkpoint. This requires support in the Java runtime and the framework.
So, it’s not only necessary that we’ve support from Spring, we also need a CRaC-enabled version of the JDK, like Liberica JDK provided by BellSoft. Moreover, we need to run our Spring application on a Linux distribution, for instance, Alpaquita Linux by BellSoft.
So, if we can package our application with a CRaC-enabled JDK running on a Linux-like environment as a portable container, it makes the solution quite portable and plug-and-play. This is quite the promise that BellSoft delivers for modern Java applications!
4. CRaC with Alpaquita Containers
BellSoft is an OpenJDK vendor that provides end-to-end solutions for cloud-native Java applications. As part of this, it offers a suite of containers highly optimized for running Java applications. They package Alpaquita Linux and Liberica JDK, both of which are BellSoft offerings.
Alpaquita Linux is the only Linux distribution purpose-built for Java and optimized for the deployment of cloud-native applications. It features better performance through kernel optimizations, memory management, and optimized mallocs. It has a base image size of just 3.28 MB!
Liberica JDK is an open-source Java runtime for cloud-native Java deployments. With the support for the widest range of architectures and operating systems, it’s truly a unified Java runtime. Apart from being secure and compliant, it helps in building cost and time-efficient containers.
BellSoft manages several public images, offering various combinations of JDK type (jre, jdk, or jdk-all), Java version (includes support for the latest LTS release, Java 21), and libc type (glibc or musl). Now, BellSoft also offers images that provide CRaC and CDS (Class Data Sharing).
These ready-to-use images allow us to integrate CRaC in a Spring Boot application seamlessly. This is available for JDK 17 and 21 with x86_64 architecture as of now. BellSoft claims that Alpaquita Containers with CRaC provide up to 164 times faster startup time and 1.1 times smaller images.
The reduction in image size is largely attributed to the decrease in the Resident Set Size (RSS), the portion of memory occupied by a process that is held in the main memory (RAM). One of the key factors for this is that Liberica JDK with CRaC performs full garbage collection before the checkpoint.
5. Getting Things to Work!
BellSsoft’s offerings are a great fit for Spring Boot-based Java applications. Spring recommends using BellSsoft Liberica JDK and it’s the default Java runtime in Spring Boot. For our tutorial, we’ll be using a Spring Boot application and will perform CRaC with an Alpaquita Container.
5.1. Preparing the Application
For this tutorial, we’ll create a simple Spring Boot application to explore CRaC. We’ll just reuse the application we created for our last tutorial. We’ll be using Java 21 and Spring Boot 3.2.5 for this tutorial. CRaC works well under this combination.
However, to be able to use CRaC, we need to add the crac package available at the Maven central repository as a dependency in our Spring Boot application:
implementation("org.crac:crac:1.4.0")
Now, we’ve to build the application using Gradle to generate an executable JAR in the directory “*./build/libs*“:
$ ./gradlew clean build
Now that we’ve created a simple Spring Boot application with CRaC dependency, we need to run it using a JDK that supports CRaC. For this, we’ll use an Alpaquita Container that supports CRaC. BellSoft manages multiple images on its Docker Hub repository.
Thankfully, all the images that support CRaC have the tag ‘crac‘. We’ll pull one such image on our machine for this tutorial:
$ docker pull bellsoft/liberica-runtime-container:jdk-21-crac-slim-glibc
Here, “jdk-21-crac-slim-glibc” is the tag of the image. With this, we are all set to experiment with checkpoint and restore features of CRaC. We’ll see how Alpaquita Containers make this effortless and portable.
5.2. Starting the Application
Let’s first create a directory called “checkpoint” inside “*./build/libs*” to hold the application dump. Now we’ll use the Alpaquita Container image that we had pulled previously to run the application JAR that we created in the previous subsection:
$ docker run -p 8080:8080 \
  --rm --privileged \
  -v $(pwd)/build/libs:/crac/ \
  -w /crac \
  -n fibonacci-crac \
  bellsoft/liberica-runtime-container:jdk-21-crac-slim-glibc \
  java -Xmx512m -XX:CRaCCheckpointTo=/crac/checkpoint \
  -jar spring-bellsoft-0.0.1-SNAPSHOT.jar
Let’s spend some time to understand this command. Here, we’ve mapped container port 8080 to the host machine port 8080. We’ve also used the “privileged” mode as this is necessary for the underlying CRIU to work properly.
Further, we’ve mapped the directory where our application JAR is present as a volume within the container and used that as the working directory. Lastly, we’ve provided the Java command to run the JAR with some necessary parameters.
If everything goes smoothly, we should be able to check the container log and verify that our application has indeed started:
2024-04-22T15:27:39.730Z  INFO 129 --- [main]
  com.baeldung.demo.Application : Started Application in 3.203 seconds (process running for 4.727)
Now, we should perform some requests to the application so that the JVM can get the compiled hot code for better performance. Although, for our simple application, these effects would be negligible.
5.3. Performing the Checkpoint
We are ready to perform the checkpoint of the application at this moment. But before we do that, let’s check the size of RSS to compare this with what we see after the restore. We would require the Process ID (PID) of the application to do so:
$ docker exec fibonacci-crac ps -a | pgrep spring-bellsoft
Once we’ve got the PID, we can use the ‘pmap‘ command to find the size of the RSS:
$ docker exec fibonacci-crac pmap -x <PID> | tail -1
total            4845016  134128  118736       0
The output of this command shows the size of the RSS in kilobytes, the second value here (134128).
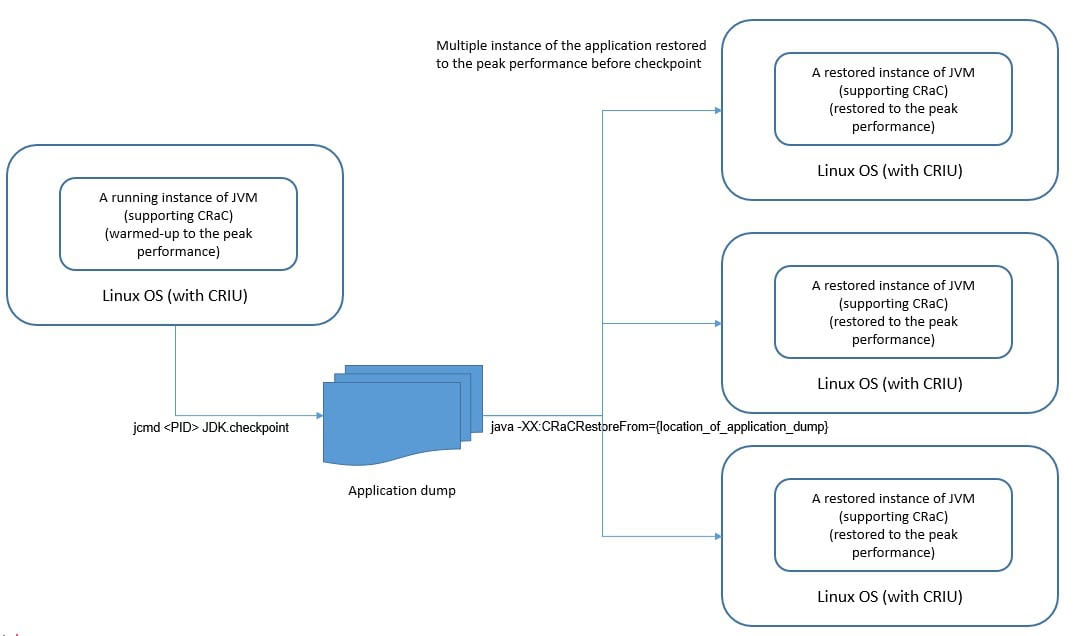
Now, let’s perform the checkpoint of the application at this state. We can do this by using the ‘jcmd‘ command that sends a command to the JVM to perform the checkpoint:
$ docker exec fibonacci-crac jcmd <PID> JDK.checkpoint
Please note that ‘fibonacci-crac‘ is the container’s name we used while starting it. As a result of this command, the Java instance is dumped and the container is stopped. The application dump consisted of multiple files at the location that we mentioned:
$ ls
core-129.img  core-139.img  core-149.img  core-198.img   pagemap-129.img
core-130.img  core-140.img  core-150.img  core-199.img   pages-1.img
core-131.img  core-141.img  core-151.img  core-200.img   pstree.img
core-132.img  core-142.img  core-152.img  dump4.log      seccomp.img
core-133.img  core-143.img  core-154.img  fdinfo-2.img   stats-dump
core-134.img  core-144.img  core-155.img  files.img      timens-0.img
core-135.img  core-145.img  core-156.img  fs-129.img
core-136.img  core-146.img  core-158.img  ids-129.img
core-137.img  core-147.img  core-159.img  inventory.img
core-138.img  core-148.img  core-160.img  mm-129.img
This dump includes the exact state of the running Java application and the information about the heap, JIT-compiled code, etc. But, as we discussed earlier, the Liberica JDK we are using here performs a full garbage collection just before the checkpoint.
5.4. Starting the Application from the Dump
Now, what is left for us to do is to use the application dump we created earlier to restore an instance of our application. This is as easy as starting the application regularly:
docker run -p 8080:8080 \
  --rm --privileged \
  -v $(pwd)/build/libs:/crac/ \
  -w /storage \
  -n fibonacci-crac-from-checkpoint \
  bellsoft/liberica-runtime-container:jdk-21-crac-slim-glibc \
  java -XX:CRaCRestoreFrom=/crac/checkpoint
Like before, if everything goes smoothly, we should be able to verify this from the application log:
2024-04-22T16:02:21.582Z  INFO 129 --- [Attach Listener]
  o.s.c.support.DefaultLifecycleProcessor :
  Spring-managed lifecycle restart completed (restored JVM running for 1494 ms)
As we can see, the application has been restored to the state at which this checkpoint was created. We can notice the restore happening much faster, however, it’s less noticeable for this simple application.
5.5. Results Overview
As we did before taking the checkpoint, let’s again check the size of the RSS after the restore and preferably after a few requests to the application:
$ docker exec fibonacci-crac-from-checkpoint pmap -x 129 | tail -1
total            5044580  120261   62728       0
As we can see, the value (120261) is less than the one we noticed before the checkpoint. Although, this is less pronounced for the nature of the application we are using for the tutorial.
We may also notice that the RSS just after the restore increases after the first request and then reaches some steady state. However, this value is still lower than the RSS we observed before taking the application dump.
This reduction in RSS is largely attributed to Liberica JDK with CRaC performing full garbage collection before the checkpoint. On restore, the HotSpot virtual machine returns part of the native memory to the OS, which includes pages freed during GC.
6. CRaC vs. GraalVM Native Image
The problems we discussed with Java have been there since its inception. But, only recently we’ve the stringent requirements to be as cost-efficient as possible on the cloud. One of the key enablers for this is Scale-to-Zero, meaning automatically scaling all resources to zero when not in use.
Of course, this requires our applications to be blazing fast to come to life and start responding to requests. So, solutions before CRaC were also proposed in response to this need. Of these, GraalVM Native Image addressed wider objectives including slow start-up time.
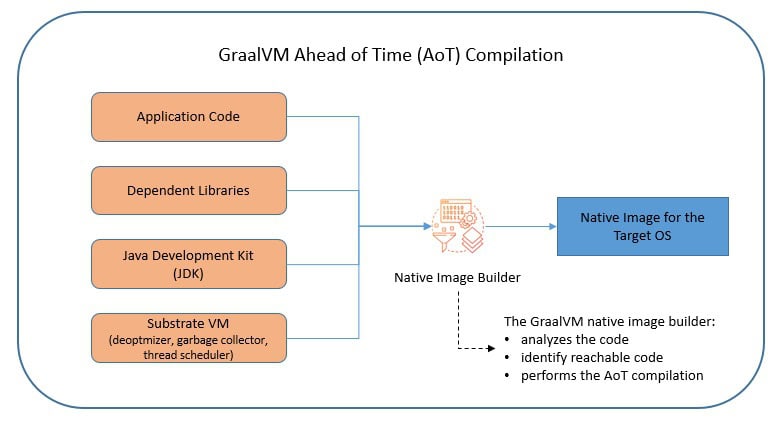
Hence, it’s worth comparing CRaC with GraalVM Native Image. GraalVM Native Image is an Ahead-of-Time (AOT) compiler that creates native executables for Linux, Windows, and macOS. BellSoft provides a Liberica Native Image Kit to generate native images based on GraalVM:
Like CRaC, GraalVM Native Image can help reduce start-up time significantly. But GraalVM fares better in terms of lesser memory usage, better security, and lower application file size. Moreover, we can generate GraalVM Native Image for multiple operating systems.
However, with GraalVM, we can not use some Java features like loading arbitrary classes at runtime. Moreover, many observability and testing frameworks do not support GraalVM as it does not allow for dynamic code generation at runtime and we can not run Java agents.
So which one is better, CRaC or GraalVM native Image? Well, both technologies have their own space. However, GraalVM Native Image solves the same problems as CRaC but with more constraints and a potentially more expensive troubleshooting experience.
7. Conclusion
In this tutorial, we understood what CRaC is and how we can use this to our advantage in a cloud-native environment. Further, we reviewed BellSoft’s offerings like Alpaquita Containers that support CRaC. Lastly, we developed a Spring Boot application and saw CRaC in action.