1. 概述
Docker 的主要功能之一是创建并隔离网络。
在本教程中,我们将看到如何提取有关网络及其包含的容器的信息。
2. Docker 中的网络
当我们运行 Docker 容器时,我们可以定义要向外界暴露的端口。这意味着我们使用(或创建)一个隔离的网络并将容器放入其中。我们可以决定我们将在网络内外以及在网络内部如何进行通信。
让我们创建几个容器并在它们之间配置网络。它们都将内部工作在端口 8080,并且将放置在两个网络中。
每个都将托管一个简单的“Hello World”HTTP 服务:
version: "3.5"

services:
  test1:
    image: node
    command: node -e "const http = require('http'); http.createServer((req, res) => { res.write('Hello from test1\n'); res.end() }).listen(8080)"
    ports:
      - "8080:8080"
    networks:
      - network1
  test2:
    image: node
    command: node -e "const http = require('http'); http.createServer((req, res) => { res.write('Hello from test2\n'); res.end() }).listen(8080)"
    ports:
      - "8081:8080"
    networks:
      - network1
      - network2
  test3:
    image: node
    command: node -e "const http = require('http'); http.createServer((req, res) => { res.write('Hello from test3\n'); res.end() }).listen(8080)"
    ports:
      - "8082:8080"
    networks:
      - network2

networks:
  network1:
    name: network1
  network2:
    name: network2
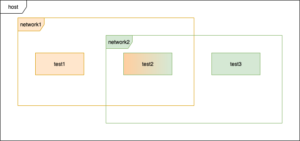
这是这些容器的图表,以供更直观地表示:
让我们使用docker-compose命令启动它们全部:
$ docker-compose up -d
Starting bael_test2_1 ... done
Starting bael_test3_1 ... done
Starting bael_test1_1 ... done
3. 检查网络
首先,让我们列出所有可用的 Docker 网络:
$ docker network ls
NETWORK ID          NAME                DRIVER              SCOPE
86e6a8138c0d        bridge              bridge              local
73402de5766c        host                host                local
e943f7124776        network1            bridge              local
3b9a28673a16        network2            bridge              local
9361d16a834a        none                null                local
我们可以看到 bridge 网络,这是我们在使用 docker run 命令时使用的默认网络。此外,我们还可以看到我们使用 docker-compose 命令创建的网络。
让我们使用 docker inspect 命令检查它们:
$ docker inspect network1 network2
[
    {
        "Name": "network1",
        "Id": "e943f7124776d45a1481ee26795b2dba3f2ab51f000d875a179a99ce832eee9f",
        "Created": "2020-08-22T10:38:22.198709146Z",
        "Scope": "local",
        "Driver": "bridge",
        "EnableIPv6": false,
        // output cutout for brevity
    }
],
    {
        "Name": "network2",
        // output cutout for brevity
    }
}
这会产生冗长而详细的输出。我们很少需要所有这些信息。幸运的是,我们可以使用Go 模板格式化它,并仅提取满足我们需求的元素。让我们只获取 network1: 的子网:
$ docker inspect -f '{{range .IPAM.Config}}{{.Subnet}}{{end}}' network1
172.22.0.0/16
4. 检查容器
同样,我们可以检查特定的容器。首先,让我们列出所有容器及其标识符:
$ docker ps --format 'table {{.ID}}\t{{.Names}}'
CONTAINER ID        NAMES
78c10f03ad89        bael_test2_1
f229dde68f3b        bael_test3_1
b09a8f47e2a8        bael_test1_1
我们现在将使用容器的 ID 作为 inspect 命令的参数来查找其 IP 地址。 类似于网络,我们可以格式化输出以获取我们所需的信息。我们将检查我们创建的两个网络中的第二个容器及其地址:
$ docker inspect 78c10f03ad89 --format '{{.NetworkSettings.Networks.network1.IPAddress}}'
172.22.0.2
$ docker inspect 78c10f03ad89 --format '{{.NetworkSettings.Networks.network2.IPAddress}}'
172.23.0.3
或者,我们可以直接从容器打印主机,使用docker exec 命令:
$ docker exec 78c10f03ad89 cat /etc/hosts
127.0.0.1    localhost
::1    localhost ip6-localhost ip6-loopback
fe00::0    ip6-localnet
ff00::0    ip6-mcastprefix
ff02::1    ip6-allnodes
ff02::2    ip6-allrouters
172.22.0.2    78c10f03ad89
172.23.0.3    78c10f03ad89
5. 容器之间的通信
使用关于 Docker 网络的知识,我们可以建立在相同网络内的容器之间的通信。
首先,让我们进入“test1”容器:
$ docker exec -it b09a8f47e2a8 /bin/bash
然后,使用 curl 向“test2”容器发送请求:
root@b09a8f47e2a8:/# curl 172.22.0.2:8080
Hello from test2
由于我们在 Docker 的网络内,我们也可以使用别名而不是 IP 地址。 Docker 内置的 DNS 服务会为我们解析地址:
root@b09a8f47e2a8:/# curl test2:8080
Hello from test2
请注意,我们无法连接到“test3”容器,因为它在不同的网络中。通过 IP 地址连接将超时:
root@b09a8f47e2a8:/# curl 172.23.0.2:8080
通过别名连接也将失败,因为 DNS 服务不会识别它:
root@b09a8f47e2a8:/# curl test3:8080
curl: (6) Could not resolve host: test3
为了让这工作,我们需要从容器外部将“test3”容器添加到“network1”:
$ docker network connect --alias test3 network1 f229dde68f3b
现在“test3”的请求将正确工作:
root@b09a8f47e2a8:/# curl test3:8080
Hello from test3
6. 总结
在本教程中,我们看到了如何为 Docker 容器配置网络,然后查询有关它们的信息。