1. 概述
在 Elasticsearch 中,索引是一个决定数据存储、组织和检索方式的重要数据结构。因此,在日常的集群监控与维护中,按名称列出索引是一项常见的操作。
在本教程中,我们将学习如何通过 Elasticsearch 提供的 REST API 和 Kibana 界面来列出索引。
2. 场景准备
在本节中,我们将在本地启动一个 Elasticsearch 集群,以便解决列出索引的使用场景。
2.1. 启动 Elasticsearch
我们可以通过 docker run 命令来快速启动一个单节点的 Elasticsearch 集群:
$ docker run -d --name elasticsearch \
-p 9200:9200 -p 9300:9300 \
-e "discovery.type=single-node" \
docker.elastic.co/elasticsearch/elasticsearch:7.13.2
我们暴露了 9200 和 9300 端口,其中 9200 端口将用于所有 REST API 的通信。
等待几秒后,我们可以使用 health API 来确认集群状态是否为绿色:
$ curl -s -X GET 'http://localhost:9200/_cluster/health' | jq -r '.status'
green
我们使用了 jq 命令从 JSON 响应中提取 status 字段。
2.2. 创建示例索引
接下来,我们使用 index API 创建三个示例索引,以模拟列出索引的场景。
首先,创建 small-index 并插入 5 条文档:
$ for i in {1..5}
do
  curl -X POST "localhost:9200/small-index/_doc/$i" -H 'Content-Type: application/json' -d'
  {
    "field1": "small-document '"$i"'",
    "field2": "value'"$i"'"
  }'
done
我们使用了 for 循环调用 POST /<index>/_doc/ 接口插入每条文档。
接着,创建 medium-index 并插入 15 条文档:
$ for i in {1..15}
do
  curl -X POST "localhost:9200/medium-index/_doc/$i" -H 'Content-Type: application/json' -d'
  {
    "field1": "medium-document '"$i"'",
    "field2": "value'"$i"'"
  }'
done
注意:文档内容对我们当前的使用场景并不重要。
再创建 large-index 并插入 50 条文档:
$ for i in {1..50}
do
  curl -X POST "localhost:9200/large-index/_doc/$i" -H 'Content-Type: application/json' -d'
  {
    "field1": "large-document '"$i"'",
    "field2": "value'"$i"'"
  }'
done
最后,为每个索引创建别名(alias),这是使用索引时常见的做法:
$ curl -X PUT "localhost:9200/small-index/_alias/index1"
{"acknowledged":true}
$ curl -X PUT "localhost:9200/medium-index/_alias/index2"
{"acknowledged":true}
$ curl -X PUT "localhost:9200/large-index/_alias/index3"
{"acknowledged":true}
好了,我们现在可以开始探索不同的方法来实现我们的目标。
3. 使用 cat indices API
我们可以使用 cat indices API 以人类可读的表格格式获取索引信息。此外,我们还可以通过查询参数微调其输出。
首先,使用 v 参数启用列标题,h 参数指定要显示的列:
$ curl -X GET "localhost:9200/_cat/indices?pretty&v&h=index,docs.count,store.size"
index        docs.count store.size
small-index           5        5kb
large-index          50      7.6kb
medium-index         15        6kb
默认情况下,输出未按索引名称排序。
接下来,添加 s 参数按 index 列排序:
$ curl -X GET "localhost:9200/_cat/indices?pretty&v&h=index,docs.count,store.size&s=index"
index        docs.count store.size
large-index          50      7.6kb
medium-index         15        6kb
small-index           5        5kb
索引已按名称升序排列。
最后,可以在列名后添加 :desc 后缀以实现降序排序:
$ curl -X GET "localhost:9200/_cat/indices?pretty&v&h=index,docs.count,store.size&s=index:desc"
index        docs.count store.size
small-index           5        5kb
medium-index         15        6kb
large-index          50      7.6kb
结果符合预期。不过,这种做法不推荐用于应用程序或自动化脚本。我们继续看看其他更有效的方法。
4. 使用 Get alias API
顾名思义,Get alias API 可以获取带有别名的索引。在自动化脚本中,我们可以使用此 API 获取索引名称及其别名,因为 cat indices API 不提供别名信息。
使用 alias API 查询我们的 Elasticsearch 集群:
$ curl -s -X GET "localhost:9200/_aliases?pretty"
{
  "large-index" : {
    "aliases" : {
      "index3" : { }
    }
  },
  "small-index" : {
    "aliases" : {
      "index1" : { }
    }
  },
  "medium-index" : {
    "aliases" : {
      "index2" : { }
    }
  }
}
响应中包含索引与别名的映射关系。
接下来,使用 jq 提取索引名称和别名,并使用 sort 命令按名称排序:
$ curl -s -X GET "localhost:9200/_aliases" | \
jq -r 'to_entries[] | "\(.key) \((.value.aliases | keys[]))"' | sort
large-index index3
medium-index index2
small-index index1
✅ 索引已按名称升序排列。我们也可以使用 -r 参数实现降序排列。
另外,使用 -k 参数可按别名(第二列)排序:
$ curl -s -X GET "localhost:9200/_aliases" | \
jq -r 'to_entries[] | "\(.key) \((.value.aliases | keys[]))"' | sort -k2
small-index index1
medium-index index2
large-index index3
输出符合预期。
5. 使用 Index stats API
在管理 Elasticsearch 集群时,我们可能需要列出索引名称和 UUID 用于故障排查。在这种情况下,可以使用 stats API 获取索引的详细统计信息。
使用 stats API 列出按名称升序排列的索引及其 UUID:
$ curl -s -X GET "localhost:9200/_stats?pretty" | \
jq -r '.indices | to_entries[] | "\(.key) \(.value.uuid)"' | sort
large-index _BaHhU-NSNu5YahOZ07qIg
medium-index vZL_wZJqRhGpjY0L7xKGng
small-index dUu-1KERTnGJAi47KOLSLQ
由于 API 响应非常冗长,我们使用 jq 通过 .indices JSON 路径提取索引名称和 UUID。此外,我们使用 to_entries[] 函数将索引对象映射为键值对数组以提取字段。最后,我们使用 sort 对输出进行排序。
同样地,可以使用 -r 实现降序排列:
$ curl -s -X GET "localhost:9200/_stats" | \
jq -r '.indices | to_entries[] | "\(.key) \(.value.uuid)"' | sort -r
small-index dUu-1KERTnGJAi47KOLSLQ
medium-index vZL_wZJqRhGpjY0L7xKGng
large-index _BaHhU-NSNu5YahOZ07qIg
✅ 输出符合预期。
6. 使用 Cluster state API
虽然 alias API 不提供 UUID,stats API 不显示别名信息。如果我们希望同时获取这些信息,可以使用 cluster state API 来获取集群及其索引的完整视图。
该 API 的响应非常长,因此我们使用 jq 提取索引名称、UUID 和别名。按名称升序排列:
$ curl -s -X GET "localhost:9200/_cluster/state/metadata" \ | \
jq -r '.metadata.indices | to_entries[] | "\(.key) \(.value.aliases| join(", ")) \(.value.settings.index.uuid)"' | sort
large-index index3 _BaHhU-NSNu5YahOZ07qIg
medium-index index2 vZL_wZJqRhGpjY0L7xKGng
small-index index1 dUu-1KERTnGJAi47KOLSLQ
需要注意的是,索引名称通过 .metadata.indices JSON 路径获取。我们使用 to_entries[] 将 indices 对象转换为键值对数组以进行遍历。最后,我们为每个索引构造了包含名称、别名和 UUID 的字符串。
同样地,使用 -r 可实现降序排列。
7. 使用 Kibana
在本节中,我们将使用 Kibana 提供的图形界面来按名称列出索引。
7.1. 启动 Kibana
我们可以启动 Kibana 并在 5601 端口暴露其用户界面:
$ docker run -d --name kibana \
--link elasticsearch:elasticsearch \
-p 5601:5601 \
-e ELASTICSEARCH_HOSTS=http://elasticsearch:9200 \
docker.elastic.co/kibana/kibana:7.13.2
访问 http://localhost:5601 即可在浏览器中打开 Kibana 界面。
7.2. 使用索引管理视图
访问 Kibana 的索引管理视图以获取索引列表:
http://localhost:5601/app/management/data/index_management/indices
在这里,我们可以查看索引信息。
点击任意列标题即可对列表进行排序:
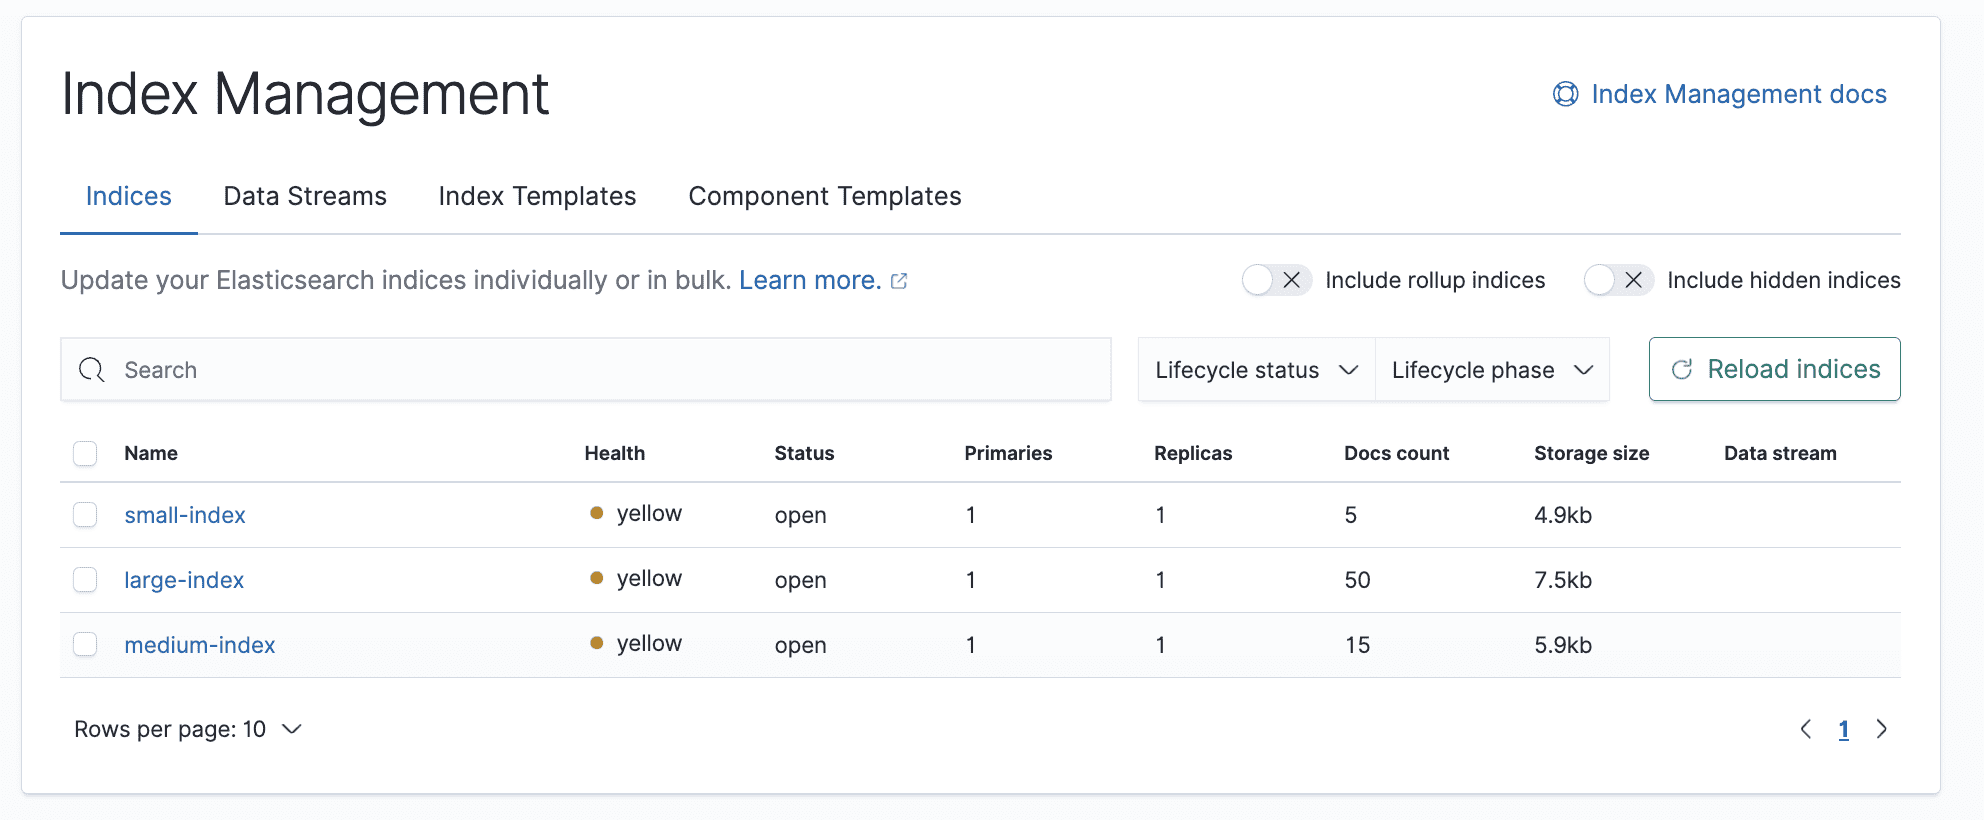
✅ 点击第一列即可按名称升序或降序排列索引。
7.3. 使用 Dev Tools 控制台
我们也可以打开 Dev Tools 控制台与 Elasticsearch 集群交互:
http://localhost:5601/app/dev_tools#/console
在控制台中输入并执行查询语句:
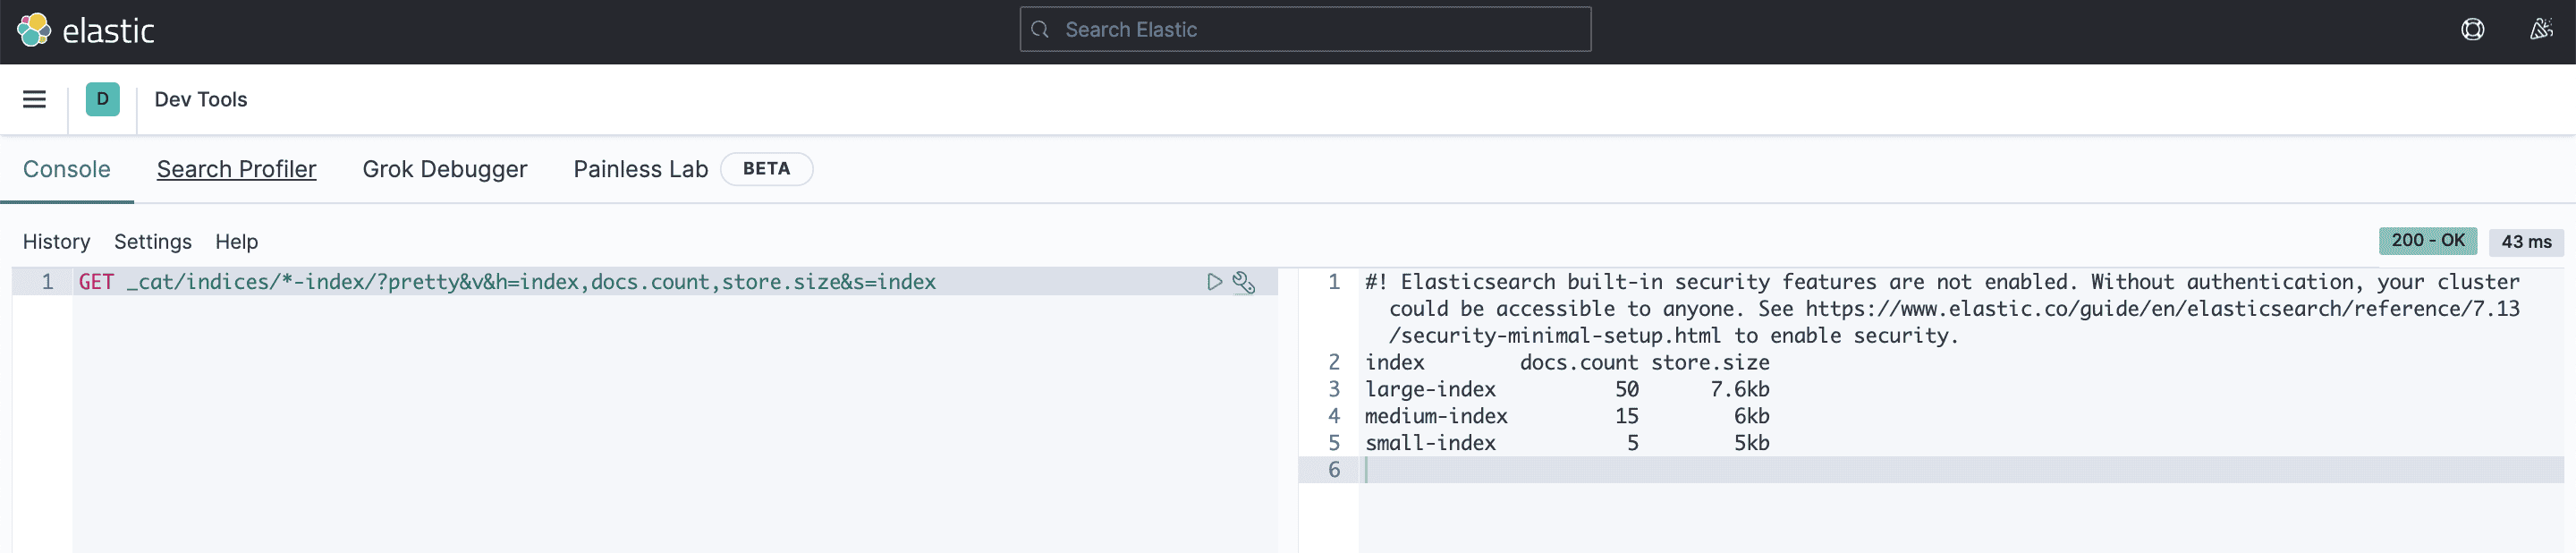
我们看到了按名称排序的索引列表。此外,我们在查询路径中添加了 /*-index 来过滤出我们感兴趣的索引。
8. 总结
在本文中,我们学习了如何在 Elasticsearch 中按名称列出索引。我们探索了多种 REST API,包括 cat indices API、alias API、index stats API 和 cluster state API。
最后,我们还使用了 Kibana 的索引管理视图和 Dev Tools 控制台来列出索引。