1. Overview
In this tutorial, we’ll go over the fundamentals of Jenkins Architecture. Furthermore, we’ll learn how we can configure Jenkins to improve the performance. Additionally, we’ll discuss the options to restart or shut down Jenkins manually.
2. Jenkins Architecture
Certain needs could not be met with one Jenkins server. Firstly, we may need multiple distinct environments in which to test our builds. A single Jenkins server will not be able to do this. Secondly, if larger and heavier projects are being produced regularly, a single Jenkins server will be overwhelmed.
Jenkins distributed architecture was created to meet the above requirements. Furthermore, Jenkins manages distributed builds using a Master-Slave architecture. The TCP/IP protocol is used to communicate between the Master and the Slave in this design.
2.1. Jenkins Master
The Jenkins master is in charge of scheduling the jobs, assigning slaves, and sending builds to slaves to execute the jobs. It’ll also keep track of the slave state (offline or online) and retrieve the build result responses from slaves and display them on the console output.
2.2. Jenkins Slave
It runs on the remote server. The Jenkins server follows the requests of the Jenkins master and is compatible with all operating systems. Building jobs dispatched by the master are executed by the slave. Also, the project can be configured to choose a specific slave machine.
2.3. Distributed Master-Slave Architecture
Let’s have a look at the Jenkins architecture using an example. One master and three Jenkins slaves are depicted in the diagram below:
Let’s look at how we may utilize Jenkins for testing in various systems, such as Ubuntu, Windows, or Mac:
In the diagram, the following items are taken care of:
- Jenkins will check the GIT repository for any changes in the source code at regular intervals
- Each Jenkins build requires its own testing environment, which can’t be created on a single server. Jenkins accomplishes this by employing various slaves as needed
- Jenkins Master will communicate the request for testing to these slaves, as well as test reports
3. Jenkins CLI
Jenkins has a command-line interface that users and administrators can use to access Jenkins from a scripting or shell environment. SSH, the Jenkins CLI client, or a JAR file included with Jenkins can use this command-line interface.
To do so, we must first download jenkins-cli.jar from a Jenkins controller at the URL /jnlpJars/jenkins-cli.jar, in effect JENKINS_URL/jnlpJars/jenkins-cli.jar, and then run it as follows:
java -jar jenkins-cli.jar -s http://localhost:8080/ -webSocket help
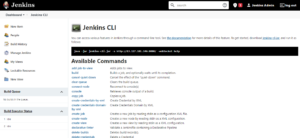
This option is available by selecting “Jenkins CLI” from the Tools and Actions section of the Manage Jenkins page:
A list of available commands is displayed in this area. We can use the command-line tool to access a variety of functions using these commands.
4. Restart Jenkins Manually
If we wish to manually restart or shut down Jenkins, just follow the below-mentioned steps:
4.1. Restart
We can execute the restart using the Jenkins Rest API. This will force the procedure to restart without waiting for existing jobs to finish:
http://(jenkins_url)/restart
We can execute the safeRestart using the Jenkins Rest API. This allows us to finish any existing tasks:
http://(jenkins_url)/safeRestart
If we install it as an rpm or deb package, the command below will work:
service jenkins restart
4.2. Ubuntu
We can also use apt-get/dpkg to install the following:
sudo /etc/init.d/jenkins restart
Usage: /etc/init.d/jenkins {start|stop|status|restart|force-reload}
4.3. For Safely Shutting Down Jenkins
If we wish to safely shut down Jenkins, we can execute the exit using the Jenkins Rest API:
http://(jenkins_url)/exit
We can execute the kill using the Jenkins Rest API to terminate all of our processes:
http://(jenkins_url)/kill
5. Boosting Jenkins Performance
Lagging or slow responsiveness is a typical complaint among Jenkins users, and there are many reported faults. Slow CI systems are inconvenient since they slow down development and waste time. Using a few simple recommendations, we can increase the performance of those systems.
In the following sections, we’ll discuss few suggestions for improving Jenkins and putting a smile on our engineers’ faces.
5.1. Minimize Builds on the Master Node
The master node is where the application is actually executing; it’s Jenkins’ brain, and unlike a slave, it can’t be replaced. So we want to keep our Jenkins master as “work-free” as possible, using the CPU and RAM for scheduling and triggering builds on slaves. We can achieve this by restricting our jobs to a node label, such as SlaveNode.
When allocating the node for pipeline jobs, use the label, for example:
stage("stage 1"){
node("SlaveNode"){
sh "echo \"Hello ${params.NAME}\" "
}
}
The task and node block will only run on slaves having the SlaveNode label in those cases.
5.2. Don’t Keep Too Much Build History
While configuring a job, we can specify how many of its builds to be kept on the filesystem and for how long. When we trigger many builds of a job in a quick time, this feature, known as Discard Old Builds, becomes useful.
We have seen examples where the history limit was set too high, resulting in excessive builds being saved. Also, Jenkins had to load a lot of old builds in these circumstances.
5.3. Clear Old Jenkins Data
Continuing on from the previous suggestion for build data, another key element to know is the old data management functionality. Jenkins, as we may know, manages jobs and stores data on the filesystem. The data format may change when we undertake actions such as upgrading our core, installing, or updating a plugin.
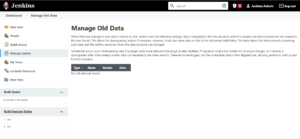
Jenkins saves the old data format to the file system and loads the new format into memory in this situation. It’s quite beneficial if we need to roll back an upgrade, but there are times when too much data is loaded into RAM. Slow UI responsiveness and even OutOfMemory problems are signs of high memory use. It is recommended to open the previous data management page to avoid such situations:
5.4. Define the Right Heap Size
The maximum heap size option is used by many current Java applications. There is an essential JVM aspect to be aware of while defining the heap size. UseCompressedOops is the name of this feature, and it only works on 64-bit platforms, which most of us use. It reduces the object’s pointer from 64 to 32 bits, saving a significant amount of memory.
This flag is enabled by default on heaps up to 32GB (a little less) in size, and it stops working on heaps larger than that. The heap should be expanded to 48GB to compensate for the lost capacity. As a result, while defining heap size, it’s advisable to keep it under 32GB.
We can use the following command (jinfo is included with the JDK) to see if the flag is set:
jinfo -flag UseCompressedOops <pid>
5.5. Tune the Garbage Collector
The garbage collector is a memory management system that runs in the background.
Its primary objective is to locate unused objects in the heap and free the memory they contain. The Java application may stall as a result of some GC actions (remember the UI freeze?). This is most likely to happen if our application has a huge heap (more than 4GB). To reduce the delay time in these circumstances, GC optimization is required. After dealing with these challenges in multiple Jenkins setups, We have come up with the following recommendations:
- Enable G1GC — the most up-to-date GC implementation (default on JDK9)
- Enable GC logging – this will aid in future monitoring and tuning
- If necessary, configure GC with extra flags
- Keep monitoring
6. Conclusion
In this quick tutorial, we first discussed the distributed master-slave architecture in Jenkins. After that, we looked at few options to manually start, stop and restart Jenkins. Finally, we explored different configurations in Jenkins to improve the performance.
If we devote some time to Jenkins and follow these guidelines, we’ll be able to take advantage of its many useful capabilities while avoiding potential dangers.