1. 简介
本文将演示如何使用 Jenkins、Marathon 和 Mesos 实现一个简单的持续交付(Continuous Delivery)流水线。
我们会先对整个技术栈和架构做一个概述,说明它们如何协同工作。随后,进入实操阶段,分步骤讲解如何构建一个完整的自动化部署流程。
最终目标是:通过 Jenkins 流水线,将应用自动部署到 Mesos 集群,并由 Marathon 负责调度与管理。
2. 技术栈概述
在使用容器和微服务架构时,会面临一些传统架构中不会出现的运维问题。例如:
- 如何在集群中部署应用
- 如何实现自动扩缩容
- 如何处理服务故障转移
- 如何管理网络与资源分配
这些问题可以通过分布式调度器(如 Mesos)和编排框架(如 Marathon)来解决。
2.1. Mesos
Mesos 可以看作是一个“分布式内核”,它将整个集群资源抽象成一个统一的资源池。这样,我们就可以像在单台服务器上一样部署和管理应用。
Mesos 负责资源的分配与调度,而具体任务的执行则交由上层框架(如 Marathon)处理。
2.2. Marathon
Marathon 是运行在 Mesos 之上的应用编排框架,用于部署和管理长期运行的服务。它提供了以下核心功能:
✅ 自动扩缩容
✅ 健康检查
✅ 故障转移
✅ 应用状态监控
通过 Marathon,我们可以将容器化应用部署到 Mesos 集群,并确保其稳定运行。
3. 环境准备
本文假设你已经完成了以下组件的部署:
- Jenkins
- Mesos 集群
- Marathon
如果没有,请先参考各自官方文档完成安装配置。否则将无法完成本文中的实操步骤。
4. 流水线设计
我们最终要实现的 Jenkins 流水线如下图所示:

流程说明:
- Jenkins 从 Git 拉取代码
- 构建应用(Maven 编译、测试)
- 构建 Docker 镜像并推送到仓库
- 通过 Marathon 插件部署到 Mesos 集群
整个流程高度自动化,适合用于 CD 场景。
5. 应用构建与测试
我们使用一个 Spring Boot 应用作为演示项目,最终产物是一个可执行的 jar 包。
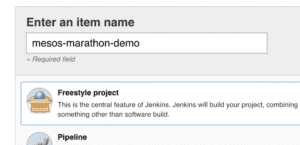
5.1. 创建 Jenkins Job
在 Jenkins 中创建一个自由风格项目(Freestyle Project),命名为 marathon-mesos-demo:
5.2. 集成 Git 仓库
配置 Git 仓库地址,本文使用的是一个公开的 GitHub 项目:
https://github.com/Baeldung/ops-tutorials/tree/main/mesos-marathon
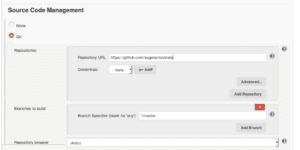
⚠️ 如果是私有仓库,需配置 SSH Key 或 Token。
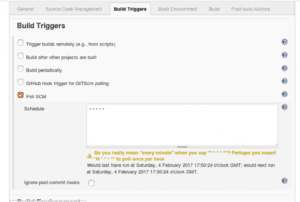
5.3. 设置构建触发器
设置定时拉取 Git 仓库,每分钟检查一次是否有新提交:
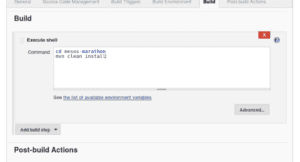
5.4. 执行构建脚本
添加构建步骤,执行如下命令:
mvn clean install
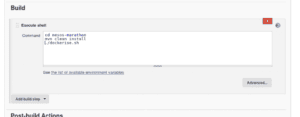
该命令会执行单元测试并生成可执行 jar。
5.5. 手动构建验证
点击 “Build Now” 触发一次手动构建,确保构建状态变为蓝色(表示成功)。
6. 应用容器化
下一步是将应用打包为 Docker 镜像,并推送到镜像仓库。
6.1. 编写 Dockerfile
在项目根目录下创建 Dockerfile,内容如下:
FROM openjdk:17-jdk-alpine
ADD target/mesos-marathon-0.0.1-SNAPSHOT.jar app.jar
EXPOSE 8082
ENTRYPOINT ["java","-jar","/app.jar"]
说明:
- 使用
openjdk:17-jdk-alpine作为基础镜像 - 将构建好的 jar 包复制进容器
- 暴露应用监听端口
8082 - 定义容器启动命令
6.2. 编写镜像构建与推送脚本
创建脚本 Dockerise.sh,用于构建并推送镜像:
#!/usr/bin/env bash
set -e
docker login -u baeldung -p $DOCKER_PASSWORD
docker build -t baeldung/mesos-marathon-demo:$BUILD_NUMBER .
docker push baeldung/mesos-marathon-demo:$BUILD_NUMBER
说明:
- 使用 Jenkins 提供的环境变量
$BUILD_NUMBER作为镜像版本号 - 使用
$DOCKER_PASSWORD作为私密变量,通过 Jenkins 的 EnvInject 插件注入
✅ 推荐将脚本纳入版本控制,便于审计和版本管理。
6.3. Jenkins 配置构建步骤
在 Jenkins Job 中添加执行脚本步骤:
再次执行构建,确认状态仍为成功。
7. 部署到 Mesos 集群
最后一步是使用 Marathon 插件将镜像部署到 Mesos 集群。
7.1. 创建 marathon.json 配置文件
在项目根目录创建 marathon.json 文件,内容如下:
{
  "id": "mesos-marathon-demo",
  "container": {
    "type": "DOCKER",
    "docker": {
      "image": "",
      "network": "BRIDGE",
      "portMappings": [
        { "containerPort": 8082, "hostPort": 0 }
      ]
    }
  }
}
说明:
"image"字段将由 Jenkins 插件动态填充"portMappings"表示容器端口 8082 映射到主机的随机端口,用于外部访问
7.2. 添加 Marathon 部署步骤
在 Jenkins Job 中添加 “Deploy with Marathon” 步骤:
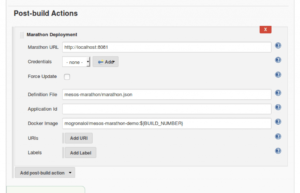
填写 Marathon 地址(如 localhost:8081),以及镜像地址(如 baeldung/mesos-marathon-demo:$BUILD_NUMBER)。
再次执行构建,确认部署成功。
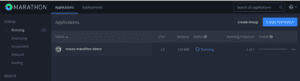
7.3. 在 Marathon UI 中验证部署
打开 Marathon 的 Web UI,查看应用状态:
点击应用查看分配的主机和端口:
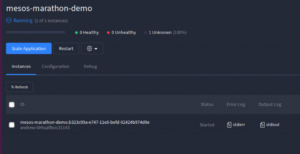
访问 http://<host>:<port> 验证应用是否正常运行。
8. 总结
本文演示了如何使用 Jenkins、Marathon 和 Mesos 实现一个完整的持续交付流水线。从代码提交、构建、容器化,到最终部署到 Mesos 集群,整个流程实现了自动化。
后续文章将深入探讨 Marathon 的高级功能,如:
- 健康检查
- 自动扩缩容
- 故障恢复机制
- Mesos 的批处理能力
项目源码地址:GitHub