1. Overview
In this tutorial, we’ll learn how to install PostgreSQL with Docker. Generally, we run a Docker container using the public Docker image. Similarly, we can pull preconfigured Docker images of the PostgreSQL database server from Docker Hub. We’ll also demonstrate how PostgreSQL can be installed, configured, and run on Docker.
First, we’ll run a Docker container with a PostgreSQL database using the PostgreSQL Public Image. Then, we’ll create a customized Dockerfile to install the PostgreSQL server in the Docker container. We’ll also learn how to back up and restore the database using the Docker container.
Now, let’s dive into running a Docker container with the PostgreSQL database.
2. Understanding the PostgreSQL Database
Before running the Docker container of the PostgreSQL database, let’s first understand a few things about it. PostgreSQL is an Open-Source RDMS, similar to MySQL. It’s an object-oriented database, but we can process both structured and unstructured data.
The PostgreSQL database engine runs on various platforms, including Windows, Mac OS X, and Linux. It also provides advanced data types and performance optimization features to store and scale complicated database workloads.
3. Setup PostgreSQL Using the Public Image
To run a PostgreSQL using Docker, we first need to pull the postgres public image available on Docker Hub:
$ docker pull postgres
Using default tag: latest
latest: Pulling from library/postgres
1fe172e4850f: Pull complete
...
c08147da7b54: Pull complete
Digest: sha256:ab0be6280ada8549f45e6662ab4f00b7f601886fcd55c5976565d4636d87c8b2
Status: Downloaded newer image for postgres:latest
docker.io/library/postgres:latest
In the above command, we pulled the latest stable image named postgres. We can also pull a particular version of the postgres image using the below command:
$ docker pull postgres:16.2
14.2: Pulling from library/postgres
Digest: sha256:f4b0987cb4ba8bcc2b90aa33ad8b5786669bec4dc633fc93d1418275e3627b34
Status: Downloaded newer image for postgres:16.2
docker.io/library/postgres:16.2
Now we’ll run the Docker container using the postgres:latest image with the below command:
$ docker run -itd -e POSTGRES_USER=baeldung -e POSTGRES_PASSWORD=baeldung -p 5432:5432 -v ./data:/var/lib/postgresql/data --name postgresql postgres
5aeda2b20a708296d22db4451d0ca57e8d23acbfe337be0dc9b526a33b302cf5
The above command uses environment variables POSTGRES_USER and POSTGRES_PASSWORD to set the username and password for the PostgreSQL database. By default, the PostgreSQL database runs on the 5432 port. We exposed the 5432 port on the host using the “-p 5432:5432” in the docker run command.
To persist the data even after the container has died, we mounted the /var/lib/postgresql/data directory, which is inside the container, to the local ./data directory of the container’s host machine. Therefore, we need to run the command above from a location that has a folder named data. Otherwise, we must adjust the command according to our needs.
psql is a command-line utility used to access PostgreSQL databases interactively. Let’s now use the psql to connect with the database:
$ PGPASSWORD=baeldung psql -h localhost -p 5432 -U baeldung
In order to get the list out of all the databases, we’ll use the command \l :
$ PGPASSWORD=baeldung psql -h localhost -p 5432 -U baeldung -c '\l'
List of databases
Name | Owner | Encoding | Collate | Ctype | Access privileges
------------+------------+----------+------------+------------+---------------------------
baeldung | baeldung | UTF8 | en_US.utf8 | en_US.utf8 |
postgres | baeldung | UTF8 | en_US.utf8 | en_US.utf8 |
template0 | baeldung | UTF8 | en_US.utf8 | en_US.utf8 | =c/baeldung +
| | | | | baeldung=CTc/baeldung
template1 | baeldung | UTF8 | en_US.utf8 | en_US.utf8 | =c/baeldung +
| | | | | baeldung=CTc/baeldung
(4 rows)
In the above output, we can get the details of all the databases present on the PostgreSQL server.
4. Setup PostgreSQL Using Customised Dockerfile
We can also set up the PostgreSQL database server by creating a customized Dockerfile. Here, we’ll create a Dockerfile that will contain all the required commands to install Postgres using Debian as the base image:
FROM debian:bullseye
# Set environment variables to reduce output from debconf
ENV DEBIAN_FRONTEND=noninteractive
RUN apt update && apt install -y \
wget \
gnupg \
lsb-release \
sudo \
&& rm -rf /var/lib/apt/lists/*
RUN wget --quiet -O - https://www.postgresql.org/media/keys/ACCC4CF8.asc | gpg --dearmor -o /usr/share/keyrings/postgresql-archive-keyring.gpg
RUN echo "deb [signed-by=/usr/share/keyrings/postgresql-archive-keyring.gpg] http://apt.postgresql.org/pub/repos/apt $(lsb_release -cs)-pgdg main" > /etc/apt/sources.list.d/pgdg.list
RUN apt update && apt install -y \
postgresql-16 \
postgresql-client-16 \
&& rm -rf /var/lib/apt/lists/*
COPY startUpScript.sh /usr/local/bin/startUpScript.sh
RUN chmod +x /usr/local/bin/startUpScript.sh
CMD ["/usr/local/bin/startUpScript.sh"]
In the above Dockerfile, we used startUpScript.sh to start the PostgreSQL database server after successfully installing it. Also, we need to make the start-up file executable so we can run it when bootstrapping the container. Now, let’s look into the startUpScript.sh file:
#!/bin/bash
# Define PostgreSQL data directory
PGDATA="/var/lib/postgresql/16/main"
pg_ctlcluster 16 main start
until pg_isready -h localhost -p 5432
do
echo "Waiting for PostgreSQL to start..."
sleep 1
done
echo "PostgreSQL has been initialized."
tail -f /dev/null
In the startUpScript.sh, we first initialized the PostgreSQL database and waited for it to be ready. Now, we can configure the database however we want.
Note that the last tail -f /dev/null command is necessary. Without it, the script will terminate the docker container immediately after finishing its execution.
5. Install pgAdmin on Docker
So far, the PostgreSQL server is active and running on the 5432 port. Now, we’ll install pgAdmin, a web-based user interface tool for managing PostgreSQL databases and services. pgAdmin can also run SQL queries on PostgreSQL databases.
To perform all the queries from the UI, we can use the pgAdmin. To do this, we need to pull the pgAdmin image using the following command:
$ docker pull dpage/pgadmin4:latest
latest: Pulling from dpage/pgadmin4
40e059520d19: Pull complete
...
6d23acfae6ef: Pull complete
Digest: sha256:f820e5579857a7210599f998c818777a2f6f39172b50fbeb2faaa1a70413e9ac
Status: Downloaded newer image for dpage/pgadmin4:latest
docker.io/dpage/pgadmin4:latest
To demonstrate, let’s run the container using the below command:
$ docker run --name pgadmin-baeldung -p 5051:80 -e "[email protected]" -e "PGADMIN_DEFAULT_PASSWORD=baeldung" -d dpage/pgadmin4
In the above command, we provided the PGADMIN_DEFAULT_EMAIL and PGADMIN_DEFAULT_PASSWORD as an environment variable to the pgadmin-baeldung container:
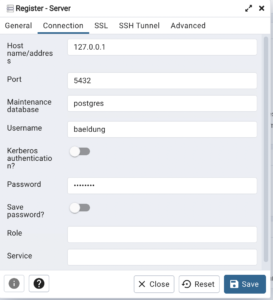
We can easily access PostgreSQL databases using the pgAdmin GUI. In order to access the database, we have to set up a connection to the Postgres server using pgAdmin. We can do this by logging in to pgAdmin.
6. Back Up and Restore the Data
In this section, we’ll learn how to backup and restore the data in PostgreSQL using Docker commands.
First, to back up the data, we’ll create a dummy database, baeldung, and a table, baeldungauthor.
$ createdb -h localhost -p 5432 -U baeldung baeldung
The command to create a table is as follows:
CREATE TABLE baeldungauthor (
AUTHOR_ID INT PRIMARY KEY NOT NULL,
AUTHOR_NAME TEXT NOT NULL,
AUTHOR_AGE INT NOT NULL,
AUTHOR_LEVEL INT NOT NULL
);
Let’s list out the created table in the database:
psql -U baeldung -d baeldung -c "\d"
List of relations
Schema | Name | Type | Owner
--------+----------------+-------+------------
public | baedlungauthor | table | baeldung
(1 row)
Now we’ll use the below command to get the schema detail of table baeldungauthor:
psql -U baeldung -d baeldung -c "\d baedlungauthor"
Table "public.baedlungauthor"
Column | Type | Collation | Nullable | Default
--------------+---------+-----------+----------+---------
author_id | integer | | not null |
author_name | text | | not null |
author_age | integer | | not null |
author_level | integer | | not null |
Indexes:
"baedlungauthor_pkey" PRIMARY KEY, btree (author_id)
So far, we’ve created a database and a table. Now let’s look into the command to back up a database for a Docker container:
$ docker exec -t postgresql pg_dumpall -c -U baeldung > dump.sql
In the above command, we used pg_dumpall to back up the baeldung database. It’s a standard PostgreSQL tool for backing up the database. We provided the username of the DB server to access the privileges.
Now, let’s check out the command to restore the database:
$ cat dump.sql | docker exec -i postgresql psql -U baeldung
Here, in short, we restored all the tables of the baeldung database using the psql command.
7. Conclusion
In this article, we learned how to install the PostgreSQL database using the Docker container. We explored each step to pull, set up, and run a Docker container of Postgres.
In addition, we discussed both ways to access the PostgreSQL database server. First, we demonstrated pgAdmin to access the PostgreSQL database server running on the Docker container. Then, we used psql to execute queries against the databases in PostgreSQL.
Next, we ran the Docker container with the PostgreSQL database using the Postgres public image present on Docker Hub. We also created our customized Dockerfile to install the PostgreSQL server in the Docker container.
Finally, we delved into the backup and restoration of the data in the PostgreSQL database with the Docker container.