1. 概述
本教程延续 Spring Security 注册系列,重点讲解如何在系统中正确实现 角色(Role)与权限(Privilege) 的管理机制。
2. 用户、角色与权限
我们先从实体模型开始。系统中主要有三个核心实体:
- User(用户)
- Role(角色),代表用户在系统中的高层次角色,每个角色包含一组低层次的权限
- Privilege(权限),代表系统中更细粒度的权限控制单元
✅ User 实体
@Entity
public class User {

    @Id
    @GeneratedValue(strategy = GenerationType.AUTO)
    private Long id;

    private String firstName;
    private String lastName;
    private String email;
    private String password;
    private boolean enabled;
    private boolean tokenExpired;

    @ManyToMany
    @JoinTable(
        name = "users_roles",
        joinColumns = @JoinColumn(
          name = "user_id", referencedColumnName = "id"),
        inverseJoinColumns = @JoinColumn(
          name = "role_id", referencedColumnName = "id"))
    private Collection<Role> roles;
}
可以看到,用户实体中包含了角色集合,用于支持多角色分配。
✅ Role 实体
@Entity
public class Role {

    @Id
    @GeneratedValue(strategy = GenerationType.AUTO)
    private Long id;

    private String name;
    @ManyToMany(mappedBy = "roles")
    private Collection<User> users;

    @ManyToMany
    @JoinTable(
        name = "roles_privileges",
        joinColumns = @JoinColumn(
          name = "role_id", referencedColumnName = "id"),
        inverseJoinColumns = @JoinColumn(
          name = "privilege_id", referencedColumnName = "id"))
    private Collection<Privilege> privileges;
}
角色实体中不仅包含用户集合,还维护了权限集合,用于实现角色到权限的映射。
✅ Privilege 实体
@Entity
public class Privilege {

    @Id
    @GeneratedValue(strategy = GenerationType.AUTO)
    private Long id;

    private String name;

    @ManyToMany(mappedBy = "privileges")
    private Collection<Role> roles;
}
权限实体通过多对多关系与角色绑定。
⚠️ 关系设计说明:User 与 Role、Role 与 Privilege 之间均为 双向多对多关系,这种设计灵活性高,适合复杂权限系统。
3. 初始化权限与角色
为了在应用启动时自动初始化角色和权限,我们可以使用 ApplicationListener 监听 ContextRefreshedEvent:
@Component
public class SetupDataLoader implements ApplicationListener<ContextRefreshedEvent> {

    boolean alreadySetup = false;

    @Autowired
    private UserRepository userRepository;

    @Autowired
    private RoleRepository roleRepository;

    @Autowired
    private PrivilegeRepository privilegeRepository;

    @Autowired
    private PasswordEncoder passwordEncoder;

    @Override
    @Transactional
    public void onApplicationEvent(ContextRefreshedEvent event) {

        if (alreadySetup) return;

        Privilege readPrivilege = createPrivilegeIfNotFound("READ_PRIVILEGE");
        Privilege writePrivilege = createPrivilegeIfNotFound("WRITE_PRIVILEGE");

        List<Privilege> adminPrivileges = Arrays.asList(readPrivilege, writePrivilege);
        createRoleIfNotFound("ROLE_ADMIN", adminPrivileges);
        createRoleIfNotFound("ROLE_USER", Arrays.asList(readPrivilege));

        Role adminRole = roleRepository.findByName("ROLE_ADMIN");
        User user = new User();
        user.setFirstName("Test");
        user.setLastName("Test");
        user.setPassword(passwordEncoder.encode("test"));
        user.setEmail("test@example.com");
        user.setRoles(Arrays.asList(adminRole));
        user.setEnabled(true);
        userRepository.save(user);

        alreadySetup = true;
    }

    @Transactional
    Privilege createPrivilegeIfNotFound(String name) {

        Privilege privilege = privilegeRepository.findByName(name);
        if (privilege == null) {
            privilege = new Privilege(name);
            privilegeRepository.save(privilege);
        }
        return privilege;
    }

    @Transactional
    Role createRoleIfNotFound(String name, Collection<Privilege> privileges) {

        Role role = roleRepository.findByName(name);
        if (role == null) {
            role = new Role(name);
            role.setPrivileges(privileges);
            roleRepository.save(role);
        }
        return role;
    }
}
✅ 初始化逻辑说明
- 创建基础权限(如
READ_PRIVILEGE、WRITE_PRIVILEGE) - 创建角色(如
ROLE_ADMIN、ROLE_USER),并为其分配权限 - 创建一个管理员用户并分配
ROLE_ADMIN角色 - 使用
alreadySetup标志防止重复初始化
⚠️ 注意事项
- Spring 中的权限(Authority)通常以
ROLE_为前缀(如ROLE_ADMIN) - 如果不显式配置前缀,需确保权限命名与 Spring Security 的匹配规则一致
4. 自定义 UserDetailsService
为了实现更灵活的权限控制,我们需要自定义 UserDetailsService,并正确映射角色和权限为 Spring Security 所需的 GrantedAuthority。
@Service("userDetailsService")
@Transactional
public class MyUserDetailsService implements UserDetailsService {

    @Autowired
    private UserRepository userRepository;

    @Autowired
    private RoleRepository roleRepository;

    @Override
    public UserDetails loadUserByUsername(String email) throws UsernameNotFoundException {

        User user = userRepository.findByEmail(email);
        if (user == null) {
            return new User(" ", " ", true, true, true, true,
                getAuthorities(Arrays.asList(roleRepository.findByName("ROLE_USER"))));
        }

        return new User(
            user.getEmail(),
            user.getPassword(),
            user.isEnabled(),
            true,
            true,
            true,
            getAuthorities(user.getRoles())
        );
    }

    private Collection<? extends GrantedAuthority> getAuthorities(Collection<Role> roles) {
        return getGrantedAuthorities(getPrivileges(roles));
    }

    private List<String> getPrivileges(Collection<Role> roles) {
        List<String> privileges = new ArrayList<>();
        List<Privilege> collection = new ArrayList<>();
        for (Role role : roles) {
            privileges.add(role.getName());
            collection.addAll(role.getPrivileges());
        }
        for (Privilege item : collection) {
            privileges.add(item.getName());
        }
        return privileges;
    }

    private List<GrantedAuthority> getGrantedAuthorities(List<String> privileges) {
        List<GrantedAuthority> authorities = new ArrayList<>();
        for (String privilege : privileges) {
            authorities.add(new SimpleGrantedAuthority(privilege));
        }
        return authorities;
    }
}
✅ 关键点说明
getPrivileges方法将角色及其权限合并为权限字符串集合getGrantedAuthorities将权限字符串转换为GrantedAuthority对象- 这种设计支持细粒度的权限控制,并保持与 Spring Security 的兼容性
5. 角色层级(Role Hierarchy)
随着系统角色数量增加,可能出现“角色爆炸”问题(一个用户拥有多个角色)。为解决这个问题,Spring Security 提供了 角色层级机制。
✅ 角色层级图示
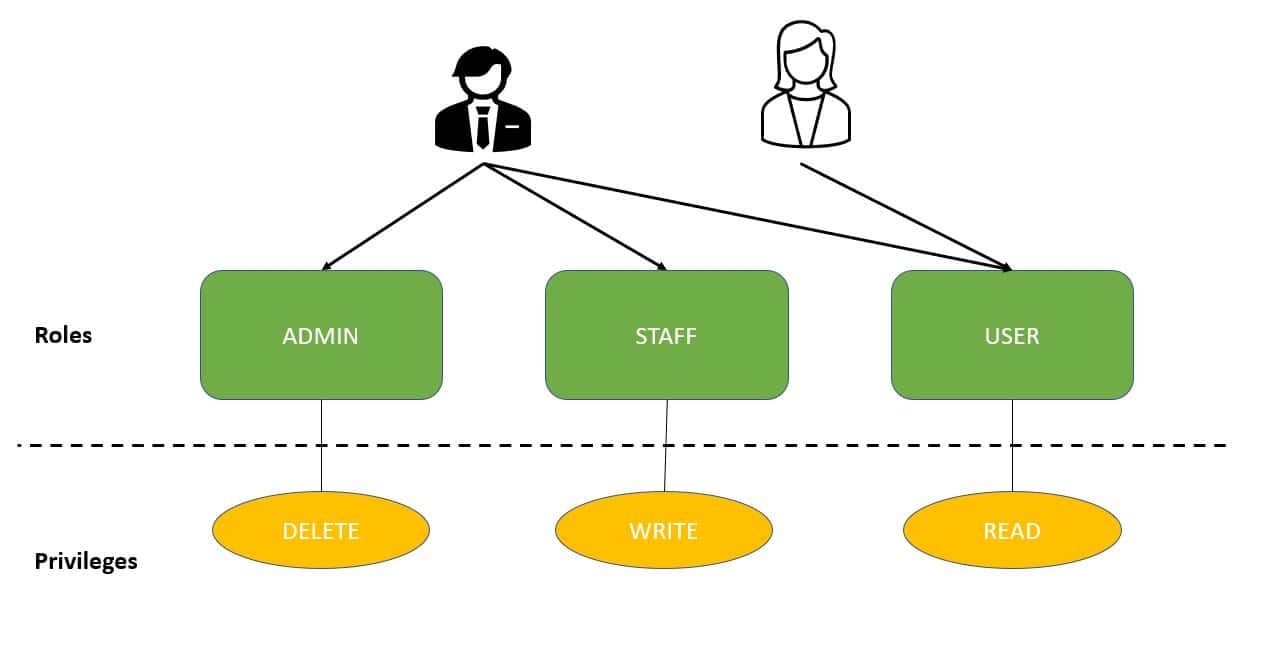
上图展示了一个角色爆炸的典型场景。
✅ 角色层级优化图示

通过角色层级,ROLE_ADMIN 自动继承 ROLE_STAFF 和 ROLE_USER 的所有权限。
✅ 配置角色层级
@Bean
public RoleHierarchy roleHierarchy() {
    RoleHierarchyImpl roleHierarchy = new RoleHierarchyImpl();
    String hierarchy = "ROLE_ADMIN > ROLE_STAFF \n ROLE_STAFF > ROLE_USER";
    roleHierarchy.setHierarchy(hierarchy);
    return roleHierarchy;
}
✅ 配置 Web 表达式处理器
@Bean
public DefaultWebSecurityExpressionHandler customWebSecurityExpressionHandler() {
    DefaultWebSecurityExpressionHandler expressionHandler = new DefaultWebSecurityExpressionHandler();
    expressionHandler.setRoleHierarchy(roleHierarchy());
    return expressionHandler;
}
✅ 应用到 Security 配置中
@Bean
public SecurityFilterChain filterChain(HttpSecurity http) throws Exception {
    http.csrf().disable()
        .authorizeRequests()
            .expressionHandler(webSecurityExpressionHandler())
            .antMatchers(HttpMethod.GET, "/roleHierarchy")
            .hasRole("STAFF");
    return http.build();
}
✅ 作用说明:通过角色层级,用户只需拥有
ROLE_ADMIN,即可自动拥有ROLE_STAFF和ROLE_USER权限,避免了角色冗余。
6. 用户注册逻辑
在用户注册时,我们需要为新用户分配默认角色。例如,普通用户注册时自动分配 ROLE_USER。
@Override
public User registerNewUserAccount(UserDto accountDto) throws EmailExistsException {

    if (emailExist(accountDto.getEmail())) {
        throw new EmailExistsException("There is an account with that email address: " + accountDto.getEmail());
    }

    User user = new User();
    user.setFirstName(accountDto.getFirstName());
    user.setLastName(accountDto.getLastName());
    user.setPassword(passwordEncoder.encode(accountDto.getPassword()));
    user.setEmail(accountDto.getEmail());

    user.setRoles(Arrays.asList(roleRepository.findByName("ROLE_USER")));
    return repository.save(user);
}
✅ 扩展建议:可以根据业务需要扩展注册逻辑,比如支持多种角色注册、前端传递角色参数等。
7. 总结
本文详细讲解了如何在 Spring Security 系统中实现角色与权限管理,包括:
- 使用 JPA 构建用户、角色、权限的实体模型
- 初始化角色与权限数据
- 自定义
UserDetailsService映射权限 - 使用角色层级简化权限配置
- 用户注册时自动分配角色
✅ 完整示例代码:可参考 GitHub 项目地址 获取完整实现。
如果你正在构建一个需要灵活权限控制的 Spring Boot 项目,这套机制非常值得参考。