1. 介绍
本教程将指导你使用Spring Boot创建一个Telegram机器人。
Telegram机器人是运行在Telegram消息平台上的自动化程序,它通过Telegram Bot API与用户交互并执行各种任务。我们将使用Java库而非直接调用API。机器人能帮助我们响应用户指令、提供信息和执行自动化操作。
我们将从创建新机器人开始,然后介绍如何使用Java库实现简单功能。
2. 创建Telegram机器人
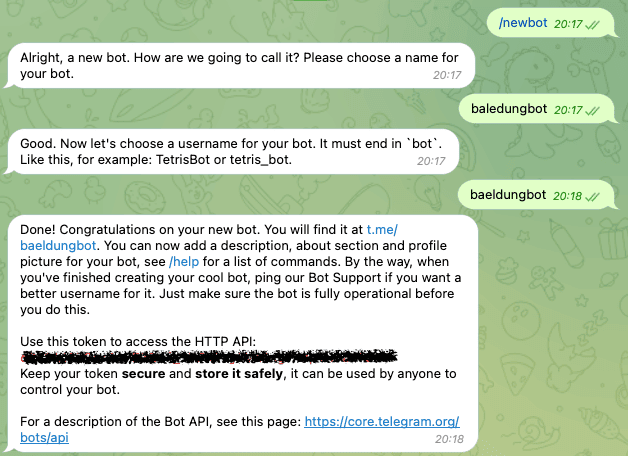
首先需要在Telegram平台创建新机器人。直接在Telegram应用中搜索BotFather,输入/newbot命令创建机器人,并按照BotFather的指示操作。它会要求你为机器人设置用户名(根据Telegram政策必须以bot结尾):
BotFather会生成一个令牌(token),务必妥善保存,后续配置应用时需要用到。
3. 设置应用
需要有一个Spring Boot项目来集成Telegram机器人。修改pom.xml文件,添加以下依赖:
<dependency>
    <groupId>org.telegram</groupId>
    <artifactId>telegrambots-spring-boot-starter</artifactId>
    <version>6.7.0</version>
</dependency>
<dependency>
    <groupId>org.telegram</groupId>
    <artifactId>telegrambots-abilities</artifactId>
    <version>6.7.0</version>
</dependency>
底层实现上,AbilityBot使用webhooks与Telegram API通信,但我们无需关心这些细节。该库已完整实现了Telegram Bot API的所有接口。
现在可以开始实现机器人了。
4. PizzaBot功能说明
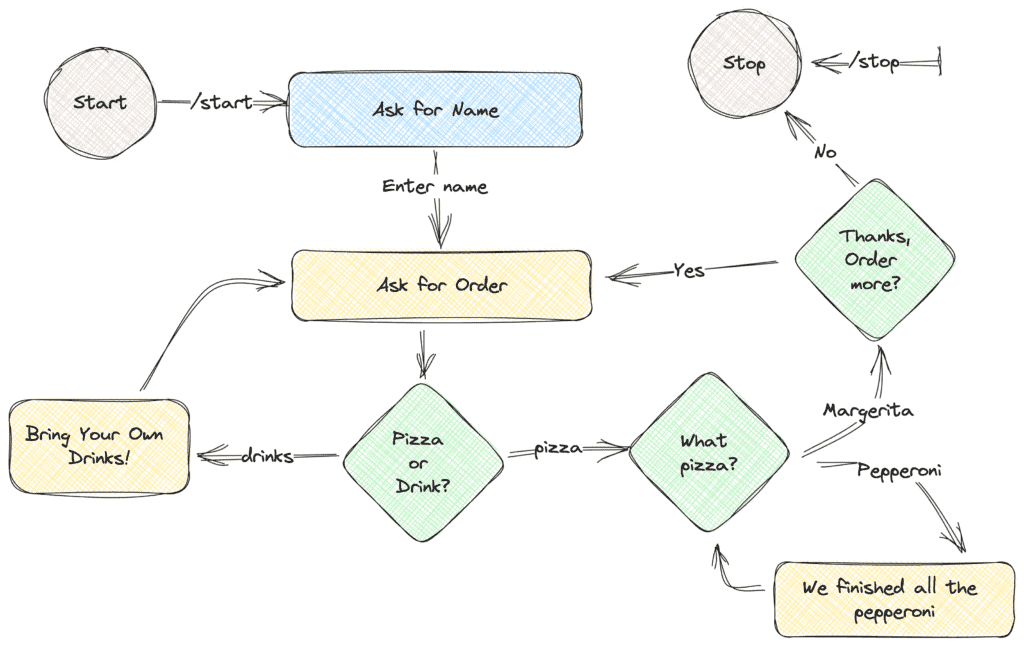
我们将实现一个模拟披萨店的简单机器人,展示如何在Spring Boot中使用该库。预设的交互流程如下:
简要流程:
- 询问用户姓名
- 提示选择披萨或饮料
- 若选饮料:回复"不卖饮料"
- 若选披萨:询问配料
- 选择配料后确认是否继续点单
- 继续:重复流程
- 结束:感谢并关闭对话
5. 配置和注册PizzaBot
先为披萨店创建AbilityBot:
@Component
public class PizzaBot extends AbilityBot {
    private final ResponseHandler responseHandler;
    @Autowired
    public PizzaBot(Environment env) {
        super(env.getProperty("botToken"), "baeldungbot");
        responseHandler = new ResponseHandler(silent, db);
    }
    @Override
    public long creatorId() {
        return 1L;
    }
}
在构造函数中通过环境变量注入botToken。必须保护令牌安全,切勿提交到代码库。本例通过环境变量导出,也可在属性文件中定义。还需提供唯一的creatorId标识机器人。
我们继承AbilityBot类以减少样板代码,它通过ReplyFlow提供状态机等常用工具。但这里只使用嵌入式数据库,在ResponseHandler中显式管理状态:
public class ResponseHandler {
    private final SilentSender sender;
    private final Map<Long, UserState> chatStates;

    public ResponseHandler(SilentSender sender, DBContext db) {
        this.sender = sender;
        chatStates = db.getMap(Constants.CHAT_STATES);
    }
}
5.1. Spring Boot 3兼容性问题
使用Spring Boot 3时,库不会自动注册@Component声明的机器人。需在主应用类中手动初始化:
TelegramBotsApi botsApi = new TelegramBotsApi(DefaultBotSession.class);
botsApi.registerBot(ctx.getBean("pizzaBot", TelegramLongPollingBot.class));
创建TelegramBotsApi实例,从Spring应用上下文获取pizzaBot组件并注册。
6. 实现PizzaBot
Telegram API非常庞大,重复实现新命令很繁琐。因此使用"能力(abilities)"简化新功能开发。设计交互流程时需考虑:
- 终端用户
- 必要条件
- 执行过程
在PizzaBot中,我们只用一个能力触发/start命令:
public Ability startBot() {
    return Ability
      .builder()
      .name("start")
      .info(Constants.START_DESCRIPTION)
      .locality(USER)
      .privacy(PUBLIC)
      .action(ctx -> responseHandler.replyToStart(ctx.chatId()))
      .build();
}
使用建造者模式构建Ability:
- 定义能力名称(即命令名)
- 提供描述(执行
/commands时显示) - 设置机器人的作用域和隐私级别
- 定义收到命令后的动作
本例中将聊天ID转发给ResponseHandler类。按上图设计,询问用户姓名并保存初始状态:
public void replyToStart(long chatId) {
    SendMessage message = new SendMessage();
    message.setChatId(chatId);
    message.setText(START_TEXT);
    sender.execute(message);
    chatStates.put(chatId, AWAITING_NAME);
}
创建SendMessage命令并通过sender执行,将聊天状态设为AWAITING_NAME,表示等待用户输入姓名:
private void replyToName(long chatId, Message message) {
    promptWithKeyboardForState(chatId, "Hello " + message.getText() + ". What would you like to have?",
      KeyboardFactory.getPizzaOrDrinkKeyboard(),
      UserState.FOOD_DRINK_SELECTION);
}
用户输入姓名后,发送ReplyKeyboardMarkup提供两个选项:
public static ReplyKeyboard getPizzaToppingsKeyboard() {
    KeyboardRow row = new KeyboardRow();
    row.add("Margherita");
    row.add("Pepperoni");
    return new ReplyKeyboardMarkup(List.of(row));
}
这将隐藏键盘并显示按钮界面:
用户选择披萨或饮料(本店不卖饮料)后,Telegram会发送包含响应的文本消息。对于流程图中所有绿色菱形元素,处理方式类似,不再赘述。重点看如何处理按钮响应。
7. 处理用户回复
在PizzaBot类中,根据当前聊天状态处理所有传入消息:
public Reply replyToButtons() {
    BiConsumer<BaseAbilityBot, Update> action = (abilityBot, upd) -> responseHandler.replyToButtons(getChatId(upd), upd.getMessage());
    return Reply.of(action, Flag.TEXT,upd -> responseHandler.userIsActive(getChatId(upd)));
}
replyToButtons()捕获所有TEXT回复,将chatId和Message对象转发给ResponseHandler。在ResponseHandler的replyToButtons()方法中决定如何处理:
public void replyToButtons(long chatId, Message message) {
    if (message.getText().equalsIgnoreCase("/stop")) {
        stopChat(chatId);
    }

    switch (chatStates.get(chatId)) {
        case AWAITING_NAME -> replyToName(chatId, message);
        case FOOD_DRINK_SELECTION -> replyToFoodDrinkSelection(chatId, message);
        case PIZZA_TOPPINGS -> replyToPizzaToppings(chatId, message);
        case AWAITING_CONFIRMATION -> replyToOrder(chatId, message);
        default -> unexpectedMessage(chatId);
    }
}
通过switch检查当前聊天状态并相应回复。例如当状态为FOOD_DRINK_SELECTION时,处理用户选择"披萨"的响应并进入下一状态:
private void replyToFoodDrinkSelection(long chatId, Message message) {
    SendMessage sendMessage = new SendMessage();
    sendMessage.setChatId(chatId);
    if ("drink".equalsIgnoreCase(message.getText())) {
        sendMessage.setText("We don't sell drinks.\nBring your own drink!! :)");
        sendMessage.setReplyMarkup(KeyboardFactory.getPizzaOrDrinkKeyboard());
        sender.execute(sendMessage);
    } else if ("pizza".equalsIgnoreCase(message.getText())) {
        sendMessage.setText("We love Pizza in here.\nSelect the toppings!");
        sendMessage.setReplyMarkup(KeyboardFactory.getPizzaToppingsKeyboard());
        sender.execute(sendMessage);
        chatStates.put(chatId, UserState.PIZZA_TOPPINGS);
    } else {
        sendMessage.setText("We don't sell " + message.getText() + ". Please select from the options below.");
        sendMessage.setReplyMarkup(KeyboardFactory.getPizzaOrDrinkKeyboard());
        sender.execute(sendMessage);
    }
}
在replyToButtons()中立即检查用户是否发送/stop命令。若是则终止对话并从chatStates映射中移除chatId:
private void stopChat(long chatId) {
    SendMessage sendMessage = new SendMessage();
    sendMessage.setChatId(chatId);
    sendMessage.setText("Thank you for your order. See you soon!\nPress /start to order again");
    chatStates.remove(chatId);
    sendMessage.setReplyMarkup(new ReplyKeyboardRemove(true));
    sender.execute(sendMessage);
}
这会从数据库中移除用户状态。用户需重新发送/start命令才能再次交互。
8. 总结
本教程介绍了使用Spring Boot实现Telegram机器人的方法:
✅ 通过BotFather创建新机器人
✅ 配置Spring Boot项目并添加必要依赖
✅ 设计PizzaBot交互流程
✅ 使用能力(abilities)简化命令开发
✅ 根据聊天状态处理用户回复
关键点:
- 令牌安全至关重要(切勿硬编码)
- Spring Boot 3需手动注册机器人
- 状态管理通过嵌入式数据库实现
- 按钮响应需结合当前状态处理
完整实现展示了从创建机器人到处理用户交互的全流程,适合作为开发Telegram机器人的基础模板。


