1. 概述
本教程将深入探讨云原生开发的核心原则,以及使用 Spring Cloud Azure Key Vault 的优势。我们将学习如何通过 Spring Cloud 简化 Azure 服务的集成过程,并提升应用的安全性和可维护性。
2. 什么是 Spring Cloud Azure?
Spring Cloud Azure 是专为 Spring 应用与 Microsoft Azure 服务集成设计的全套库和工具集合。
虽然已经可以通过 Azure SDK 集成 Java 应用,但 Spring Cloud Azure 将这种集成提升到了全新高度。
通过利用 Spring Cloud Azure 提供的强大 API,我们可以便捷地与各种 Azure 服务交互,例如:
- Azure Storage
- Cosmos DB
- 其他多种服务
它显著简化了开发流程,同时提升了应用的整体安全性和性能。
Spring Cloud Azure 提供多个模块用于集成最常用的 Azure 服务,典型示例包括:
- 配置管理:通过
spring-cloud-azure-starter-appconfiguration集成 Azure App Configuration,实现云端配置的集中管理 - 存储服务:使用
spring-cloud-azure-starter-storage无缝对接 Azure Storage,支持各类结构化/非结构化数据存储 - 数据库集成:通过
spring-cloud-azure-starter-cosmos集成多模型数据库 Azure Cosmos DB - 消息队列:使用
spring-cloud-azure-starter-servicebus集成 Azure Service Bus,实现分布式系统解耦通信 - 身份认证:通过
spring-cloud-azure-starter-active-directory集成 Azure Active Directory,统一管理身份和访问权限
完整模块列表请参考 官方文档。
3. 项目搭建
要开始使用 Azure 云服务,首先需要注册 Azure 订阅。
获取订阅后,安装 Azure CLI。 这个命令行工具让我们能在本地直接操作 Azure 服务。
打开终端执行登录命令:
> az login
登录成功后,为订阅创建新的资源组:
>az group create --name spring_cloud_azure --location eastus
除了命令行创建,也可以通过 Azure 门户 在浏览器中管理资源组和订阅。
接下来配置 IDE(本教程使用 IntelliJ)。Azure Toolkit 是必备插件,它为 Azure 开发提供专用工具集:
- 安装插件
- 进入 Tools > Azure > Login
- 输入 Azure 凭据完成认证
4. 集成实现
已完成 Spring 应用与 Azure 服务集成的准备工作。本教程将通过两种方式集成 Azure Key Vault:
- 使用原生 Azure SDK
- 使用 Spring Cloud Azure 模块
4.1. Azure Key Vault 简介
Azure Key Vault 是云端的密钥管理服务,提供安全存储和管控敏感数据的能力,包括:
- 加密密钥
- 应用密钥
- 数字证书
它可作为应用的外部配置源,避免在配置文件中硬编码敏感信息。在运行时通过 Key Vault 安全注入密钥。
首先在之前创建的资源组中新建 Key Vault(可通过 Azure 门户 或 CLI):
> az keyvault create --name new_keyvault --resource-group spring_cloud_azure --location eastus
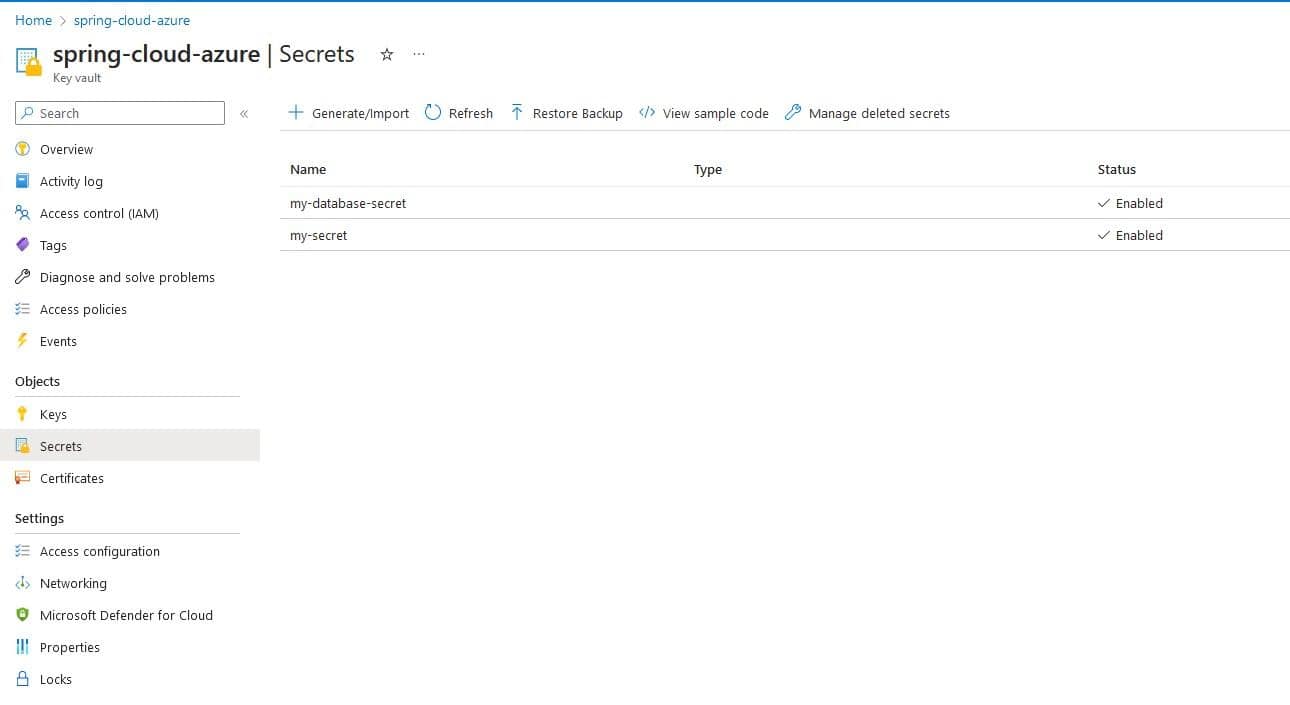
在 new_keyvault 中创建两个测试密钥:
> az keyvault secret set --name my-database-secret --value my-database-secret-value --vault-name new_keyvault
> az keyvault secret set --name my-secret --value my-secret-value --vault-name new_keyvault
创建的密钥信息:
- 第一个:键
my-database-secret,值my-database-secret-value - 第二个:键
my-secret,值my-secret-value
4.2. 密钥客户端设计
定义密钥后,在应用中实现 SecretClient 接口。该接口提供从 Key Vault 检索和管理密钥的客户端功能。
创建基础接口:
public interface KeyVaultClient {

    SecretClient getSecretClient();

    default KeyVaultSecret getSecret(String key) {
        KeyVaultSecret secret;
        try {
            secret = getSecretClient().getSecret(key);
        } catch (Exception ex) {
            throw new NoSuchElementException(String.format("无法获取密钥 %s", key), ex);
        }
        return secret;
    }
}
接口包含两个核心方法:
getSecretClient():返回SecretClient实例getSecret():默认实现,通过客户端获取KeyVaultSecret对象
接下来通过两种方式实现客户端:
- 原生 Azure SDK 方案
- Spring Cloud Azure 方案
4.3. 原生 SDK 集成方案
此方案仅使用 Microsoft Azure SDK 配置 SecretClient。
添加 azure-keyvault-extensions 依赖:
<dependency>
    <groupId>com.microsoft.azure</groupId>
    <artifactId>azure-keyvault-extensions</artifactId>
    <version>1.2.6</version>
</dependency>
在 application.yaml 中配置必要参数:
azure:
  keyvault:
    vaultUrl: {$myVaultUrl}
    tenantId: {$myTenantId}
    clientId: {$myClientId}
    clientSecret: {$myClientSecret}
⚠️ 安全提示:
✅ 推荐使用 Azure 管道注入密钥值
❌ 避免硬编码敏感信息(如 clientId/clientSecret)
参考:通过 Azure 管道注入密钥
创建配置属性类:
@ConfigurationProperties("azure.keyvault")
@ConstructorBinding
public class KeyVaultProperties {
    private String vaultUrl;
    private String tenantId;
    private String clientId;
    private String clientSecret;
    // 标准构造器、getter/setter
}
实现客户端类:
@EnableConfigurationProperties(KeyVaultProperties.class)
@Component("KeyVaultManuallyConfiguredClient")
public class KeyVaultManuallyConfiguredClient implements KeyVaultClient {

    private KeyVaultProperties keyVaultProperties;

    private SecretClient secretClient;

    @Override
    public SecretClient getSecretClient() {
        if (secretClient == null) {
            secretClient = new SecretClientBuilder()
              .vaultUrl(keyVaultProperties.getVaultUrl())
              .credential(new ClientSecretCredentialBuilder()
                .tenantId(keyVaultProperties.getTenantId())
                .clientId(keyVaultProperties.getClientId())
                .clientSecret(keyVaultProperties.getClientSecret())
                .build())
              .buildClient();
        }
        return secretClient;
    }
}
注入此实现后,getSecret() 方法将返回手动配置的 SecretClient。
4.4. Spring Cloud Azure 集成方案
此方案利用 Spring Cloud Azure Key Vault 自动配置客户端,并支持密钥注入属性文件。
添加 spring-cloud-azure-starter-keyvault-secrets 依赖:
<dependency>
   <groupId>com.azure.spring</groupId>
   <artifactId>spring-cloud-azure-starter-keyvault-secrets</artifactId>
   <version>5.12.0-beta.1</version>
</dependency>
在 application.yaml 中添加基础配置:
spring:
  cloud:
    azure:
      keyvault:
        secret:
          endpoint: {$key-vault-endpoint}
将 {$key-vault-endpoint} 替换为 Key Vault 的 URI(在 Azure 门户的 资源 > {keyvault名称} > Vault URI 中获取)。
实现自动配置客户端:
@Component("KeyVaultAutoconfiguredClient")
public class KeyVaultAutoconfiguredClient implements KeyVaultClient {
    private final SecretClient secretClient;

    public KeyVaultAutoconfiguredClient(SecretClient secretClient) {
        this.secretClient = secretClient;
    }

    @Override
    public SecretClient getSecretClient() {
        return secretClient;
    }
}
✅ 优势:
- 只需配置
endpoint - Spring Cloud 自动处理所有认证参数
密钥注入属性文件功能:
修改 application.yaml 启用属性源:
spring:
  cloud:
    azure:
      compatibility-verifier:
        enabled: false
      keyvault:
        secret:
          property-sources[0]:
            name: key-vault-property-source-1
            endpoint: https://spring-cloud-azure.vault.azure.net/
          property-source-enabled: true
在属性文件中使用动态密钥:
database:
  secret:
    value: ${my-database-secret}
应用启动时,Spring Cloud Azure 会自动将 ${my-database-secret} 替换为 Key Vault 中 my-database-secret 的实际值。
4.5. 密钥注入方案对比
两种密钥注入方案对比:
| 方案 | 优势 | 劣势 |
|---|---|---|
| Spring Cloud Azure | 简单直接,无需额外工具 | 需在配置文件中暴露 Key Vault URI |
| Azure 管道 | 无敏感信息硬编码,更安全 | 需要配置 CI/CD 管道 |
推荐实践:
✅ 使用 Spring Cloud Azure 模块获取自动配置的 SecretClient
✅ 通过 Azure 管道注入密钥到属性文件
❌ 避免在配置文件中硬编码任何敏感信息
4.6. 运行应用
创建启动类验证功能:
@SpringBootApplication
public class Application implements CommandLineRunner {

    @Value("${database.secret.value}")
    private String mySecret;

    private final KeyVaultClient keyVaultClient;

    public Application(@Qualifier(value = "KeyVaultAutoconfiguredClient") KeyVaultAutoconfiguredClient keyVaultAutoconfiguredClient) {
        this.keyVaultClient = keyVaultAutoconfiguredClient;
    }

    public static void main(String[] args) {
        SpringApplication.run(Application.class);
    }

    @Override
    public void run(String... args) throws Exception {
        KeyVaultSecret keyVaultSecret = keyVaultClient.getSecret("my-secret");
        System.out.println("通过客户端获取的密钥 ->" + keyVaultSecret.getValue());
        System.out.println("通过属性文件注入的密钥 ->" + mySecret);
    }
}
启动应用后,控制台将输出:
- 通过自动配置客户端获取的
my-secret值 - 通过属性文件注入的
my-database-secret值
5. 总结
本文深入探讨了 Spring Cloud 与 Azure 的集成方案,重点对比了两种 Key Vault 集成方式:
✅ Spring Cloud Azure 方案优势:
- 显著减少样板代码
- 自动处理认证流程
- 内置密钥注入机制
- 与 Spring 生态无缝集成
❌ 原生 SDK 方案不足:
- 需要手动配置认证参数
- 代码冗余度高
- 缺乏 Spring 特性支持
对于 Spring 应用开发者,强烈推荐使用 Spring Cloud Azure 模块,它能以更简洁的方式实现与 Azure 服务的安全集成。
完整示例代码请访问 GitHub 仓库。
