1. 概述
本教程将使用Spring Cloud Gateway和spring-addons实现OAuth2后端为前端(BFF)模式,让三个不同的单页应用(Angular、React和Vue)消费无状态REST API。
一个有趣的现象:使用OAuth2的主流网站(Google、Facebook、Github或LinkedIn)中,我们通过调试工具找不到任何Bearer令牌。这是为什么?
根据安全专家的建议,我们不应该将运行在用户设备上的应用配置为"公开"OAuth2客户端,即使使用PKCE也不行。推荐的替代方案是:通过运行在我们信任的服务器上的BFF会话来授权移动应用和Web应用。
我们将看到单页应用(SPA)如何轻松通过OAuth2 BFF消费REST API,同时了解到现有的资源服务器(使用Bearer访问令牌授权的无状态REST API)无需任何修改。
2. OAuth2后端为前端模式
在深入实现之前,我们先了解OAuth2 BFF是什么、它带来什么好处以及代价是什么。
2.1 定义
后端为前端(BFF)是前端和REST API之间的中间件,可以有多种用途。这里我们关注OAuth2 BFF,它桥接了使用会话cookie的请求授权(与前端)和使用Bearer令牌的授权(资源服务器期望的方式)。其职责包括:
- 使用"机密"OAuth2客户端驱动授权码和刷新令牌流程
- 维护会话并在会话中存储令牌
- 在将前端请求转发到资源服务器之前,将会话cookie替换为会话中的访问令牌
2.2 相比公开OAuth2客户端的优势
主要优势在于安全性:
- BFF运行在我们信任的服务器上,授权服务器的令牌接口可以通过密钥和防火墙规则保护,只允许来自我们后端的请求。这大大降低了令牌被恶意客户端获取的风险。
- 令牌保存在服务器(会话中),防止它们在用户设备上被恶意程序窃取。使用会话cookie需要防范CSRF,但cookie可以标记为
HttpOnly、Secure和SameSite,此时设备上的cookie保护由浏览器强制执行。相比之下,配置为公开客户端的SPA需要访问令牌,我们必须非常小心这些令牌的存储方式:如果恶意程序读取了访问令牌,对用户可能是灾难性的。刷新令牌的情况更糟,因为身份盗用可能持续很长时间。
另一个优势是对用户会话的完全控制能力,以及即时撤销访问的能力。提醒一下,JSON Web令牌(JWT)无法被撤销,而且当我们在服务器上终止会话时,很难删除存储在用户设备上的令牌。如果我们通过网络发送JWT访问令牌,我们只能等待它过期,因为在此之前对资源服务器的访问将继续被授权。但是,如果令牌从未离开后端,我们可以在BFF上随用户会话一起删除它们,立即撤销对资源的访问。
2.3 代价
BFF是系统中的一个额外层,且处于关键路径上。在生产环境中,这意味着需要更多资源和更多延迟。它还需要一些监控。
此外,BFF后面的资源服务器可以(也应该)是无状态的,但OAuth2 BFF本身需要会话,这需要特定的操作来使其可扩展和容错。
我们可以轻松地将Spring Cloud Gateway打包成原生镜像。这使其非常轻量,启动时间不到一秒,但单个实例能处理的流量总是有限的。当流量增加时,我们必须在BFF实例之间共享会话。Spring Session项目对此非常有帮助。另一个选择是使用智能代理,将来自特定设备的所有请求路由到同一个BFF实例。
2.4 实现选择
一些框架实现了OAuth2 BFF模式,但没有明确说明或这样称呼它。例如NextAuth库就是这种情况,它使用服务器组件实现OAuth2(服务器上Node实例中的机密客户端)。这足以享受OAuth2 BFF模式的安全性。
但由于Spring生态系统,当监控、可扩展性和容错性重要时,很少有解决方案像Spring Cloud Gateway那样方便:
-
spring-boot-starter-actuator依赖提供强大的审计功能。 - Spring Session是分布式会话的相当简单的解决方案。
-
spring-boot-starter-oauth2-client和oauth2Login()处理授权码和刷新令牌流程。它还将令牌存储在会话中。 -
TokenRelay=过滤器在将前端请求转发到资源服务器时,将会话cookie替换为会话中的访问令牌。
3. 架构
到目前为止,我们列出了相当多的服务:前端(SPA)、REST API、BFF和授权服务器。让我们看看这些如何构成一个连贯的系统。
3.1 系统概览
以下是使用主要配置时服务、端口和路径前缀的表示:
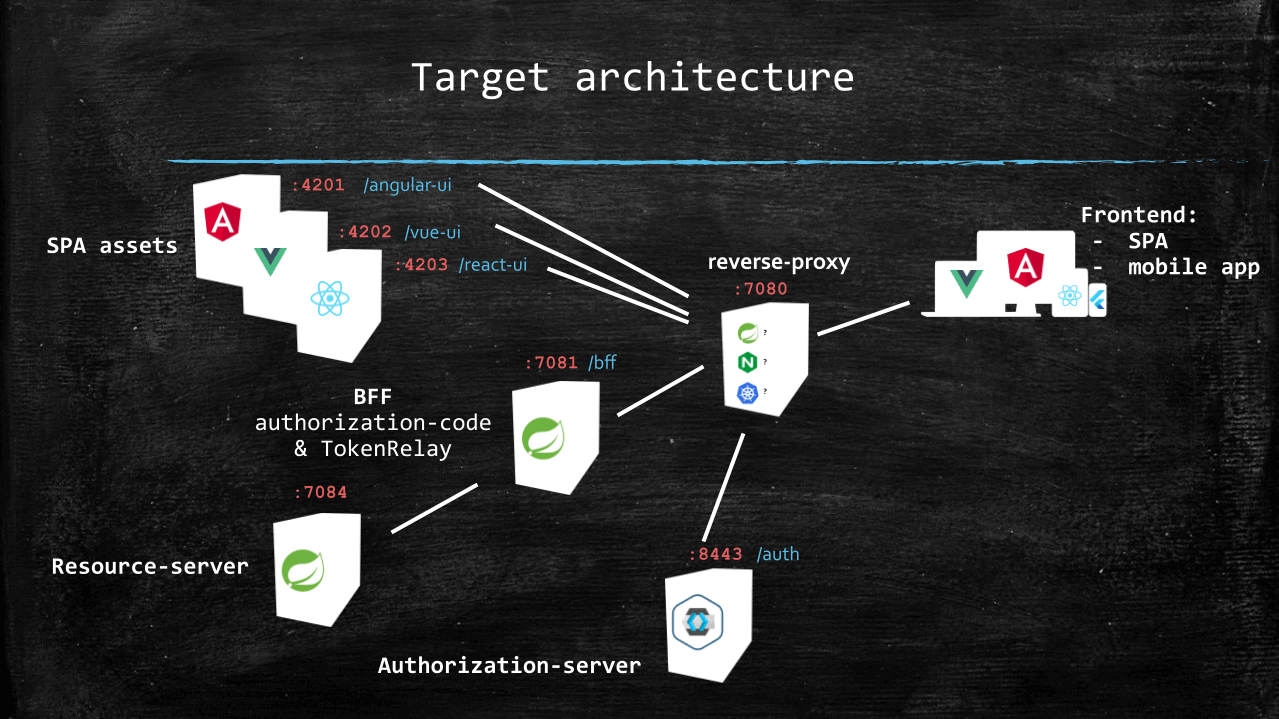
从这个模式中需要注意两点:
- 从最终用户设备的角度看,至少BFF和SPA资产有一个单一联系点:反向代理。
- 资源服务器通过BFF访问。
正如我们稍后将看到的,通过反向代理提供授权服务器是可选的。
当进入类生产环境时,我们可以使用(子)域而不是路径前缀来区分SPA。
3.2 快速开始
配套仓库包含一个构建脚本,用于为上述每个服务构建和启动docker镜像。
要启动所有服务,我们应该确保:
- 路径上有JDK 17到21之间的版本。我们可以运行
java –version来检查。 - Docker Desktop已安装并运行。
- 路径上有最新的node LTS(
nvm或nvm-windows对此很有帮助)。
然后我们可以运行以下shell脚本(在Windows上,我们可以使用Git bash):
git clone https://github.com/eugenp/tutorials.git
cd tutorials/spring-security-modules/spring-security-oauth2-bff/
sh ./build.sh
在接下来的部分中,我们将看到如何用现成的东西替换每个容器。
4. 使用Spring Cloud Gateway和spring-addons-starter-oidc实现BFF
首先,使用我们的IDE或https://start.spring.io/*,创建一个名为*bff的新Spring Boot项目,依赖项选择Reactive Gateway和OAuth2 client。
然后,将src/main/resources/application.properties重命名为src/main/resources/application.yml。
最后,我们将*spring-addons-starter-oidc*添加到依赖项中:
<dependency>
    <groupId>com.c4-soft.springaddons</groupId>
    <artifactId>spring-addons-starter-oidc</artifactId>
    <version>7.7.0</version>
</dependency>
4.1 可重用属性
让我们从application.yml中的一些常量开始,这些常量将在其他部分以及需要在命令行或IDE启动配置中覆盖某些值时提供帮助:
scheme: http
hostname: localhost
reverse-proxy-port: 7080
reverse-proxy-uri: ${scheme}://${hostname}:${reverse-proxy-port}
authorization-server-prefix: /auth
issuer: ${reverse-proxy-uri}${authorization-server-prefix}/realms/baeldung
client-id: baeldung-confidential
client-secret: secret
username-claim-json-path: $.preferred_username
authorities-json-path: $.realm_access.roles
bff-port: 7081
bff-prefix: /bff
resource-server-port: 7084
audience:
当然,我们必须覆盖client-secret的值,例如使用环境变量、命令行参数或IDE启动配置。
4.2 服务器属性
现在是常规的服务器属性:
server:
  port: ${bff-port}
4.3 Spring Cloud Gateway路由
由于网关后面只有一个资源服务器,我们只需要一个路由定义:
spring:
  cloud:
    gateway:
      routes:
      - id: bff
        uri: ${scheme}://${hostname}:${resource-server-port}
        predicates:
        - Path=/api/**
        filters:
        - DedupeResponseHeader=Access-Control-Allow-Credentials Access-Control-Allow-Origin
        - TokenRelay=
        - SaveSession
        - StripPrefix=1
最重要的部分是SaveSession和TokenRelay=,它们构成了OAuth2 BFF模式实现的基石。第一个确保会话被持久化,包含由oauth2Login()获取的令牌;第二个在路由请求时将会话cookie替换为会话中的访问令牌。
StripPrefix=1过滤器在路由请求时从路径中移除/api前缀。值得注意的是,/bff前缀已经在反向代理路由时被剥离。因此,从前端发送到/bff/api/me的请求在资源服务器上会作为/me到达。
4.4 Spring Security
我们现在可以使用标准的Boot属性配置OAuth2客户端安全:
spring:
  security:
    oauth2:
      client:
        provider:
          baeldung:
            issuer-uri: ${issuer}
        registration:
          baeldung:
            provider: baeldung
            authorization-grant-type: authorization_code
            client-id: ${client-id}
            client-secret: ${client-secret}
            scope: openid,profile,email,offline_access
这里真的没什么特别的,只是一个标准的OpenID Provider声明,使用授权码和刷新令牌的单个注册。
4.5 spring-addons-starter-oidc
要完成配置,让我们使用spring-addons-starter-oidc调整Spring Security:
com:
  c4-soft:
    springaddons:
      oidc:
        # 受信任的OpenID Provider配置(包含权限映射)
        ops:
        - iss: ${issuer}
          authorities:
          - path: ${authorities-json-path}
          aud: ${audience}
        # 使用oauth2Login()的SecurityFilterChain(启用会话和CSRF保护)
        client:
          client-uri: ${reverse-proxy-uri}${bff-prefix}
          security-matchers:
          - /api/**
          - /login/**
          - /oauth2/**
          - /logout
          permit-all:
          - /api/**
          - /login/**
          - /oauth2/**
          csrf: cookie-accessible-from-js
          oauth2-redirections:
            rp-initiated-logout: ACCEPTED
        # 使用oauth2ResourceServer()的SecurityFilterChain(禁用会话和CSRF保护)
        resourceserver:
          permit-all:
          - /login-options
          - /error
          - /actuator/health/readiness
          - /actuator/health/liveness
让我们理解三个主要部分:
-
ops:包含OpenID Provider特定值。这使我们能够指定要转换为Spring权限的声明的JSON路径(每个路径可选前缀和大小写转换)。如果aud属性不为空,spring-addons会向JWT解码器添加一个受众验证器。 -
client:当security-matchers不为空时,此部分触发创建带有oauth2Login()的SecurityFilterChainbean。这里,通过client-uri属性,我们强制使用反向代理URI作为所有重定向的基础(而不是BFF内部URI)。此外,由于我们使用SPA,我们要求BFF暴露一个可被JavaScript访问的cookie中的CSRF令牌。最后,为防止CORS错误,我们要求BFF对RP-Initiated Logout响应201状态(而不是3xx),这使SPA能够拦截此响应并要求浏览器在新来源的请求中处理它。 -
resourceserver:请求第二个带有oauth2ResourceServer()的SecurityFilterChainbean。这个过滤器链具有最低优先级的@Order,将处理所有未被客户端SecurityFilterChain的security matchers匹配的请求。我们将其用于所有不需要会话的资源:不涉及登录或使用TokenRelay路由的接口。
4.6 /login-options 接口
BFF是我们定义登录配置的地方:使用授权码的Spring OAuth2客户端注册。为避免在每个SPA中重复配置(以及可能的不一致),我们将在BFF上托管一个REST接口,暴露它支持的用户登录选项。
为此,我们只需要暴露一个带有单个接口的@RestController,返回从配置属性构建的负载:
@RestController
public class LoginOptionsController {
    private final List<LoginOptionDto> loginOptions;

    public LoginOptionsController(OAuth2ClientProperties clientProps, SpringAddonsOidcProperties addonsProperties) {
        final var clientAuthority = addonsProperties.getClient()
          .getClientUri()
          .getAuthority();
        this.loginOptions = clientProps.getRegistration()
          .entrySet()
          .stream()
          .filter(e -> "authorization_code".equals(e.getValue().getAuthorizationGrantType()))
          .map(e -> {
              final var label = e.getValue().getProvider();
              final var loginUri = "%s/oauth2/authorization/%s".formatted(addonsProperties.getClient().getClientUri(), e.getKey());
              final var providerId = clientProps.getRegistration()
                .get(e.getKey())
                .getProvider();
              final var providerIssuerAuthority = URI.create(clientProps.getProvider()
                .get(providerId)
                .getIssuerUri())
                .getAuthority();
              return new LoginOptionDto(label, loginUri, Objects.equals(clientAuthority, providerIssuerAuthority));
          })
          .toList();
    }

    @GetMapping(path = "/login-options", produces = MediaType.APPLICATION_JSON_VALUE)
    public Mono<List<LoginOptionDto>> getLoginOptions() throws URISyntaxException {
        return Mono.just(this.loginOptions);
    }

    public static record LoginOptionDto(@NotEmpty String label, @NotEmpty String loginUri, boolean isSameAuthority) {
    }
}
我们现在可以停止baeldung-bff.bff docker容器并运行BFF应用程序,在命令行或运行配置中仔细提供:
-
hostname:hostname命令或HOSTNAME环境变量的值,转换为小写 -
client-secret:授权服务器中声明的baeldung-confidential客户端的密钥值(除非明确更改,否则为"secret")
4.7 非标准RP-Initiated Logout
RP-Initiated Logout是OpenID标准的一部分,但一些提供程序没有严格执行它。例如Auth0和Amazon Cognito就是这种情况,它们不在OpenID配置中提供end_session端点,并使用自己的查询参数进行注销。
spring-addons-starter-oidc支持这种"几乎"符合标准的注销端点。配套项目中的BFF配置包含所需配置的配置文件:
---
spring:
  config:
    activate:
      on-profile: cognito
issuer: https://cognito-idp.us-west-2.amazonaws.com/us-west-2_RzhmgLwjl
client-id: 12olioff63qklfe9nio746es9f
client-secret: change-me
username-claim-json-path: username
authorities-json-path: $.cognito:groups
com:
  c4-soft:
    springaddons:
      oidc:
        client:
          oauth2-logout:
            baeldung:
              uri: https://spring-addons.auth.us-west-2.amazoncognito.com/logout
              client-id-request-param: client_id
              post-logout-uri-request-param: logout_uri

---
spring:
  config:
    activate:
      on-profile: auth0
issuer: https://dev-ch4mpy.eu.auth0.com/
client-id: yWgZDRJLAksXta8BoudYfkF5kus2zv2Q
client-secret: change-me
username-claim-json-path: $['https://c4-soft.com/user']['name']
authorities-json-path: $['https://c4-soft.com/user']['roles']
audience: bff.baeldung.com
com:
  c4-soft:
    springaddons:
      oidc:
        client:
          authorization-params:
            baeldung:
              audience: ${audience}
          oauth2-logout:
            baeldung:
              uri: ${issuer}v2/logout
              client-id-request-param: client_id
              post-logout-uri-request-param: returnTo
在上面的代码片段中,baeldung是对Spring Boot属性中客户端注册的引用。如果我们在spring.security.oauth2.client.registration中使用了不同的键,我们也必须在这里使用它。
除了必需的属性覆盖外,我们可以在第二个配置文件中注意到向Auth0发送授权请求时指定了额外的请求参数:audience。
5. 使用spring-addons-starter-oidc的资源服务器
我们对此系统的需求很简单:一个使用JWT访问令牌授权的无状态REST API,暴露一个接口来反映令牌中包含的一些用户信息(如果请求未授权,则返回空值的负载)。
为此,我们将创建一个名为resource-server的新Spring Boot项目,依赖项选择Spring Web和OAuth2 Resource Server。
然后,将src/main/resources/application.properties重命名为src/main/resources/application.yml。
最后,我们将*spring-addons-starter-oidc*添加到依赖项中:
<dependency>
    <groupId>com.c4-soft.springaddons</groupId>
    <artifactId>spring-addons-starter-oidc</artifactId>
    <version>7.7.0</version>
</dependency>
5.1 配置
让我们看看资源服务器需要的属性:
scheme: http
hostname: localhost
reverse-proxy-port: 7080
reverse-proxy-uri: ${scheme}://${hostname}:${reverse-proxy-port}
authorization-server-prefix: /auth
issuer: ${reverse-proxy-uri}${authorization-server-prefix}/realms/baeldung
username-claim-json-path: $.preferred_username
authorities-json-path: $.realm_access.roles
resource-server-port: 7084
audience:

server:
  port: ${resource-server-port}

com:
  c4-soft:
    springaddons:
      oidc:
        ops:
        - iss: ${issuer}
          username-claim: ${username-claim-json-path}
          authorities:
          - path: ${authorities-json-path}
          aud: ${audience}
        resourceserver:
          permit-all:
          - /me
感谢spring-addons-starter-oidc,这足以声明一个无状态资源服务器,具有:
- 从我们选择的声明中映射权限(在Keycloak使用领域角色的情况下是realm_access.roles)
- 使*/me*可被匿名请求访问
配套仓库中的application.yaml包含其他使用不同私有声明角色的OpenID Provider的配置文件。
5.2 @RestController
让我们实现一个REST接口,返回安全上下文中Authentication的一些数据(如果有):
@RestController
public class MeController {

    @GetMapping("/me")
    public UserInfoDto getMe(Authentication auth) {
        if (auth instanceof JwtAuthenticationToken jwtAuth) {
            final var email = (String) jwtAuth.getTokenAttributes()
                .getOrDefault(StandardClaimNames.EMAIL, "");
            final var roles = auth.getAuthorities()
                .stream()
                .map(GrantedAuthority::getAuthority)
                .toList();
            final var exp = Optional.ofNullable(jwtAuth.getTokenAttributes()
                .get(JwtClaimNames.EXP)).map(expClaim -> {
                    if(expClaim instanceof Long lexp) {
                        return lexp;
                    }
                    if(expClaim instanceof Instant iexp) {
                        return iexp.getEpochSecond();
                    }
                    if(expClaim instanceof Date dexp) {
                        return dexp.toInstant().getEpochSecond();
                    }
                    return Long.MAX_VALUE;
                }).orElse(Long.MAX_VALUE);
            return new UserInfoDto(auth.getName(), email, roles, exp);
        }
        return UserInfoDto.ANONYMOUS;
    }

    /**
     * @param username 令牌中资源所有者的唯一标识符(默认为sub声明)
     * @param email OpenID email声明
     * @param roles 为安全上下文中的身份验证解析的Spring权限
     * @param exp 从1970-01-01T00:00:00Z UTC到访问令牌过期的指定UTC日期/时间的秒数
     */
    public static record UserInfoDto(String username, String email, List<String> roles, Long exp) {
        public static final UserInfoDto ANONYMOUS = new UserInfoDto("", "", List.of(), Long.MAX_VALUE);
    }
}
就像我们对BFF所做的那样,我们现在可以停止baeldung-bff.resource-server docker容器,在命令行或运行配置中提供hostname。
5.3 资源服务器多租户
如果消费我们REST API的前端不都在同一个授权服务器或领域上授权用户(或者如果它们提供授权服务器的选择)怎么办?
使用spring-security-starter-oidc,这非常简单:com.c4-soft.springaddons.oidc.ops配置属性是一个数组,我们可以添加尽可能多的我们信任的发行者,每个发行者都有自己的用户名和权限映射。由这些发行者中的任何一个发行的有效令牌都将被我们的资源服务器接受,并且角色将正确映射到Spring权限。
6. SPA
由于将SPA连接到OAuth2 BFF的框架存在一些差异,我们将涵盖三个主要框架:Angular、React和Vue。
但是,创建SPA超出了本文的范围。下面,我们只关注Web应用程序在OAuth2 BFF上登录和注销用户以及查询其后面的REST API所需的内容。请参考配套仓库获取完整实现。
应用程序被设计为具有相同的结构:
- 两个路由来演示如何在身份验证后恢复当前路由。
- 一个Login组件提供登录体验选择(如果iframe和default都可用)。它还处理iframe显示状态或重定向到授权服务器。
- 一个Logout组件向BFF /logout接口发送POST请求,然后重定向到授权服务器进行RP-Initiated Logout。
- 一个UserService通过BFF从资源服务器获取当前用户数据。它还包含一些逻辑,用于在BFF上的访问令牌即将过期时安排刷新此数据。
然而,当前用户数据的管理方式存在差异,因为框架处理状态的方式非常不同:
- 在Angular应用中,UserService是一个使用BehaviorSubject管理当前用户的单例。
- 在React应用中,我们在app/layout.tsx中使用createContext向所有组件公开当前用户,并在需要访问它的任何地方使用useContext。
- 在Vue应用中,UserService是一个单例(在main.ts中实例化),使用ref管理当前用户。
6.1 在配套仓库中运行SPA
首先要做的是cd进入我们要运行的项目文件夹。
然后,我们应该运行*"npm install"*来拉取所有必需的npm包。
最后,在停止相应的docker容器后,根据框架:
- Angular:运行*"npm run start"并打开http://{hostname}:7080/angular-ui/*
- Vue:运行*"npm run dev"并打开http://{hostname}:7080/vue-ui/*
- React (Next.js):运行*"npm run dev"并打开http://{hostname}:7080/react-ui/*
我们应该小心只使用指向反向代理的URL,而不是指向SPA开发服务器的URL(http://{hostname}:7080,而不是http://{hostname}:4201、http://{hostname}:4202或http://{hostname}:4203)。
6.2 用户服务
UserService的职责是:
- 定义用户表示(内部和DTO)。
- 暴露一个函数,通过BFF从资源服务器获取用户数据。
- 安排*refresh()*调用在访问令牌过期之前(保持会话活动)。
6.3 登录
正如我们已经看到的,在可能的情况下,我们提供两种不同的登录体验:
- 用户使用当前浏览器选项卡重定向到授权服务器(SPA暂时"退出")。这是默认行为,始终可用。
- 授权服务器表单显示在SPA内的iframe中,这要求SPA和授权服务器具有SameOrigin,因此仅当BFF和资源服务器使用默认配置文件(使用Keycloak)运行时才有效。
逻辑由一个Login组件实现,该组件显示一个下拉菜单来选择登录体验(iframe或default)和一个按钮。
登录选项在组件初始化时从BFF获取。在本教程中,我们期望只有一个选项,因此我们只选择响应负载中的第一个条目。
当用户单击Login按钮时,发生的情况取决于选择的登录体验:
- 如果选择iframe,则iframe源设置为登录URI,并显示包含iframe的模式div。
- 否则,window.location.href设置为登录URI,这会"退出"SPA并使用全新的来源设置当前选项卡。
当用户选择iframe登录体验时,我们为iframeload事件注册一个事件监听器,以检查用户身份验证是否成功并隐藏模式。每次iframe中发生重定向时,此回调都会运行。
最后,我们可以注意到SPA如何将post_login_success_uri请求参数添加到授权码流启动请求中。*spring-addons-starter-oidc*将此参数的值保存在会话中,并在授权码交换为令牌后,使用它构建返回给前端的重定向URI。
6.4 注销
注销按钮和相关逻辑由Logout组件处理。
默认情况下,Spring /logout接口期望POST请求,并且作为任何修改服务器状态的请求,它应包含CSRF令牌。Angular和React透明地处理标记为http-only=false的CSRF cookie和请求头。但是我们必须在Vue中手动读取XSRF-TOKEN cookie并为每个POST、PUT、PATCH和DELETE请求设置X-XSRF-TOKEN头。我们还应该始终参考我们选择的前端框架的文档,因为可能存在一些微妙的障碍。例如,Angular只会为我们设置X-XSRF-TOKEN头,但仅适用于没有权限的URL(我们应该查询*/bff/api/me而不是http://localhost:7080/bff/api/me*,即使窗口位置是*http://localhost:7080/angular-ui/*)。
当涉及Spring OAuth2客户端时,RP-Initiated Logout发生在两个请求中:
- 首先,向Spring OAuth2客户端发送POST请求,关闭其自己的会话。
- 第一个请求的响应具有一个Location头,其中包含授权服务器上的URI,用于关闭用户在那里的另一个会话。
Spring的默认行为是对第一个请求使用302状态,这会使浏览器自动跟随到授权服务器,保持相同的来源。为避免CORS错误,我们将BFF配置为使用2xx范围内的状态。这要求SPA手动跟随重定向,但给它机会使用window.location.href(使用新来源)来执行此操作。
最后,我们可以注意到SPA如何使用X-POST-LOGOUT-SUCCESS-URI头与注销请求一起提供注销后URI。spring-addons-starter-oidc使用此头的值在授权服务器的注销请求URI中插入请求参数。
6.5 客户端多租户
在配套项目中,只有一个使用授权码的OAuth2客户端注册。但是如果我们有更多呢?例如,如果我们在多个前端之间共享一个BFF,其中一些具有不同的发行者或范围,就可能发生这种情况。
应该只提示用户选择他可以认证的OpenID Provider,在许多情况下,我们可以过滤登录选项。
以下是一些我们可以大幅减少可能选择数量的情况示例,理想情况下减少到一个,这样用户就不会被提示选择:
- SPA配置了要使用的特定选项。
- 有多个反向代理,每个都可以设置类似头的东西来指定要使用的选项。
- 一些技术信息,如前端设备的IP,可以告诉我们用户应该在这里或那里被授权。
在这种情况下,我们有两个选择:
- 将过滤条件与请求一起发送到*/login-options*,并在BFF控制器中进行过滤。
- 在前端内部过滤*/login-options*响应。
7. 后端通道注销
如果在SSO配置中,在我们BFF上打开会话的用户使用另一个OAuth2客户端注销怎么办?
在OIDC中,后端通道注销规范就是为这种情况设计的:在授权服务器上声明客户端时,我们可以注册一个URL,在用户注销时调用。
由于BFF运行在服务器上,它可以暴露一个接口来接收此类注销事件的通知。自版本6.2起,Spring Security支持后端通道注销,而spring-addons-starter-oidc暴露了一个标志来启用它。
一旦会话通过后端通道注销在BFF上结束,从前端到资源服务器的请求将不再被授权(即使在令牌过期之前)。因此,为了完美的用户体验,在BFF上激活后端通道注销时,我们可能还应该添加类似WebSockets的机制来通知前端用户状态变化。
8. 反向代理
我们需要SPA和其BFF具有相同的来源,因为:
- 请求使用前端和BFF之间的会话cookie进行授权。
- Spring会话cookie标记为SameSite=Lax。
为此,我们将使用反向代理作为浏览器的单一联系点。但是实现这种反向代理有许多不同的解决方案,我们的选择将取决于上下文:
- 在Docker中,我们使用Nginx容器。
- 在K8s上,我们可能会配置Ingress。
- 从IDE工作时,我们可能更喜欢Spring Cloud Gateway实例。如果运行服务的数量很重要,我们甚至可以在用作BFF的Gateway实例上使用一些额外的路由,而不是像本文那样使用专用的反向代理。
8.1 是否将授权服务器隐藏在反向代理后面
出于安全原因,授权服务器应始终设置X-Frame-Options头。由于Keycloak允许将其设置为SAMEORIGIN,如果授权服务器和SPA共享相同的来源,那么可以在嵌入此SPA的iframe中显示Keycloak登录和注册表单。
从最终用户的角度来看,在同一个Web应用中保持,授权表单显示在模式中,而不是在SPA和授权服务器之间来回重定向,可能是更好的体验。
另一方面,单点登录(SSO)依赖于标记为SameOrigin的cookie。因此,两个SPA要享受单点登录,它们不仅应该在同一个授权服务器上认证用户,而且应该对它使用相同的权限(https://appa.net和https://appy.net都在https://sso.net上认证用户)。
匹配这两个条件的一个解决方案是所有SPA和授权服务器使用相同的来源,URI如下:
这是我们在使用Keycloak时将使用的选项,但是在SPA和授权服务器之间共享相同的来源并不是BFF模式工作的要求,只有在SPA和BFF之间共享相同的来源才是必需的。
配套仓库中的项目预配置为使用Amazon Cognito和Auth0及其来源(没有智能代理动态重写重定向URL)。因此,仅在使用默认配置文件(使用Keycloak)时,才可使用iframe登录。
8.2 使用Spring Cloud Gateway实现
首先,使用我们的IDE或https://start.spring.io/,创建一个名为reverse-proxy的新Spring Boot项目,依赖项选择Reactive Gateway。
然后将src/main/resources/application.properties重命名为src/main/resources/application.yml。
然后我们应该为Spring Cloud Gateway定义路由属性:
# 自定义属性以简化配置覆盖
# 在命令行或IDE启动配置中
scheme: http
hostname: localhost
reverse-proxy-port: 7080
angular-port: 4201
angular-prefix: /angular-ui
angular-uri: http://${hostname}:${angular-port}${angular-prefix}
vue-port: 4202
vue-prefix: /vue-ui
vue-uri: http://${hostname}:${vue-port}${vue-prefix}
react-port: 4203
react-prefix: /react-ui
react-uri: http://${hostname}:${react-port}${react-prefix}
authorization-server-port: 8080
authorization-server-prefix: /auth
authorization-server-uri: ${scheme}://${hostname}:${authorization-server-port}${authorization-server-prefix}
bff-port: 7081
bff-prefix: /bff
bff-uri: ${scheme}://${hostname}:${bff-port}

server:
  port: ${reverse-proxy-port}

spring:
  cloud:
    gateway:
      default-filters:
      - DedupeResponseHeader=Access-Control-Allow-Credentials Access-Control-Allow-Origin
      routes:
      # SPA资产
      - id: angular-ui
        uri: ${angular-uri}
        predicates:
        - Path=${angular-prefix}/**
      - id: vue-ui
        uri: ${vue-uri}
        predicates:
        - Path=${vue-prefix}/**
      - id: react-ui
        uri: ${react-uri}
        predicates:
        - Path=${react-prefix}/**

      # 授权服务器
      - id: authorization-server
        uri: ${authorization-server-uri}
        predicates:
        - Path=${authorization-server-prefix}/**

      # BFF
      - id: bff
        uri: ${bff-uri}
        predicates:
        - Path=${bff-prefix}/**
        filters:
        - StripPrefix=1
我们现在可以启动反向代理(在停止docker容器并在命令行参数或运行配置中提供hostname之后)。
9. 授权服务器
GitHub上的配套项目默认配置文件是为Keycloak设计的,但感谢spring-addons-starter-oidc,切换到任何其他OpenID Provider只需编辑application.yml。配套项目中提供的文件包含配置文件,帮助我们轻松开始使用Auth0和Amazon Cognito。
无论我们选择哪个OpenID Provider,我们都应该:
- 声明一个机密客户端
- 找出要用作用户角色来源的私有声明
- 更新BFF和资源服务器属性
10. 为什么使用spring-addons-starter-oidc?
在整个文章中,我们修改了spring-boot-starter-oauth2-client和spring-boot-starter-oauth2-resource-server的许多默认行为:
- 将OAuth2重定向URI更改为指向反向代理而不是内部OAuth2客户端。
- 让SPA控制用户在登录/注销后重定向到何处。
- 在可被浏览器中运行的JavaScript代码访问的cookie中暴露CSRF令牌。
- 适应不完全标准的RP-Initiated Logout(例如Auth0和Amazon Cognito)。
- 向授权请求添加可选参数(例如Auth0的audience)。
- 更改OAuth2重定向的HTTP状态,以便SPA可以选择如何跟随Location头。
- 注册两个不同的SecurityFilterChain bean,分别带有*oauth2Login()(基于会话的安全性和CSRF保护)和oauth2ResourceServer()*(无状态,基于令牌的安全性),以保护不同的资源组。
- 定义哪些接口可被匿名访问。
- 在资源服务器上,接受由多个OpenID Provider发行的令牌。
- 向JWT解码器添加受众验证器。
- 从任何声明映射权限(并添加前缀或强制大写/小写)。
这通常需要相当多的Java代码和对Spring Security的深入了解。但在这里,我们仅使用应用程序属性就完成了,并且可以使用IDE自动完成的指导!
我们应该参考GitHub上的starter README获取完整的功能列表、自动配置调整和默认覆盖。
11. 结论
在本教程中,我们看到了如何使用Spring Cloud Gateway和spring-addons实现OAuth2后端为前端模式。
我们还看到了:
- 为什么我们应该优先选择此解决方案,而不是将SPA配置为"公开"OAuth2客户端。
- 引入BFF对SPA本身影响很小。
- 此模式对资源服务器没有任何改变。
- 因为我们使用服务器端OAuth2客户端,我们可以完全控制用户会话,即使在SSO配置中,这要归功于后端通道注销。
最后,我们开始探索spring-addons-starter-oidc的便利性,仅使用属性配置通常需要相当多Java配置的内容。
像往常一样,所有代码实现都可以在GitHub上找到。