1. Introduction
GraphQL is a relatively new concept from Facebook. GraphQL is a query language to retrieve data from a server, as an alternative to REST, SOAP, or gRPC.
In this tutorial, we’ll learn how to set up a GraphQL server using Spring Boot so that we can add it to existing applications or use it in new ones.
2. What Is GraphQL?
Traditional REST APIs are built around managing server-managed resources, manipulated through standard HTTP verbs. While effective within this framework, they struggle when deviating from it or when clients require data from multiple resources simultaneously, often resulting in larger response sizes due to unnecessary data
GraphQL addresses these challenges by empowering clients to request precisely the data they need in a single query, facilitating navigation of child resources and enabling multiple queries at once. This approach, resembling RPC (Remote Procedure Call), emphasizes named queries and mutations, allowing both API developers and consumers to control functionality and desired outcomes effectively.
For example, a blog might allow the following query:
query {
recentPosts(count: 10, offset: 0) {
id
title
category
author {
id
name
thumbnail
}
}
}
This query will:
- request the ten most recent posts
- for each post, request the ID, title, and category
- for each post, request the author, returning the ID, name, and thumbnail
In a traditional REST API, this either needs 11 requests, one for the posts and 10 for the authors or needs to include the author details in the post details.
2.1. GraphQL Schemas
The GraphQL server exposes a schema describing the API. This schema consists of type definitions. Each type has one or more fields, each taking zero or more arguments and returning a specific type.
The graph is derived from the way these fields are nested with each other. Note that the graph doesn’t need to be acyclic, cycles are perfectly acceptable, but it is directed. The client can get from one field to its children, but it can’t automatically get back to the parent unless the schema defines this explicitly.
An example GraphQL Schema for a blog may contain the following definitions describing a Post, the Author of the post, and a root query to get the most recent posts on the blog:
type Post {
id: ID!
title: String!
text: String!
category: String
author: Author!
}
type Author {
id: ID!
name: String!
thumbnail: String
posts: [Post]!
}
# The Root Query for the application
type Query {
recentPosts(count: Int, offset: Int): [Post]!
}
# The Root Mutation for the application
type Mutation {
createPost(title: String!, text: String!, category: String, authorId: String!) : Post!
}
The “!” at the end of some names indicates that it’s a non-nullable type. Any type that doesn’t have this can be null in the response from the server. The GraphQL service handles these correctly, allowing us to safely request child fields of nullable types.
The GraphQL Service also exposes the schema using a standard set of fields, allowing any client to query for the schema definition ahead of time.
This allows the client to automatically detect when the schema changes and allows clients to adapt dynamically to how the schema works. One incredibly useful example is the GraphiQL tool, which allows us to interact with any GraphQL API.
3. Introducing GraphQL Spring Boot Starter
The Spring Boot GraphQL Starter offers a fantastic way to get a GraphQL server running in a very short time. Using autoconfiguration and an annotation-based programming approach, we need only write the code necessary for our service.
3.1. Setting up the Service
All we need for this to work is the correct dependencies:
<dependency>
<groupId>org.springframework.boot</groupId>
<artifactId>spring-boot-starter-graphql</artifactId>
</dependency>
<dependency>
<groupId>org.springframework.boot</groupId>
<artifactId>spring-boot-starter-web</artifactId>
</dependency>
Because GraphQL is transport-agnostic, we’ve included the web starter in our config. This exposes the GraphQL API over HTTP using Spring MVC on the default /graphql endpoint. Other starters can be used for other underlying implementations, such as Spring Webflux.
We can also customize this endpoint in our application.properties file if necessary.
4. Writing the Schema
The GraphQL Boot starter works by processing GraphQL Schema files to build the correct structure and then wires special beans to this structure. The Spring Boot GraphQL starter automatically finds these schema files.
We need to save these “*.graphqls” or “.gqls*” schema files under src/main/resources/graphql/** location, and Spring Boot will pick them up automatically. As usual, we can customize the locations with spring.graphql.schema.locations and the file extensions with spring.graphql.schema.file-extensions config properties.
The one requirement is that there must be exactly one root query and up to one root mutation. Unlike the rest of the schema, we can’t split this across files. This is a limitation of the GraphQL Schema definition, not the Java implementation.
5. Implementing Our Schema
Once we’ve written our schema, we need to be able to implement it in code. This consists of three different types of code that we can implement:
- Root Query Resolver – These are used to resolve values of top-level queries from our schema.
- Field Resolver – These are used to resolve values nested within our response.
- Mutations – These are used to implement mutations from our schema.
All of these are implemented by writing beans within our application and annotating them as appropriate.
5.1. Root Query Resolver
The root query needs to have specially annotated methods to handle the various fields in this root query. Unlike the schema definition, there’s no restriction that there only be a single Spring bean for the root query fields.
We need to annotate the handler methods with @QueryMapping annotation and place these inside standard @Controller components in our application. This registers the annotated classes as data-fetching components in our GraphQL application:
@Controller
public class PostController {
private PostDao postDao;
@QueryMapping
public List<Post> recentPosts(@Argument int count, @Argument int offset) {
return postDao.getRecentPosts(count, offset);
}
}
The above defines the method recentPosts, which we’ll use to handle any GraphQL queries for the recentPosts field in the schema defined earlier. Additionally, the method must have parameters annotated with @Argument that correspond to the corresponding parameters in the schema.
It can also optionally take other GraphQL-related parameters, such as GraphQLContext, DataFetchingEnvironment, etc., for access to the underlying context and environment.
The method must also return the correct return type for the type in the GraphQL scheme, as we’re about to see. We can use any simple types, String, Int, List, etc., with the equivalent Java types, and the system just maps them automatically.
5.2. Using Beans to Represent Types
Every complex type in the GraphQL server is represented by a Java bean, whether loaded from the root query or from anywhere else in the structure. The same Java class must always represent the same GraphQL type, but the name of the class isn’t necessary.
Fields inside the Java bean will directly map onto fields in the GraphQL response based on the name of the field:
public class Post {
private String id;
private String title;
private String category;
private String authorId;
}
Any fields or methods on the Java bean that don’t map onto the GraphQL schema will be ignored but won’t cause problems. This is important for field resolvers to work.
For example, here, the field authorId doesn’t correspond to anything in the schema we defined earlier, but it will be available to use for the next step.
5.3. Field Resolvers for Complex Values
Sometimes, the value of a field is non-trivial to load. This might involve database lookups, complex calculations, or anything else. The @SchemaMapping annotation maps the handler method to a field with the same name in the schema and uses it as the DataFetcher for that field.
@SchemaMapping
public Author author(Post post) {
return authorDao.getAuthor(post.getAuthorId());
}
Importantly, if the client doesn’t request a field, then the GraphQL Server won’t do the work to retrieve it. This means that if a client retrieves a Post and doesn’t ask for the author field, the author() method above won’t be executed, and the DAO call won’t be made.
Alternatively, we can also specify the parent type name, and the field name in the annotation:
@SchemaMapping(typeName="Post", field="author")
public Author getAuthor(Post post) {
return authorDao.getAuthor(post.getAuthorId());
}
Here, the annotation attributes are used to declare this as the handler for the author field in the schema.
5.4. Nullable Values
The GraphQL Schema has the concept that some types are nullable and others aren’t.
We handle this in the Java code by directly using null values. Conversely, we can use the new Optional type from Java 8 directly for nullable types, and the system will do the correct thing with the values.
This is very useful, as it means that our Java code is more obviously the same as the GraphQL schema from the method definitions.
5.5. Mutations
So far, everything we’ve done has been about retrieving data from the server. GraphQL also has the ability to update the data stored on the server through mutations.
From the code’s point of view, there’s no reason that a Query can’t change data on the server. We could easily write query resolvers that accept arguments, save new data, and return those changes. Doing this will cause surprising side effects for the API clients and is considered bad practice.
Instead, Mutations should be used to inform the client that this will cause a change to the data being stored.
Similar to Query, mutations are defined in the controller by annotating the handler method with @MutationMapping. The return value from a Mutation field is then treated exactly the same as from a Query field, allowing nested values to be retrieved as well:
@MutationMapping
public Post createPost(@Argument String title, @Argument String text,
@Argument String category, @Argument String authorId) {
Post post = new Post();
post.setId(UUID.randomUUID().toString());
post.setTitle(title);
post.setText(text);
post.setCategory(category);
post.setAuthorId(authorId);
postDao.savePost(post);
return post;
}
6. GraphiQL
GraphQL also has a companion tool called GraphiQL. This UI tool can communicate with any GraphQL Server and helps to consume and develop against a GraphQL API. A downloadable version of it exists as an Electron app and can be retrieved from here.
Spring GraphQL comes with GraphiQL built in. This is turned off by default, but we can turn it on by adding the following to application.yml:
spring:
graphql:
graphiql:
enabled: true
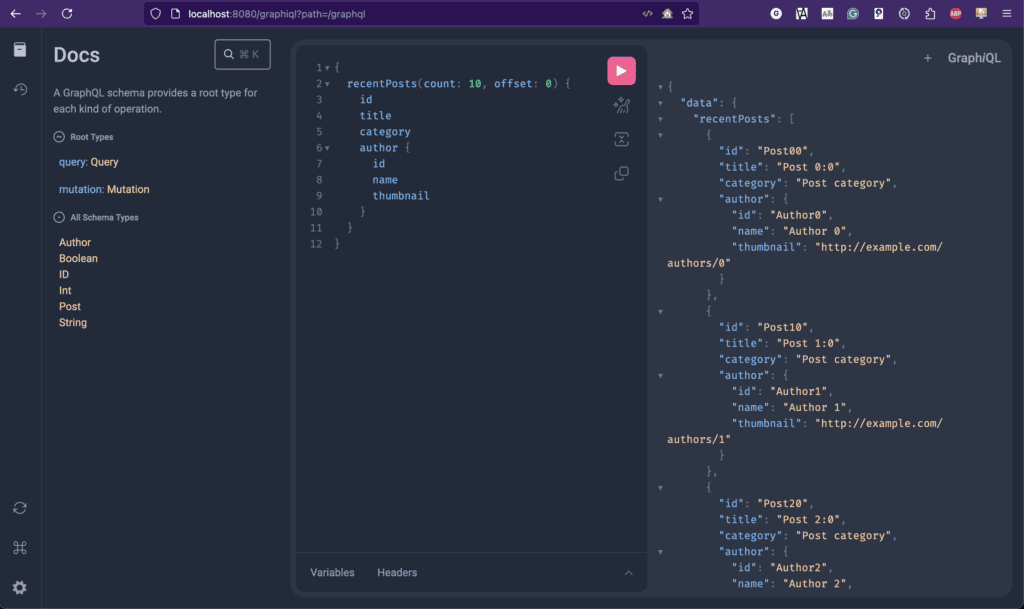
Once we do this, we can navigate to the /graphiql endpoint on our application and get the full GraphiQL user interface for interacting with our API. This provides a very useful in-browser tool to write and test queries, particularly during development and testing:
7. Summary
GraphQL is a very exciting new technology that can potentially revolutionize how we develop Web APIs.
Spring Boot GraphQL Starter makes it incredibly easy to add this technology to any new or existing Spring Boot application.
As always, code snippets can be found on GitHub.