1. Overview
In this tutorial, we’ll learn about JSON Web Signature (JWS), and how it can be implemented using the JSON Web Key (JWK) specification on applications configured with Spring Security OAuth2.
We should keep in mind that even though Spring is working to migrate all the Spring Security OAuth features to the Spring Security framework, this guide is still a good starting point to understand the basic concepts of these specifications and it should come in handy at the time of implementing them on any framework.
First, we’ll try to understand the basic concepts; like what’s JWS and JWK, their purpose and how we can easily configure a Resource Server to use this OAuth solution.
Then we’ll go deeper, we’ll analyze the specifications in detail by analyzing what OAuth2 Boot is doing behind the scenes, and by setting up an Authorization Server to use JWK.
2. Understanding the Big Picture of JWS and JWK
Before starting, it’s important that we understand correctly some basic concepts. It’s advisable to go through our OAuth and our JWT articles first since these topics are not part of the scope of this tutorial.
JWS is a specification created by the IETF that describes different cryptographic mechanisms to verify the integrity of data, namely the data in a JSON Web Token (JWT). It defines a JSON structure that contains the necessary information to do so.
It’s a key aspect in the widely-used JWT spec since the claims need to be either signed or encrypted in order to be considered effectively secured.
In the first case, the JWT is represented as a JWS. While if it’s encrypted, the JWT will be encoded in a JSON Web Encryption (JWE) structure.
The most common scenario when working with OAuth is having just signed JWTs. This is because we don’t usually need to “hide” information but simply verify the integrity of the data.
Of course, whether we’re handling signed or encrypted JWTs, we need formal guidelines to be able to transmit public keys efficiently.
This is the purpose of JWK, a JSON structure that represents a cryptographic key, defined also by the IETF.
Many Authentication providers offer a “JWK Set” endpoint, also defined in the specifications. With it, other applications can find information on public keys to process JWTs.
For instance, a Resource Server uses the kid (Key Id) field present in the JWT to find the correct key in the JWK set.
2.1. Implementing a Solution Using JWK
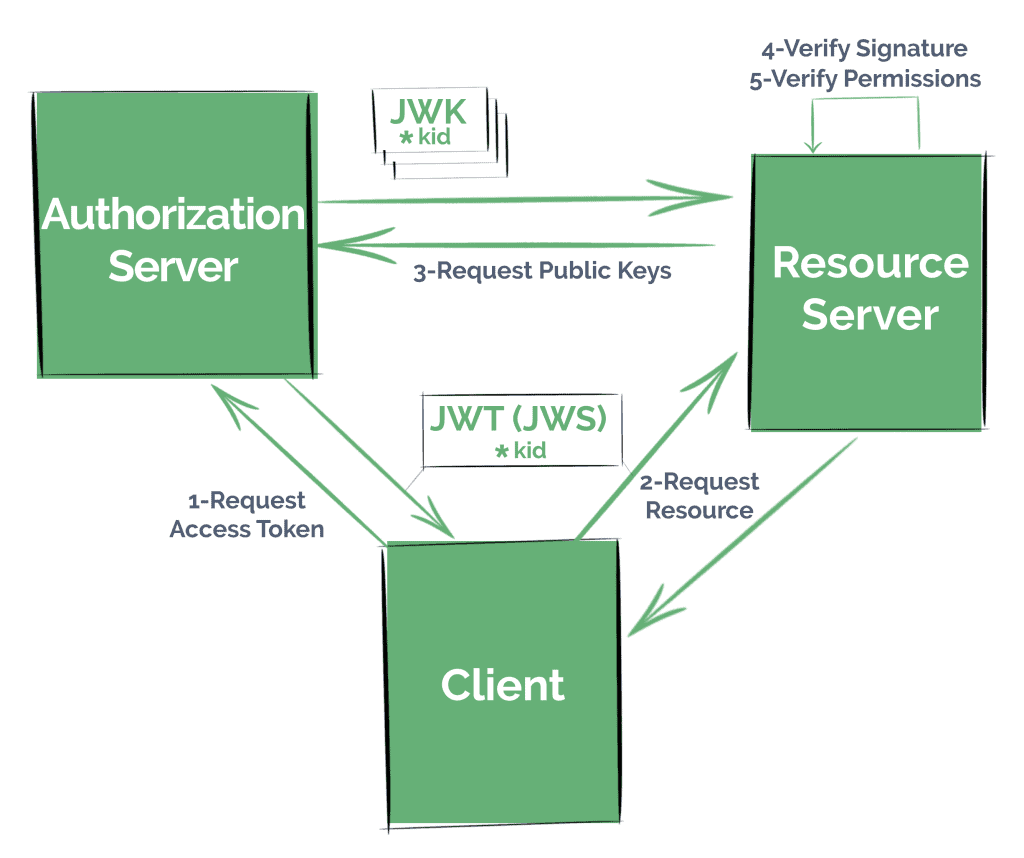
Commonly, if we want our application to serve resource in a secure manner, like by using a standard security protocol such as OAuth 2.0, we’ll need to follow the next steps:
- Register Clients in an Authorization Server – either in our own service, or in a well-known provider like Okta, Facebook or Github
- These Clients will request an access token from the Authorization Server, following any of the OAuth strategies we might have configured
- They will then try to access the resource presenting the token (in this case, as a JWT) to the Resource Server
- The Resource Server has to verify that the token hasn’t been manipulated by checking its signature as well as validate its claims
- And finally, our Resource Server retrieves the resource, now being sure that the Client has the correct permissions
3. JWK and the Resource Server Configuration
Later on, we’ll see how to set up our own Authorization server that serves JWTs and a ‘JWK Set’ endpoint.
At this point, though, we’ll focus on the simplest – and probably most common – scenario where we’re pointing at an existing Authorization server.
All we have to do is indicate how the service has to validate the access token it receives, like what public key it should use to verify the JWT’s signature.
We’ll use Spring Security OAuth’s Autoconfig features to achieve this in a simple and clean way, using only application properties.
3.1. Maven Dependency
We’ll need to add the OAuth2 auto-configuration dependency to our Spring application’s pom file:
<dependency>
<groupId>org.springframework.security.oauth.boot</groupId>
<artifactId>spring-security-oauth2-autoconfigure</artifactId>
<version>2.1.6.RELEASE</version>
</dependency>
As usual, we can check the latest version of the artifact in Maven Central.
Note that this dependency is not managed by Spring Boot, and therefore we need to specify its version.
It should match the version of Spring Boot we’re using anyway.
3.2. Configuring the Resource Server
Next, we’ll have to enable the Resource Server features in our application with the @EnableResourceServer annotation:
@SpringBootApplication
@EnableResourceServer
public class ResourceServerApplication {
public static void main(String[] args) {
SpringApplication.run(ResourceServerApplication.class, args);
}
}
Now we need to indicate how our application can obtain the public key necessary to validate the signature of the JWTs it receives as Bearer tokens.
OAuth2 Boot offers different strategies to verify the token.
As we said before, most Authorization servers expose a URI with a collection of keys that other services can use to validate the signature.
We’ll configure the JWK Set endpoint of a local Authorization Server we’ll work on further ahead.
Let’s add the following in our application.properties:
security.oauth2.resource.jwk.key-set-uri=
http://localhost:8081/sso-auth-server/.well-known/jwks.json
We’ll have a look at other strategies as we analyze this subject in detail.
Note: the new Spring Security 5.1 Resource Server only supports JWK-signed JWTs as authorization, and Spring Boot also offers a very similar property to configure the JWK Set endpoint:
spring.security.oauth2.resourceserver.jwk-set-uri=
http://localhost:8081/sso-auth-server/.well-known/jwks.json
3.3. Spring Configurations Under the Hood
The property we added earlier translates in the creation of a couple of Spring beans.
More precisely, OAuth2 Boot will create:
- a JwkTokenStore with the only ability to decode a JWT and verifying its signature
- a DefaultTokenServices instance to use the former TokenStore
4. The JWK Set Endpoint in the Authorization Server
Now we’ll go deeper on this subject, analyzing some key aspects of JWK and JWS as we configure an Authorization Server that issues JWTs and serves its JWK Set endpoint.
Note that since Spring Security doesn’t yet offer features to set up an Authorization Server, creating one using Spring Security OAuth capabilities is the only option at this stage. It will be compatible with Spring Security Resource Server, though.
4.1. Enabling Authorization Server Features
The first step is configuring our Authorization server to issue access tokens when required.
We’ll also add the spring-security-oauth2-autoconfigure dependency as we did with Resource Server.
First, we’ll use the @EnableAuthorizationServer annotation to configure the OAuth2 Authorization Server mechanisms:
@Configuration
@EnableAuthorizationServer
public class JwkAuthorizationServerConfiguration {
// ...
}
And we’ll register an OAuth 2.0 Client using properties:
security.oauth2.client.client-id=bael-client
security.oauth2.client.client-secret=bael-secret
With this, our application will retrieve random tokens when requested with the corresponding credentials:
curl bael-client:bael-secret\
@localhost:8081/sso-auth-server/oauth/token \
-d grant_type=client_credentials \
-d scope=any
As we can see, Spring Security OAuth retrieves a random string value by default, not JWT-encoded:
"access_token": "af611028-643f-4477-9319-b5aa8dc9408f"
4.2. Issuing JWTs
We can easily change this by creating a JwtAccessTokenConverter bean in the context:
@Bean
public JwtAccessTokenConverter accessTokenConverter() {
return new JwtAccessTokenConverter();
}
and using it in a JwtTokenStore instance:
@Bean
public TokenStore tokenStore() {
return new JwtTokenStore(accessTokenConverter());
}
So with these changes, let’s request a new access token, and this time we’ll obtain a JWT, encoded as a JWS, to be accurate.
We can easily identify JWSs; their structure consists of three fields (header, payload, and signature) separated by a dot:
"access_token":"eyJhbGciOiJIUzI1NiIsInR5cCI6IkpXVCJ9
.
eyJzY29wZSI6WyJhbnkiXSwiZXhwIjoxNTYxOTcy...
.
XKH70VUHeafHLaUPVXZI9E9pbFxrJ35PqBvrymxtvGI"
By default, Spring signs the header and payload using a Message Authentication Code (MAC) approach.
We can verify this by analyzing the JWT in one of the many JWT decoder/verifier online tools we can find out there.
If we decode the JWT we obtained, we’ll see that the value of the alg attribute is HS256, which indicates an HMAC-SHA256 algorithm was used to sign the token.
In order to understand why we don’t need JWKs with this approach, we have to understand how MAC hashing function works.
4.3. The Default Symmetric Signature
MAC hashing uses the same key to sign the message and to verify its integrity; it’s a symmetric hashing function.
Therefore, for security purposes, the application can’t publicly share its signing key.
Only for academic reasons, we’ll make public the Spring Security OAuth /oauth/token_key endpoint:
security.oauth2.authorization.token-key-access=permitAll()
And we’ll customize the signing key value when we configure the JwtAccessTokenConverter bean:
converter.setSigningKey("bael");
To know exactly which symmetric key is being used.
Note: even if we don’t publish the signing key, setting up a weak signing key is a potential threat to dictionary attacks.
Once we know the signing key, we can manually verify the token integrity using the online tool we mentioned before.
The Spring Security OAuth library also configures a /oauth/check_token endpoint which validates and retrieves the decoded JWT.
This endpoint is also configured with a denyAll() access rule and should be secured consciously. For this purpose, we could use the security.oauth2.authorization.check-token-access property as we did for the token key before.
4.4. Alternatives for the Resource Server Configuration
Depending on our security needs, we might consider that securing one of the recently mentioned endpoints properly – whilst making them accessible to the Resource Servers – is enough.
If that’s the case, then we can leave the Authorization Server as-is, and choose another approach for the Resource Server.
The Resource Server will expect the Authorization Server to have secured endpoints, so for starters, we’ll need to provide the client credentials, with the same properties we used in the Authorization Server:
security.oauth2.client.client-id=bael-client
security.oauth2.client.client-secret=bael-secret
Then we can choose to use the /oauth/check_token endpoint (a.k.a. the introspection endpoint) or obtain a single key from /oauth/token_key:
## Single key URI:
security.oauth2.resource.jwt.key-uri=
http://localhost:8081/sso-auth-server/oauth/token_key
## Introspection endpoint:
security.oauth2.resource.token-info-uri=
http://localhost:8081/sso-auth-server/oauth/check_token
Alternatively, we can just configure the key that will be used to verify the token in the Resource Service:
## Verifier Key
security.oauth2.resource.jwt.key-value=bael
With this approach, there will be no interaction with the Authorization Server, but of course, this means less flexibility on changes with the Token signing configuration.
As with the key URI strategy, this last approach might be recommended only for asymmetric signing algorithms.
4.5. Creating a Keystore File
Let’s not forget our final objective. We want to provide a JWK Set endpoint as the most well-known providers do.
If we’re going to share keys, it’ll be better if we use asymmetric cryptography (particularly, digital signature algorithms) to sign the tokens.
The first step towards this is creating a keystore file.
One easy way to achieve this is:
- open the command line in the /bin directory of any JDK or JRE you have in handy:
cd $JAVA_HOME/bin
- run the keytool command, with the corresponding parameters:
./keytool -genkeypair \
-alias bael-oauth-jwt \
-keyalg RSA \
-keypass bael-pass \
-keystore bael-jwt.jks \
-storepass bael-pass
Notice we used an RSA algorithm here, which is asymmetric.
- answer the interactive questions and generate the keystore file
4.6. Adding the Keystore File to Our Application
We have to add the keystore to our project resources.
This is a simple task, but keep in mind this is a binary file. That means it can’t be filtered, or it’ll become corrupted.
If we’re using Maven, one alternative is to put the text files in a separate folder and configure the pom.xml accordingly:
<build>
<resources>
<resource>
<directory>src/main/resources</directory>
<filtering>false</filtering>
</resource>
<resource>
<directory>src/main/resources/filtered</directory>
<filtering>true</filtering>
</resource>
</resources>
</build>
4.7. Configuring the TokenStore
The next step is configuring our TokenStore with the pair of keys; the private to sign the tokens, and the public to validate the integrity.
We’ll create a KeyPair instance employing the keystore file in the classpath, and the parameters we used when we created the .jks file:
ClassPathResource ksFile =
new ClassPathResource("bael-jwt.jks");
KeyStoreKeyFactory ksFactory =
new KeyStoreKeyFactory(ksFile, "bael-pass".toCharArray());
KeyPair keyPair = ksFactory.getKeyPair("bael-oauth-jwt");
And we’ll configure it in our JwtAccessTokenConverter bean, removing any other configuration:
converter.setKeyPair(keyPair);
We can request and decode a JWT again to check the alg parameter changed.
If we have a look at the Token Key endpoint, we’ll see the public key obtained from the keystore.
It’s easily identifiable by the PEM “Encapsulation Boundary” header; the string starting with “—–BEGIN PUBLIC KEY—–“*.*
4.8. The JWK Set Endpoint Dependencies
The Spring Security OAuth library doesn’t support JWK out of the box.
Consequently, we’ll need to add another dependency to our project, nimbus-jose-jwt which provides some basic JWK implementations:
<dependency>
<groupId>com.nimbusds</groupId>
<artifactId>nimbus-jose-jwt</artifactId>
<version>7.3</version>
</dependency>
Remember we can check the latest version of the library using the Maven Central Repository Search Engine.
4.9. Creating the JWK Set Endpoint
Let’s start by creating a JWKSet bean using the KeyPair instance we configured previously:
@Bean
public JWKSet jwkSet() {
RSAKey.Builder builder = new RSAKey.Builder((RSAPublicKey) keyPair().getPublic())
.keyUse(KeyUse.SIGNATURE)
.algorithm(JWSAlgorithm.RS256)
.keyID("bael-key-id");
return new JWKSet(builder.build());
}
Now creating the endpoint is quite simple:
@RestController
public class JwkSetRestController {
@Autowired
private JWKSet jwkSet;
@GetMapping("/.well-known/jwks.json")
public Map<String, Object> keys() {
return this.jwkSet.toJSONObject();
}
}
The Key Id field we configured in the JWKSet instance translates into the kid parameter.
This kid is an arbitrary alias for the key, and it’s usually used by the Resource Server to select the correct entry from the collection since the same key should be included in the JWT Header.
We face a new problem now; since Spring Security OAuth doesn’t support JWK, the issued JWTs won’t include the kid Header.
Let’s find a workaround to solve this.
4.10. Adding the kid Value to the JWT Header
We’ll create a new class extending the JwtAccessTokenConverter we’ve been using, and that allows adding header entries to the JWTs:
public class JwtCustomHeadersAccessTokenConverter
extends JwtAccessTokenConverter {
// ...
}
First of all, we’ll need to:
- configure the parent class as we’ve been doing, setting up the KeyPair we configured
- obtain a Signer object that uses the private key from the keystore
- of course, a collection of custom headers we want to add to the structure
Let’s configure the constructor based on this:
private Map<String, String> customHeaders = new HashMap<>();
final RsaSigner signer;
public JwtCustomHeadersAccessTokenConverter(
Map<String, String> customHeaders,
KeyPair keyPair) {
super();
super.setKeyPair(keyPair);
this.signer = new RsaSigner((RSAPrivateKey) keyPair.getPrivate());
this.customHeaders = customHeaders;
}
Now we’ll override the encode method. Our implementation will be the same as the parent one, with the only difference that we’ll also pass the custom headers when creating the String token:
private JsonParser objectMapper = JsonParserFactory.create();
@Override
protected String encode(OAuth2AccessToken accessToken,
OAuth2Authentication authentication) {
String content;
try {
content = this.objectMapper
.formatMap(getAccessTokenConverter()
.convertAccessToken(accessToken, authentication));
} catch (Exception ex) {
throw new IllegalStateException(
"Cannot convert access token to JSON", ex);
}
String token = JwtHelper.encode(
content,
this.signer,
this.customHeaders).getEncoded();
return token;
}
Let’s use this class now when creating the JwtAccessTokenConverter bean:
@Bean
public JwtAccessTokenConverter accessTokenConverter() {
Map<String, String> customHeaders =
Collections.singletonMap("kid", "bael-key-id");
return new JwtCustomHeadersAccessTokenConverter(
customHeaders,
keyPair());
}
We’re ready to go. Remember to change the Resource Server’s properties back. We need to use only the key-set-uri property we set up at the beginning of the tutorial.
We can ask for an Access Token, check it’s kid value, and use it to request a resource.
Once the public key is retrieved, the Resource Server stores it internally, mapping it to the Key Id for future requests.
5. Conclusion
We’ve learned quite a lot in this comprehensive guide about JWT, JWS, and JWK. Not only Spring-specific configurations, but also general Security concepts, seeing them in action with a practical example.
We’ve seen the basic configuration of a Resource Server that handles JWTs using a JWK Set endpoint.
Lastly, we’ve extended the basic Spring Security OAuth features, by setting up an Authorization Server exposing a JWK Set endpoint efficiently.
We can find both services in our OAuth Github repo, as always.