1. 概述
本文将介绍如何利用 OAuth 2 的 Refresh Token 为 OAuth 2 安全应用添加"记住我"功能。
本文是《使用 OAuth 2 保护 Spring REST API》系列的延续,该系列中的 REST API 通过 AngularJS 客户端访问。关于授权服务器、资源服务器和前端客户端的搭建,可以参考入门文章。
注意:本文使用的是 Spring OAuth 遗留项目。
2. OAuth 2 Access Token 和 Refresh Token
首先快速回顾一下 OAuth 2 的两种令牌及其用途。
当用户首次使用 password 授权类型进行身份验证时,需要发送有效的用户名密码以及客户端 ID 和密钥。如果认证成功,服务器会返回如下响应:
{
    "access_token": "2e17505e-1c34-4ea6-a901-40e49ba786fa",
    "token_type": "bearer",
    "refresh_token": "e5f19364-862d-4212-ad14-9d6275ab1a62",
    "expires_in": 59,
    "scope": "read write",
}
响应中同时包含 access token 和 refresh token。access token 用于后续需要认证的 API 调用,而 refresh token 的作用是获取新的有效 access token 或直接撤销旧令牌。
使用 refresh_token 授权类型获取新 access token 时,用户无需再输入凭据,只需提供客户端 ID、密钥和 refresh token 即可。
使用两种令牌的目的是增强用户安全性。通常 access token 有效期较短,这样即使攻击者获取了 access token,其可用时间也有限。另一方面,如果 refresh token 泄露,由于还需要客户端 ID 和密钥,因此单独泄露 refresh token 并无实际作用。
refresh token 的另一个好处是允许撤销 access token,当用户出现异常行为(如从新 IP 登录)时,可以停止发放新令牌。
3. 使用 Refresh Token 实现 Remember-Me 功能
用户通常希望保留会话状态,避免每次访问应用时都输入凭据。
由于 Access Token 有效期较短,我们可以利用 refresh token 生成新的 access token,从而避免在 access token 过期时反复要求用户输入凭据。
接下来讨论两种实现方式:
- ✅ 被动刷新:拦截返回 401 状态码的用户请求(表示 access token 无效)。此时若用户勾选了"记住我",自动使用
refresh_token授权类型请求新 access token,然后重试原始请求。 - ✅ 主动刷新:在 access token 过期前几秒主动发送刷新请求。
第二种方案的优势在于用户请求不会因刷新操作而延迟。
4. 存储 Refresh Token
在上一篇关于 Refresh Token 的文章中,我们添加了 CustomPostZuulFilter,用于拦截对 OAuth 服务器的请求,提取认证返回的 refresh token,并将其存储在服务端 cookie 中:
@Component
public class CustomPostZuulFilter extends ZuulFilter {

    @Override
    public Object run() {
        //...
        Cookie cookie = new Cookie("refreshToken", refreshToken);
        cookie.setHttpOnly(true);
        cookie.setPath(ctx.getRequest().getContextPath() + "/oauth/token");
        cookie.setMaxAge(2592000); // 30 days
        ctx.getResponse().addCookie(cookie);
        //...
    }
}
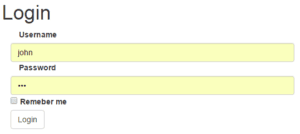
接下来在登录表单中添加复选框,绑定到 loginData.remember 变量:
<input type="checkbox"  ng-model="loginData.remember" id="remember"/>
<label for="remember">记住我</label>
登录表单现在会显示额外的复选框:
loginData 对象会随认证请求一起发送,因此包含 remember 参数。在发送认证请求前,我们根据该参数设置名为 remember 的 cookie:
function obtainAccessToken(params){
    if (params.username != null){
        if (params.remember != null){
            $cookies.put("remember","yes");
        }
        else {
            $cookies.remove("remember");
        }
    }
    //...
}
后续通过检查此 cookie 判断是否需要刷新 access token,取决于用户是否选择被记住。
5. 通过拦截 401 响应刷新令牌
要拦截返回 401 响应的请求,修改 AngularJS 应用添加带有 responseError 函数的拦截器:
app.factory('rememberMeInterceptor', ['$q', '$injector', '$httpParamSerializer',
  function($q, $injector, $httpParamSerializer) {
    var interceptor = {
        responseError: function(response) {
            if (response.status == 401){

                // 刷新 access token

                // 重试原始请求
                return deferred.promise.then(function() {
                    return $http(response.config);
                });
            }
            return $q.reject(response);
        }
    };
    return interceptor;
}]);
该函数检查状态码是否为 401(表示 Access Token 无效),如果是则尝试使用 Refresh Token 获取新 Access Token。
成功后继续重试导致 401 错误的原始请求,确保用户体验无缝衔接。
下面详细看刷新 access token 的过程。首先初始化必要变量:
var $http = $injector.get('$http');
var $cookies = $injector.get('$cookies');
var deferred = $q.defer();

var refreshData = {grant_type:"refresh_token"};

var req = {
    method: 'POST',
    url: "oauth/token",
    headers: {"Content-type": "application/x-www-form-urlencoded; charset=utf-8"},
    data: $httpParamSerializer(refreshData)
}
req 变量用于向 /oauth/token 接口发送 POST 请求,参数为 grant_type=refresh_token。
接下来使用注入的 $http 模块发送请求。成功时设置新的 Authorization 头和新 access_token cookie;失败时(如 refresh token 也过期)重定向到登录页:
$http(req).then(
    function(data){
        $http.defaults.headers.common.Authorization= 'Bearer ' + data.data.access_token;
        var expireDate = new Date (new Date().getTime() + (1000 * data.data.expires_in));
        $cookies.put("access_token", data.data.access_token, {'expires': expireDate});
        window.location.href="index";
    },function(){
        console.log("error");
        $cookies.remove("access_token");
        window.location.href = "login";
    }
);
Refresh Token 由前文实现的 CustomPreZuulFilter 添加到请求中:
@Component
public class CustomPreZuulFilter extends ZuulFilter {

    @Override
    public Object run() {
        //...
        String refreshToken = extractRefreshToken(req);
        if (refreshToken != null) {
            Map<String, String[]> param = new HashMap<String, String[]>();
            param.put("refresh_token", new String[] { refreshToken });
            param.put("grant_type", new String[] { "refresh_token" });

            ctx.setRequest(new CustomHttpServletRequest(req, param));
        }
        //...
    }
}
除定义拦截器外,还需将其注册到 $httpProvider:
app.config(['$httpProvider', function($httpProvider) {
    $httpProvider.interceptors.push('rememberMeInterceptor');
}]);
6. 主动刷新令牌
另一种实现"记住我"的方式是在当前 access token 过期前主动请求新令牌。
接收 access token 时,JSON 响应包含 expires_in 值,表示令牌有效秒数。
将此值保存在每次认证的 cookie 中:
$cookies.put("validity", data.data.expires_in);
然后使用 AngularJS 的 $timeout 服务,在令牌过期前 10 秒调度刷新请求:
if ($cookies.get("remember") == "yes"){
    var validity = $cookies.get("validity");
    if (validity >10) validity -= 10;
    $timeout( function(){ $scope.refreshAccessToken(); }, validity * 1000);
}
7. 总结
本文探讨了在 OAuth2 应用和 AngularJS 前端中实现"记住我"功能的两种方式。
完整示例代码可在 GitHub 获取。可通过 URL /login_remember 访问带"记住我"功能的登录页。
