1. 概述
本文将演示如何在 Thymeleaf 中绑定 List 类型的数据。这在实际开发中非常常见,比如批量添加书籍、编辑多个用户信息等场景。
如果你还不熟悉 Thymeleaf 与 Spring 的集成,可以先参考 Spring 中使用 Thymeleaf 的完整指南,里面涵盖了字段展示、表单提交、校验错误显示和数据转换等内容。
2. Thymeleaf 中 List 的使用场景
我们以一个图书管理系统为例,展示以下两个核心功能:
✅ 在页面上展示 List<Book> 数据
✅ 通过表单批量提交 List<Book> 数据
先来看基础模型类:
public class Book {
    private long id;
    private String title;
    private String author;

    // getter 和 setter 省略
}
接下来会实现:
- 展示已有书籍列表
- 允许用户一次性添加多本新书
- 批量编辑已有书籍
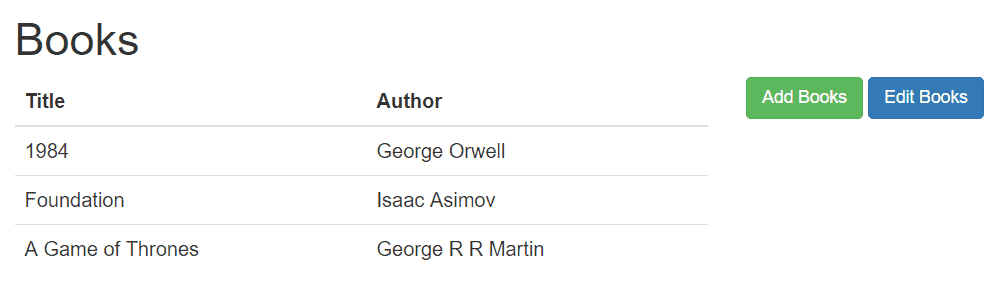
3. 展示 List 数据
先从最简单的开始 —— 显示列表数据。
控制器方法如下:
@GetMapping("/all")
public String showAll(Model model) {
    model.addAttribute("books", bookService.findAll());
    return "books/allBooks";
}
对应的 Thymeleaf 模板使用 th:each 遍历列表:
<table>
    <thead>
        <tr>
            <th>标题</th>
            <th>作者</th>
        </tr>
    </thead>
    <tbody>
        <tr th:if="${books.empty}">
            <td colspan="2">暂无书籍</td>
        </tr>
        <tr th:each="book : ${books}">
            <td><span th:text="${book.title}">标题</span></td>
            <td><span th:text="${book.author}">作者</span></td>
        </tr>
    </tbody>
</table>
⚠️ 注意:th:each 是关键,它能自动遍历集合。配合 ${books.empty} 判断空集合,避免页面出现空白表格。
4. 使用 Selection 表达式绑定 List(新增场景)
要让表单支持提交 List<Book>,不能直接把 List 当作模型对象。必须包装在一个 DTO 中。
✅ 创建包装类
public class BooksCreationDto {
    private List<Book> books;

    public BooksCreationDto() {
        this.books = new ArrayList<>();
    }

    public BooksCreationDto(List<Book> books) {
        this.books = books;
    }

    public void addBook(Book book) {
        this.books.add(book);
    }

    // getter 和 setter
}
✅ 控制器准备表单数据
用户要一次添加 3 本书:
@GetMapping("/create")
public String showCreateForm(Model model) {
    BooksCreationDto booksForm = new BooksCreationDto();

    for (int i = 1; i <= 3; i++) {
        booksForm.addBook(new Book());
    }

    model.addAttribute("form", booksForm);
    return "books/createBooksForm";
}
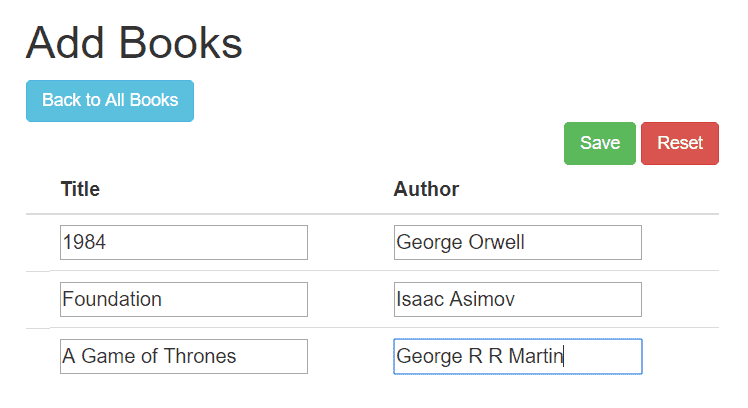
✅ Thymeleaf 表单代码
<form action="#" th:action="@{/books/save}" th:object="${form}" method="post">
    <fieldset>
        <input type="submit" id="submitButton" th:value="保存">
        <input type="reset" id="resetButton" name="reset" th:value="重置"/>
        <table>
            <thead>
                <tr>
                    <th>标题</th>
                    <th>作者</th>
                </tr>
            </thead>
            <tbody>
                <tr th:each="book, itemStat : *{books}">
                    <td><input th:field="*{books[__${itemStat.index}__].title}" /></td>
                    <td><input th:field="*{books[__${itemStat.index}__].author}" /></td>
                </tr>
            </tbody>
        </table>
    </fieldset>
</form>
🔍 关键点解析
| 技术点 | 说明 |
|---|---|
th:object="${form}" |
绑定整个表单到 BooksCreationDto 实例 |
*{books} |
Selection 表达式,表示当前表单对象的 books 字段 |
itemStat.index |
获取当前遍历索引,用于定位 List 中具体元素 |
__${...}__ |
Thymeleaf 的内联表达式语法,动态生成字段名 |
最终页面效果如下:
✅ 提交处理
@PostMapping("/save")
public String saveBooks(@ModelAttribute BooksCreationDto form, Model model) {
    bookService.saveAll(form.getBooks());
    model.addAttribute("books", bookService.findAll());
    return "redirect:/books/all";
}
提交后跳转到书籍列表页,展示所有数据:
5. 使用 Variable 表达式绑定 List(编辑场景)
当需要编辑已有数据时,不能再用 Selection 表达式,而应使用 Variable 表达式,并显式设置 name 和 value。
✅ 加载已有数据
@GetMapping("/edit")
public String showEditForm(Model model) {
    List<Book> books = new ArrayList<>();
    bookService.findAll().forEach(books::add);

    model.addAttribute("form", new BooksCreationDto(books));
    return "books/editBooksForm";
}
✅ 编辑表单模板
<form action="#" th:action="@{/books/update}" th:object="${form}" method="post">
    <table>
        <thead>
            <tr>
                <th>ID</th>
                <th>标题</th>
                <th>作者</th>
            </tr>
        </thead>
        <tbody>
            <tr th:each="book, itemStat : ${form.books}">
                <td>
                    <input type="hidden"
                           th:name="|books[${itemStat.index}].id|"
                           th:value="${book.id}" />
                    [[${book.id}]]
                </td>
                <td>
                    <input type="text"
                           th:name="|books[${itemStat.index}].title|"
                           th:value="${book.title}" />
                </td>
                <td>
                    <input type="text"
                           th:name="|books[${itemStat.index}].author|"
                           th:value="${book.author}" />
                </td>
            </tr>
        </tbody>
    </table>
    <button type="submit">保存修改</button>
</form>
⚠️ 踩坑提醒
- ❌ 不要用
th:field,否则会覆盖已有的name,导致后端无法正确绑定 - ✅ 必须手动设置
th:name="books[index].property"格式 - ✅ 使用
|...|字符串连接语法,让 Thymeleaf 正确解析动态字段名 - ✅ 编辑场景必须包含
id字段(隐藏域),否则会变成新增而不是更新
✅ 更新接口
@PostMapping("/update")
public String updateBooks(@ModelAttribute BooksCreationDto form) {
    bookService.updateAll(form.getBooks());
    return "redirect:/books/all";
}
6. 总结
| 场景 | 推荐方式 | 注意事项 |
|---|---|---|
| 新增批量数据 | Selection 表达式 + th:field |
使用 *{} 和 itemStat.index |
| 编辑已有数据 | Variable 表达式 + 手动 name |
禁用 th:field,显式设置 name |
| 空值处理 | ${list.empty} |
避免前端空表格难看 |
✅ 正确绑定 List 的关键是:包装类 + 索引定位 + 区分新增与编辑场景。
⚠️ 记住:Thymeleaf 表单绑定不是魔法,理解底层字段命名规则(如 books[0].title)才能避免踩坑。
掌握这些技巧后,你就能轻松应对各种批量操作需求,比如批量审批、批量导入等复杂业务场景。