1. Overview
Apache Tomcat is one of the most popular web servers in the Java community. It ships as a servlet container capable of serving Web Archives with the WAR extension.
It provides a management dashboard from which we can deploy a new web application, or undeploy an existing one without having to restart the container. This is especially useful in production environments.
In this tutorial, we’ll do a quick overview of Tomcat, and then cover various approaches to deploying a WAR file.
2. Tomcat Structure
Before we begin, we should familiarize ourselves with some terminology and environment variables.
2.1. Environment Variables
If we’ve worked with Tomcat before, these will be familiar to us.
This variable points to the directory where our server is installed:
$CATALINA_HOME
This variable points to the directory of a particular instance of Tomcat (we may have multiple instances installed):
$CATALINA_BASE
If this variable isn’t set explicitly, then it’ll be assigned the same value as $CATALINA_HOME.
Web applications are deployed under the $CATALINA_HOME\webapps directory.
2.2. Terminology
Document root – Refers to the top-level directory of a web application where all the application resources are located, like JSP files, HTML pages, Java classes, and images.
Context path – Refers to the location that’s relative to the server’s address and represents the name of the web application.
For example, if our web application is put under the $CATALINA_HOME\webapps\myapp directory, it’ll be accessed by the URL http://localhost/myapp, and its context path will be /myapp.
WAR – Short for Web Archive. It’s the extension of a file that packages a web application directory hierarchy in ZIP format. Java web applications are usually packaged as WAR files for deployment. These files can be created on the command line or with an IDE, like Eclipse.
After deploying the WAR file, Tomcat unpacks it and stores all the project files from the webapps directory in a new directory named after the project.
3. Tomcat Setup
The Tomcat Apache web server is free software that can be downloaded from their website. It’s a requirement that the user’s machine has a JDK available, and that the JAVA_HOME environment variable is set correctly.
3.1. Start Tomcat
We can start the Tomcat server by simply running the startup script located at $CATALINA_HOME\bin\startup. There’s a .bat and .sh in every installation.
We’ll choose the appropriate option depending on whether we’re using a Windows or Unix based operating system.
3.2. Configure Roles
During the deployment phase, we’ll have some options, one of which is to use Tomcat’s management dashboard. To access this dashboard, we must have an admin user configured with the appropriate roles.
To have access to the dashboard, the admin user needs the manager-gui role. Later, we’ll need to deploy a WAR file using Maven, and for this we’ll also need the manager-script role too.
Let’s make these changes in $CATALINA_HOME\conf\tomcat-users:
<role rolename="manager-gui"/>
<role rolename="manager-script"/>
<user username="admin" password="password" roles="manager-gui, manager-script"/>
More details about the different Tomcat roles can be found by following this official link.
3.3. Set Directory Permissions
Finally, we’ll ensure that there’s read/write permission on the Tomcat installation directory.
3.4. Test Installation
To test that Tomcat is set up properly, we’ll run the startup script (startup.bat/startup.sh). If no errors are displayed on the console, we can double-check by visiting http://localhost:8080.
If we see the Tomcat landing page, then we have installed the server correctly.
3.5. Resolve Port Conflict
By default, Tomcat is set to listen to connections on port 8080. If there’s another application that’s already bound to this port, the startup console will let us know.
To change the port, we can edit the server configuration file, server.xml, located at $CATALINA_HOME\conf\server.xml. By default, the connector configuration is:
<Connector port="8080" protocol="HTTP/1.1"
  connectionTimeout="20000" redirectPort="8443" />
For instance, if we want to change our port to 8081, then we’ll have to change the connector’s port attribute:
<Connector port="8081" protocol="HTTP/1.1"
  connectionTimeout="20000" redirectPort="8443" />
Sometimes, the port we have chosen is not open by default. In that case, we would need to open the port with the appropriate commands in the Unix kernel, or create the appropriate firewall rules in Windows. We won’t go into further details here as it’s beyond the scope of this article.
4. Deploy From Maven
If we want to use Maven for deploying our web archives, we must configure Tomcat as a server in Maven’s settings.xml file.
There are two locations where the settings.xml file may be found:
- The Maven install: ${maven.home}/conf/settings.xml
- A user’s install: ${user.home}/.m2/settings.xml
Once we have found it, we’ll add Tomcat:
<server>
    <id>TomcatServer</id>
    <username>admin</username>
    <password>password</password>
</server>
Now we’ll need to create a basic web application from Maven to test the deployment. Let’s navigate to where we would like to create the application.
We’ll run this command on the console to create a new Java web application:
mvn archetype:generate -DgroupId=com.baeldung -DartifactId=tomcat-war-deployment
  -DarchetypeArtifactId=maven-archetype-webapp -DinteractiveMode=false
This will create a complete web application in the directory tomcat-war-deployment, which will print hello world! if we deploy it now and access it via the browser.
But before we do that, we need to make one change to enable Maven deployment. Let’s head over to the pom.xml and add this plugin:
<plugin>
    <groupId>org.apache.tomcat.maven</groupId>
    <artifactId>tomcat7-maven-plugin</artifactId>
    <version>2.2</version>
    <configuration>
        <url>http://localhost:8080/manager/text</url>
        <server>TomcatServer</server>
        <path>/myapp</path>
    </configuration>
</plugin>
Note that we’re using the Tomcat 7 plugin because it works for both versions 7 and 8 without any special changes.
The configuration url is the url to which we’re sending our deployment, and Tomcat will know what to do with it. The server element is the name of the server instance that Maven recognizes. Finally, the path element defines the context path of our deployment.
This means that if our deployment succeeds, we’ll access the web application by hitting http://localhost:8080/myapp.
Now we can run the following commands from Maven.
To deploy the web app:
mvn tomcat7:deploy
Then to undeploy it:
mvn tomcat7:undeploy
Finally, to redeploy it after making changes:
mvn tomcat7:redeploy
5. Deploy With Cargo Plugin
Cargo is a versatile library that allows us to manipulate the various types of application containers in a standard way.
5.1. Cargo Deployment Setup
In this section, we’ll learn how to use Cargo’s Maven plugin to deploy a WAR to Tomcat. In this case, we’ll deploy it to a version 7 instance.
To get a firm understanding of the whole process, we’ll start from scratch by creating a new Java web application from the command line:
mvn archetype:generate -DgroupId=com.baeldung -DartifactId=cargo-deploy
  -DarchetypeArtifactId=maven-archetype-webapp -DinteractiveMode=false
This will create a complete Java web application in the cargo-deploy directory. If we build, deploy, and load this application as is, it’ll print Hello World! in the browser.
Unlike the Tomcat7 Maven plugin, the Cargo Maven plugin requires that this file is present.
Since our web application doesn’t contain any servlets, our web.xml file will be very basic. We’ll navigate to the WEB-INF folder of our newly created project, and create a web.xml file with the following content:
<?xml version="1.0" encoding="UTF-8"?>
<web-app xmlns:xsi="http://www.w3.org/2001/XMLSchema-instance"
  xmlns="http://java.sun.com/xml/ns/javaee"
    xsi:schemaLocation="http://java.sun.com/xml/ns/javaee
      http://java.sun.com/xml/ns/javaee/web-app_3_0.xsd"
        id="WebApp_ID" version="3.0">

    <display-name>cargo-deploy</display-name>
    <welcome-file-list>
        <welcome-file>index.jsp</welcome-file>
    </welcome-file-list>
</web-app>
To enable Maven to recognize Cargo’s commands without typing the fully qualified name, we need to add the Cargo Maven plugin to a plugin group in Maven’s settings.xml.
As an immediate child of the root
<pluginGroups>
    <pluginGroup>org.codehaus.cargo</pluginGroup>
</pluginGroups>
5.2. Local Deploy
In this subsection, we’ll edit our pom.xml to suit our new deployment requirements.
We’ll add this plugin:
<build>
    <plugins>
        <plugin>
            <groupId>org.codehaus.cargo</groupId>
            <artifactId>cargo-maven2-plugin</artifactId>
            <version>1.5.0</version>
            <configuration>
                <container>
                    <containerId>tomcat7x</containerId>
                    <type>installed</type>
                    <home>Insert absolute path to tomcat 7 installation</home>
                </container>
                <configuration>
                    <type>existing</type>
                    <home>Insert absolute path to tomcat 7 installation</home>
                </configuration>
            </configuration>
       </plugin>
    </plugins>
</build>
The latest version, at the time of writing, is 1.5.0. However, the latest version can always be found here.
Notice that we explicitly define the packaging as a WAR; without this, our build will fail. In the plugins section, we’ll then add the cargo maven2 plugin. Additionally, we’ll add a configuration section where we tell Maven that we’re using a Tomcat container and also an existing installation.
By setting the container type to installed, we tell Maven that we have an instance installed on the machine, and we provide the absolute URL to this installation.
By setting the configuration type to existing, we tell Tomcat that we have an existing setup that we’re using, and no further configuration is required.
The alternative would be to tell cargo to download and setup the version specified by providing a URL. However, our focus is on WAR deployment.
It’s worth noting that whether we’re using Maven 2.x or Maven 3.x, the cargo maven2 plugin works for both.
We can now install our application by executing:
mvn install
Then we’ll deploy it:
mvn cargo:deploy
If all goes well, we should be able to run our web application by loading http://localhost:8080/cargo-deploy.
5.3. Remote Deploy
To do a remote deploy, we only need to change the configuration section of our pom.xml. Remote deploy means that we don’t have a local installation of Tomcat, but have access to the manager dashboard on a remote server.
Let’s change the pom.xml so that the configuration section looks like this:
<configuration>
    <container>
        <containerId>tomcat8x</containerId>
        <type>remote</type>
    </container>
    <configuration>
        <type>runtime</type>
        <properties>
            <cargo.remote.username>admin</cargo.remote.username>
            <cargo.remote.password>admin</cargo.remote.password>
            <cargo.tomcat.manager.url>http://localhost:8080/manager/text
              </cargo.tomcat.manager.url>
        </properties>
    </configuration>
</configuration>
This time, we change the container type from installed to remote, and the configuration type from existing to runtime. Finally, we add authentication and remote URL properties to the configuration.
We’ll ensure that the roles and users are already present in $CATALINA_HOME/conf/tomcat-users.xml, just as before.
If we’re editing the same project for remote deployment, we’ll first un-deploy the existing WAR:
mvn cargo:undeploy
Then we’ll clean the project:
mvn clean
Next, we’ll install it:
mvn install
Finally, we’ll deploy it:
mvn cargo:deploy
6. Deploy From Eclipse
Eclipse allows us to embed servers in order to add web project deployment in the normal workflow without navigating away from the IDE.
6.1. Embed Tomcat in Eclipse
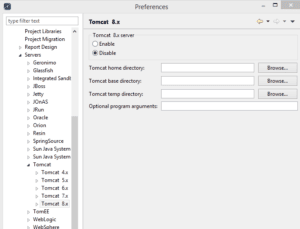
To embed an installation into eclipse, we select the window menu item from the taskbar, and then preferences from the drop down.
Then we’ll see a tree grid of preference items on the left panel of the window that appears. Next, we navigate to eclipse -> servers, or just type servers in the search bar.
We can then select the installation directory, if not already open for us, and choose the Tomcat version we downloaded.
On the right hand side of the panel, a configuration page will appear. Here we select the Enable option to activate this server version and browse to the installation folder.
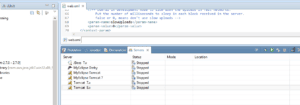
We’ll apply the changes, and then the next time we open the servers view from Eclipse’s windows -> show view sub-menu, the newly configured server will be present, and we can start, stop and deploy applications to it.
6.2. Deploy Web Application in Embedded Tomcat
To deploy a web application to Tomcat, it must exist in our workspace.
Let’s open the servers view from window -> show view and look for servers. When open, we can just right click on the server we configured and select add deployment from the context menu that appears.
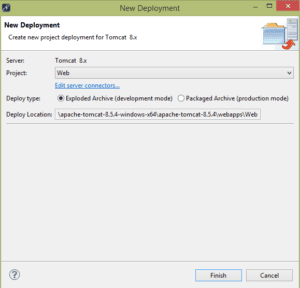
From the New Deployment dialog box that appears, we’ll open the project drop down, and select the web project.
There’s a Deploy Type section beneath the Project combo box. When we select Exploded Archive(development mode), our changes in the application will be synced live without having to redeploy. This is the best option during development as it’s very efficient.
Selecting Packaged Archive(production mode) will require us to redeploy every time we make changes and see them in the browser. This is best only for production, but still, Eclipse makes it equally easy.
6.3. Deploy Web Application in External Location
We usually choose to deploy a WAR through Eclipse to make debugging easier. However, there may come a time when we want it deployed to a location other than those used by Eclipse’s embedded servers. The most common instance is when our production server is online, and we want to update the web application.
We can bypass this procedure by deploying in production mode, noting the Deploy Location in the New Deployment dialog box, and then picking the WAR from there.
During deployment, instead of selecting an embedded server, we can select the
7. Deploy From IntelliJ IDEA
To deploy a web application to Tomcat, it must exist and have already been downloaded and installed.
7.1. Local Configuration
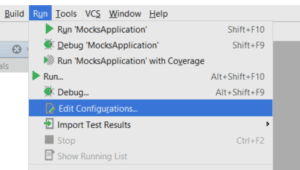
Let’s open the Run menu, and click the Edit Configurations options.
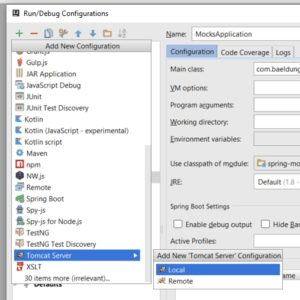
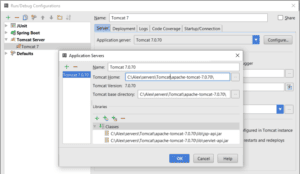
In the panel on the left, we’ll search for Tomcat Server. If it’s not there, we’ll click the + sign in the menu, search for Tomcat, and select Local. In the name field, we’ll put Tomcat 7/8 (depending on our version).
Then we’ll click the Configure… button, and in the Tomcat Home field, we’ll navigate to the home location of our installation and select it.
Optionally, we can set the Startup page to be http://localhost:8080/ and HTTP port: 8080; we’ll change the port as appropriate.
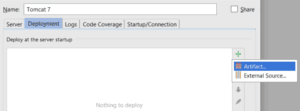
Finally, we’ll go to the Deployment tab, click on the + symbol, select the artifact we want to add to the server, and click OK.
7.2. Remote Configuration
We’ll follow the same instructions as for local Tomcat configurations, but in the server tab, we must enter the remote location of the installation.
8. Deploy by Copying Archive
We’ve learned how to export a WAR from Eclipse. Another thing we can do is to deploy it by simply dropping it into the $CATALINA_HOME\webapps directory of any Tomcat instance. If the instance is running, the deployment will start instantly as Tomcat unpacks the archive and configures its context path.
If the instance isn’t running, then the server will deploy the project the next time it’s started.
9. Deploy From Tomcat Manager
Assuming we already have our WAR file to hand, and would like to deploy it using the management dashboard, we can access the manager dashboard by visiting: http://localhost:8080/manager.
The dashboard has five different sections: Manager, Applications, Deploy, Diagnostics, and Server Information.
If we go to the Deploy section, we’ll find two subsections.
9.1. Deploy Directory or WAR File Located on Server
If the WAR file is located on the server where the Tomcat instance is running, then we can fill the required Context Path field preceded by a forward slash “/”.
For example, if we’d like our web application to be accessed from the browser with the URL http://localhost:8080/myapp, then our context path field will have /myapp.
We can also skip the XML Configuration file URL field and head over to the WAR or Directory URL field. Here, we’ll enter the absolute URL to the Web Archive file as it appears on our server. For example, if our file’s location is C:/apps/myapp.war, then we enter this location. It’s important we don’t forget the WAR extension.
After that, we can click the deploy button. The page will reload, and we should see this message at the top of the page:
OK - Deployed application at context path /myapp
Our application should also appear in the Applications section of the page.
9.2. WAR File to Deploy
Here, we just click the choose file button, navigate to the location of the WAR file, select it, and then click the deploy button.
In both situations, if all goes well, the Tomcat console will inform us that the deployment has been successful with the following message:
INFO: Deployment of web application archive \path\to\deployed_war has finished in 4,833 ms
10. Conclusion
In this article, we focused on how to deploy a WAR into a Tomcat server.
