1. 概述
在本文我们将学习YugabyteDB。YugabyteDB是一个SQL数据库,旨在解决当今分布式云原生应用程序面临的困难。 Yugabyte DB为企业和开发人员提供了一个开源的、高性能的数据库。
2. YugabyteDB 架构
YugabyteDB 是一个高性能、云原生、分布式SQL数据库,旨在支持所有 PostgreSQL 功能。
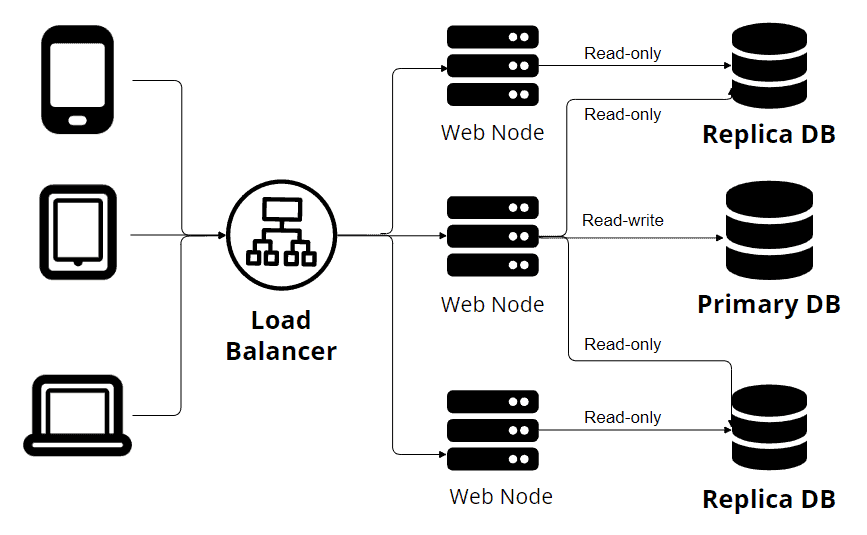
大多数关系数据库的工作方式如下:
上面是经典的单主从复制架构图。从图中可以看到,多个设备通过负载均衡器发送请求,多个Web节点连接到多个数据库节点。只有主节点支持读写操作,而其他副本节点只接受只读事务。
与传统数据库复制系统不同,YugabyteDB利用分区来确保高可用性和容错性。 分区涉及到在集群中的多个节点之间分配数据,每个节点负责存储数据的一部分。通过将数据分割成较小的部分,并将它们分布到多个节点上,YugabyteDB实现了并行处理和负载均衡。在节点故障的情况下,YugabyteDB的分区特性确保剩余节点可以无缝地接管服务数据的责任,维持不间断的可用性。
3. 示例
3.1. Maven 依赖
要在Java项目中访问YugabyteDB数据库,需要添加下面的Maven依赖:
<dependency>
    <groupId>org.postgresql</groupId>
    <artifactId>postgresql</artifactId>
</dependency>
<dependency>
    <groupId>org.springframework.boot</groupId>
    <artifactId>spring-boot-starter-data-jpa</artifactId>
</dependency>
由于YugabyteDB与PostgreSQL兼容,因此直接使用PostgreSQL驱动即可。
3.2. 安装Yugabytedb
Yugabyte 有多种安装方式,具体可参考官方文档。本文简单起见,使用Docker方式安装。
拉取镜像:
$ docker pull yugabytedb/yugabyte:latest
运行 Yugabyte:
$ docker run -d --name yugabyte -p7000:7000 -p9000:9000 -p5433:5433 yugabytedb/yugabyte:latest bin/yugabyted start --daemon=false
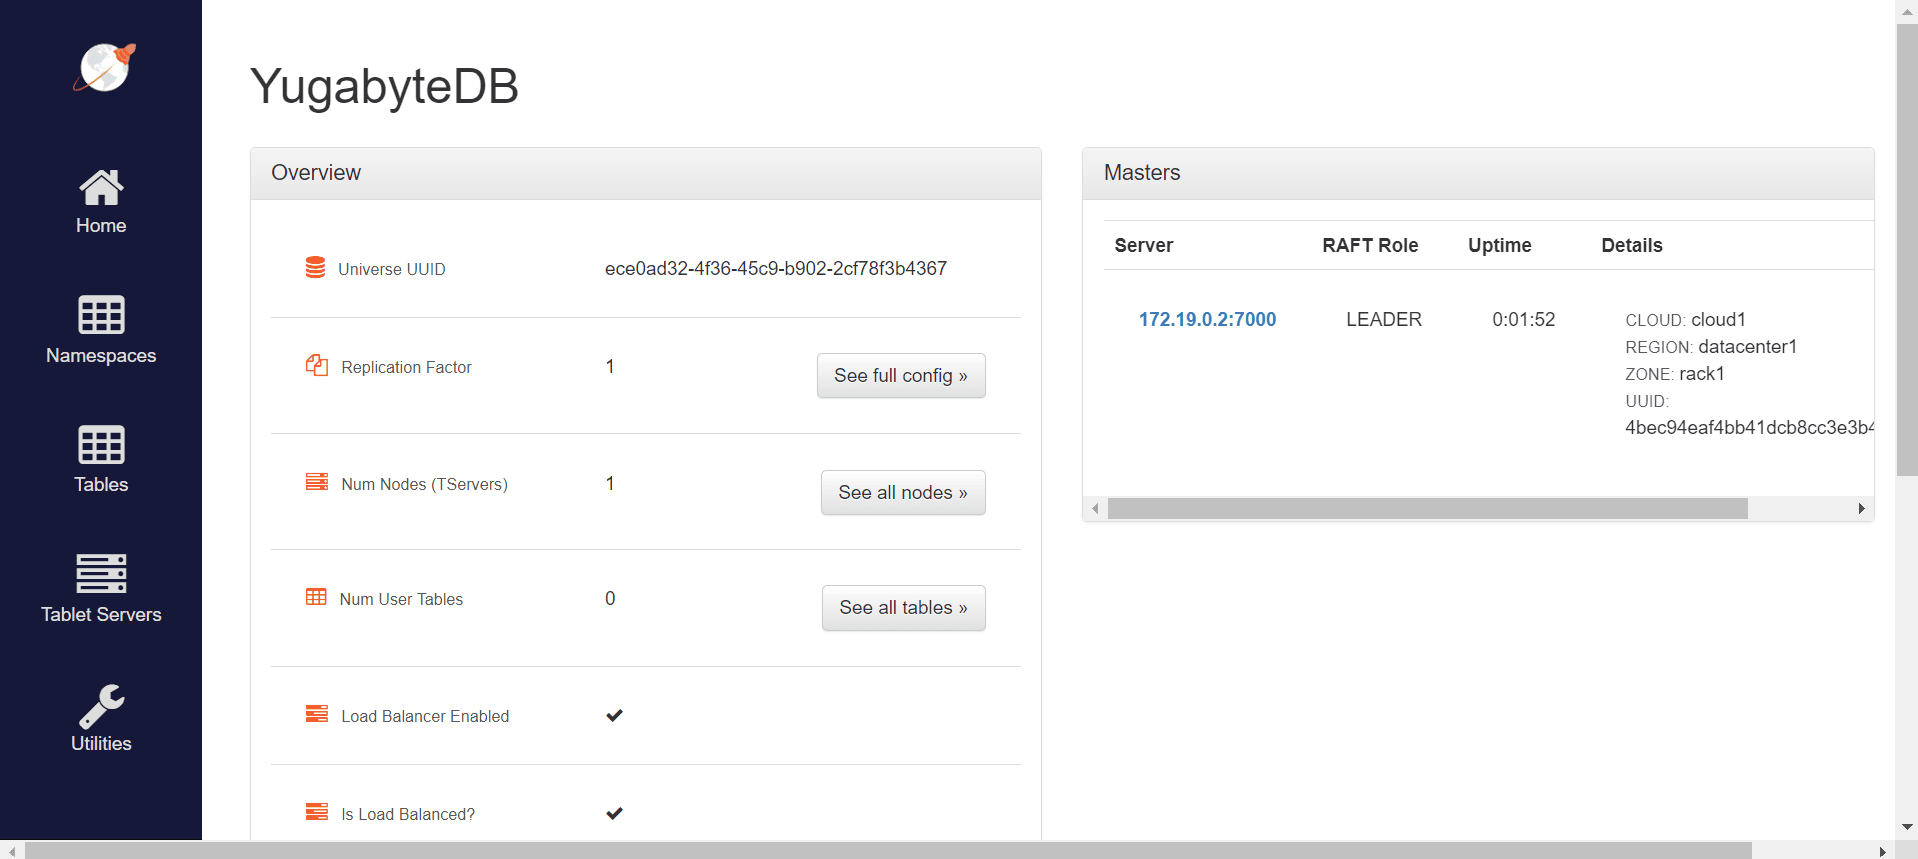
现在我们有了一个完整功能的YugabyteDB实例。我们可以访问*http://localhost:7000/*来查看Admin web服务器控制台:
现在我们可以开始在我们的application.properties文件中配置数据库连接。
spring.datasource.url=jdbc:postgresql://localhost:5433/yugabyte
spring.datasource.username=yugabyte
spring.datasource.password=yugabyte
spring.jpa.hibernate.ddl-auto=create
spring.jpa.database-platform=org.hibernate.dialect.PostgreSQLDialect
由于和PostgreSQL兼容,直接参考PostgreSQL数据库的配置。我们还将spring.jpa.hibernate.ddl-auto属性设置为create。这意味着Hibernate将负责创建与我们的实体匹配的表。
3.3. 创建表
Now, after configuring the database, we can start by creating the entities.
@Entity
@Table(name = "users")
public class User {

    @Id
    @GeneratedValue(strategy = GenerationType.IDENTITY)
    private Long id;

    @Column
    private String name;

    // getters, setters, toString()
}
Now, we can run our application, and the users table will be created automatically. We can check it by entering the admin UI and selecting the Tables sections:
Here we can see that we have one table created. Also, we can get more information about the table by clicking on its name.
We can also connect to our database using any management tool that is compatible with PostgreSQL, like pgAdmin.
3.4. 读写数据
After the configuration and table creation, we need to create a repository — extending the existing JPARepository interface:
public interface UserRepository extends JpaRepository<User, Long> {
}
JPARepository is a part of the Spring Data JPA framework, which provides us with a set of abstractions and utilities for simplifying database access. Also, it comes with methods like save(), findById(), and delete(), allowing quick and simple interaction with the database.
@Test
void givenTwoUsers_whenPersistUsingJPARepository_thenUserAreSaved() {
    User user1 = new User();
    user1.setName("Alex");
    User user2 = new User();
    user2.setName("John");
    userRepository.save(user1);
    userRepository.save(user2);
    List<User> allUsers = userRepository.findAll();
    assertEquals(2, allUsers.size());
}
The example above illustrates two simple inserts in the database and a query that retrieves all data from the table. For the sake of simplicity, we wrote a test to check if the users persist in the database.
After running the test, we’ll get confirmation that the test has passed, meaning that we inserted and queried our users successfully.
3.5. Write Data Using Multiple Clusters
One of the strengths of this database is its high fault tolerance and resilience. We saw in the previous example a simple scenario, but we all know that we usually need to run more than one instance of the database. And we’ll see how YugabyteDB manages it in the following example.
We’ll start by creating a Docker network for our clusters:
$ docker network create yugabyte-network
Afterward, we’ll create our main YugabyteDB node:
$ docker run -d --name yugabyte1 --net=yugabyte-network -p7000:7000 -p9000:9000 -p5433:5433 yugabytedb/yugabyte:latest bin/yugabyted start --daemon=false
Besides that, we can add two more nodes so that we’ll have a three-node cluster:
$ docker run -d --name yugabyte2 --net=yugabyte-network yugabytedb/yugabyte:latest bin/yugabyted start --join=yugabyte1 --daemon=false
$ docker run -d --name yugabyte3 --net=yugabyte-network yugabytedb/yugabyte:latest bin/yugabyted start --join=yugabyte1 --daemon=false
Now, if we open de Admin UI running at port 7000, we can see that the Replication Factor is 3. This means that data is shared on all three database cluster nodes. More precisely, if one node contains the primary copy of an object, the other two nodes will keep a copy of that object.
For this example, we will implement the CommandLineRunner interface. With its help, by overriding the run(String…args) method, we can write code that will be invoked at application startup after the Spring application context is instantiated.
@Override
public void run(String... args) throws InterruptedException {

    int iterationCount = 1_000;
    int elementsPerIteration = 100;

    for (int i = 0; i < iterationCount; i++) {
        for (long j = 0; j < elementsPerIteration; j++) {
            User user = new User();
            userRepository.save(user);
        }
        Thread.sleep(1000);
    }
}
With this script, we’ll insert serial batches of elements in a row, with a one-second pause between them. We want to observe how the database splits the load between nodes.
First of all, we’ll run the script, enter the admin console and navigate to the Tablet Servers tab.
Here we can see that even with minimal load-balancing configuration, YugabyteDB can split all the load between clusters.
3.6. Fault Tolerance
We know things can’t go perfectly all the time. Because of that, we’ll simulate a database cluster going down. Now, we can run the application again, but this time we’ll stop one cluster in the middle of execution:
$ docker stop yugabyte2
Now, if we wait a little bit and access again the Tablet Servers page, we can see that the stopped container is marked as dead. After that, all the load is balanced between the remaining clusters.
This is made possible by YugabyteDB’s heartbeat-based mechanism. This heartbeat mechanism involves regular communication between the different nodes, where each node sends heartbeats to its peers to indicate its liveliness. If a node fails to respond to the heartbeats within a certain timeout period, it is considered dead.
4. 总结
In this article, we went through the basics of YugabyteDB using Spring Data. We saw that not only the YugabyteDB makes scaling applications easier, but it also has automatic fault tolerance.
The source code of the examples above can be found over on GitHub.


