1. 简介
本文将通过一个实战案例,带你全面掌握 JMeter 中 BeanShell 的核心功能。我们将学习如何利用 BeanShell 脚本实现各种定制化测试需求,让你在性能测试中游刃有余。
2. 环境准备
首先需要下载 JMeter。解压后直接运行可执行文件(Unix 系统用 jmeter.sh,Windows 用 jmeter.bat)即可启动。
⚠️ 版本兼容性踩坑:当前最新稳定版 5.6.3 已内置 BeanShell 2.0b6。BeanShell 3 尚在开发中,将支持新版 Java 特性。在此之前,我们只能使用 Java 4 语法,尽管 JMeter 本身可在新版 JVM 上运行。
BeanShell 虽是功能丰富的脚本语言,但在 JMeter 中主要用于实现测试步骤。我们将通过一个实际场景演示:发送 POST 请求并捕获统计信息(如发送字节数和响应时间)。
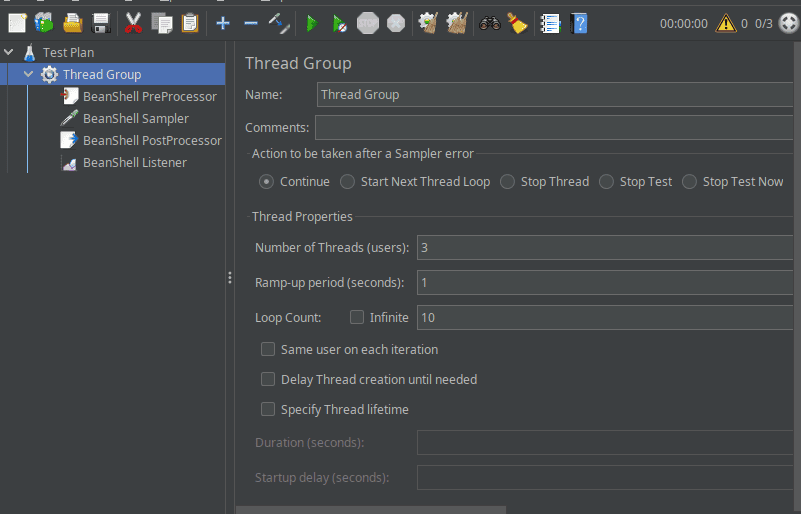
**启动 JMeter 后,唯一需要的非 BeanShell 元素是线程组**。创建方式:右键"测试计划" → "添加" → "线程(用户)" → "线程组"。只需配置线程数和循环次数:
配置完成后,即可开始创建 BeanShell 测试元素。
3. 前置处理器
使用前置处理器为 POST 请求生成动态参数。创建路径:右键线程组 → "添加" → "前置处理器" → "BeanShell 前置处理器"。编写脚本生成随机请求参数:
random = new Random();

key = "k"+random.nextInt();
value = random.nextInt();
✅ 变量声明技巧:无需显式声明类型,可直接使用 JVM 或 JMeter lib 目录中的任意类型。
通过 vars 对象(脚本间共享的特殊变量)保存参数供后续使用:
vars.put("base-api", "http://localhost:8080/api");

vars.put("key", key);
vars.putObject("value", value);
⚠️ 类型处理注意:value 使用 putObject() 存储,因为 put() 只接受字符串。最后定义一个控制日志打印频率的变量:
vars.putObject("summary-iterations", 5)
4. 采样器
采样器将读取预设参数,通过 JMeter 内置的 Apache HTTP 框架发送请求。关键点:所有非默认导入的类都需要显式导入。
构建请求体时,由于 Java 4 不支持 varargs,需使用旧式 new Object[]{...} 语法调用 String.format():
url = vars.get("base-api");
json = String.format(
  "{\"key\": \"%s\", \"value\": %s}",
  new Object[]{ vars.get("key"), vars.get("value") }
);
执行 HTTP 请求:
client = HttpClients.createDefault();
body = new StringEntity(json, ContentType.APPLICATION_JSON);

post = new HttpPost(url);
post.setEntity(body);

response = client.execute(post);
提取响应信息供后续使用:
ResponseCode = response.getStatusLine().getStatusCode();
ResponseMessage = EntityUtils.toString(response.getEntity());
❌ 资源管理注意:由于不支持 try-with-resources,必须手动关闭资源:
response.close();
client.close();

return json;  // 返回请求体用于后续计算
5. 后置处理器
后置处理器在采样器后立即执行。我们用它聚合统计信息。先编写一个变量自增函数:
incrementVar(name, increment) {
    value = (Long) vars.getObject(name);
    if (value == null)
      value = 0l;

    value += increment;
    vars.putObject(name, value);
    log.info("{}: {}", name, value);
}
✅ 日志记录技巧:log 对象无需配置即可直接使用,日志会输出到 JMeter 控制台。注意函数定义可省略访问修饰符和类型声明。
通过 prev 变量获取上一步的统计信息:
incrementVar("elapsed-time-total", prev.getTime());
incrementVar("bytes-received-total", prev.getResponseMessage().getBytes().length);
incrementVar("bytes-sent-total", prev.getBytesAsLong());
6. 监听器
监听器在后置处理器后运行,用于生成报告文件。先定义辅助函数和变量:
println(writer, message, arg1) {
    writer.println(String.format(message, new Object[] {arg1}));
}

thread = ctx.getThread();
threadGroup = ctx.getThreadGroup();

request = prev.getResponseDataAsString();
response = prev.getResponseMessage();
✅ 上下文访问:ctx 变量提供线程组和当前线程信息。创建报告文件(写入用户主目录):
fw = new FileWriter(new File(System.getProperty("user.home"), "jmeter-report.txt"), true);
writer = new PrintWriter(new BufferedWriter(fw));

println(writer, "* iteration: %s", vars.getIteration());
println(writer, "* elapsed time: %s ms.", prev.getTime());
println(writer, "* request: %s", request);
println(writer, "= %s bytes", prev.getBytesAsLong());
println(writer, "* response body: %s", response);
println(writer, "= %s bytes", response.getBytes().length);
每达到指定迭代次数(summary-iterations)时输出汇总统计:
if (vars.getIteration() % vars.getObject("summary-iterations") == 0) {
    println(writer, "## summary for %s", thread.getThreadName());
    println(writer, "* total bytes sent: %s bytes", vars.get("bytes-sent-total"));
    println(writer, "* total bytes received: %s bytes", vars.get("bytes-received-total"));
    println(writer, "* total elapsed time: %s ms.", vars.get("elapsed-time-total"));
}
最后关闭文件写入流:
writer.close();
7. 总结
本文深入探讨了如何在 JMeter 中有效使用 BeanShell 实现定制化测试脚本。我们覆盖了前置处理器、采样器、后置处理器和监听器等核心组件,展示了如何操作请求数据、处理响应以及记录性能指标。
完整源码可在 GitHub 获取。
