1. Overview
Keycloak is a third-party authorization server that manages users of our web or mobile applications.
It offers some default attributes, such as first name, last name, and email to be stored for any given user. But many times, these are not enough, and we might need to add some extra user attributes specific to our application.
In this tutorial, we’ll see how we can add custom user attributes to our Keycloak authorization server and access them in a Spring-based backend.
First, we’ll see this for a standalone Keycloak server, and then for an embedded one.
2. Standalone Server
2.1. Adding Custom User Attributes
The first step here is to go to Keycloak’s admin console. For that, we’ll need to start the server by running this command from our Keycloak distribution’s bin folder:
kc.bat start-dev
Then we need to go to the admin console and key-in the initial1/zaq1!QAZ credentials.
Next, we’ll click on Users under the Manage tab :
Here we can see the user we’d added previously: user1.
Now let’s click on its ID and go to the Attributes tab to add a new one, DOB for date of birth:
After clicking Save, the custom attribute gets added to the user’s information.
Next, we need to add a mapping for this attribute as a custom claim so that it’s available in the JSON payload for the user’s token.
For that, we need to go to our application’s client on the admin console. Recall that earlier we’d created a client, login-app:
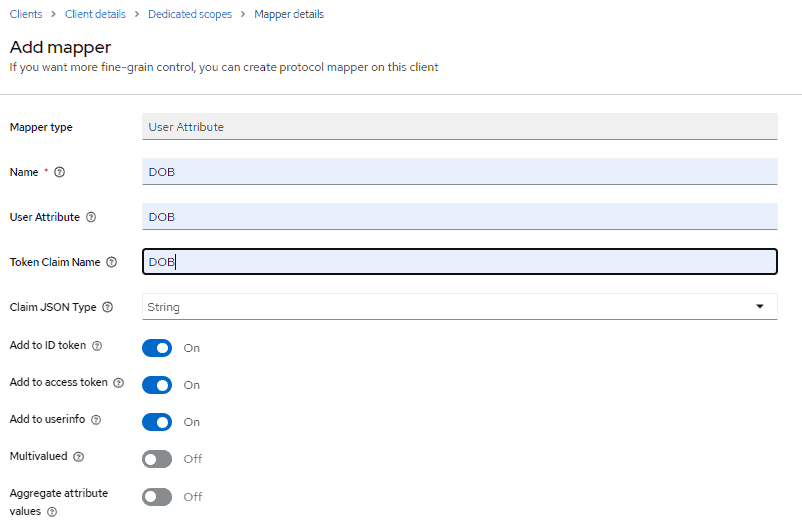
Now, let’s click on it and then on Client scopes tab. On Client scopes page click on login-app-dedicated link and go to its Mappers tab. Now click on Configure a new mapper and select User Attribute to create a new mapping:
Set Name, User Attribute, and Token Claim Name as DOB. Claim JSON Type should be set as String.
On clicking Save, our mapping is ready. So now, we’re equipped from the Keycloak end to receive DOB as a custom user attribute.
In the next section, we’ll see how to access it via an API call.
2.2. Accessing Custom User Attributes
Building on top of our Spring Boot application, let’s add a new REST controller to get the user attribute we added:
@Controller
public class CustomUserAttrController {

    @GetMapping(path = "/users")
    public String getUserInfo(Model model) {

        final DefaultOidcUser user = (DefaultOidcUser) SecurityContextHolder.getContext()
            .getAuthentication()
            .getPrincipal();

        String dob = "";

        OidcIdToken token = user.getIdToken();

        Map<String, Object> customClaims = token.getClaims();

       if (customClaims.containsKey("DOB")) {
            dob = String.valueOf(customClaims.get("DOB"));
        }

        model.addAttribute("username", user.getName());
        model.addAttribute("dob", dob);
        return "userInfo";
    }

}
As we can see, here we first obtained the Authentication from the security context and then extracted the OidcUser from it. Then we obtained its IDToken. DOB can then be extracted from this IDToken‘s Claims.
Here’s the template, named userInfo.html, that we’ll use to display this information:
<div id="container">
    <h1>Hello, <span th:text="${username}">--name--</span>.</h1>
    <h3>Your Date of Birth as per our records is <span th:text="${dob}"/>.</h3>
</div>
2.3. Testing
On starting the Boot application, we should navigate to http://localhost:8081/users. We’ll first be asked to enter credentials.
After entering user1‘s credentials, we should see this page:
3. Embedded Server
Now let’s see how to achieve the same thing on an embedded Keycloak instance.
3.1. Adding Custom User Attributes
Basically, we need to do the same steps here, only that we’ll need to save them as pre-configurations in our realm definition file, baeldung-realm.json.
To add the attribute DOB to our user [email protected], first, we need to configure its attributes:
"attributes" : {
    "DOB" : "1984-07-01"
},
Then add the protocol mapper for DOB:
"protocolMappers": [
    {
    "id": "c5237a00-d3ea-4e87-9caf-5146b02d1a15",
    "name": "DOB",
    "protocol": "openid-connect",
    "protocolMapper": "oidc-usermodel-attribute-mapper",
    "consentRequired": false,
    "config": {
        "userinfo.token.claim": "true",
        "user.attribute": "DOB",
        "id.token.claim": "true",
        "access.token.claim": "true",
        "claim.name": "DOB",
        "jsonType.label": "String"
        }
    }
]
That’s all we need here.
Now that we’ve seen the authorization server part of adding a custom user attribute, it’s time to look at how the resource server can access the user’s DOB.
3.2. Accessing Custom User Attributes
On the resource server-side, the custom attributes will simply be available to us as claim values in the AuthenticationPrincipal.
Let’s code an API for it:
@RestController
public class CustomUserAttrController {
    @GetMapping("/user/info/custom")
    public Map<String, Object> getUserInfo(@AuthenticationPrincipal Jwt principal) {
        return Collections.singletonMap("DOB", principal.getClaimAsString("DOB"));
    }
}
3.3. Testing
Now let’s test it using JUnit.
We’ll first need to obtain an access token and then call the /user/info/custom API endpoint on the resource server:
@Test
public void givenUserWithReadScope_whenGetUserInformationResource_thenSuccess() {
    String accessToken = obtainAccessToken("read");
    Response response = RestAssured.given()
      .header(HttpHeaders.AUTHORIZATION, "Bearer " + accessToken)
      .get(userInfoResourceUrl);

    assertThat(response.as(Map.class)).containsEntry("DOB", "1984-07-01");
}
As we can see, here we verified that we’re getting the same DOB value as we added in the user’s attributes.
4. Conclusion
In this tutorial, **we learned how to add extra attributes to a user in Keycloak.
**
We saw this for both a standalone and an embedded instance. We also saw how to access these custom claims in a REST API on the backend in both scenarios.
As always, the source code is available over on GitHub. For the standalone server, it’s on the tutorials GitHub, and for the embedded instance, on the OAuth GitHub.


