1. Overview
In this tutorial, we’ll explore various command-line tools and scripts for cropping borders and white space from images in a Linux environment.
We’ll see instructions for installing the required packages using the apt package manager. However, equivalent packages are available in other package managers.
For practical demonstrations, we’ll use three sample images available for download from our repository.
2. ImageMagick
ImageMagick is a robust software suite for creating, editing, and composing bitmap images in a variety of formats.
Let’s install it:
$ sudo apt install imagemagick
It provides a collection of command-line tools, among which we can use convert and mogrify for autocropping. Their difference lies in their intended use and the effect they have on the original files:
- convert → it requires a for loop in a shell script to batch process multiple files and saves the output as new files
- mogrify → it’s designed for batch processing and can process multiple files in a single command, overwriting the originals
So convert is safer for experimentation.
2.1. convert
When we use the -trim option in ImageMagick, the image is trimmed to remove the whitespace. However, the resulting image may retain the original offset metadata.
The +repage command removes the offset metadata by resetting the coordinates of the cropped image to the upper left corner (0, 0). This ensures that the cropped image retains no positional reference to the original. As a rule of thumb, ImageMagick’s official documentation states that we should always use +repage after any cropping operation.
That said, let’s automatically crop our three sample images:
$ for file in *.png; do convert "$file" -trim +repage "cropped_$file"; done
The terminal doesn’t produce any output. However, we can easily compare the pixel size of the images using identify, another tool of ImageMagick:
$ for file in *.png; do identify -format "%f: %wx%h\n" "$file"; done
cropped_sample-1.png: 665x459
cropped_sample-2.png: 760x672
cropped_sample-3.png: 714x464
sample-1.png: 1024x1024
sample-2.png: 1024x1024
sample-3.png: 1024x1024
Moreover, we can visually compare the first sample image with the resulting cropped image. To do this, we added a very thin blue border around each image to clearly indicate its size:
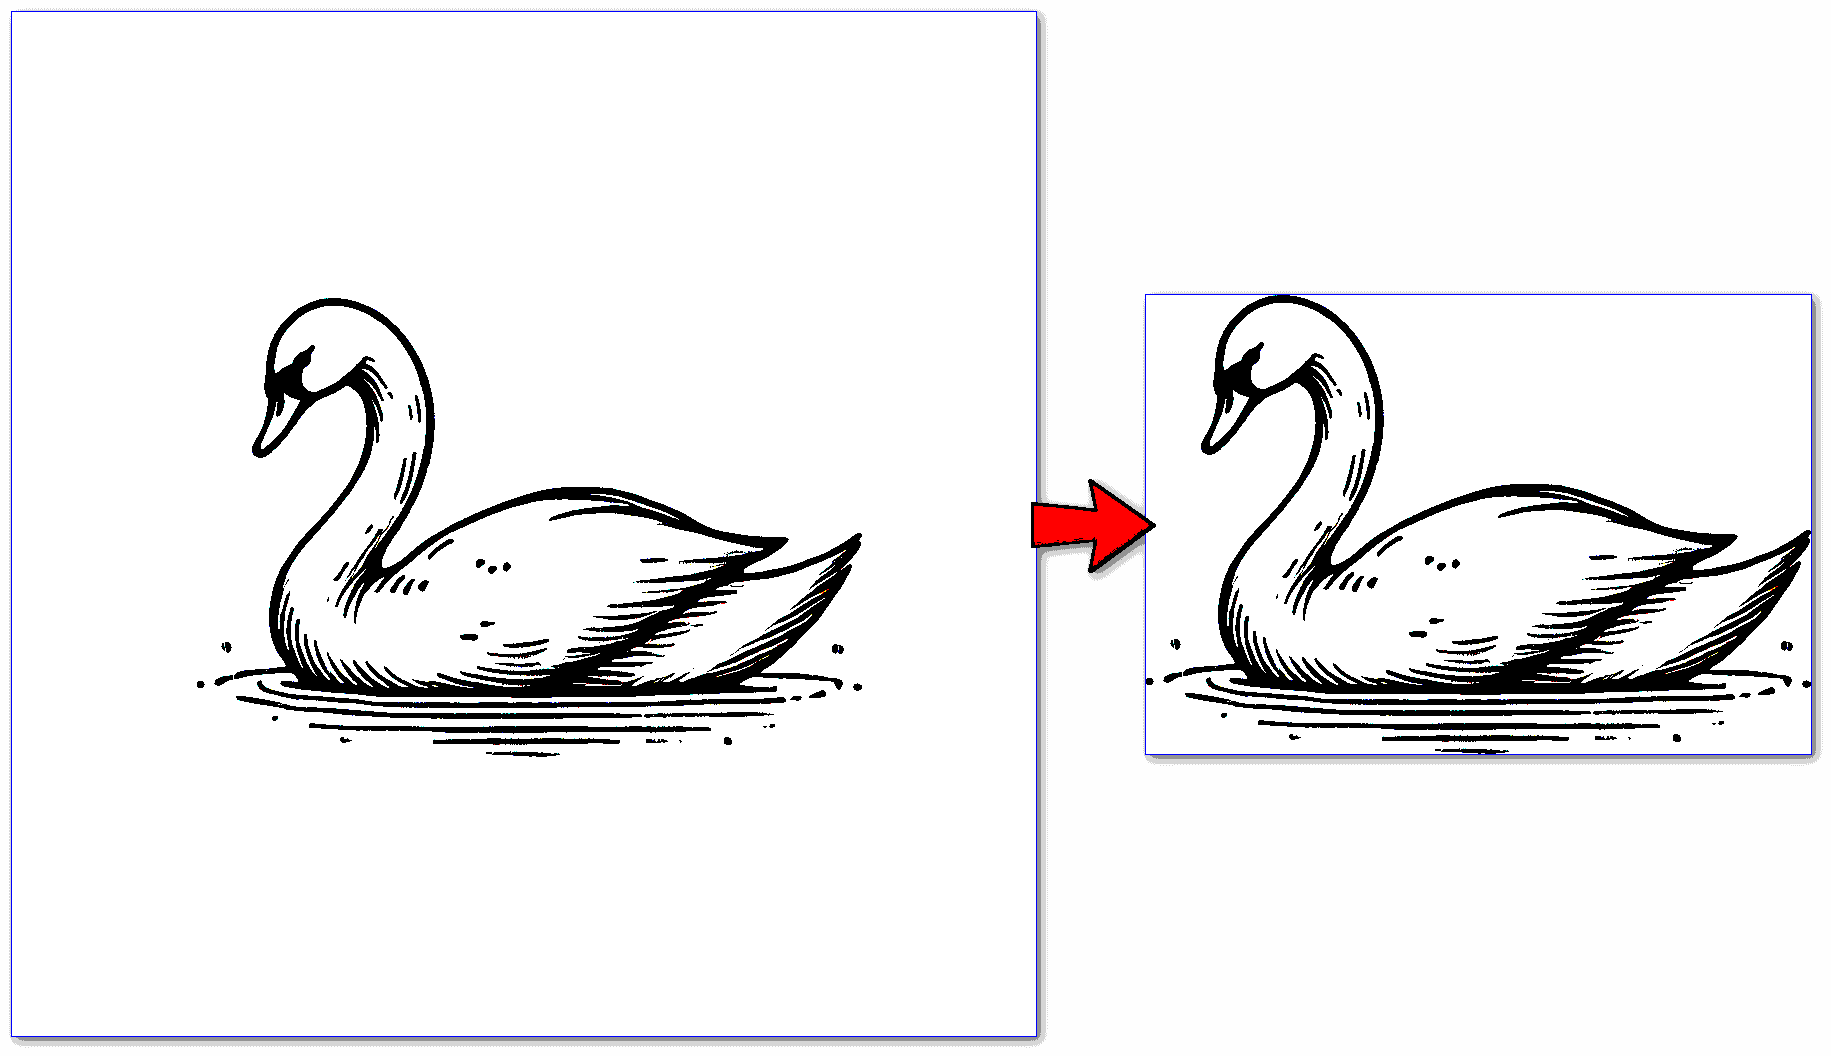
The result is similar for the other images.
2.2. mogrify
mogrify crops images by overwriting them, using the -trim and +repage options we discussed before:
$ mogrify -trim +repage *.png
No doubt it’s more concise than convert. Let’s see if the dimensions are the same as before:
$ for file in *.png; do identify -format "%f: %wx%h\n" "$file"; done
sample-1.png: 665x459
sample-2.png: 760x672
sample-3.png: 714x464
The result is as expected, and even a visual inspection of the images confirms this.
3. GraphicsMagick
GraphicsMagick is a stable and powerful alternative to ImageMagick. We can keep both installed at the same time without conflict.
Unlike ImageMagick, which provides different tools for different tasks, GraphicsMagick implements all its functionality in a single command-line tool, gm, which can perform the same functions as ImageMagick’s separate tools.
Let’s install it:
$ sudo apt install graphicsmagick
GraphicsMagick allows us to use the same -trim and +repage options we discussed earlier. Here’s how to use gm to trim multiple PNG files in a directory:
$ for file in *.png; do gm convert "$file" -trim +repage "cropped_$file"; done
The result is identical to what we got with ImageMagick.
Just out of curiosity, we could do a time evaluation to see which tool suits us better for cropping a huge number of images. Here is the skeleton of our benchmarking script:
#!/bin/bash

ITERATIONS=100

measure_time_1() {
  local start_time=$(date +%s%N)

  for ((i=0; i<$ITERATIONS; i++)); do
    # command to be executed
  done

  local end_time=$(date +%s%N)
  echo "TOOLNAME time: $((($end_time - $start_time) / 1000000)) ms"
}

measure_time_2() {
  [...]
}

measure_time_1
measure_time_2
After completing this skeleton by inserting the commands we saw earlier, we got these results:
$ ./test.sh
GraphicsMagick time: 14122 ms
ImageMagick time: 12153 ms
We find in repeated tests that ImageMagick is always slightly faster.
We’ll use this simple benchmarking script again to test all the other tools we’ll be discussing, just by adding the appropriate commands.
4. Netpbm
Another powerful autocropping tool is pnmcrop, which removes borders that are the background color. It’s included in the Netpbm package, which provides a collection of over 330 graphics tools.
Let’s install it:
$ sudo apt install netpbm
This command crops all PNG images in the current directory:
$ for file in *.png; do pngtopnm "$file" | pnmcrop | pnmtopng > "cropped_${file}"; done
Basically, it loops through all PNG files, converts PNG to the PNM format, crops the PNM image, and converts it back to PNG format. The resulting images are identical to ImageMagick’s.
If we are using JPEG images instead of PNG images, we can use jpegtopnm instead of pngtopnm and pnmtojpeg instead of pnmtopng.
As for performance, we got this result:
$ ./benchmark.sh
ImageMagick time: 12642 ms
Netpbm time: 12176 ms
Netpbm and ImageMagick are equivalent in speed.
5. Pillow (Python)
If we prefer to use Python3, our choice might be Pillow, a powerful image-processing library that is a fork of the Python Imaging Library (PIL).
Let’s install it:
$ python3 -m pip install --upgrade pip
$ python3 -m pip install --upgrade Pillow
Then, let’s save this script as autocrop.py. Comments make it as self-explanatory as possible:
#!/usr/bin/env python3

import os
from PIL import Image, ImageChops

def trim(im):
    # If the image has an alpha layer, replace it with a white background
    # This is necessary because transparency may cause ImageChops.difference not to detect the differences correctly
    if im.mode == 'RGBA': # Colored image
        white_bg = Image.new('RGBA', im.size, (255, 255, 255, 255))
        im = Image.alpha_composite(white_bg, im).convert('RGB')
    elif im.mode == 'LA': # Grayscale image
        white_bg = Image.new('LA', im.size, (255, 255))
        im = Image.composite(im, white_bg, im.split()[1]).convert('L')
    elif im.mode == 'P': # Indexed image with palette
        im = im.convert('RGBA')
        white_bg = Image.new('RGBA', im.size, (255, 255, 255, 255))
        im = Image.alpha_composite(white_bg, im).convert('RGB')

    # Create a background image using the color of the first pixel
    bg = Image.new(im.mode, im.size, im.getpixel((0, 0)))
    # Calculate the difference between the image and the background
    diff = ImageChops.difference(im, bg)
    # Get the bounding box of the non-zero regions in the difference image
    bbox = diff.getbbox()
    if bbox:
        # If a bounding box is found, crop the image to that box
        return im.crop(bbox)
    # Return the original image if no bounding box is found
    return im

if __name__ == "__main__":
    # Iterate over all files in the current directory
    for filename in os.listdir('.'):
        # Process only files that end with .png
        if filename.endswith('.png'):
            try:
                # Open the image file
                img = Image.open(filename)
                # Trim the image
                cropped_img = trim(img)
                # Save the cropped image with a new filename prefixed with "cropped_"
                cropped_filename = f"cropped_{filename}"
                cropped_img.save(cropped_filename)
            except Exception as e:
                print(f"Failed to process {filename}: {e}")
By iterating through all the PNG files in the directory, the script crops the images and saves the cropped versions with a new filename prefixed with cropped_.
Let’s give it a try:
$ ./autocrop.py
The resulting cropped images are identical to ImageMagick’s.
As for performance, we found Pillow to be much slower than ImageMagick:
$ ./benchmark.sh
ImageMagick time: 12085 ms
Pillow (Python) time: 33011 ms
Anyway, our implementation of autocrop.py isn’t necessarily the most efficient or robust. We relied on our test images, but further testing with a wide variety of images could help fine-tune the code.
6. GIMP
GIMP (GNU Image Manipulation Program) is a versatile and powerful open-source software that is used for tasks ranging from photo retouching and image composition to image authoring. One of the key features that sets GIMP apart is its scripting capability, which allows us to automate repetitive tasks such as cropping images.
Let’s install it:
$ sudo apt install gimp
Then, let’s save this Script-Fu script as ~/.config/GIMP/2.10/scripts/batch-auto crop.scm, or in an equivalent directory if our GIMP version isn’t 2.10:
(define (batch-autocrop pattern)
  (let* ((filelist (cadr (file-glob pattern 1))))
    (while (not (null? filelist))
      (let* ((filename (car filelist))
             (basename (car (last (strbreakup filename "/"))))
             (cropped-filename (string-append "cropped_" basename))
             (image (car (gimp-file-load RUN-NONINTERACTIVE filename filename)))
             (drawable (car (gimp-image-get-active-layer image))))
        (plug-in-autocrop RUN-NONINTERACTIVE image drawable)
        (gimp-file-save RUN-NONINTERACTIVE image drawable cropped-filename cropped-filename)
        (gimp-image-delete image))
      (set! filelist (cdr filelist)))))
Once it’s saved, we can run it from the terminal:
$ gimp -i -b '(batch-autocrop "*.png")' -b '(gimp-quit 0)'
This command tells GIMP to run in the non-interactive mode, process all PNG files in the specified directory with our batch-autocrop.scm script, save the cropped images with new filenames prefixed with cropped_, and exit.
The resulting cropped images are identical to ImageMagick’s.
As for performance, we got a really disappointing result:
$ ./benchmark.sh
ImageMagick time: 13262 ms
[...]
GIMP Script time: 403107 ms
GIMP is significantly slower than ImageMagick due to its complex architecture. However, Script-Fu scripts excel at complex image manipulation, such as advanced layer handling and specific filter applications that are beyond the capabilities of ImageMagick. So, for projects involving GIMP-specific files or detailed adjustments, GIMP scripts are the right choice.
7. Conclusion
In this article, we explored various command-line tools and scripts for cropping borders and white space from images in a Linux environment. We discussed ImageMagick, GraphicsMagick, Netpbm, Pillow (Python), and GIMP, looking at installation instructions and hands-on demonstrations for each tool.
ImageMagick, GraphicsMagick, and Netpbm provide robust and fast solutions. We found Pillow to be slower in comparison, although it offers the flexibility of scripting in Python. GIMP, with its powerful scripting capabilities, allows for complex image manipulation but is significantly slower due to its resource-intensive architecture.
Each tool has its strengths and use cases, making them valuable additions to our image processing toolkit.