1. Overview
OpenVPN is robust and highly configurable VPN software that can help secure our internet traffic and ensure privacy. We can encrypt our data and mask our IP address by routing all our traffic through OpenVPN. Additionally, we must adjust our firewall rules to make sure all traffic goes through the VPN.
In this tutorial, let’s discuss how to direct all our Linux traffic through OpenVPN.
2. OpenVPN
OpenVPN’s server and client components work together to create a secure, encrypted communication channel, thus, protecting all traffic passing through it.
Additionally, OpenVPN can operate on any port using UDP or TCP, making it highly flexible and capable of bypassing network restrictions and firewalls.
2.1. OpenVPN Server and Client
The OpenVPN server is responsible for authenticating clients, establishing encrypted tunnels, and routing client traffic securely to the internet or other network resources. The server listens for incoming connections on a specified port and uses SSL/TLS certificates for mutual authentication with clients. Upon authenticating a client, the server negotiates a secure encrypted tunnel, typically using the AES encryption algorithm.
We need to ensure all traffic from the client is securely routed via the VPN. Thus, we need to configure network settings, manage client configurations, and implement firewall rules on the server. In addition to providing secure remote access to network resources, we can configure the server to handle multiple clients simultaneously.
The OpenVPN client connects to the VPN server to establish a secure connection. The client uses configuration files (.ovpn) provided by the VPN service or organization, this includes the server’s address, port, and authentication details. When the client initiates a connection, it authenticates with the server using SSL/TLS certificates or other authentication methods configured.
As soon as the client authenticates, it establishes an encrypted tunnel with the server, through which all internet traffic is routed. This process masks the client’s IP address with the server’s IP, enhancing privacy and security. OpenVPN encrypts network traffic before sending it to the server, ensuring the security of the client’s data even over public networks.
If we don’t have a server of our own, we can use configuration files from other available servers.
2.2. OpenVPN Installation and Configuration
In this section, we’ll install, configure, and then run OpenVPN.
Firstly, let’s install OpenVPN, for Debian-based distributions, we’ll use the package manager:
$ sudo apt update
$ sudo apt install openvpn
Once downloaded, we can use the openvpn command to configure OpenVPN.
Next, we need OpenVPN configuration files from our VPN provider. These files usually come with a .ovpn extension. Alternatively, we can configure both the server and the client and generate our files.
For this tutorial, we’ll use the configurations from vpnbook. Let’s download the configuration files we need for our client machine:
$ wget https://www.vpnbook.com/free-openvpn-account/vpnbook-openvpn-ca196.zip
Let’s create a dedicated directory to store our OpenVPN configuration files:
$ sudo mkdir -p /etc/openvpn/client
$ sudo unzip vpnbook-openvpn-ca196.zip -d /etc/openvpn/client/
After, creating the directory, we’ve unzipped the contents of the directory we downloaded into it.
Now let’s configure the VPN using these files:
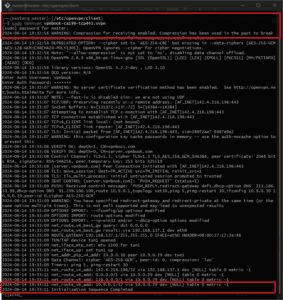
$ sudo openvpn /etc/openvpn/client/vpnbook-ca196-tcp443.ovpn
If the configuration is successful, we should see ‘Initialization Sequence Completed‘:
Let’s verify that the tunnel exists:
$ ip a
2: eth0: <BROADCAST,MULTICAST,UP,LOWER_UP> mtu 1500 qdisc fq_codel state UP group default qlen 1000
    link/ether 08:00:27:12:2e:46 brd ff:ff:ff:ff:ff:ff
    inet 192.168.137.223/24 brd 192.168.137.255 scope global dynamic noprefixroute eth0
       valid_lft 600394sec preferred_lft 600394sec
    inet6 fe80::a00:27ff:fe12:2e46/64 scope link noprefixroute
       valid_lft forever preferred_lft forever
3: tun1: <POINTOPOINT,MULTICAST,NOARP,UP,LOWER_UP> mtu 1500 qdisc fq_codel state UNKNOWN group default qlen 500
    link/none
    inet 10.9.0.30 peer 10.9.0.29/32 scope global tun1
       valid_lft forever preferred_lft forever
    inet6 fe80::ff55:ba58:341d:b63e/64 scope link stable-privacy proto kernel_ll
       valid_lft forever preferred_lft forever
3. Configuring Routes and Modifying Firewalls
Now that we’ve configured our OpenVPN, let’s route all traffic through OpenVPN on our Linux machine. We need to configure the system’s routing table and firewall rules to ensure all outbound traffic goes through the VPN tunnel.
Firstly, we need to enable IP forwarding to route all traffic through the VPN. We can do this by modifying the sysctl configuration file:
$ sudo vi /etc/sysctl.conf
Let’s check if the following line exists and uncomment it. Otherwise, let’s add it:
net.ipv4.ip_forward = 1
let’s apply the changes:
$ sudo sysctl -p
3.1. Configuring Routes
Following this, we need to change the default gateway to route through the OpenVPN tunnel (tun1). This will direct all outgoing traffic through the VPN:
$ sudo ip route del default via 192.168.137.1
We should replace 192.168.137.1 with the various actual gateway IP’s of our eth0 interfaces if different.
Following, let’s add a new default gateway via the VPN tunnel:
$ sudo ip route add default via 10.9.0.30 dev tun1
To maintain access to our local network resources (e.g., our router), let’s add a route to the local network:
$ sudo ip route add default via 192.168.137.0/24
Let’s look at the routing table:
$ ip route
0.0.0.0/1 via 10.9.0.29 dev tun1
default via 10.9.0.30 dev tun1
10.9.0.1 via 10.9.0.29 dev tun1
10.9.0.29 dev tun1 proto kernel scope link src 10.9.0.30
128.0.0.0/1 via 10.9.0.29 dev tun1
142.4.216.196 via 192.168.137.1 dev eth0
192.168.137.0/24 dev eth0 proto kernel scope link src 192.168.137.223 metric 100
Based on the routing table output, let’s look at how our network traffic is directed through the VPN:
- The route 0.0.0.0/1 via 10.9.0.29 dev tun1 directs traffic for IP’s in the range 0.0.0.0 to 127.255.255.255 to be routed through the VPN interface tun1, via 10.9.0.29.
- Secondly, default via 10.9.0.30 dev tun1 (the default route) sends all traffic that doesn’t match other specific routes through the VPN interface tun1, through 10.9.0.30.
- Next, 10.9.0.1 via 10.9.0.29 dev tun1 directs traffic to 10.9.0.1 which is routed through 10.9.0.29 on the tun1 interface.
- Fourthly, 10.9.0.29 dev tun1 proto kernel scope link src 10.9.0.30 shows that the IP 10.9.0.29 is directly reachable on tun1, with the source IP 10.9.0.30.
- 128.0.0.0/1 via 10.9.0.29 dev tun1 directs traffic for IP’s in the range 128.0.0.0 to 255.255.255.255 to be routed through 10.9.0.29 on tun1.
- 142.4.216.196 via 192.168.137.1 dev eth0 path ensures traffic to 142.4.216.196 is routed through the physical network interface eth0, via 192.168.137.1.
- Finally, the path 192.168.137.0/24 dev eth0 proto kernel scope link src 192.168.137.223 metric 100 indicates that traffic within the local subnet 192.168.137.0/24 is routed through eth0.
Most of the traffic is routed through the VPN, while local and exception routes are handled by the local network interface.
3.2. Modifying Firewalls
Now that our VPN is running, let’s set up iptables to route all traffic through it:
$ sudo iptables -L
$ sudo iptables -A INPUT -i tun1 -j ACCEPT
$ sudo iptables -A INPUT -s 10.9.0.30 -j ACCEPT
$ sudo iptables -A OUTPUT -o tun1 -j ACCEPT
$ sudo iptables -A OUTPUT -d 10.9.0.30 -j ACCEPT
The above rules perform the following actions:
- The output of sudo iptables -L displays the current firewall rules set using iptables.
- -j flag allows all incoming traffic from the VPN interface tun1 (-i tun1) to pass through the firewall.
- Allow incoming traffic from a specific source IP address 10.9.0.30 (-s 10.9.0.30) to pass through the firewall (-j ACCEPT).
- Allow all outgoing traffic to the VPN interface tun1 (-o tun1) to pass through the firewall (-j ACCEPT).
- Allow outgoing traffic to a specific destination IP address 10.9.0.30 (-d 10.9.0.30) to pass through the firewall (-j ACCEPT).
To make these rules persistent across reboots, we need to save them. On Debian-based distributions, we use iptables-persistent:
$ sudo apt install iptables-persistent
$ sudo netfilter-persistent save
Let’s confirm that our traffic goes through the VPN. We’ll check our IP address using an online service like www.whatismyip.com or by using the curl command:
$ curl ifconfig.me
142.4.216.196
If we encounter issues, we need to check the OpenVPN log files for errors. These logs are typically located at:
$ cat /var/log/openvpn.log
We should also pass DNS queries through the VPN by including DNS settings in our .ovpn file.
Additionally, we should edit our iptables rules appropriately according to our network environment and needs. Any misconfiguration would make our entire network unreachable.
4. Conclusion
In this tutorial, we’ve looked at how to route all traffic through OpenVPN on a Linux machine. We discussed installing OpenVPN, configuring it with the appropriate settings, setting up firewall rules to ensure all traffic goes through the VPN, and verifying the configuration. While adding iptables configurations, we should ensure that our settings don’t block/prevent any required connection.