1. 简介
在本教程中,我们将快速回顾 OAuth 2.0、OpenID Connect 和 Keycloak 的基本概念。然后重点介绍如何通过 Postman 调用 Keycloak 提供的 RESTful 接口。
2. OAuth 2.0
OAuth 2.0 是一个授权框架,允许已认证的用户通过令牌(token)向第三方应用授权访问其受保护资源。这些令牌通常具有有限的作用域和生命周期,因此相比直接暴露用户凭据更为安全。
OAuth 2.0 包含四个核心组件:
- ✅ Resource Owner(资源所有者):拥有受保护资源的最终用户或系统
- ✅ Resource Server(资源服务器):提供受保护资源的服务端,通常通过基于 HTTP 的 API 暴露
- ✅ Client(客户端):代表资源所有者访问资源的应用程序
- ✅ Authorization Server(授权服务器):负责认证用户并颁发 OAuth 2.0 令牌给客户端
虽然 OAuth 2.0 是一套标准协议,但本文重点关注其中的授权服务器部分。
3. OpenID Connect
OpenID Connect 1.0(简称 OIDC)是在 OAuth 2.0 基础上扩展的身份层协议。它使得客户端能够验证用户的标识,并获取基础的用户信息,这一切都基于标准的 OAuth 2.0 流程完成。
OIDC 在 OAuth 2.0 中引入了一些标准的作用域(scope),例如 openid、profile 和 email,用于获取用户身份信息。
4. Keycloak 作为授权服务器
Keycloak 是 JBoss 开发的一款开源 Java 身份与访问管理解决方案。
Keycloak 支持 OAuth 2.0 和 OpenID Connect 协议,还提供了诸如身份代理(Identity Brokering)、用户联合(User Federation)以及单点登录(SSO)等功能。
你可以将 Keycloak 部署为独立服务并通过管理控制台进行配置,也可以将其嵌入到 Spring Boot 应用中运行。无论哪种方式,一旦 Keycloak 启动成功,就可以开始调用其提供的各类接口了。
5. Keycloak 接口详解
Keycloak 提供了多种符合 OAuth 2.0 规范的 RESTful 接口。
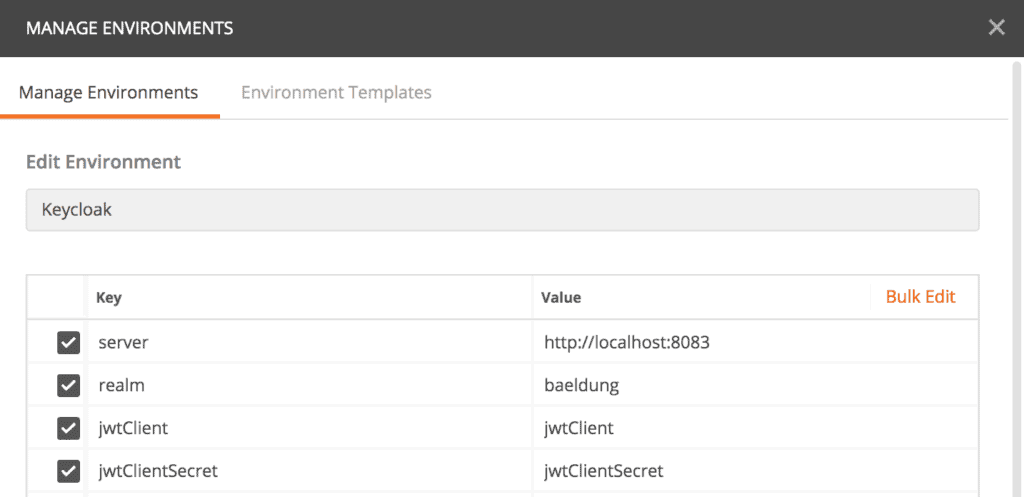
在 Postman 中调用这些接口前,建议先创建一个名为 “Keycloak” 的环境变量集合,并添加如下关键变量:
server: Keycloak 授权服务器地址(如http://localhost:8083)realm: 使用的 Realm 名称(如baeldung)client_id: 客户端 ID(如jwtClient)client_secret: 客户端密钥(如secret123)
接着可以新建一个 Collection 来组织 Keycloak 相关请求,方便后续调试。
5.1. OpenID 配置接口(Discovery Endpoint)
这个接口是整个 OIDC 协议的入口点,返回当前 Realm 所支持的所有接口地址、作用域、声明和支持的签名算法等元数据。
接口地址如下:
{{server}}/auth/realms/{{realm}}/.well-known/openid-configuration
在 Postman 中创建 GET 请求后执行,若一切正常,会返回类似如下 JSON 内容:
{
    "issuer": "http://localhost:8083/auth/realms/baeldung",
    "authorization_endpoint": "http://localhost:8083/auth/realms/baeldung/protocol/openid-connect/auth",
    "token_endpoint": "http://localhost:8083/auth/realms/baeldung/protocol/openid-connect/token",
    "token_introspection_endpoint": "http://localhost:8083/auth/realms/baeldung/protocol/openid-connect/token/introspect",
    "userinfo_endpoint": "http://localhost:8083/auth/realms/baeldung/protocol/openid-connect/userinfo",
    "end_session_endpoint": "http://localhost:8083/auth/realms/baeldung/protocol/openid-connect/logout",
    "jwks_uri": "http://localhost:8083/auth/realms/baeldung/protocol/openid-connect/certs",
    "check_session_iframe": "http://localhost:8083/auth/realms/baeldung/protocol/openid-connect/login-status-iframe.html",
    "grant_types_supported": [...],
    ...
    "registration_endpoint": "http://localhost:8083/auth/realms/baeldung/clients-registrations/openid-connect",
    ...
    "introspection_endpoint": "http://localhost:8083/auth/realms/baeldung/protocol/openid-connect/token/introspect"
}
可以看到很多关键接口地址都在这里列出,比如授权接口、令牌接口、用户信息接口等。
此外,还可以从响应中看到支持的授权类型(grant types)和作用域(scopes),非常实用。
5.2. 授权接口(Authorize Endpoint)
此接口用于启动 OAuth 2.0 授权码流程(Authorization Code Flow)。接口地址为:
{{server}}/auth/realms/{{realm}}/protocol/openid-connect/auth?response_type=code&client_id=jwtClient
该接口还接受 scope 和 redirect_uri 参数。
⚠️ 注意:这个接口不适合直接在 Postman 中测试,通常需要通过浏览器发起请求。Keycloak 会在没有有效登录 Cookie 的情况下跳转至登录页面,最后将授权码重定向到指定 URI。
我们将在下一步通过令牌接口获取访问令牌。
5.3. 令牌接口(Token Endpoint)
此接口用于获取访问令牌(access token)、刷新令牌(refresh token)或 ID 令牌(id token)。支持多种授权类型,如 authorization_code、refresh_token 或 password。
接口地址:
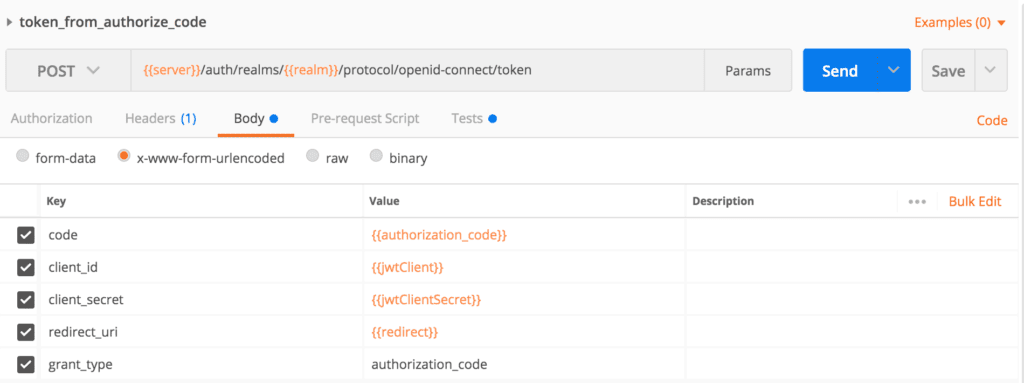
{{server}}/auth/realms/{{realm}}/protocol/openid-connect/token
使用授权码获取令牌
请求参数包括:
client_idclient_secretgrant_type=authorization_codecoderedirect_uri
还可以传递 scope 参数。
使用密码模式获取令牌
如果想跳过授权码流程,可以直接使用用户名密码模式(password grant)获取令牌。
请求参数包括:
client_idclient_secretgrant_type=passwordusernamepassword
⚠️ 请确保在 Postman 环境变量中提前设置好 username 和 password。
使用刷新令牌获取新令牌
当已有刷新令牌时,可使用以下参数重新获取新的访问令牌:
client_idclient_secretgrant_type=refresh_tokenrefresh_token
为了简化测试,可以在 Postman 的 Tests 脚本区域添加如下代码,自动保存返回的 access_token 和 refresh_token 到环境变量中:
var jsonData = JSON.parse(responseBody);
postman.setEnvironmentVariable("refresh_token", jsonData.refresh_token);
postman.setEnvironmentVariable("access_token", jsonData.access_token);
5.4. 用户信息接口(User Info Endpoint)
当拥有有效的 access_token 时,可以通过此接口获取用户的基本信息。
接口地址:
{{server}}/auth/realms/{{realm}}/protocol/openid-connect/userinfo
在 Postman 中设置 Authorization Header 为 Bearer Token,值为上一步获取的 access_token。
成功响应示例:
{
    "sub": "a5461470-33eb-4b2d-82d4-b0484e96ad7f",
    "preferred_username": "[email protected]",
    "DOB": "1984-07-01",
    "organization": "baeldung"
}
5.5. 令牌校验接口(Introspect Endpoint)
资源服务器需要验证 access_token 是否有效,或者想获取更多关于该令牌的信息时,可以调用此接口。
接口地址:
{{server}}/auth/realms/{{realm}}/protocol/openid-connect/token/introspect
请求参数包括:
client_idclient_secrettoken(要校验的 access_token)
✅ 若 token 有效,响应如下:
{
    "exp": 1601824811,
    "iat": 1601824511,
    "jti": "d5a4831d-7236-4686-a17b-784cd8b5805d",
    "iss": "http://localhost:8083/auth/realms/baeldung",
    "sub": "a5461470-33eb-4b2d-82d4-b0484e96ad7f",
    "typ": "Bearer",
    "azp": "jwtClient",
    "session_state": "96030af2-1e48-4243-ba0b-dd4980c6e8fd",
    "preferred_username": "[email protected]",
    "email_verified": false,
    "acr": "1",
    "scope": "profile email read",
    "DOB": "1984-07-01",
    "organization": "baeldung",
    "client_id": "jwtClient",
    "username": "[email protected]",
    "active": true
}
❌ 若 token 无效,则响应为:
{
    "active": false
}
6. 总结
本文介绍了如何在 Postman 中调用 Keycloak 的核心 OAuth 2.0 和 OIDC 接口,包括授权、令牌、用户信息和令牌校验等常见操作。
完整示例代码可在 GitHub 获取:https://github.com/Baeldung/spring-security-oauth/tree/master/oauth-jwt/jwt-auth-server


